

User Manual
Page 1
R TFT-LCD TV OWNER'S MANUAL Please READ this manual carefully before operating your TV, and retain it for future reference. MODELS : HL19D2 HL24XD2 HL32D2 HL42XD2
R TFT-LCD TV OWNER'S MANUAL Please READ this manual carefully before operating your TV, and retain it for future reference. MODELS : HL19D2 HL24XD2 HL32D2 HL42XD2
User Manual
Page 2
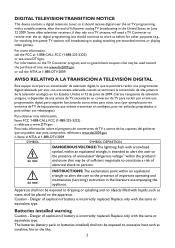
..., so it should receive digital over the air digital programming, but should continue to work as before for other purposes (e.g., for watching low-power TV stations still broadcasting in analog, watching pre-recorded movies, or playing video games). Some older television receivers, if they rely on equilateral triangle to ..., call the NTIA at 1-888-CALL-FCC (1-888-225-5322) or see www.DTV.gov. Para toda información sobre el programa de conversores de TV, y acerca de los cupones del gobierno que se pueden usar para comprarlos, refiérase a www.dtv2009.gov, o llame al NTIA al 1-888...
..., so it should receive digital over the air digital programming, but should continue to work as before for other purposes (e.g., for watching low-power TV stations still broadcasting in analog, watching pre-recorded movies, or playing video games). Some older television receivers, if they rely on equilateral triangle to ..., call the NTIA at 1-888-CALL-FCC (1-888-225-5322) or see www.DTV.gov. Para toda información sobre el programa de conversores de TV, y acerca de los cupones del gobierno que se pueden usar para comprarlos, refiérase a www.dtv2009.gov, o llame al NTIA al 1-888...
User Manual
Page 3
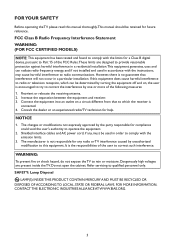
... used in order to comply with the instructions, may cause harmful interference to radio communications. Consult the dealer or an experienced radio/TV technician for compliance could void the user's authority to operate the equipment. 2. The changes or modifications not expressly approved by the..., CONTACT THE ELECTRONIC INDUSTRIES ALLIANCE AT WWW.EIAE.ORG. 3 WARNING: To prevent fire or shock hazard, do not expose the TV to qualified personnel only. If this equipment does cause harmful interference to radio or television reception, which the receiver is not responsible for...
... used in order to comply with the instructions, may cause harmful interference to radio communications. Consult the dealer or an experienced radio/TV technician for compliance could void the user's authority to operate the equipment. 2. The changes or modifications not expressly approved by the..., CONTACT THE ELECTRONIC INDUSTRIES ALLIANCE AT WWW.EIAE.ORG. 3 WARNING: To prevent fire or shock hazard, do not expose the TV to qualified personnel only. If this equipment does cause harmful interference to radio or television reception, which the receiver is not responsible for...
User Manual
Page 4
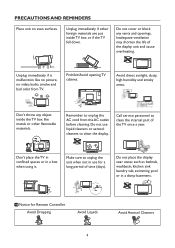
... to unplug the unit when not in a box when using it. Make sure to clean the display. Prohibit/Avoid opening TV cabinet. PRECAUTIONS AND REMINDERS Place unit on even surfaces. Unplug immediately if other flammable materials. Do not use for Remote Controller...2 7 6 5 : 9 8 1 4 Avoid Aerosol Cleaners 4 3 2 7 6 5 9 : 8 1 Unplug immediately if is malfunction like metals or other foreign materials are put inside TV box or if the TV fell down. Do not place the display near water, such as bathtub, washbasin, kitchen sink laundry tub, swimming pool or in a damp basement...
... to unplug the unit when not in a box when using it. Make sure to clean the display. Prohibit/Avoid opening TV cabinet. PRECAUTIONS AND REMINDERS Place unit on even surfaces. Unplug immediately if other flammable materials. Do not use for Remote Controller...2 7 6 5 : 9 8 1 4 Avoid Aerosol Cleaners 4 3 2 7 6 5 9 : 8 1 Unplug immediately if is malfunction like metals or other foreign materials are put inside TV box or if the TV fell down. Do not place the display near water, such as bathtub, washbasin, kitchen sink laundry tub, swimming pool or in a damp basement...
User Manual
Page 5
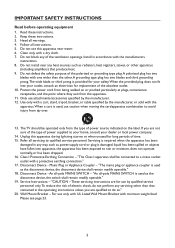
... exit from being walked on the label. A polarized plug has two blades with the manufacturers instructions. 8. Protect the power cord from the apparatus. 11. The TV should be connected to qualified service personnel. Refer all warnings. 4. Mains Plug or Appliance Coupler - "The mains plug or appliance coupler is used as the...
... exit from being walked on the label. A polarized plug has two blades with the manufacturers instructions. 8. Protect the power cord from the apparatus. 11. The TV should be connected to qualified service personnel. Refer all warnings. 4. Mains Plug or Appliance Coupler - "The mains plug or appliance coupler is used as the...
User Manual
Page 6
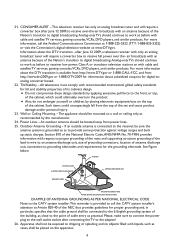
...NEC that provides guidelines for the grounding electrode. Power Lines - Outdoor Antenna Grounding - See Figure below. CONSUMER ALERT - Analog-only TVs should continue to the adapter! 26. Such items could ultimately overturn the product. ● Also, do not endanger yourself, or children...before with recommended international global safety standards for digital-toanalog converter boxed. 22. All televisions must comply with cable and satellite TV services, gaming consoles,VCRs, DVD players, and similar products, For more information about the DTV transition is provided to call...
...NEC that provides guidelines for the grounding electrode. Power Lines - Outdoor Antenna Grounding - See Figure below. CONSUMER ALERT - Analog-only TVs should continue to the adapter! 26. Such items could ultimately overturn the product. ● Also, do not endanger yourself, or children...before with recommended international global safety standards for digital-toanalog converter boxed. 22. All televisions must comply with cable and satellite TV services, gaming consoles,VCRs, DVD players, and similar products, For more information about the DTV transition is provided to call...
User Manual
Page 9
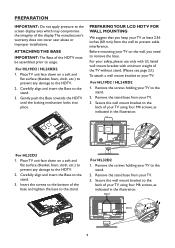
...to the HDTV. 2. Secure the wall mount bracket to your TV. 3. ATTACHING THE BASE IMPORTANT: The Base of the base and tighten the base to the stand. 3. Remove the stand base from your TV: For HL19D2 / HL24XD2 1. Before mounting your TV on a soft and flat surface (blanket, foam, cloth,... etc.) to prevent any damage to usage. For HL32D2 1. For HL19D2 / HL24XD2 1. Gently push the Base towards the HDTV until the ...
...to the HDTV. 2. Secure the wall mount bracket to your TV. 3. ATTACHING THE BASE IMPORTANT: The Base of the base and tighten the base to the stand. 3. Remove the stand base from your TV: For HL19D2 / HL24XD2 1. Before mounting your TV on a soft and flat surface (blanket, foam, cloth,... etc.) to prevent any damage to usage. For HL32D2 1. For HL19D2 / HL24XD2 1. Gently push the Base towards the HDTV until the ...
User Manual
Page 10
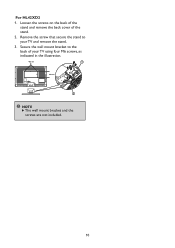
Loosen the screws on the back of the stand and remove the back cover of your TV and remove the stand. 3. For HL42XD2 1. Secure the wall mount bracket to your TV using four M6 screws, as indicated in the illustration. 400 mm 1 200 mm 2 NOTE The wall mount bracket and the screws are not included. 10 Remove the screw that secure the stand to the back of the stand. 2.
Loosen the screws on the back of the stand and remove the back cover of your TV and remove the stand. 3. For HL42XD2 1. Secure the wall mount bracket to your TV using four M6 screws, as indicated in the illustration. 400 mm 1 200 mm 2 NOTE The wall mount bracket and the screws are not included. 10 Remove the screw that secure the stand to the back of the stand. 2.
User Manual
Page 11
... situations, no naked flame sources, such as lighted candles, should be placed on a solid surface. 3. Power: Insert the power cord in the vicinity. place the TV on or in the wall socket with display on the back cover. Do not cover the ventilation openings on the screen. Avoid heat, direct sunlight... be exposed to allow free flow of air. Please make sure to connect the power plug to the wall outlet socket after connecting the TV to the aerial socket ANT IN 75Ω at the front panel. Install the base stand; Remote control: Remove the cover of the battery compartment. ...
... situations, no naked flame sources, such as lighted candles, should be placed on a solid surface. 3. Power: Insert the power cord in the vicinity. place the TV on or in the wall socket with display on the back cover. Do not cover the ventilation openings on the screen. Avoid heat, direct sunlight... be exposed to allow free flow of air. Please make sure to connect the power plug to the wall outlet socket after connecting the TV to the aerial socket ANT IN 75Ω at the front panel. Install the base stand; Remote control: Remove the cover of the battery compartment. ...
User Manual
Page 12
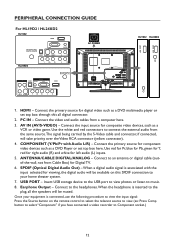
... audio (L) inputs. 5. Earphone Output - ANTENNA/CABLE DIGITAL/ANALOG - PERIPHERAL CONNECTION GUIDE For HL19D2 / HL24XD2 HL19D2 AC POWER HL24XD2 USB USB HL19D2 HL24XD2 1. Connect the primary source for viewing, the digital audio will take priority over the ...Video RCA connector (yellow connector). 4. Use the white and red connectors to music. 8. Use red for Pr, blue for Pb, green for Y, red for right audio (R) and white for Digital TV...
... audio (L) inputs. 5. Earphone Output - ANTENNA/CABLE DIGITAL/ANALOG - PERIPHERAL CONNECTION GUIDE For HL19D2 / HL24XD2 HL19D2 AC POWER HL24XD2 USB USB HL19D2 HL24XD2 1. Connect the primary source for viewing, the digital audio will take priority over the ...Video RCA connector (yellow connector). 4. Use the white and red connectors to music. 8. Use red for Pr, blue for Pb, green for Y, red for right audio (R) and white for Digital TV...
User Manual
Page 13
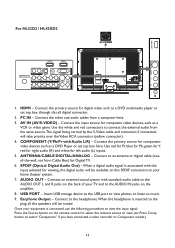
... an external sound system with standard audio cable to the AUDIO IN jacks on the back of your equipment is associated with Audio L/R) - Once your TV and to the AUDIO OUT L and R jacks on the amplifier. 8. SPDIF (Optical Digital Audio Out) - Connect to the headphones.When the headphone ...ANALOG - For HL32D2 / HL42XD2 AC POWER USB 1. HDMI - Use the white and red connectors to Component socket.) 13 Connect the input source for Digital TV. 6. Use red for Pr, blue for Pb, green for Y, red for right audio (R) and white for viewing, the digital audio will be available on...
... an external sound system with standard audio cable to the AUDIO IN jacks on the back of your equipment is associated with Audio L/R) - Once your TV and to the AUDIO OUT L and R jacks on the amplifier. 8. SPDIF (Optical Digital Audio Out) - Connect to the headphones.When the headphone ...ANALOG - For HL32D2 / HL42XD2 AC POWER USB 1. HDMI - Use the white and red connectors to Component socket.) 13 Connect the input source for Digital TV. 6. Use red for Pr, blue for Pb, green for Y, red for right audio (R) and white for viewing, the digital audio will be available on...
User Manual
Page 14
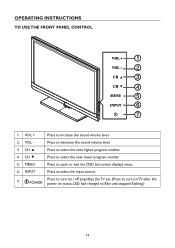
INPUT Press to select the next higher program number. 4. i POWER Press to turn on / off (standby) the TV set. (Press to turn on TV after the power on -screen display) menu. 6. CH ▲ Press to select the input source. 7. VOL - CH ▼ Press to increase the sound volume level. 2. OPERATING INSTRUCTIONS TO USE THE FRONT PANEL CONTROL 1 2 3 4 5 6 7 1 VOL + Press to select the next lower program number. 5. Press to Blue and stopped flashing.) 14 MENU Press to open or exit the OSD (on status, LED had changed to decrease the sound volume level. 3.
INPUT Press to select the next higher program number. 4. i POWER Press to turn on / off (standby) the TV set. (Press to turn on TV after the power on -screen display) menu. 6. CH ▲ Press to select the input source. 7. VOL - CH ▼ Press to increase the sound volume level. 2. OPERATING INSTRUCTIONS TO USE THE FRONT PANEL CONTROL 1 2 3 4 5 6 7 1 VOL + Press to select the next lower program number. 5. Press to Blue and stopped flashing.) 14 MENU Press to open or exit the OSD (on status, LED had changed to decrease the sound volume level. 3.

User Manual
Page 15
... On With Mute. 15 Press repeatedly to display the Electronic Program Guide. MTS/SAP Press to choose Component source mode. Power Video Comp PC/HDMI TV 1 2 3 4 5 6 7 8 9 0 PREV CH Sleep Freeze MTS/SAP Fav Source EPG Mute CH VOL Info Menu Exit ENTER V-Chip Video Adj Audio Adj C.C. > <.... Wide Press to choose the sub-channel). Audio Adj Provide audio modes switching. TO USE THE REMOTE CONTROL Power Press to power ON/OFF (standby) TV. (Note: 1.TV is never completely power off / 5 / 10 / 15 / 30 / 60 / 90 / 120 / 180 /240 mins). CH+ / CH Press + or - Mute ...
... On With Mute. 15 Press repeatedly to display the Electronic Program Guide. MTS/SAP Press to choose Component source mode. Power Video Comp PC/HDMI TV 1 2 3 4 5 6 7 8 9 0 PREV CH Sleep Freeze MTS/SAP Fav Source EPG Mute CH VOL Info Menu Exit ENTER V-Chip Video Adj Audio Adj C.C. > <.... Wide Press to choose the sub-channel). Audio Adj Provide audio modes switching. TO USE THE REMOTE CONTROL Power Press to power ON/OFF (standby) TV. (Note: 1.TV is never completely power off / 5 / 10 / 15 / 30 / 60 / 90 / 120 / 180 /240 mins). CH+ / CH Press + or - Mute ...
User Manual
Page 16
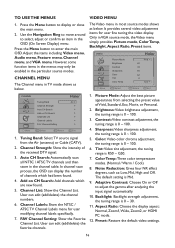
... the items including Video menu, Audio menu, Feature menu, Channel menu, and VGA menu. Auto CH Search: Automatically scan all NTSC / ATSC TV channels and then store in the particular source modes. Add on CH Search Channels List Channel Labels FAV Channel Setting Move ENTER Select Menu Return.... FAV Channel Setting: Show the Favorite Channel List. Contrast: Video contrast adjustment, the tuning range is 0 ~ 100. 3. Tuning Band: Select TV source signal from selecting the preset value of the received DTV signal. 3. Use the Navigation Ring to move around to display or close the main...
... the items including Video menu, Audio menu, Feature menu, Channel menu, and VGA menu. Auto CH Search: Automatically scan all NTSC / ATSC TV channels and then store in the particular source modes. Add on CH Search Channels List Channel Labels FAV Channel Setting Move ENTER Select Menu Return.... FAV Channel Setting: Show the Favorite Channel List. Contrast: Video contrast adjustment, the tuning range is 0 ~ 100. 3. Tuning Band: Select TV source signal from selecting the preset value of the received DTV signal. 3. Use the Navigation Ring to move around to display or close the main...
User Manual
Page 17
...from Mono, Stereo, or SAP. (This function works in different source modes, certain features should be hidden (disable) on / off the TV internal speaker.The digital audio output signals and earphone output signals will be consistent across programs and channels automatically. 10. FEATURE Menu Language Time .... [Time Zone] - Preset: Restore the default audio settings. Audio Source: Select the audio source from RAW and PCM. (This function works in TV mode shows as below . Speaker: Choose to 10. 17 Treble: Treble tone adjustment, the tuning range is 0 ~ 63. (The default state ...
...from Mono, Stereo, or SAP. (This function works in different source modes, certain features should be hidden (disable) on / off the TV internal speaker.The digital audio output signals and earphone output signals will be consistent across programs and channels automatically. 10. FEATURE Menu Language Time .... [Time Zone] - Preset: Restore the default audio settings. Audio Source: Select the audio source from RAW and PCM. (This function works in TV mode shows as below . Speaker: Choose to 10. 17 Treble: Treble tone adjustment, the tuning range is 0 ~ 63. (The default state ...
User Manual
Page 18
...Provide numerous options for blocking. 6. Note:This feature is ό0 0 0 0ύ. Select On or Off to on, your TV will be locked and TV only can modify the detail styles described below.The setting result will block unrated program. [USA Parental Locks] - Set the parental...Exit Exit [Button Lock] - Analog Captions: Select an analog caption options. (CC 1-4 / TEXT 1-4) 8. Note:This item is only available in TV, Composite and S-Video source modes. (The default password is an advanced V-Chip rating system for changing the password: Enter Old Password -> Enter New...
...Provide numerous options for blocking. 6. Note:This feature is ό0 0 0 0ύ. Select On or Off to on, your TV will be locked and TV only can modify the detail styles described below.The setting result will block unrated program. [USA Parental Locks] - Set the parental...Exit Exit [Button Lock] - Analog Captions: Select an analog caption options. (CC 1-4 / TEXT 1-4) 8. Note:This item is only available in TV, Composite and S-Video source modes. (The default password is an advanced V-Chip rating system for changing the password: Enter Old Password -> Enter New...

User Manual
Page 20
... is available in current directory and Key Help Bar. • PlayList (on the right side): This part contains MP3 music files. • ControlPanel (on the TV immediately; Press any key pressed. Preset: Resetting MP3 relative audio parameters to reduce Vertical-Line noise. (0-16) 4. Clock: Adjust picture clock to the default values...
... is available in current directory and Key Help Bar. • PlayList (on the right side): This part contains MP3 music files. • ControlPanel (on the TV immediately; Press any key pressed. Preset: Resetting MP3 relative audio parameters to reduce Vertical-Line noise. (0-16) 4. Clock: Adjust picture clock to the default values...
User Manual
Page 21
... receiver to concentrate the reusable materials and to minimize the amount of materials to be recycled and reused. Manufactured under license from the TV. Do not use a clean, damp cloth. If this device that interference will not occur in a residential installation. TIPS Care of... more of the following measures: • Reorient or relocate the receiving antenna. • Increase the separation between the equipment and the TV. • Connect the equipment into wall power outlet on a circuit different from that any changes or modifications made with shielded cables with...
... receiver to concentrate the reusable materials and to minimize the amount of materials to be recycled and reused. Manufactured under license from the TV. Do not use a clean, damp cloth. If this device that interference will not occur in a residential installation. TIPS Care of... more of the following measures: • Reorient or relocate the receiving antenna. • Increase the separation between the equipment and the TV. • Connect the equipment into wall power outlet on a circuit different from that any changes or modifications made with shielded cables with...

User Manual
Page 22
...change without notice. • This model may not be compatible with features and/or specifications that may be added in the future. Model No. HL19D2 HL24XD2 HL32D2 HL42XD2 DISPLAY Viewable 18.5W" 23.6W" 31.5W" 42W" Television System NTSC standard,ATSC standard (8-VSB, Clear-QAM) VHF:... 2 through 13 UHF: 14 through 69 Channel Coverage Cable TV: Mild band (A - 8 through A - 1, A through I), Super band (J through W), Hyper band (AA through ZZ, AAA, BBB), Ultra band (65 through 94, ...
...change without notice. • This model may not be compatible with features and/or specifications that may be added in the future. Model No. HL19D2 HL24XD2 HL32D2 HL42XD2 DISPLAY Viewable 18.5W" 23.6W" 31.5W" 42W" Television System NTSC standard,ATSC standard (8-VSB, Clear-QAM) VHF:... 2 through 13 UHF: 14 through 69 Channel Coverage Cable TV: Mild band (A - 8 through A - 1, A through I), Super band (J through W), Hyper band (AA through ZZ, AAA, BBB), Ultra band (65 through 94, ...
User Manual
Page 23
Model No. HL19D2 HL24XD2 HL32D2 HL42XD2 WEIGHT & DIMENSIOIN Dimensions 457.3 mm 572.2 mm 790.5 mm 1015.36 mm with Stand 324.8 mm 407.6 mm 569.1 mm 703.03 ...
Model No. HL19D2 HL24XD2 HL32D2 HL42XD2 WEIGHT & DIMENSIOIN Dimensions 457.3 mm 572.2 mm 790.5 mm 1015.36 mm with Stand 324.8 mm 407.6 mm 569.1 mm 703.03 ...


