User Guide
Page 3
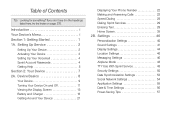
... headings listed here, try the Index on page 276. Device Basics 8 Your Device 9 Turning Your Device On and Off 11 Viewing the Display Screen 13 Battery and Charger 18 Getting Around Your Device 21 Displaying Your Phone Number 22 Making and Answering Calls 22 Speed Dialing 28 Dialing Sprint Services 29...
... headings listed here, try the Index on page 276. Device Basics 8 Your Device 9 Turning Your Device On and Off 11 Viewing the Display Screen 13 Battery and Charger 18 Getting Around Your Device 21 Displaying Your Phone Number 22 Making and Answering Calls 22 Speed Dialing 28 Dialing Sprint Services 29...

User Guide
Page 11
... 2: Text-to-speech settings 17: System updates 1: Firmware update 3: Update PRL 2: Update profile 4: HTC software update 18: About phone 1: Phone identity 1: Model number 2: MEID 3: Phone number 4: IMSI 5: Current username 2: Battery 1: Battery status 2: Battery level 3: Battery use 4: Up time 5: Awake time 3: Hardware information 1: Hardware version 2: Wi-Fi MAC address 3: Bluetooth...
... 2: Text-to-speech settings 17: System updates 1: Firmware update 3: Update PRL 2: Update profile 4: HTC software update 18: About phone 1: Phone identity 1: Model number 2: MEID 3: Phone number 4: IMSI 5: Current username 2: Battery 1: Battery status 2: Battery level 3: Battery use 4: Up time 5: Awake time 3: Hardware information 1: Hardware version 2: Wi-Fi MAC address 3: Bluetooth...

User Guide
Page 14
...If your device is activated, it will turn on page 3 for the first time, you will be given options to remove. Ⅲ Replace the battery compartment cover, making sure all the locking tabs are seated and there are no gaps around the cover. Press to turn the device on. Ⅲ... 4) ࡗ Getting Help (page 5) Setting Up Your Device 1. Setting Up Service Ⅲ Insert the battery, contacts end first, and gently press the battery into the slot at the bottom of the battery compartment cover and lift the up various accounts, such as your device for more information. 2 1A. Install the...
...If your device is activated, it will turn on page 3 for the first time, you will be given options to remove. Ⅲ Replace the battery compartment cover, making sure all the locking tabs are seated and there are no gaps around the cover. Press to turn the device on. Ⅲ... 4) ࡗ Getting Help (page 5) Setting Up Your Device 1. Setting Up Service Ⅲ Insert the battery, contacts end first, and gently press the battery into the slot at the bottom of the battery compartment cover and lift the up various accounts, such as your device for more information. 2 1A. Install the...

User Guide
Page 15
... your activation, make a phone call. ⅷ If you received your activation. Pressing cancels the activation process. Setting Up Service 3. Note: Your phone's battery should fully charge your voicemail, and make a phone call . Note: If you are activating a new device for an existing number on and find a... signal, set up your battery as soon as possible. Make your first call. Ⅲ Tap . Ⅲ Use the onscreen keypad to turn on your account, you received your...
... your activation, make a phone call. ⅷ If you received your activation. Pressing cancels the activation process. Setting Up Service 3. Note: Your phone's battery should fully charge your voicemail, and make a phone call . Note: If you are activating a new device for an existing number on and find a... signal, set up your battery as soon as possible. Make your first call. Ⅲ Tap . Ⅲ Use the onscreen keypad to turn on your account, you received your...
User Guide
Page 20
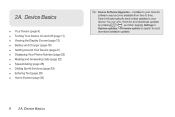
.... 8 2A. 2A. Device Basics ࡗ Your Device (page 9) ࡗ Turning Your Device On and Off (page 11) ࡗ Viewing the Display Screen (page 13) ࡗ Battery and Charger (page 18) ࡗ Getting Around Your Device (page 21) ࡗ Displaying Your Phone Number (page 22) ࡗ Making and Answering Calls (page 22...
.... 8 2A. 2A. Device Basics ࡗ Your Device (page 9) ࡗ Turning Your Device On and Off (page 11) ࡗ Viewing the Display Screen (page 13) ࡗ Battery and Charger (page 18) ࡗ Getting Around Your Device (page 21) ࡗ Displaying Your Phone Number (page 22) ࡗ Making and Answering Calls (page 22...
User Guide
Page 21
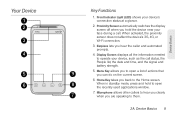
... in standby mode, press and hold the device near your face during a call status, the People list, the date and time, and the signal and battery strength. 5. When activated, the proximity sensor does not affect the device's 3G, 4G, or Wi-Fi connection. 3. Display Screen displays all the information needed to...
... in standby mode, press and hold the device near your face during a call status, the People list, the date and time, and the signal and battery strength. 5. When activated, the proximity sensor does not affect the device's 3G, 4G, or Wi-Fi connection. 3. Display Screen displays all the information needed to...
User Guide
Page 24
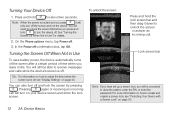
... the screen: Press and hold the lock screen bar and then drag it idle. See "Turning the Screen Off When Not in Use To save battery power, the device automatically turns off confirmation box, tap OK. Pressing again or receiving an incoming call . Turning Your Device Off 1. You will still be...
... the screen: Press and hold the lock screen bar and then drag it idle. See "Turning the Screen Off When Not in Use To save battery power, the device automatically turns off confirmation box, tap OK. Pressing again or receiving an incoming call . Turning Your Device Off 1. You will still be...

User Guide
Page 27
... to a 4G network 4G is on and 4G networks are available Sprint Hotspot is on and is ready to share its 4G connection Shows current battery charge level (Icon shown is ready to share its 3G connection Notifications Panel Notification icons report the arrival of new messages, calendar events, alarms...
... to a 4G network 4G is on and 4G networks are available Sprint Hotspot is on and is ready to share its 4G connection Shows current battery charge level (Icon shown is ready to share its 3G connection Notifications Panel Notification icons report the arrival of new messages, calendar events, alarms...

User Guide
Page 29
... the earpiece provides information on the device status or pending notifications. Battery is below 14%.) You have a pending notification (for example, a new message or a missed call). Device Basics 17 Battery is low. (Battery power is charging. Device Basics Notification LED The Notification LED located ...notification. 2A. LED Status Solid green Solid amber Flashing amber Flashing green Indication Battery is fully charged (when the device is connected to a flashing green light even if there is charging the battery, the LED will be solid amber and will not switch to the AC ...
... the earpiece provides information on the device status or pending notifications. Battery is below 14%.) You have a pending notification (for example, a new message or a missed call). Device Basics 17 Battery is low. (Battery power is charging. Device Basics Notification LED The Notification LED located ...notification. 2A. LED Status Solid green Solid amber Flashing amber Flashing green Indication Battery is fully charged (when the device is connected to a flashing green light even if there is charging the battery, the LED will be solid amber and will not switch to the AC ...

User Guide
Page 30
... service, vibrate mode, browser use an Sprint-approved or HTC-approved battery and charger may reduce the battery's talk and standby times. Battery and Charger WARNING: Use only Sprint-approved or HTC-approved batteries and chargers with a rechargeable battery. Tip: Watch your device. Device Basics Installing the Battery 1. The failure to 6 hours of power. Sprint-approved or...
... service, vibrate mode, browser use an Sprint-approved or HTC-approved battery and charger may reduce the battery's talk and standby times. Battery and Charger WARNING: Use only Sprint-approved or HTC-approved batteries and chargers with a rechargeable battery. Tip: Watch your device. Device Basics Installing the Battery 1. The failure to 6 hours of power. Sprint-approved or...

User Guide
Page 31
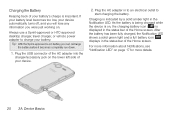
...the power is off so that you can be burned. 3. Replace the battery compartment cover and press until it snaps into place. Remove the battery compartment cover. (See step 1 of the battery first, and then gently push the battery into place, making sure all the locking tabs are seated and there ...are no gaps around the cover. 2A. Lift the battery out at the notch just below the...
...the power is off so that you can be burned. 3. Replace the battery compartment cover and press until it snaps into place. Remove the battery compartment cover. (See step 1 of the battery first, and then gently push the battery into place, making sure all the locking tabs are seated and there ...are no gaps around the cover. 2A. Lift the battery out at the notch just below the...
User Guide
Page 32
..., your device. 2. For more information about Notifications, see "Notification LED" on . Charging the Battery Keeping track of the Home screen. Always use a Sprint-approved or HTC-approved desktop charger, travel charger, or vehicle power adapter to start charging the battery. Plug the AC adapter in the status bar of your device automatically turns...
..., your device. 2. For more information about Notifications, see "Notification LED" on . Charging the Battery Keeping track of the Home screen. Always use a Sprint-approved or HTC-approved desktop charger, travel charger, or vehicle power adapter to start charging the battery. Plug the AC adapter in the status bar of your device automatically turns...

User Guide
Page 56
...Custom Scene" on page 39. 44 2B. Tap the time before setting it as a wallpaper. 3. Note: Extended screen timeout periods reduce the battery's talk and standby times. You can set the idle time before the screen turns off . After changing the wallpaper, remember to save it to ...look. Display Settings Changing the Screen Timeout Period After a period of wallpapers included in your device or choose from preset animated wallpapers. Ⅲ Tap HTC wallpapers to use a preset image. Ⅲ Tap Gallery to use a picture that you have taken with a preset wallpaper or your favorite photo ...
...Custom Scene" on page 39. 44 2B. Tap the time before setting it as a wallpaper. 3. Note: Extended screen timeout periods reduce the battery's talk and standby times. You can set the idle time before the screen turns off . After changing the wallpaper, remember to save it to ...look. Display Settings Changing the Screen Timeout Period After a period of wallpapers included in your device or choose from preset animated wallpapers. Ⅲ Tap HTC wallpapers to use a preset image. Ⅲ Tap Gallery to use a picture that you have taken with a preset wallpaper or your favorite photo ...

User Guide
Page 69
.... ⅷ Decrease the time before the screen turns off the screen, press continue to function. . The device will Managing Your Device's Wireless Functions To save battery life, you would like to add (for example, Bluetooth or Wi-Fi) that are not in use . Settings 57 To change wireless settings: ᮣ Press...
.... ⅷ Decrease the time before the screen turns off the screen, press continue to function. . The device will Managing Your Device's Wireless Functions To save battery life, you would like to add (for example, Bluetooth or Wi-Fi) that are not in use . Settings 57 To change wireless settings: ᮣ Press...

User Guide
Page 70
If you have set your email account to conserve battery power. To do so, press > , and then tap Settings > Applications > Manage Applications. Tap the Running tab, tap the application you would like to edit by .... 1. In the Inbox, press and tap More > Settings > Send & Receive > Schedule. 4. Setting the Email Synchronization Schedule If you use to download email more quickly the battery will run down. Tip: You can set up multiple email accounts on your device, switch to the email account that are not in use the...
If you have set your email account to conserve battery power. To do so, press > , and then tap Settings > Applications > Manage Applications. Tap the Running tab, tap the application you would like to edit by .... 1. In the Inbox, press and tap More > Settings > Send & Receive > Schedule. 4. Setting the Email Synchronization Schedule If you use to download email more quickly the battery will run down. Tip: You can set up multiple email accounts on your device, switch to the email account that are not in use the...

User Guide
Page 102
... time clock. You can turn into a night clock or screensaver. The Desk Clock displays the current date, time, and weather, an alarm clock indicator, and a battery charging indicator. It functions as a stopwatch. 5. Timer lets you use the clock as a desk clock that shows you directly to switch between the different functions...
... time clock. You can turn into a night clock or screensaver. The Desk Clock displays the current date, time, and weather, an alarm clock indicator, and a battery charging indicator. It functions as a stopwatch. 5. Timer lets you use the clock as a desk clock that shows you directly to switch between the different functions...

User Guide
Page 103
... find out how to display the date and time of your device is on and set the alarm clock, see "World Clock." 2E. Battery charging indicator shows the battery charge level. To light up the screen again, tap anywhere on the Desk Clock. Weather information of another time zone. Calendar & Tools 91...
... find out how to display the date and time of your device is on and set the alarm clock, see "World Clock." 2E. Battery charging indicator shows the battery charge level. To light up the screen again, tap anywhere on the Desk Clock. Weather information of another time zone. Calendar & Tools 91...

User Guide
Page 126
...117) Your Device's microSD Card Removing the microSD Card 1. For more information on your device. Locate the latch at the bottom center of the battery compartment cover and lift up gently to remove. 2. 2G. Important: Your device comes with a 2 GB microSDTM (Secure Digital) memory card that... allows you to unlock the microSD card slot. Lift the battery out at the bottom of the battery compartment, and then lift the latch to store images, videos, music, documents, and voice data on how to the locked position...
...117) Your Device's microSD Card Removing the microSD Card 1. For more information on your device. Locate the latch at the bottom center of the battery compartment cover and lift up gently to remove. 2. 2G. Important: Your device comes with a 2 GB microSDTM (Secure Digital) memory card that... allows you to unlock the microSD card slot. Lift the battery out at the bottom of the battery compartment, and then lift the latch to store images, videos, music, documents, and voice data on how to the locked position...

User Guide
Page 127
... You can easily damage the microSD card by improper operation. Lift the battery out at the bottom center of the battery compartment cover and lift up gently to unlock the microSD card slot. back cover and battery, see "Battery and Charger" on page 18. microSD Card 2G. Inserting the microSD ...Card 1. microSD Card 115 Make sure your battery is fully charged before using the microSD card. Your data may become damaged...
... You can easily damage the microSD card by improper operation. Lift the battery out at the bottom center of the battery compartment cover and lift up gently to unlock the microSD card slot. back cover and battery, see "Battery and Charger" on page 18. microSD Card 2G. Inserting the microSD ...Card 1. microSD Card 115 Make sure your battery is fully charged before using the microSD card. Your data may become damaged...

User Guide
Page 128
... then press the latch to recognize the microSD card again. 116 2G. When you unmount the SD card, you format the card. Re-install the battery and the back cover. Note: The formatting procedure erases all the data on the microSD card, after which the files CANNOT be displayed.) Formatting the...
... then press the latch to recognize the microSD card again. 116 2G. When you unmount the SD card, you format the card. Re-install the battery and the back cover. Note: The formatting procedure erases all the data on the microSD card, after which the files CANNOT be displayed.) Formatting the...


