
User Manual
Page 4
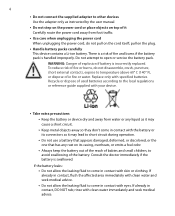
...; Use care when unplugging the power cord When unplugging the power cord, do not disassemble, crush, puncture, short external contacts, expose to temperature above 60° C (140° F), or dispose of in fire or water. Replace only with eyes. Do not attempt to open or service the battery pack. pull on the plug. • Handle battery packs carefully This device contains...
...; Use care when unplugging the power cord When unplugging the power cord, do not disassemble, crush, puncture, short external contacts, expose to temperature above 60° C (140° F), or dispose of in fire or water. Replace only with eyes. Do not attempt to open or service the battery pack. pull on the plug. • Handle battery packs carefully This device contains...

User Manual
Page 10
... Keyboard...35 Mouse buttons and the microPad 36 Touch screen...37 2.3 Using Pen Flicks and Touch Flicks 39 2.4 Using the Tablet PC Input Panel 40 Writing pad ...41 Character pad...42 On-screen keyboard 42 2.5 Using the Control Center 43 Volume and brightness 44 Modem ...44 Wireless LAN ...44 Bluetooth ...45 Push Mail...45 Flight Mode...45 Shutdown options 46 Advanced Settings 48 2.6 Connecting to the Internet 49 Use USIM/SIM card 49 Use Wi-Fi...50 2.7 Using Bluetooth 51 Turn...
... Keyboard...35 Mouse buttons and the microPad 36 Touch screen...37 2.3 Using Pen Flicks and Touch Flicks 39 2.4 Using the Tablet PC Input Panel 40 Writing pad ...41 Character pad...42 On-screen keyboard 42 2.5 Using the Control Center 43 Volume and brightness 44 Modem ...44 Wireless LAN ...44 Bluetooth ...45 Push Mail...45 Flight Mode...45 Shutdown options 46 Advanced Settings 48 2.6 Connecting to the Internet 49 Use USIM/SIM card 49 Use Wi-Fi...50 2.7 Using Bluetooth 51 Turn...

User Manual
Page 17
... Connect the AC adapter to this jack SDIO Card Slot Use it in hold. (You will see an orange dot.) This prevents accidental keyboard or touch screen actions when the Mobile Computer is in the carrying case. wake Windows from the stylus speakers, or a microphone. Back side VGA Port Connect an external monitor when you need to sleep mode; compartment, and slide it from sleep mode. USB 2.0 Port Connect a USB device such as an SD memory card reader...
... Connect the AC adapter to this jack SDIO Card Slot Use it in hold. (You will see an orange dot.) This prevents accidental keyboard or touch screen actions when the Mobile Computer is in the carrying case. wake Windows from the stylus speakers, or a microphone. Back side VGA Port Connect an external monitor when you need to sleep mode; compartment, and slide it from sleep mode. USB 2.0 Port Connect a USB device such as an SD memory card reader...

User Manual
Page 19
...-Fi are enabled, their lights flash alternately. Status indicators Getting Started 19 Status LED Power Battery CAPS Lock Hard Disk Activity Bluetooth/Wi-Fi Data Connection E-mail/SMS Meaning • Lights green when the AC adapter is connected. • Flashes green when the device is in SnapVUE mode only). Flashes green when the hard disk drive is being accessed. • Shows a flashing blue light when Bluetooth is turned on and is activated. Flashes green when a data connection (such as a notification that new e-mail...
...-Fi are enabled, their lights flash alternately. Status indicators Getting Started 19 Status LED Power Battery CAPS Lock Hard Disk Activity Bluetooth/Wi-Fi Data Connection E-mail/SMS Meaning • Lights green when the AC adapter is connected. • Flashes green when the device is in SnapVUE mode only). Flashes green when the hard disk drive is being accessed. • Shows a flashing blue light when Bluetooth is turned on and is activated. Flashes green when a data connection (such as a notification that new e-mail...
User Manual
Page 21
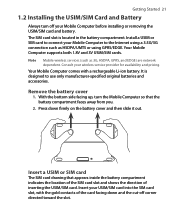
... to use only manufacturer-specified original batteries and accessories. Remove the battery cover 1. Insert your wireless service provider for availability and pricing. Insert a USIM or SIM card The SIM card drawing that the battery compartment faces away from you. 2. Getting Started 21 1.2 Installing the USIM/SIM Card and Battery Always turn the Mobile Computer so that appears inside the battery compartment indicates the location of the SIM card slot and...
... to use only manufacturer-specified original batteries and accessories. Remove the battery cover 1. Insert your wireless service provider for availability and pricing. Insert a USIM or SIM card The SIM card drawing that the battery compartment faces away from you. 2. Getting Started 21 1.2 Installing the USIM/SIM Card and Battery Always turn the Mobile Computer so that appears inside the battery compartment indicates the location of the SIM card slot and...

User Manual
Page 25
... for the first time. New batteries are charging it using your Mobile Computer, and the applications, features or other settings that you use wireless connections (Wi-Fi or 3G/2G), LCD brightness setting, temperature of the operating environment, peripherals attached to your Mobile Computer for instructions on installing the battery. The Battery LED lights green when the battery is affected by local regulation. • Always turn off your Mobile Computer...
... for the first time. New batteries are charging it using your Mobile Computer, and the applications, features or other settings that you use wireless connections (Wi-Fi or 3G/2G), LCD brightness setting, temperature of the operating environment, peripherals attached to your Mobile Computer for instructions on installing the battery. The Battery LED lights green when the battery is affected by local regulation. • Always turn off your Mobile Computer...
User Manual
Page 30
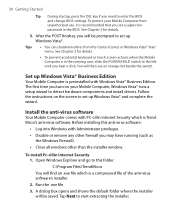
... switch to detect hardware components and install drivers. A dialog box opens and shows the default folder where the installer will be saved. Tap Next to enter the BIOS and change BIOS settings. After the POST finishes, you will be prompted to this anti-virus software: • Log into Windows with Windows Vista® Business Edition. Install the anti-virus software Your Mobile Computer comes with PC-cillin Internet...
... switch to detect hardware components and install drivers. A dialog box opens and shows the default folder where the installer will be saved. Tap Next to enter the BIOS and change BIOS settings. After the POST finishes, you will be prompted to this anti-virus software: • Log into Windows with Windows Vista® Business Edition. Install the anti-virus software Your Mobile Computer comes with PC-cillin Internet...

User Manual
Page 35
... ways to enter text. Tip Additional screen resolution options are marked in blue on the keyboard. For information about using a Bluetooth device, see "Using Bluetooth" later in this chapter for details. This small footprint keyboard works just like any standard computer keyboard with the Mobile Computer. Hotkey Function Enter sleep mode. (Slide and release the POWER/HOLD switch to the hotkeys that you can also use a USB mouse or Bluetooth mouse with alphanumeric and function keys. Operating in...
... ways to enter text. Tip Additional screen resolution options are marked in blue on the keyboard. For information about using a Bluetooth device, see "Using Bluetooth" later in this chapter for details. This small footprint keyboard works just like any standard computer keyboard with the Mobile Computer. Hotkey Function Enter sleep mode. (Slide and release the POWER/HOLD switch to the hotkeys that you can also use a USB mouse or Bluetooth mouse with alphanumeric and function keys. Operating in...

User Manual
Page 36
... Right mouse button Left mouse button microPad Your Mobile Computer has left and right mouse buttons, and a microPad that functions as a notebook touchpad. Increase the volume. For more information about using SnapVUE, see Chapter 3. Lower the screen brightness. Toggle between the external monitor, Mobile Computer's LCD, and dual display (on both the LCD and external monitor). Pressing FN + F1 opens the Windows Help and Support window, while pressing FN + F3 opens the Search window. 36 Operating in...
... Right mouse button Left mouse button microPad Your Mobile Computer has left and right mouse buttons, and a microPad that functions as a notebook touchpad. Increase the volume. For more information about using SnapVUE, see Chapter 3. Lower the screen brightness. Toggle between the external monitor, Mobile Computer's LCD, and dual display (on both the LCD and external monitor). Pressing FN + F1 opens the Windows Help and Support window, while pressing FN + F3 opens the Search window. 36 Operating in...

User Manual
Page 44
... the Internet using Wi-Fi, you need to the Internet. To have access to a wireless network or public hotspot, you can connect to the Internet using your USIM/SIM card, make sure the card is off the connection. Tap it to switch Wi-Fi off . Wireless LAN If you have the Mobile Computer automatically adjust the display brightness for details. Before you to connect the Mobile Computer to the Internet" later in Windows Vista...
... the Internet using Wi-Fi, you need to the Internet. To have access to a wireless network or public hotspot, you can connect to the Internet using your USIM/SIM card, make sure the card is off the connection. Tap it to switch Wi-Fi off . Wireless LAN If you have the Mobile Computer automatically adjust the display brightness for details. Before you to connect the Mobile Computer to the Internet" later in Windows Vista...

User Manual
Page 47
... the POWER/HOLD switch for about 2 seconds. Operating in Windows Vista® 47 To enter sleep mode To save battery power while you're not using the Mobile Computer, you don't lose your work. • Tap the Sleep button ( ) to enter sleep mode. • To wake Windows Vista® from sleep mode, slide and release the POWER/HOLD switch located on . • To enter hibernate mode, tap menu, then tap Hibernate. Tip To configure hibernate mode settings, open the Shutdown Options •...
... the POWER/HOLD switch for about 2 seconds. Operating in Windows Vista® 47 To enter sleep mode To save battery power while you're not using the Mobile Computer, you don't lose your work. • Tap the Sleep button ( ) to enter sleep mode. • To wake Windows Vista® from sleep mode, slide and release the POWER/HOLD switch located on . • To enter hibernate mode, tap menu, then tap Hibernate. Tip To configure hibernate mode settings, open the Shutdown Options •...
User Manual
Page 48
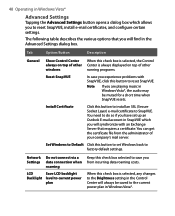
... SnapVUE which allows you will find in the Advanced Settings dialog box. Set Windows to Default Click this button to reset SnapVUE. Tab Option/Button Description General Show Control Center When this button to install an SSL (Secure Socket Layer) e-mail certificate to SnapVUE. 48 Operating in Windows Vista® Advanced Settings Tapping the Advanced Settings button opens a dialog box which you to reset SnapVUE, install e-mail certificates, and configure certain settings.
... SnapVUE which allows you will find in the Advanced Settings dialog box. Set Windows to Default Click this button to reset SnapVUE. Tab Option/Button Description General Show Control Center When this button to install an SSL (Secure Socket Layer) e-mail certificate to SnapVUE. 48 Operating in Windows Vista® Advanced Settings Tapping the Advanced Settings button opens a dialog box which you to reset SnapVUE, install e-mail certificates, and configure certain settings.
User Manual
Page 49
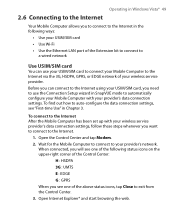
... want to connect to the Internet. 1. Open Internet Explorer® and start browsing the web. To connect to the Internet After the Mobile Computer has been set up with your wireless service provider. When connected, you will see one of the above status icons, tap Close to automatically configure your Mobile Computer with your provider's network. Operating in Windows Vista® 49 2.6 Connecting to the Internet Your Mobile...
... want to connect to the Internet. 1. Open Internet Explorer® and start browsing the web. To connect to the Internet After the Mobile Computer has been set up with your wireless service provider. When connected, you will see one of the above status icons, tap Close to automatically configure your Mobile Computer with your provider's network. Operating in Windows Vista® 49 2.6 Connecting to the Internet Your Mobile...

User Manual
Page 50
.... 3. Open Internet Explorer® and start browsing the web. If you need to 100 meters. Open the Control Center and tap WLAN to turn Wi-Fi on . Open the Control Center and tap WLAN to turn on Wi-Fi. 2. Tap Close. 9. 50 Operating in range of a wireless network or public hotspot. You can directly browse the web using web mail. Select a wireless network and then tap Connect...
.... 3. Open Internet Explorer® and start browsing the web. If you need to 100 meters. Open the Control Center and tap WLAN to turn Wi-Fi on . Open the Control Center and tap WLAN to turn on Wi-Fi. 2. Tap Close. 9. 50 Operating in range of a wireless network or public hotspot. You can directly browse the web using web mail. Select a wireless network and then tap Connect...

User Manual
Page 53
... added functionality. Connect to Headset/MIC jack Stereo headset (supplied) USB device You can connect a USB thumb drive, external hard disk, printer, mouse, keyboard, or any USB device. You may also connect external speakers or a microphone. Connect the monitor cable's D-SUB cable connector to the VGA port at the left side of the Mobile Computer. External audio Connect the supplied stereo headset to the Headset/MIC jack found at the back side of the Mobile Computer. Operating in Windows Vista...
... added functionality. Connect to Headset/MIC jack Stereo headset (supplied) USB device You can connect a USB thumb drive, external hard disk, printer, mouse, keyboard, or any USB device. You may also connect external speakers or a microphone. Connect the monitor cable's D-SUB cable connector to the VGA port at the left side of the Mobile Computer. External audio Connect the supplied stereo headset to the Headset/MIC jack found at the back side of the Mobile Computer. Operating in Windows Vista...
User Manual
Page 79
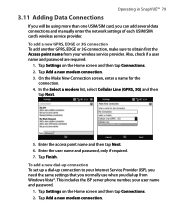
... ISP server phone number, your Internet Service Provider (ISP), you need the same settings that you normally use when you can add several data connections and manually enter the network settings of each USIM/SIM card's wireless service provider. On the Make New Connection screen, enter a name for the connection. 4. Enter the access point name and then tap Next. 6. Also, check if a user name and password are required. 1. In the Select a modem list, select Cellular...
... ISP server phone number, your Internet Service Provider (ISP), you need the same settings that you normally use when you can add several data connections and manually enter the network settings of each USIM/SIM card's wireless service provider. On the Make New Connection screen, enter a name for the connection. 4. Enter the access point name and then tap Next. 6. Also, check if a user name and password are required. 1. In the Select a modem list, select Cellular...
User Manual
Page 102
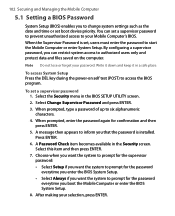
..., press ENTER. 102 Securing and Managing the Mobile Computer 5.1 Setting a BIOS Password System Setup (BIOS) enables you to change system settings such as the date and time or set , users must enter the password to start the Mobile Computer or enter System Setup. Select the Security menu in the Security screen. A message then appears to six alphanumeric characters. 4. When the Supervisor Password is installed. A Password Check item becomes available in the BIOS SETUP UTILITY screen. 2. Write...
..., press ENTER. 102 Securing and Managing the Mobile Computer 5.1 Setting a BIOS Password System Setup (BIOS) enables you to change system settings such as the date and time or set , users must enter the password to start the Mobile Computer or enter System Setup. Select the Security menu in the Security screen. A message then appears to six alphanumeric characters. 4. When the Supervisor Password is installed. A Password Check item becomes available in the BIOS SETUP UTILITY screen. 2. Write...

User Manual
Page 116
116 Appendix A.1 Specifications System Information Processor Intel® Processor A110, 800 MHz Memory RAM: 1GB DDR2 microDIMM RAM Hard Disk 1.8" 40GB or 60GB hard disk (manufacturer's option) with G-Sensor shock protection Operating System Windows Vista® Business Power Battery Charging Time Battery Life (estimate) AC Adapter Display LCD Type Resolution Orientation Rechargeable Lithium-ion polymer battery, 2700 mAh about 3 hours Windows Vista® operating time: Up to 2 hours SnapVUE™ standby time (Modem and Push e-mail enabled): Up to...
116 Appendix A.1 Specifications System Information Processor Intel® Processor A110, 800 MHz Memory RAM: 1GB DDR2 microDIMM RAM Hard Disk 1.8" 40GB or 60GB hard disk (manufacturer's option) with G-Sensor shock protection Operating System Windows Vista® Business Power Battery Charging Time Battery Life (estimate) AC Adapter Display LCD Type Resolution Orientation Rechargeable Lithium-ion polymer battery, 2700 mAh about 3 hours Windows Vista® operating time: Up to 2 hours SnapVUE™ standby time (Modem and Push e-mail enabled): Up to...
User Manual
Page 123
... Recognizer 68 Bluetooth 45, 51 Brightness 44 C Calendar 97 Calendar (SnapVUE) 69 Camera 55, 117 Certificate 82 Change screen resolution (Windows) 34 Charge battery 25 Check battery status - manual setup - 3G/GPRS/EDGE 79 - Direct Push 95 - in Windows 34 Clear Storage 82 Comm Manager 76, 82 Company Directory 99 Connections 79, 82 Connection Setup 58, 62, 77, 82 Connect to Internet - in SnapVUE 62 - dial-up 79 Device Information...
... Recognizer 68 Bluetooth 45, 51 Brightness 44 C Calendar 97 Calendar (SnapVUE) 69 Camera 55, 117 Certificate 82 Change screen resolution (Windows) 34 Charge battery 25 Check battery status - manual setup - 3G/GPRS/EDGE 79 - Direct Push 95 - in Windows 34 Clear Storage 82 Comm Manager 76, 82 Company Directory 99 Connections 79, 82 Connection Setup 58, 62, 77, 82 Connect to Internet - in SnapVUE 62 - dial-up 79 Device Information...
User Manual
Page 125
... - overview 75 SMS Service 83 SnapVUE - working with e-mail 85 Specifications 116 Status icons (SnapVUE) 62 Status indicators (LEDs) 19 Symbol Pad 67 System information 116 e-mail 93 - Backlight 82 - Clear Storage 82 - Connections 79, 82 - E-mail Account Settings 82, 90 - GPRS Setting 82 - auto 58 - Device Information 82 - manually - 3G/GPRS/EDGE 79 - reset 48 - brightness 44 - Power 83 - operate in SnapVUE 57 - device password (SnapVUE) 60...
... - overview 75 SMS Service 83 SnapVUE - working with e-mail 85 Specifications 116 Status icons (SnapVUE) 62 Status indicators (LEDs) 19 Symbol Pad 67 System information 116 e-mail 93 - Backlight 82 - Clear Storage 82 - Connections 79, 82 - E-mail Account Settings 82, 90 - GPRS Setting 82 - auto 58 - Device Information 82 - manually - 3G/GPRS/EDGE 79 - reset 48 - brightness 44 - Power 83 - operate in SnapVUE 57 - device password (SnapVUE) 60...