Instruction Manual
Page 1
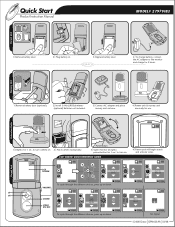
...video. O R pen R 1 Depress for 1 sec. R R R 1 Remove battery door (optional). 2 Install 3 AAA (LR03) batteries (optional) Batteries not included. 3 Connect AC adapter and place nursery unit on Vibe off 9:22pm 9:22pm No Signal ©2008 Graco ISPM023AA 03/08 Parent Unit Power Button 3 Open monitor... 9:22pm Vibe on base. 4 Parent unit & nursery unit are ready for 3 hours. Quick Start Product Instruction Manual R R MODEL# 2797VIB3 R Parent Unit Nursery Unit Activating Units 1 Remove battery door. 2 Plug battery in. 3 Replace battery door. 4 To charge battery, ...
...video. O R pen R 1 Depress for 1 sec. R R R 1 Remove battery door (optional). 2 Install 3 AAA (LR03) batteries (optional) Batteries not included. 3 Connect AC adapter and place nursery unit on Vibe off 9:22pm 9:22pm No Signal ©2008 Graco ISPM023AA 03/08 Parent Unit Power Button 3 Open monitor... 9:22pm Vibe on base. 4 Parent unit & nursery unit are ready for 3 hours. Quick Start Product Instruction Manual R R MODEL# 2797VIB3 R Parent Unit Nursery Unit Activating Units 1 Remove battery door. 2 Plug battery in. 3 Replace battery door. 4 To charge battery, ...

Instruction Manual
Page 5
... • Use ONLY with a dry cloth. 2 Clean only with 110-120 volt AC electrical outlets. • Protect the AC adapter cords. When using the monitor, you must still provide the supervision necessary for the continued safety of your child's reach. This product is designed to follow these warnings and the.... Do not cover the Nursery Unit or Parent Units with the normal flow of air. • DO NOT immerse any object such as a medical monitor. Do not use with extension cords. • DO NOT place the Nursery Unit or its cord within range of each other items. • Allow...
... • Use ONLY with a dry cloth. 2 Clean only with 110-120 volt AC electrical outlets. • Protect the AC adapter cords. When using the monitor, you must still provide the supervision necessary for the continued safety of your child's reach. This product is designed to follow these warnings and the.... Do not cover the Nursery Unit or Parent Units with the normal flow of air. • DO NOT immerse any object such as a medical monitor. Do not use with extension cords. • DO NOT place the Nursery Unit or its cord within range of each other items. • Allow...
Instruction Manual
Page 8
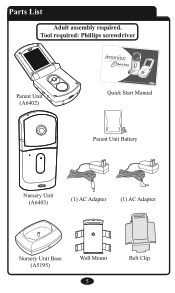
Parts List Adult assembly required. Tool required: Phillips screwdriver R Digital Color Video Baby Monitor Quick Start Product Instruction Manual Parent Unit (A6402) OWNER'S MANUAL Keep instructions for future use. Quick Start Manual Parent Unit Battery R Nursery Unit (A6403) (1) AC Adapter (1) AC Adapter Nursery Unit Base (A5195) Wall Mount 5 Belt Clip
Parts List Adult assembly required. Tool required: Phillips screwdriver R Digital Color Video Baby Monitor Quick Start Product Instruction Manual Parent Unit (A6402) OWNER'S MANUAL Keep instructions for future use. Quick Start Manual Parent Unit Battery R Nursery Unit (A6403) (1) AC Adapter (1) AC Adapter Nursery Unit Base (A5195) Wall Mount 5 Belt Clip
Instruction Manual
Page 19
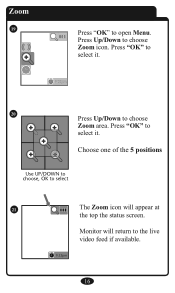
Press "OK" to choose Zoom icon. Press Up/Down to select it . 9:22pm Use UP/DOWN to choose, OK to select 20 Press Up/Down to open Menu. Monitor will return to select 21 The Zoom icon will appear at the top the status screen. Choose one of the 5 positions 9:22pm Use UP/DOWN to choose, OK to the live video feed if available. 9:22pm 16 Zoom 19 Press "OK" to choose Zoom area. Press "OK" to select it .
Press "OK" to choose Zoom icon. Press Up/Down to select it . 9:22pm Use UP/DOWN to choose, OK to select 20 Press Up/Down to open Menu. Monitor will return to select 21 The Zoom icon will appear at the top the status screen. Choose one of the 5 positions 9:22pm Use UP/DOWN to choose, OK to the live video feed if available. 9:22pm 16 Zoom 19 Press "OK" to choose Zoom area. Press "OK" to select it .

Instruction Manual
Page 20
Zoom Out 22 Press OK to live video screen if available. Press OK to select it. 9:22pm Use UP/DOWN to choose, OK to select 23 Monitor will not be visible on the status screen. 9:22pm 17 Press Up/Down to choose Zoom out icon. Zoom icon will return to open Menu.
Zoom Out 22 Press OK to live video screen if available. Press OK to select it. 9:22pm Use UP/DOWN to choose, OK to select 23 Monitor will not be visible on the status screen. 9:22pm 17 Press Up/Down to choose Zoom out icon. Zoom icon will return to open Menu.
Instruction Manual
Page 21
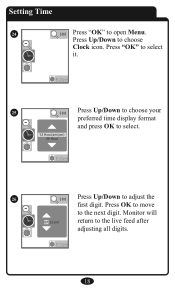
Press "OK" to select it. 9:22pm 25 Press Up/Down to choose your preferred time display format and press OK to select. 12 Hour(am/pm) 24 Hour 9:22pm 26 Press Up/Down to the next digit. Press OK to move to adjust the first digit. Setting Time 24 Press "OK" to the live feed after adjusting all digits. 9:22pm 18 Monitor will 07 :32 pm return to open Menu. Press Up/Down to choose Clock icon.
Press "OK" to select it. 9:22pm 25 Press Up/Down to choose your preferred time display format and press OK to select. 12 Hour(am/pm) 24 Hour 9:22pm 26 Press Up/Down to the next digit. Press OK to move to adjust the first digit. Setting Time 24 Press "OK" to the live feed after adjusting all digits. 9:22pm 18 Monitor will 07 :32 pm return to open Menu. Press Up/Down to choose Clock icon.
Instruction Manual
Page 22
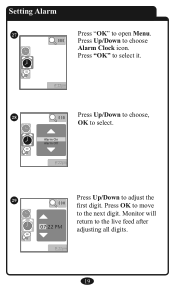
Alarm On Alarm Off 9:22pm 29 Press Up/Down to choose Alarm Clock icon. Press Up/Down to adjust the first digit. Monitor will 07:22 PM return to the next digit. Press OK to move to the live feed after adjusting all digits. 9:22pm 19 Setting Alarm 27 Press "OK" to select. Press "OK" to select it. 9:22pm 28 Press Up/Down to choose, OK to open Menu.
Alarm On Alarm Off 9:22pm 29 Press Up/Down to choose Alarm Clock icon. Press Up/Down to adjust the first digit. Monitor will 07:22 PM return to the next digit. Press OK to move to the live feed after adjusting all digits. 9:22pm 19 Setting Alarm 27 Press "OK" to select. Press "OK" to select it. 9:22pm 28 Press Up/Down to choose, OK to open Menu.
Instruction Manual
Page 24
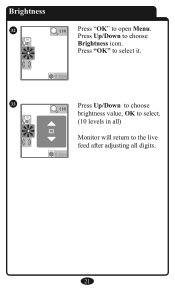
Press "OK" to select it. 9:22pm 33 Press Up/Down to choose brightness value, OK to select. (10 levels in all) 10 Monitor will return to choose Brightness icon. Press Up/Down to the live feed after adjusting all digits. 9:22pm 21 Brightness 32 Press "OK" to open Menu.
Press "OK" to select it. 9:22pm 33 Press Up/Down to choose brightness value, OK to select. (10 levels in all) 10 Monitor will return to choose Brightness icon. Press Up/Down to the live feed after adjusting all digits. 9:22pm 21 Brightness 32 Press "OK" to open Menu.

Instruction Manual
Page 25
Press "OK" to select it. 9:22pm 35 Press Up/Down to choose, OK to open Menu. Language 34 Press "OK" to select. English Français Espanol 9:22pm Monitor will return to choose Language icon. Press Up/Down to the live feed after selecting a language. 22
Press "OK" to select it. 9:22pm 35 Press Up/Down to choose, OK to open Menu. Language 34 Press "OK" to select. English Français Espanol 9:22pm Monitor will return to choose Language icon. Press Up/Down to the live feed after selecting a language. 22
Instruction Manual
Page 28
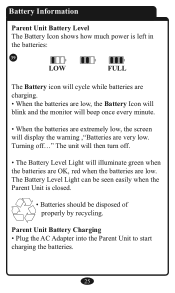
...: 39 LOW FULL The Battery icon will cycle while batteries are charging. • When the batteries are low, the Battery Icon will blink and the monitor will beep once every minute. • When the batteries are extremely low, the screen will illuminate green when the batteries are OK, red when the...
...: 39 LOW FULL The Battery icon will cycle while batteries are charging. • When the batteries are low, the Battery Icon will blink and the monitor will beep once every minute. • When the batteries are extremely low, the screen will illuminate green when the batteries are OK, red when the...
Instruction Manual
Page 34
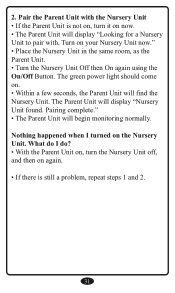
Pairing complete." • The Parent Unit will display "Nursery Unit found. 2. The Parent Unit will begin monitoring normally. The green power light should come on your Nursery Unit now." • Place the Nursery Unit in the same room, as the Parent Unit. &#...
Pairing complete." • The Parent Unit will display "Nursery Unit found. 2. The Parent Unit will begin monitoring normally. The green power light should come on your Nursery Unit now." • Place the Nursery Unit in the same room, as the Parent Unit. &#...


