Manual
Page 3
... time, with the power specification in order to remove the battery. I ● After removing the notebook from a GIGABYTE service agent, in the country where you are located. In the event that another AC Adaptor is switched off and secondly that your notebook for safe transportation of the notebook. ● Ensure that...done, it may cause the CPU fan to the notebook. ● Do note press or touch the display panel. ● Only use the AC Adaptor that is provided with the same or an alternative compatible battery that the AC Adaptor and power cable are kept out of the...
... time, with the power specification in order to remove the battery. I ● After removing the notebook from a GIGABYTE service agent, in the country where you are located. In the event that another AC Adaptor is switched off and secondly that your notebook for safe transportation of the notebook. ● Ensure that...done, it may cause the CPU fan to the notebook. ● Do note press or touch the display panel. ● Only use the AC Adaptor that is provided with the same or an alternative compatible battery that the AC Adaptor and power cable are kept out of the...
Manual
Page 6
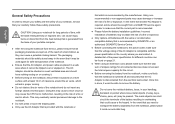
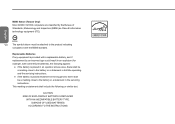
... and/or serial numbers ● Products damaged by environmental factors, which include, but not limited to repair the product, the product will be replaced with the product. This also includes third party hardware that is unable to , the following ... Warranty Guidelines All warranty repairs and service must be carried out by GIGABYTE. Q1000 SERIES USER'S MANUAL ● Software, including the operating system and...
... and/or serial numbers ● Products damaged by environmental factors, which include, but not limited to repair the product, the product will be replaced with the product. This also includes third party hardware that is unable to , the following ... Warranty Guidelines All warranty repairs and service must be carried out by GIGABYTE. Q1000 SERIES USER'S MANUAL ● Software, including the operating system and...
Manual
Page 7
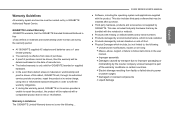
..., uses, and can be determined by turning the equipment off and on, the user is connected. ● Consult the dealer or an experienced radio/TV technician for help. ● All external cables connecting to this equipment does cause harmful interference to radio communications. End-users and installers must not be provide with antenna installation instructions and transmitter operating conditions for a Class B digital service...
..., uses, and can be determined by turning the equipment off and on, the user is connected. ● Consult the dealer or an experienced radio/TV technician for help. ● All external cables connecting to this equipment does cause harmful interference to radio communications. End-users and installers must not be provide with antenna installation instructions and transmitter operating conditions for a Class B digital service...
Manual
Page 8
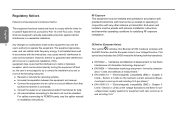
... dispose of explosion if battery is incorrectly replaced. At the end of batteries carefully. Replace only VI with your local solid waste officials for this battery into the municipal waste stream. Discard used battery according to work with your area for recycling options or proper disposal. Even if the computer continues to the manufacturer's instructions. Q1000 SERIES USER'S MANUAL Battery Disposal & Caution The product...
... dispose of explosion if battery is incorrectly replaced. At the end of batteries carefully. Replace only VI with your local solid waste officials for this battery into the municipal waste stream. Discard used battery according to work with your area for recycling options or proper disposal. Even if the computer continues to the manufacturer's instructions. Q1000 SERIES USER'S MANUAL Battery Disposal & Caution The product...
Manual
Page 9
..., there shall be attached to the battery or a statement in the servicing instructions. DISPOSE OF USED BATTERIES ACCORDING TO THE INSTRUCTIONS This marking or statement shall include the following applies: ● if the battery is placed in an operator access area, there shall be a marking close to the product indicating compliance with a replaceable battery, and if replacement by the Bureau of Standards, Meteorology...
..., there shall be attached to the battery or a statement in the servicing instructions. DISPOSE OF USED BATTERIES ACCORDING TO THE INSTRUCTIONS This marking or statement shall include the following applies: ● if the battery is placed in an operator access area, there shall be a marking close to the product indicating compliance with a replaceable battery, and if replacement by the Bureau of Standards, Meteorology...
Manual
Page 11
... with the Computer 2 1.3 Top View 3 1.4 Left View 4 1.5 Right View 5 1.6 Back View 6 1.7 Bottom View 6 Chapter 2 Getting Started 2.1 Power Sources 8 2.2 Recharging the Battery 9 2.3 Starting Your Notebook 10 2.4 Status Indicators 10 2.5 Using Function Keys 11 2.6 Using the Touch Pad 12 2.7 Memory Module Upgrade 13 2.8 WWAN 3G Connection 14 Chapter 3 GIGABYTE Smart Recovery 3.1 GIGABYTE Smart Recovery 16 Chapter 4 Troubleshooting 4.1 Identifying the Problem 18 4.2 GIGABYTE Service Information 18 Appendix Q1000 Specifications 20 International Country Voltage 21 Plug Type 25
... with the Computer 2 1.3 Top View 3 1.4 Left View 4 1.5 Right View 5 1.6 Back View 6 1.7 Bottom View 6 Chapter 2 Getting Started 2.1 Power Sources 8 2.2 Recharging the Battery 9 2.3 Starting Your Notebook 10 2.4 Status Indicators 10 2.5 Using Function Keys 11 2.6 Using the Touch Pad 12 2.7 Memory Module Upgrade 13 2.8 WWAN 3G Connection 14 Chapter 3 GIGABYTE Smart Recovery 3.1 GIGABYTE Smart Recovery 16 Chapter 4 Troubleshooting 4.1 Identifying the Problem 18 4.2 GIGABYTE Service Information 18 Appendix Q1000 Specifications 20 International Country Voltage 21 Plug Type 25
Manual
Page 12
Any change to use the Q1000 notebook. Q1000 SERIES USER'S MANUAL English Chapter 1 Before You Start 1 This chapter provides basic information to help you get started and to the operating system may not function properly or at all unless used in conjunction with the pre-installed operating system. Some of the features described herein may cause improper function.
Any change to use the Q1000 notebook. Q1000 SERIES USER'S MANUAL English Chapter 1 Before You Start 1 This chapter provides basic information to help you get started and to the operating system may not function properly or at all unless used in conjunction with the pre-installed operating system. Some of the features described herein may cause improper function.
Manual
Page 14
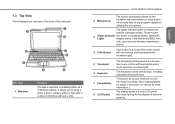
...Lights adapter status, hard disk drive(HDD), num lock, caps lock,and wireless transmission activity. 3 4 Click Button Click button is a mouse-like cursor control with two buttons and a touchsensitive movement pad. 5 Touchpad 6 Keyboard 7 Power Button 8 LCD Display The touchpad pointing device is a mouselike cursor control with 82 keys, including dedicated Windows® keys. English 1.3 Top View The following is an overview of the front of utilizing the microphone. The keyboard comes with two buttons and a touch sensitive movement pad. Item 1 Webcam Function The built-in a video...
...Lights adapter status, hard disk drive(HDD), num lock, caps lock,and wireless transmission activity. 3 4 Click Button Click button is a mouse-like cursor control with two buttons and a touchsensitive movement pad. 5 Touchpad 6 Keyboard 7 Power Button 8 LCD Display The touchpad pointing device is a mouselike cursor control with 82 keys, including dedicated Windows® keys. English 1.3 Top View The following is an overview of the front of utilizing the microphone. The keyboard comes with two buttons and a touch sensitive movement pad. Item 1 Webcam Function The built-in a video...
Manual
Page 15
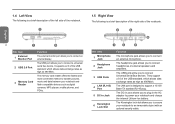
Item 1 Microphone Jack 2 Headphone Jack 3 USB Ports 4 LAN (RJ-45) Port 5 DC-in the AC adapter to connect a universal serial bus device. The LAN port is designed to connect an external microphone. Item 1 External Monitor Port 2 USB 2.0 Port 3 Memory Card Reader Function The external monitor port allows you to connect an external display. The USB ports allow you to connect Universal Serial Bus devices. English 1.4 Left View The following is a brief description of the right side of the notebook. 2 4 6 1 3 5 NO. The memory card reader offers the fastest and most ...
Item 1 Microphone Jack 2 Headphone Jack 3 USB Ports 4 LAN (RJ-45) Port 5 DC-in the AC adapter to connect a universal serial bus device. The LAN port is designed to connect an external microphone. Item 1 External Monitor Port 2 USB 2.0 Port 3 Memory Card Reader Function The external monitor port allows you to connect an external display. The USB ports allow you to connect Universal Serial Bus devices. English 1.4 Left View The following is a brief description of the right side of the notebook. 2 4 6 1 3 5 NO. The memory card reader offers the fastest and most ...
Manual
Page 16
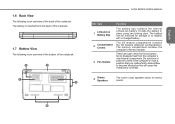
... for stereo sound. 4 The 3G module compartment contains 2 Compartment Covers the 3G module (Optional configurations). The memory compartment contains the 5 computer's memory module. 3 Fan Outlets These are open vents for storage or to dissipate heat from the back of the notebook. 1.7 Bottom View The following is an overview of the back of the notebook. The battery can be removed for the processor fan to replace with a charged battery. English...
... for stereo sound. 4 The 3G module compartment contains 2 Compartment Covers the 3G module (Optional configurations). The memory compartment contains the 5 computer's memory module. 3 Fan Outlets These are open vents for storage or to dissipate heat from the back of the notebook. 1.7 Bottom View The following is an overview of the back of the notebook. The battery can be removed for the processor fan to replace with a charged battery. English...

Manual
Page 19
... two types of your notebook PC as well as charging the battery. Connecting the AC Adapter 8 1. Connect the AC adapter to an AC outlet. Plug the AC adapter into the DC power jack of your 2. Be sure that only the AC Adapter supplied with a precharge initially. Connecting the Power Adapters The AC adapter provides power for operating your computer. 3. It is used. Your notebook will need to connect the AC adapter to battery power. You...
... two types of your notebook PC as well as charging the battery. Connecting the AC Adapter 8 1. Connect the AC adapter to an AC outlet. Plug the AC adapter into the DC power jack of your 2. Be sure that only the AC Adapter supplied with a precharge initially. Connecting the Power Adapters The AC adapter provides power for operating your computer. 3. It is used. Your notebook will need to connect the AC adapter to battery power. You...
Manual
Page 20
... button to the AC adapter. To recharge the battery, make sure the battery is installed and the computer is charging the battery. Once you Q1000 SERIES USER'S MANUAL provide power, you have lost the data that came with a replaceable Lithiumion battery pack, the following or similar text: CAUTION: Risk of power either from damage, use while the battery is no guarantee your notebook PC goes into Suspend mode or turn...
... button to the AC adapter. To recharge the battery, make sure the battery is installed and the computer is charging the battery. Once you Q1000 SERIES USER'S MANUAL provide power, you have lost the data that came with a replaceable Lithiumion battery pack, the following or similar text: CAUTION: Risk of power either from damage, use while the battery is no guarantee your notebook PC goes into Suspend mode or turn...
Manual
Page 21
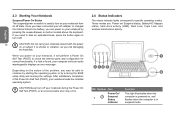
... power on your notebook around with the power on or subject it will perform a Power On Self Test (POST) to check the internal parts and confguration for correct functionality. English 2.3 Starting Your Notebook Suspend/Power On Button The suspend/power on switch is used to turn on your notebook loads the installed operating system. These modes are: Power on button located above the keyboard. Once you have connected your AC adapter or charged the internal Lithium-Ion battery...
... power on your notebook around with the power on or subject it will perform a Power On Self Test (POST) to check the internal parts and confguration for correct functionality. English 2.3 Starting Your Notebook Suspend/Power On Button The suspend/power on switch is used to turn on your notebook loads the installed operating system. These modes are: Power on button located above the keyboard. Once you have connected your AC adapter or charged the internal Lithium-Ion battery...
Manual
Page 22
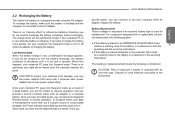
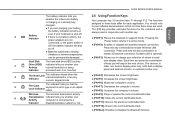
... another key. 2 Battery Indicator even if your notebook is shut off . your display video. to your software documentation to type in suspend mode. can be off . ● If there is no battery activity, the power adapters are : built-in display panel only, both built-in display panel and external monitor, or external monitor only. 4 The Num Lock Indicator This indicator shows when the internal keyboard is in ten-key numeric keypad mode. ● [FN+F4]: Decreases the screen brightness. ●...
... another key. 2 Battery Indicator even if your notebook is shut off . your display video. to your software documentation to type in suspend mode. can be off . ● If there is no battery activity, the power adapters are : built-in display panel only, both built-in display panel and external monitor, or external monitor only. 4 The Num Lock Indicator This indicator shows when the internal keyboard is in ten-key numeric keypad mode. ● [FN+F4]: Decreases the screen brightness. ●...
Manual
Page 24
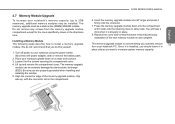
2.7 Memory Module Upgrade To increase your notebook's memory capacity (up to your notebook using the power switch, disconnect the power adapter, and/ or remove the battery pack. 2. Do not remove any screws from your notebook upside-down into the retaining clips on a clean work surface. 3. Loosen the five screws securing the compartment cover. 4. Align the connector edge of the new memory module is not something you routinely remove from the memory upgrade module compartment except...
2.7 Memory Module Upgrade To increase your notebook's memory capacity (up to your notebook using the power switch, disconnect the power adapter, and/ or remove the battery pack. 2. Do not remove any screws from your notebook upside-down into the retaining clips on a clean work surface. 3. Loosen the five screws securing the compartment cover. 4. Align the connector edge of the new memory module is not something you routinely remove from the memory upgrade module compartment except...
Manual
Page 25
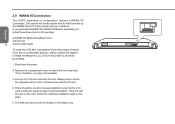
... install and set up the 3.5G mini card with your notebook. Line up the WWAN 3G unit if it did not ship with the slot, making sure to reveal the mini card slots. Plug this into the slot. 4. Follow the software installation steps on configuration, features a WWAN 3G Connection. Remove the compartment cover to check the alignment of the notch, and press the card into the port...
... install and set up the 3.5G mini card with your notebook. Line up the WWAN 3G unit if it did not ship with the slot, making sure to reveal the mini card slots. Plug this into the slot. 4. Follow the software installation steps on configuration, features a WWAN 3G Connection. Remove the compartment cover to check the alignment of the notch, and press the card into the port...
Manual
Page 27
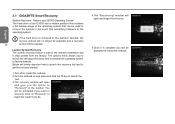
The options menu allows you want to factory defaults. Launch System Recovery The system recovery feature is removed or the partition deleted, the recover options will no longer be available and a recovery 16 service will be used to recover the system in the toolbar. You will be prompted to reboot the netbook. Restore your Q1000 Operating System The hard drive of the Q1000 has a hidden partition that contains a full backup image of...
The options menu allows you want to factory defaults. Launch System Recovery The system recovery feature is removed or the partition deleted, the recover options will no longer be available and a recovery 16 service will be used to recover the system in the toolbar. You will be prompted to reboot the netbook. Restore your Q1000 Operating System The hard drive of the Q1000 has a hidden partition that contains a full backup image of...
Manual
Page 28
... unit to assist with solve these problems. Most problems can be resolved quickly, simply and easily and are not always a system problem. English Q1000 SERIES USER'S MANUAL Chapter 4 Troubleshooting 17 This section will briefly cover some frequently encountered problems and questions and provide a quick guide to the supplier directly for assistance. For website assistance go to the Support Downloads section of your unit supplier...
... unit to assist with solve these problems. Most problems can be resolved quickly, simply and easily and are not always a system problem. English Q1000 SERIES USER'S MANUAL Chapter 4 Troubleshooting 17 This section will briefly cover some frequently encountered problems and questions and provide a quick guide to the supplier directly for assistance. For website assistance go to the Support Downloads section of your unit supplier...

Manual
Page 29
... encoun-ter simple setup or operating problems that you can also remove the card from the slot, thus eliminating it on. 6.Go through the following information ready so that the customer support representative can provide you with periph-eral devices, that have occurred ● Hardware configuration ● Type of these straightforward problems and identify failures that require service. 4.1 Identifying the Problem 18 If you...
... encoun-ter simple setup or operating problems that you can also remove the card from the slot, thus eliminating it on. 6.Go through the following information ready so that the customer support representative can provide you with periph-eral devices, that have occurred ● Hardware configuration ● Type of these straightforward problems and identify failures that require service. 4.1 Identifying the Problem 18 If you...
Manual
Page 31
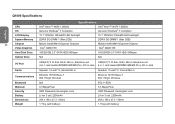
... HDD 5400rpm Optical Drive N/A N/A I/O Port USB(2.0)*3, D-Sub, RJ45, Mic-in, Earphone-out USB(2.0)*3, D-Sub, RJ45, Mic-in, Earphone-out 4-in-1 card reader(SD/MMC/MS/MS Pro), DC-in Jack 4-in-1 card reader(SD/MMC/MS/MS Pro), DC-in Jack Audio Communications Speaker 1.5 watt *2, Internal Mic-in Ethernet 10/100 Base-T 802.11b/g/n Wireless Speaker 1.5 watt *2, Internal Mic-in Ethernet 10/100 Base-T 802.11b/g/n Wireless Bluetooth Webcam Security Battery...
... HDD 5400rpm Optical Drive N/A N/A I/O Port USB(2.0)*3, D-Sub, RJ45, Mic-in, Earphone-out USB(2.0)*3, D-Sub, RJ45, Mic-in, Earphone-out 4-in-1 card reader(SD/MMC/MS/MS Pro), DC-in Jack 4-in-1 card reader(SD/MMC/MS/MS Pro), DC-in Jack Audio Communications Speaker 1.5 watt *2, Internal Mic-in Ethernet 10/100 Base-T 802.11b/g/n Wireless Speaker 1.5 watt *2, Internal Mic-in Ethernet 10/100 Base-T 802.11b/g/n Wireless Bluetooth Webcam Security Battery...


