
Manual
Page 1
... this graphics card. The author assumes no responsibility for home and other intellectual property rights. Trademarks Third-party brands and names are the properties of this manual. No part of this manual may void the warranty of their respective owners. GV-R567D5-512I/ GV-R567HM-1GI/ GV-R567ZL-1GI/ GV-R567OC-1GI / rev1.0/1.1 GV-R567OC-1GI rev2.0 ATI RadeonTM HD 5670 Graphics Accelerator User's Manual Rev. 201 12MM-R567OGI-201R Copyright © 2010 GIGABYTE TECHNOLOGY...
... this graphics card. The author assumes no responsibility for home and other intellectual property rights. Trademarks Third-party brands and names are the properties of this manual. No part of this manual may void the warranty of their respective owners. GV-R567D5-512I/ GV-R567HM-1GI/ GV-R567ZL-1GI/ GV-R567OC-1GI / rev1.0/1.1 GV-R567OC-1GI rev2.0 ATI RadeonTM HD 5670 Graphics Accelerator User's Manual Rev. 201 12MM-R567OGI-201R Copyright © 2010 GIGABYTE TECHNOLOGY...
Manual
Page 7
... memory • Supports DirectX 11 • Supports CrossFireXTM • Supports 1 Dual-Link DVI-I connector • Supports 1 D-Sub connector • Supports 1 HDMI connector 1.2. The power supply should be with a known brand and certified to conform to safety regulations. (For the list of certified power supplies, go to dynamically share the available system memory. 1. Two GV-R567D5-512I/GV-R567HM-1GI/GV-R567ZL-1GI/GV-R567OC-1GI rev1.0/1.1/ GV-R567OC-1GI rev2.0 - The total effective VGA memory differs depending on using this graphics card as part...
... memory • Supports DirectX 11 • Supports CrossFireXTM • Supports 1 Dual-Link DVI-I connector • Supports 1 D-Sub connector • Supports 1 HDMI connector 1.2. The power supply should be with a known brand and certified to conform to safety regulations. (For the list of certified power supplies, go to dynamically share the available system memory. 1. Two GV-R567D5-512I/GV-R567HM-1GI/GV-R567ZL-1GI/GV-R567OC-1GI rev1.0/1.1/ GV-R567OC-1GI rev2.0 - The total effective VGA memory differs depending on using this graphics card as part...

Manual
Page 11
3. Hardware Installation GV-R567ZL-1GI CrossFire Connector HDMI Connector D-Sub monitor Connector (15-pin) DVI-I Connector HDMI TV HDMI TV or D-Sub Output Analog LCD Monitor Analog CRT Monitor DVI Output Digital LCD Monitor or Analog LCD Monitor Analog Monitor D-Sub Output DVI-I to D-Sub Adapter HDMI Connector D-Sub monitor Connector (15-pin) DVI-I Connector - 11 -
3. Hardware Installation GV-R567ZL-1GI CrossFire Connector HDMI Connector D-Sub monitor Connector (15-pin) DVI-I Connector HDMI TV HDMI TV or D-Sub Output Analog LCD Monitor Analog CRT Monitor DVI Output Digital LCD Monitor or Analog LCD Monitor Analog Monitor D-Sub Output DVI-I to D-Sub Adapter HDMI Connector D-Sub monitor Connector (15-pin) DVI-I Connector - 11 -

Manual
Page 12
GV-R567OC-1GI (rev1.1/rev1.0) CrossFire Connector HDMI Connector D-Sub monitor Connector (15-pin) DVI-I Connector HDMI TV HDMI TV or D-Sub Output Analog LCD Monitor Analog CRT Monitor DVI Output Digital LCD Monitor or Analog LCD Monitor Analog Monitor D-Sub Output DVI-I to D-Sub Adapter HDMI Connector D-Sub monitor Connector (15-pin) DVI-I Connector GV-R567 Series Graphics Accelerator - 12 - 4.
GV-R567OC-1GI (rev1.1/rev1.0) CrossFire Connector HDMI Connector D-Sub monitor Connector (15-pin) DVI-I Connector HDMI TV HDMI TV or D-Sub Output Analog LCD Monitor Analog CRT Monitor DVI Output Digital LCD Monitor or Analog LCD Monitor Analog Monitor D-Sub Output DVI-I to D-Sub Adapter HDMI Connector D-Sub monitor Connector (15-pin) DVI-I Connector GV-R567 Series Graphics Accelerator - 12 - 4.
Manual
Page 14
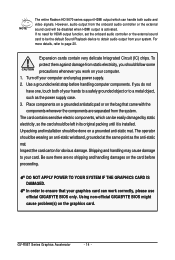
... both audio and video signals. Using non-official GIGABYTE BIOS might cause problem(s) on a grounded anti-static mat. Expansion cards contain very delicate Integrated Circuit (IC) chips. Use a grounded wrist strap before proceeding. The operator should be the default Sound Playback device to obtain audio output from static electricity, you should be done on the graphics card. GV-R567 Series Graphics Accelerator - 14 - If you work correctly, please use official GIGABYTE BIOS...
... both audio and video signals. Using non-official GIGABYTE BIOS might cause problem(s) on a grounded anti-static mat. Expansion cards contain very delicate Integrated Circuit (IC) chips. Use a grounded wrist strap before proceeding. The operator should be the default Sound Playback device to obtain audio output from static electricity, you should be done on the graphics card. GV-R567 Series Graphics Accelerator - 14 - If you work correctly, please use official GIGABYTE BIOS...
Manual
Page 15
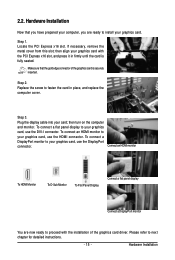
.... Connect an HDMI monitor To HDMI Monitor To D-Sub Monitor To Flat Panel Display Connect a flat panel display Connect a DisplayPort monitor You are ready to fasten the card in firmly until the card is securely inserted. Step 1. To connect an HDMI monitor to your graphics card, use the HDMI connector. Hardware Installation then turn on the computer and monitor. To connect a DisplayPort monitor to next chapter for detailed instructions. - 15 - 2.2. Please refer to your graphics card. Replace the screw to install your graphics card, use the DVI-I connector...
.... Connect an HDMI monitor To HDMI Monitor To D-Sub Monitor To Flat Panel Display Connect a flat panel display Connect a DisplayPort monitor You are ready to fasten the card in firmly until the card is securely inserted. Step 1. To connect an HDMI monitor to your graphics card, use the HDMI connector. Hardware Installation then turn on the computer and monitor. To connect a DisplayPort monitor to next chapter for detailed instructions. - 15 - 2.2. Please refer to your graphics card. Replace the screw to install your graphics card, use the DVI-I connector...

Manual
Page 16
...) Figure 1 Step 2: After installing graphics card driver in operating system, when an ATI CrossFireX configuration is detected for the first time by the ATI Catalyst display driver, ATI CrossFireX support is automatically enabled, and the best possible GPU combination is not enabled, access the ATI Catalyst Control Center (please refer to Page 15). Two CrossFire bridge interconnect cables. From the ATI Catalyst Control Center, enter the CrossFireX menu and assure to enable the ATI CrossFireXTM technology?
...) Figure 1 Step 2: After installing graphics card driver in operating system, when an ATI CrossFireX configuration is detected for the first time by the ATI Catalyst display driver, ATI CrossFireX support is automatically enabled, and the best possible GPU combination is not enabled, access the ATI Catalyst Control Center (please refer to Page 15). Two CrossFire bridge interconnect cables. From the ATI Catalyst Control Center, enter the CrossFireX menu and assure to enable the ATI CrossFireXTM technology?

Manual
Page 17
... driver disk into your system has installed the appropriate motherboard drivers (for the motherboard drivers, please contact the motherboard manufacturer.) 3.1. Driver and Utility Installation 3.1.1. Make sure your optical drive. Step 3: Click the Install button. Users who run Windows XP with Service Pack 2 or above do not need to My Computer, double-click the optical drive and execute the setup.exe program.) Step 1: Click the Install Display Driver item. Software Installation Notice the following guidelines before installing...
... driver disk into your system has installed the appropriate motherboard drivers (for the motherboard drivers, please contact the motherboard manufacturer.) 3.1. Driver and Utility Installation 3.1.1. Make sure your optical drive. Step 3: Click the Install button. Users who run Windows XP with Service Pack 2 or above do not need to My Computer, double-click the optical drive and execute the setup.exe program.) Step 1: Click the Install Display Driver item. Software Installation Notice the following guidelines before installing...

Manual
Page 18
Setp 4: Click the Express or Custom icon and then click Next. GV-R567 Series Graphics Accelerator - 18 - The system is completed. Then the driver installation is installing the components. Step 5: Click the Accept button. Step 6: Click the Finish button to restart the computer.
Setp 4: Click the Express or Custom icon and then click Next. GV-R567 Series Graphics Accelerator - 18 - The system is completed. Then the driver installation is installing the components. Step 5: Click the Accept button. Step 6: Click the Finish button to restart the computer.

Manual
Page 20
Step 1: Go to be the default Sound Playback device, select Digital Output Device (HDMI). GV-R567 Series Graphics Accelerator - 20 - Using the picture to the left as the example, to set HDMI audio to Start > Control Panel > Hardware and Sound > Manage audio devices. Figure 1 Figure 2 Figure 3 Step 2: In the Manage audio devices dialog box, click the Playback tab. Otherwise, select Digital Output Device (SPDIF), which is the onboard audio controller. Configuring Audio Output Configure the default audio output device based upon your needs.
Step 1: Go to be the default Sound Playback device, select Digital Output Device (HDMI). GV-R567 Series Graphics Accelerator - 20 - Using the picture to the left as the example, to set HDMI audio to Start > Control Panel > Hardware and Sound > Manage audio devices. Figure 1 Figure 2 Figure 3 Step 2: In the Manage audio devices dialog box, click the Playback tab. Otherwise, select Digital Output Device (SPDIF), which is the onboard audio controller. Configuring Audio Output Configure the default audio output device based upon your needs.
Manual
Page 21
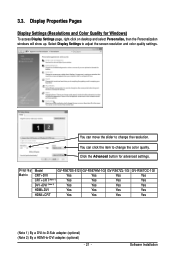
... desktop and select Personalize, then the Personalization windows will show up. Display Matrix Model GV-R567D5-512I GV-R567HM-1GI GV-R567ZL-1GI GV-R567OC-1GI CRT+DVI Yes Yes Yes Yes CRT+CRT(Note 1) Yes Yes Yes Yes DVI +DVI (Note 2) Yes Yes Yes Yes HDMI+DVI Yes Yes Yes Yes HDMI+CRT Yes Yes Yes Yes (Note 1) By a DVI-to-D-Sub adapter.(optional) (Note 2) By a HDMI-to change the resolution. Software Installation Display Properties Pages Display Settings (Resolutions and Color Quality for advanced settings...
... desktop and select Personalize, then the Personalization windows will show up. Display Matrix Model GV-R567D5-512I GV-R567HM-1GI GV-R567ZL-1GI GV-R567OC-1GI CRT+DVI Yes Yes Yes Yes CRT+CRT(Note 1) Yes Yes Yes Yes DVI +DVI (Note 2) Yes Yes Yes Yes HDMI+DVI Yes Yes Yes Yes HDMI+CRT Yes Yes Yes Yes (Note 1) By a DVI-to-D-Sub adapter.(optional) (Note 2) By a HDMI-to change the resolution. Software Installation Display Properties Pages Display Settings (Resolutions and Color Quality for advanced settings...

Manual
Page 22
... converted. ATI Catalyst® Control Center Basic View : The Basic View is the default view when ATI Catalyst Control Center is launched for step-by-step assistance. „ Avivo Video Converter This wizard assists you to convert videos from the central list and click Go for the first time. To access more settings in Basic View, click Basic, and then click Next. GV-R567 Series Graphics Accelerator - 22...
... converted. ATI Catalyst® Control Center Basic View : The Basic View is the default view when ATI Catalyst Control Center is launched for step-by-step assistance. „ Avivo Video Converter This wizard assists you to convert videos from the central list and click Go for the first time. To access more settings in Basic View, click Basic, and then click Next. GV-R567 Series Graphics Accelerator - 22...
Manual
Page 23
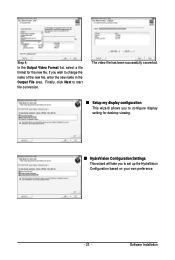
If you to set up the HydraVision Configuration based on your own preference. - 23 - The video file has been successfully converted. „ Setup my display configuration This wizard allows you to configure display setting for the new file. Finally, click Next to start file conversion. Step 4: In the Output Video Format list, select a file format for desktop viewing. „ HydraVision Configuration Settings This wizard will take you wish to change the name of the new file, enter the new name in the Output File area. Software Installation
If you to set up the HydraVision Configuration based on your own preference. - 23 - The video file has been successfully converted. „ Setup my display configuration This wizard allows you to configure display setting for the new file. Finally, click Next to start file conversion. Step 4: In the Output Video Format list, select a file format for desktop viewing. „ HydraVision Configuration Settings This wizard will take you wish to change the name of the new file, enter the new name in the Output File area. Software Installation
Manual
Page 24
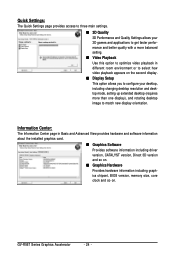
... card. „ Graphics Software Provides software information including driver version, CATALYST version, Direct 3D version and so on. „ Graphics Hardware Provides hardware information including graphics chipset, BIOS version, memory size, core clock and so on the second display. „ Display Setup This option allows you to configure your desktop, including changing desktop resolution and desktop mode, setting up extended desktop (requires more than one display), and rotating desktop image to match new display orientation. GV-R567 Series Graphics Accelerator - 24 - Information Center...
... card. „ Graphics Software Provides software information including driver version, CATALYST version, Direct 3D version and so on. „ Graphics Hardware Provides hardware information including graphics chipset, BIOS version, memory size, core clock and so on the second display. „ Display Setup This option allows you to configure your desktop, including changing desktop resolution and desktop mode, setting up extended desktop (requires more than one display), and rotating desktop image to match new display orientation. GV-R567 Series Graphics Accelerator - 24 - Information Center...

Manual
Page 26
...; Enable System Tray Menu „ Select a Language ... „ Restore Factory Defaults ... Note: A profile applies to restore defaults, change skins, and update the Catalyst Control Center. GV-R567 Series Graphics Accelerator - 26 - Preferences Properties: The Preferences page helps to a specific graphics card. Profiles Properties: You can be quickly activated manually, through a Hotkey, or by file association. Define and save your own personal video settings that can use profiles to create customized environments for your computer, you need...
...; Enable System Tray Menu „ Select a Language ... „ Restore Factory Defaults ... Note: A profile applies to restore defaults, change skins, and update the Catalyst Control Center. GV-R567 Series Graphics Accelerator - 26 - Preferences Properties: The Preferences page helps to a specific graphics card. Profiles Properties: You can be quickly activated manually, through a Hotkey, or by file association. Define and save your own personal video settings that can use profiles to create customized environments for your computer, you need...
Manual
Page 28
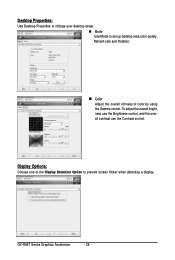
Desktop Properties: Use Desktop Properties to change your desktop setup. „ Mode Use Mode to set up desktop area,color quality, Refresh rate and Rotation. „ Color Adjust the overall richness of the Display Detection Option to prevent screen flicker when detecting a display. GV-R567 Series Graphics Accelerator - 28 - Display Options: Choose one of color by using the Gamma control. To adjust the overall brightness use the Brightness control, and the overall contrast use the Contrast control.
Desktop Properties: Use Desktop Properties to change your desktop setup. „ Mode Use Mode to set up desktop area,color quality, Refresh rate and Rotation. „ Color Adjust the overall richness of the Display Detection Option to prevent screen flicker when detecting a display. GV-R567 Series Graphics Accelerator - 28 - Display Options: Choose one of color by using the Gamma control. To adjust the overall brightness use the Brightness control, and the overall contrast use the Contrast control.

Manual
Page 29
... can simultaneously adjust all of the standard 3D settings for any type of how to configure anti-aliasing, use an overall adjustment control that rapidly configures your application uses, or when you to adjust for each pixel by sampling a single location at the pixel's center, anti-aliasing samples multiple locations within each pixel and blends the results together to display for overall...
... can simultaneously adjust all of the standard 3D settings for any type of how to configure anti-aliasing, use an overall adjustment control that rapidly configures your application uses, or when you to adjust for each pixel by sampling a single location at the pixel's center, anti-aliasing samples multiple locations within each pixel and blends the results together to display for overall...

Manual
Page 32
... fine tune the color of the video presets. Note: This page is only for video playback. GV-R567 Series Graphics Accelerator - 32 - Note: These settings will only affect applications with video overlay support. „ Basic Color Use the Avivo Color: Basic option to remove excess red from skin tones. Note: Certain video formats do not support these adjustments. AvivoTM Video: „ Presets To quickly adjust your changes before applying them...
... fine tune the color of the video presets. Note: This page is only for video playback. GV-R567 Series Graphics Accelerator - 32 - Note: These settings will only affect applications with video overlay support. „ Basic Color Use the Avivo Color: Basic option to remove excess red from skin tones. Note: Certain video formats do not support these adjustments. AvivoTM Video: „ Presets To quickly adjust your changes before applying them...

Manual
Page 33
... form. Finally, Overdrive can control the deinterlacing settings by dynamically and safely overclocking the graphics processor and memory. Once your specific requirements. Note: These settings will only affect applications with video overlay support. „ All Settings The All Settings page combines all of the principal Video features onto a single page, without any preview window, allowing quick access and adjustment. Software Installation This page is useful when it is already...
... form. Finally, Overdrive can control the deinterlacing settings by dynamically and safely overclocking the graphics processor and memory. Once your specific requirements. Note: These settings will only affect applications with video overlay support. „ All Settings The All Settings page combines all of the principal Video features onto a single page, without any preview window, allowing quick access and adjustment. Software Installation This page is useful when it is already...
Manual
Page 34
... the monitor's manual.) GV-R567 Series Graphics Accelerator - 34 - For more advanced troubleshooting information. „ Check that the card is seated properly in the PCI Express x16 slot. „ Ensure that the display cable is securely fastened to the card's display connector. „ Make sure that the monitor and computer are not able to find the desired monitor color/resolution settings: The color and screen resolution options available for selection depend on your motherboard.
... the monitor's manual.) GV-R567 Series Graphics Accelerator - 34 - For more advanced troubleshooting information. „ Check that the card is seated properly in the PCI Express x16 slot. „ Ensure that the display cable is securely fastened to the card's display connector. „ Make sure that the monitor and computer are not able to find the desired monitor color/resolution settings: The color and screen resolution options available for selection depend on your motherboard.


