Manual
Page 3
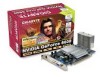
...to update the information contained herein. Trademarks Third-party brands and names are the property of their respective owners. Copyright © 2005 GIGABYTE TECHNOLOGY CO., LTD Copyright by GIGA-BYTE TECHNOLOGY CO., LTD. ("GBT"). The author assumes no responsibility for the recycling of waste electrical... without the expressed, written permission of GBT. No part of this manual may be reproduced or transmitted in European Union's member states. GV-NX66128DP GeForce™ 6600 Graphics Accelerator User's Manual Rev. 101 12MD-NX661SI-101R * The WEEE marking on VGA card, this may void ...
...to update the information contained herein. Trademarks Third-party brands and names are the property of their respective owners. Copyright © 2005 GIGABYTE TECHNOLOGY CO., LTD Copyright by GIGA-BYTE TECHNOLOGY CO., LTD. ("GBT"). The author assumes no responsibility for the recycling of waste electrical... without the expressed, written permission of GBT. No part of this manual may be reproduced or transmitted in European Union's member states. GV-NX66128DP GeForce™ 6600 Graphics Accelerator User's Manual Rev. 101 12MD-NX661SI-101R * The WEEE marking on VGA card, this may void ...

Manual
Page 4
... 5.1.2. Minimum system requirement 3 2. Windows® XP driver and utilities installation 8 3.1.1. Operating system requirement 8 3.1.2. Appendix 28 5.1. Resolutions and Color Depth Table (In Windows® XP 29 GV-NX66128DP Graphics Accelerator - 2 - Display properties pages 17 3.1.7. Troubleshooting Tips 27 5. Board Layout 4 2.2. DirectX installation ...8 3.1.3. Windows® 2000 driver installation 26 4. Reflash BIOS in Windows mode 28...
... 5.1.2. Minimum system requirement 3 2. Windows® XP driver and utilities installation 8 3.1.1. Operating system requirement 8 3.1.2. Appendix 28 5.1. Resolutions and Color Depth Table (In Windows® XP 29 GV-NX66128DP Graphics Accelerator - 2 - Display properties pages 17 3.1.7. Troubleshooting Tips 27 5. Board Layout 4 2.2. DirectX installation ...8 3.1.3. Windows® 2000 driver installation 26 4. Reflash BIOS in Windows mode 28...
Manual
Page 5
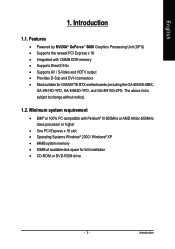
...; One PCI Express x 16 slot • Operating Systems Windows® 2000 / Windows® XP • 64MB system memory • 50MB of available disk space for GIGABYTE BTX motherboards (including the GA-8I945G-MBX, GA-8I915D-YFD, GA-8I945D-YFD, and GA-8I915G-ZFD. English 1. Introduction
...; One PCI Express x 16 slot • Operating Systems Windows® 2000 / Windows® XP • 64MB system memory • 50MB of available disk space for GIGABYTE BTX motherboards (including the GA-8I945G-MBX, GA-8I915D-YFD, GA-8I945D-YFD, and GA-8I915G-ZFD. English 1. Introduction
Manual
Page 7
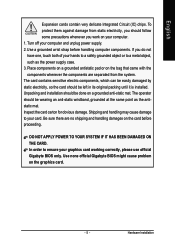
... power supply. 2. Unpacking and installation should be wearing an anti-static wristband, grounded at the same point as the power supply case. 3. Use none official Gigabyte BIOS might cause problem on the card before handling computer components. The operator should be left in its original packing until it is installed. In...
... power supply. 2. Unpacking and installation should be wearing an anti-static wristband, grounded at the same point as the power supply case. 3. Use none official Gigabyte BIOS might cause problem on the card before handling computer components. The operator should be left in its original packing until it is installed. In...
Manual
Page 8
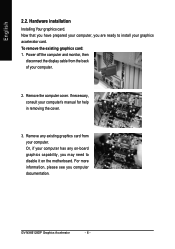
... card. Power off the computer and monitor, then disconnect the display cable from your computer. Remove the computer cover. To remove the existing graphics card: 1. GV-NX66128DP Graphics Accelerator - 6 - If necessary, consult your computer, you computer documentation. Or, if your computer has any existing graphics card from the back of your graphics...
... card. Power off the computer and monitor, then disconnect the display cable from your computer. Remove the computer cover. To remove the existing graphics card: 1. GV-NX66128DP Graphics Accelerator - 6 - If necessary, consult your computer, you computer documentation. Or, if your computer has any existing graphics card from the back of your graphics...
Manual
Page 9
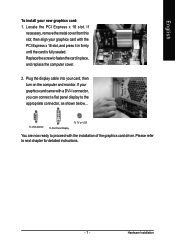
If your new graphics card: 1. Please refer to fasten the card in firmly until the card is fully seated. Hardware Installation To VGA Monitor To Flat Panel Display To TV or VCR You are now ready to proceed with a DVI-I connector, you can connect a flat panel display to the appropriate connector, as shown below... then align your card; Plug the display cable into your graphics card with the PCI Express x 16 slot, and press it in place, and replace the computer cover. 2. English To install your graphics card came with the installation of the graphics card driver. ...
If your new graphics card: 1. Please refer to fasten the card in firmly until the card is fully seated. Hardware Installation To VGA Monitor To Flat Panel Display To TV or VCR You are now ready to proceed with a DVI-I connector, you can connect a flat panel display to the appropriate connector, as shown below... then align your card; Plug the display cable into your graphics card with the PCI Express x 16 slot, and press it in place, and replace the computer cover. 2. English To install your graphics card came with the installation of the graphics card driver. ...

Manual
Page 10
...; 2000 or Windows® XP to be Drive D: The installation of SIS or VIA chipsets, please install the appropriate driver program for motherboard driver. 3.1.2. Windows® XP driver and utilities installation 3.1.1. When autorun window show up , click the Install DirectX 9 item. GV-NX66128DP Graphics Accelerator - 8 - Then you must install DirectX first. DirectX installation...
...; 2000 or Windows® XP to be Drive D: The installation of SIS or VIA chipsets, please install the appropriate driver program for motherboard driver. 3.1.2. Windows® XP driver and utilities installation 3.1.1. When autorun window show up , click the Install DirectX 9 item. GV-NX66128DP Graphics Accelerator - 8 - Then you must install DirectX first. DirectX installation...

Manual
Page 11
Choose I accept the agreement and click the "Next" button. Step 4. Then the DirectX 9 installation is completed. - 9 - Click "Finish" to restart computer. Software Installation English Step 2. Click the "Next" button. Installing the components. Step 3.
Choose I accept the agreement and click the "Next" button. Step 4. Then the DirectX 9 installation is completed. - 9 - Click "Finish" to restart computer. Software Installation English Step 2. Click the "Next" button. Installing the components. Step 3.
Manual
Page 12
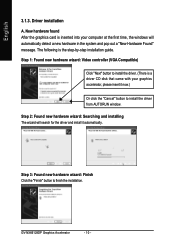
.... (There is the step-by-step installation guide. New hardware found After the graphics card is inserted into your graphics accelerator, please insert it automatically. GV-NX66128DP Graphics Accelerator - 10 -
.... (There is the step-by-step installation guide. New hardware found After the graphics card is inserted into your graphics accelerator, please insert it automatically. GV-NX66128DP Graphics Accelerator - 10 -
Manual
Page 13
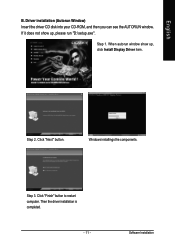
When autorun window show up , click Install Display Driver item. If it does not show up , please run "D:\setup.exe". Step 2. Step 1. Software Installation Click "Next" button. Then the driver installation is completed. - 11 - Windows installings the components. Step 3. Driver installation (Autorun Window) Insert the driver CD disk into your CD-ROM, and then you can see the AUTORUN window. Click "Finish" button to restart computer. English B.
When autorun window show up , click Install Display Driver item. If it does not show up , please run "D:\setup.exe". Step 2. Step 1. Software Installation Click "Next" button. Then the driver installation is completed. - 11 - Windows installings the components. Step 3. Driver installation (Autorun Window) Insert the driver CD disk into your CD-ROM, and then you can see the AUTORUN window. Click "Finish" button to restart computer. English B.
Manual
Page 14
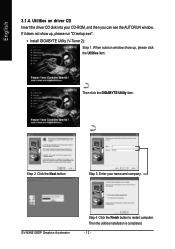
Utilities on driver CD Insert the driver CD disk into your name and company. Click the Next button. When autorun window show up , please click the Utilities item. Click the Finish button to restart computer. Step 3. GV-NX66128DP Graphics Accelerator Step 4. Then click the GIGABYTE Utility item. Step 2. If it does not show up , please run "D:\setup.exe". • Install GIGABYTE Utility (V-Tuner 2): Step 1. Enter your CD-ROM, and then you can see the AUTORUN window. Then the utilities installation is completed. - 12 - English 3.1.4.
Utilities on driver CD Insert the driver CD disk into your name and company. Click the Next button. When autorun window show up , please click the Utilities item. Click the Finish button to restart computer. Step 3. GV-NX66128DP Graphics Accelerator Step 4. Then click the GIGABYTE Utility item. Step 2. If it does not show up , please run "D:\setup.exe". • Install GIGABYTE Utility (V-Tuner 2): Step 1. Enter your CD-ROM, and then you can see the AUTORUN window. Then the utilities installation is completed. - 12 - English 3.1.4.
Manual
Page 15
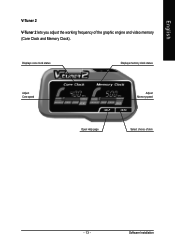
English V-Tuner 2 V-Tuner 2 lets you adjust the working frequency of skin - 13 - Software Installation Displays core clock status Displays memory clock status Adjust Core speed Adjust Memory speed Open Help page Select choice of the graphic engine and video memory (Core Clock and Memory Clock).
English V-Tuner 2 V-Tuner 2 lets you adjust the working frequency of skin - 13 - Software Installation Displays core clock status Displays memory clock status Adjust Core speed Adjust Memory speed Open Help page Select choice of the graphic engine and video memory (Core Clock and Memory Clock).

Manual
Page 16
... about the graphics accelerator, latest drivers, and other functions. GV-NX66128DP Graphics Accelerator - 14 - English 3.1.5. You can link to change your display settings. Right-clicking this icon opens the GIGABYTE control panel, showing a menu composed of shortcut of the display drivers, you will find a GIGABYTE icon on the taskbar's status area. Click Advanced after...
... about the graphics accelerator, latest drivers, and other functions. GV-NX66128DP Graphics Accelerator - 14 - English 3.1.5. You can link to change your display settings. Right-clicking this icon opens the GIGABYTE control panel, showing a menu composed of shortcut of the display drivers, you will find a GIGABYTE icon on the taskbar's status area. Click Advanced after...
Manual
Page 17
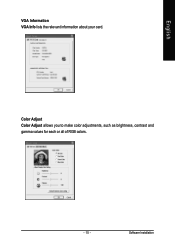
Color Adjust Color Adjust allows you to make color adjustments, such as brightness, contrast and gamma values for each or all of RGB colors. - 15 - Software Installation English VGA Information VGA Info lists the relevant information about your card.
Color Adjust Color Adjust allows you to make color adjustments, such as brightness, contrast and gamma values for each or all of RGB colors. - 15 - Software Installation English VGA Information VGA Info lists the relevant information about your card.

Manual
Page 18
GV-NX66128DP Graphics Accelerator - 16 - You can adjust the properties of the display drivers, you will find a NVIDIA icon on the taskbar's status area. Right click the icon. Click this icon to open the control panel. English After installation of the graphics accelerator from here.
GV-NX66128DP Graphics Accelerator - 16 - You can adjust the properties of the display drivers, you will find a NVIDIA icon on the taskbar's status area. Right click the icon. Click this icon to open the control panel. English After installation of the graphics accelerator from here.
Manual
Page 19
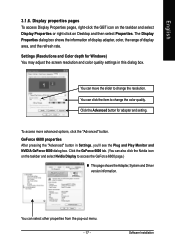
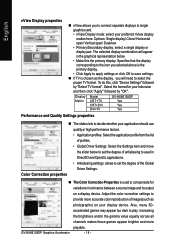
You can also click the Nvidia icon on Desktop and then select Properties. Software Installation English 3.1.6. Display properties pages To access Display Properties pages, right-click the GBT icon on the taskbar and select Display Properties or right-click on the taskbar and select Nvidia Display to access the GeForce 6600 page.) „ This page shows theAdapter, System and Driver version information. You can move the slider to change the resolution. Click the GeForce 6600 tab. (You can select other properties from the pop-out menu. - 17 - Click the Advanced button for ...
You can also click the Nvidia icon on Desktop and then select Properties. Software Installation English 3.1.6. Display properties pages To access Display Properties pages, right-click the GBT icon on the taskbar and select Display Properties or right-click on the taskbar and select Nvidia Display to access the GeForce 6600 page.) „ This page shows theAdapter, System and Driver version information. You can move the slider to change the resolution. Click the GeForce 6600 tab. (You can select other properties from the pop-out menu. - 17 - Click the Advanced button for ...
Manual
Page 20
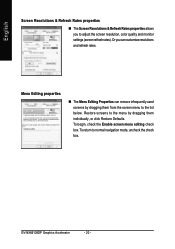
Display Matrix Model CRT+TV CRT+DVI DVI+TV GV-NX66128DP Yes Yes Yes Performance and Quality Settings properties „ The sliders lets to decide whether your television and then click "Apply" followed by "Select TV ...: Select the Settings item and move the slider below . • Make this , click "Device Settings" followed by "OK". Adjust the color correction settings to play. GV-NX66128DP Graphics Accelerator - 18 - Increasing the brightness and/or the gamma value equally across all channels makes these games appear brighter and more accurate color reproduction...
Display Matrix Model CRT+TV CRT+DVI DVI+TV GV-NX66128DP Yes Yes Yes Performance and Quality Settings properties „ The sliders lets to decide whether your television and then click "Apply" followed by "Select TV ...: Select the Settings item and move the slider below . • Make this , click "Device Settings" followed by "OK". Adjust the color correction settings to play. GV-NX66128DP Graphics Accelerator - 18 - Increasing the brightness and/or the gamma value equally across all channels makes these games appear brighter and more accurate color reproduction...
Manual
Page 21
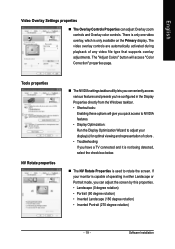
English Video Overlay Settings properties „ The Overlay Controls Properties can adjust the screen by this properties. • Landscape (0 degree rotation) • Portrait (90 degree rotation) • Inverted Landscape (180 degree rotation) • Inverted Portrait (270 degree rotation) - 19 - Tools properties NV Rotate properties „ The NVIDIA settings taskbar utility lets you conveniently access various features and presets you've configured in either Landscape or Portrait mode, you have a TV connected and it is not being detected, select the check box below. „ The NV ...
English Video Overlay Settings properties „ The Overlay Controls Properties can adjust the screen by this properties. • Landscape (0 degree rotation) • Portrait (90 degree rotation) • Inverted Landscape (180 degree rotation) • Inverted Portrait (270 degree rotation) - 19 - Tools properties NV Rotate properties „ The NVIDIA settings taskbar utility lets you conveniently access various features and presets you've configured in either Landscape or Portrait mode, you have a TV connected and it is not being detected, select the check box below. „ The NV ...
Manual
Page 22
GV-NX66128DP Graphics Accelerator - 20 - Menu Editing properties „ The Menu Editing Properties can customize resolutions and refresh rates. Or you to the menu by dragging them ...
GV-NX66128DP Graphics Accelerator - 20 - Menu Editing properties „ The Menu Editing Properties can customize resolutions and refresh rates. Or you to the menu by dragging them ...
Manual
Page 23
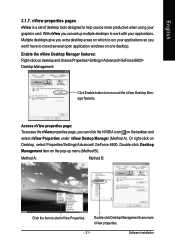
English 3.1.7. Or right-click on all the nView Desktop Manager features. Method A: Method B: Click the item to help you can set up menu (Method B). Enable the nView Desktop Manager features: Right-click on desktop and choose Properties>Settings>Advanced>GeForce 6600> Desktop Management Click Enable button to turn on Desktop, select Properties/Settings/Advanced/ GeForce 6600. Multiple desktops give you extra desktop areas on one desktop. Double-click Desktop Management to work with your graphics card. With nView you won't have to crowd several open application windows on...
English 3.1.7. Or right-click on all the nView Desktop Manager features. Method A: Method B: Click the item to help you can set up menu (Method B). Enable the nView Desktop Manager features: Right-click on desktop and choose Properties>Settings>Advanced>GeForce 6600> Desktop Management Click Enable button to turn on Desktop, select Properties/Settings/Advanced/ GeForce 6600. Multiple desktops give you extra desktop areas on one desktop. Double-click Desktop Management to work with your graphics card. With nView you won't have to crowd several open application windows on...