Manual
Page 4
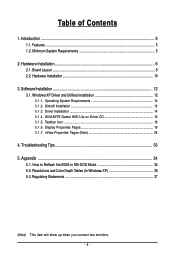
Table of Contents 1. Minimum System Requirements 5 2. Hardware Installation ...10 3. Windows XP Driver and Utilities Installation 12 3.1.1. nView Properties Pages (Note 28 4. Introduction ...5 1.1. Board Layout ...6 2.2. Features ...5 1.2. How to Reflash the BIOS in MS-DOS... Installation ...14 3.1.4. Taskbar Icon ...18 3.1.6. Regulatory Statements 37 (Note) This item will show up when you connect two monitors. - 4 - Operating System Requirements 12 3.1.2. GIGABYTE Gamer HUD Lite on Driver CD 16 3.1.5. Appendix ...34 5.1. Resolutions and Color Depth Tables (In...
Table of Contents 1. Minimum System Requirements 5 2. Hardware Installation ...10 3. Windows XP Driver and Utilities Installation 12 3.1.1. nView Properties Pages (Note 28 4. Introduction ...5 1.1. Board Layout ...6 2.2. Features ...5 1.2. How to Reflash the BIOS in MS-DOS... Installation ...14 3.1.4. Taskbar Icon ...18 3.1.6. Regulatory Statements 37 (Note) This item will show up when you connect two monitors. - 4 - Operating System Requirements 12 3.1.2. GIGABYTE Gamer HUD Lite on Driver CD 16 3.1.5. Appendix ...34 5.1. Resolutions and Color Depth Tables (In...
Manual
Page 5
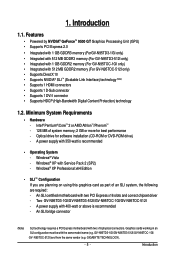
...AMD AthlonTM/PhenomTM - 128 MB of an SLI system, the following are required: - GIGABYTE TECHNOLOGY). - 5 - 1. Minimum System Requirements • Hardware - Windows® XP with the same model name (e.g. Windows® XP Professional x64 Edition • SLI TM Configuration If you are planning on ...using this graphics card as part of system memory; 2 GB or more for software installation (CD-ROM or DVD-ROM drive) - Two GV-N95TD3-1GI/GV-N95TD3-512I/GV-N95TOC-1GI/GV-N95TOC-512I -...
...AMD AthlonTM/PhenomTM - 128 MB of an SLI system, the following are required: - GIGABYTE TECHNOLOGY). - 5 - 1. Minimum System Requirements • Hardware - Windows® XP with the same model name (e.g. Windows® XP Professional x64 Edition • SLI TM Configuration If you are planning on ...using this graphics card as part of system memory; 2 GB or more for software installation (CD-ROM or DVD-ROM drive) - Two GV-N95TD3-1GI/GV-N95TD3-512I/GV-N95TOC-1GI/GV-N95TOC-512I -...
Manual
Page 12
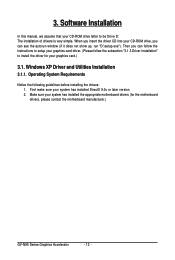
...drivers (for your graphics card driver. (Please follow the subsection "3.1.3 Driver Installation" to be Drive D: The installation of drivers is very simple. Windows XP Driver and Utilities Installation 3.1.1. Make sure your system has installed DirectX 9.0c or later version. 2. When you insert the driver CD into... assume that your CD-ROM drive letter to install the driver for the motherboard drivers, please contact the motherboard manufacturer.) GV-N95 Series Graphics Accelerator - 12 - Operating System Requirements Notice the following guidelines before installing the drivers: 1.
...drivers (for your graphics card driver. (Please follow the subsection "3.1.3 Driver Installation" to be Drive D: The installation of drivers is very simple. Windows XP Driver and Utilities Installation 3.1.1. Make sure your system has installed DirectX 9.0c or later version. 2. When you insert the driver CD into... assume that your CD-ROM drive letter to install the driver for the motherboard drivers, please contact the motherboard manufacturer.) GV-N95 Series Graphics Accelerator - 12 - Operating System Requirements Notice the following guidelines before installing the drivers: 1.
Manual
Page 13
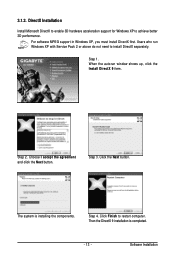
...Microsoft DirectX to enable 3D hardware acceleration support for Windows XP to restart computer. When the autorun window shows up, click the Install DirectX 9 item. Step 3. Step 4. Click Finish to achieve better 3D performance. Users who run Windows XP with Service Pack 2 or above do not...install DirectX separately. Click the Next button. Software Installation Step 2. The system is completed. - 13 - For software MPEG support in Windows XP, you must install DirectX first. Choose I accept the agreement and click the Next button. Step 1. Then the DirectX 9 installation is ...
...Microsoft DirectX to enable 3D hardware acceleration support for Windows XP to restart computer. When the autorun window shows up, click the Install DirectX 9 item. Step 3. Step 4. Click Finish to achieve better 3D performance. Users who run Windows XP with Service Pack 2 or above do not...install DirectX separately. Click the Next button. Software Installation Step 2. The system is completed. - 13 - For software MPEG support in Windows XP, you must install DirectX first. Choose I accept the agreement and click the Next button. Step 1. Then the DirectX 9 installation is ...
Manual
Page 14
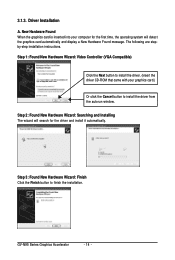
...your computer for the first time, the operating system will search for the driver and install it automatically. Driver Installation A. 3.1.3. GV-N95 Series Graphics Accelerator - 14 - The following are stepby-step installation instructions. Step 3: Found New Hardware Wizard: Finish ...Click the Finish button to install the driver from the autorun window. Step 2: Found New Hardware Wizard: Searching and Installing The wizard will detect the graphics card automatically and display a New Hardware ...
...your computer for the first time, the operating system will search for the driver and install it automatically. Driver Installation A. 3.1.3. GV-N95 Series Graphics Accelerator - 14 - The following are stepby-step installation instructions. Step 3: Found New Hardware Wizard: Finish ...Click the Finish button to install the driver from the autorun window. Step 2: Found New Hardware Wizard: Searching and Installing The wizard will detect the graphics card automatically and display a New Hardware ...
Manual
Page 15
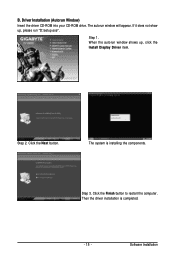
Step 1. The system is completed. - 15 - Then the driver installation is installing the components. The autorun window will appear. Step 2. Step 3. If it does not show up , click the Install Display Driver item. Click the Finish button to restart the computer. B. When the autorun window shows up , please run "D:\setup.exe". Software Installation Driver Installation (Autorun Window) Insert the driver CD-ROM into your CD-ROM drive. Click the Next button.
Step 1. The system is completed. - 15 - Then the driver installation is installing the components. The autorun window will appear. Step 2. Step 3. If it does not show up , click the Install Display Driver item. Click the Finish button to restart the computer. B. When the autorun window shows up , please run "D:\setup.exe". Software Installation Driver Installation (Autorun Window) Insert the driver CD-ROM into your CD-ROM drive. Click the Next button.
Manual
Page 16
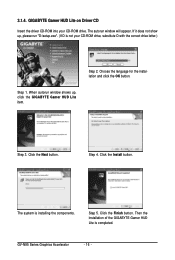
...click the OK button. The system is completed. Then the installation of the GIGABYTE Gamer HUD Lite is installing the components. Step 3. Click the Install button. GV-N95 Series Graphics Accelerator - 16 - GIGABYTE Gamer HUD Lite on Driver CD Insert the driver CD-ROM into your CD...letter.) Step 2. Step 5. Click the Next button. 3.1.4. Step 4. Click the Finish button. If it does not show up , click the GIGABYTE Gamer HUD Lite item. Step 1. The autorun window will appear. When autorun window shows up , please run "D:\setup.exe". (If D is not your CD-ROM drive.
...click the OK button. The system is completed. Then the installation of the GIGABYTE Gamer HUD Lite is installing the components. Step 3. Click the Install button. GV-N95 Series Graphics Accelerator - 16 - GIGABYTE Gamer HUD Lite on Driver CD Insert the driver CD-ROM into your CD...letter.) Step 2. Step 5. Click the Next button. 3.1.4. Step 4. Click the Finish button. If it does not show up , click the GIGABYTE Gamer HUD Lite item. Step 1. The autorun window will appear. When autorun window shows up , please run "D:\setup.exe". (If D is not your CD-ROM drive.
Manual
Page 19
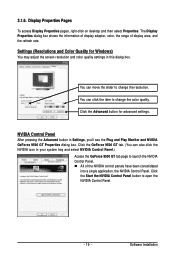
... your system tray and select NVIDIA Control Panel.) Access the GeForce 9500 GT tab page to change the color quality. Click the Advanced button for Windows) You may adjust the screen resolution and color quality settings in this dialog box. You can also click the NVIDIA icon in Settings, you'll...
... your system tray and select NVIDIA Control Panel.) Access the GeForce 9500 GT tab page to change the color quality. Click the Advanced button for Windows) You may adjust the screen resolution and color quality settings in this dialog box. You can also click the NVIDIA icon in Settings, you'll...
Manual
Page 28
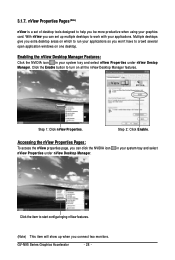
... is a set up when you can click the NVIDIA icon nView Properties under nView Destop Manager. Click the Enable button to crowd several open application windows on all the nView Desktop Manager features. With nView you connect two monitors. Step 2: Click Enable. Accessing the nView Properties Pages: To access the nView... your applications. in your applications so you extra desktop areas on which to run your system tray and select nView Properties under nView Desktop Manager. GV-N95 Series Graphics Accelerator - 28 -
... is a set up when you can click the NVIDIA icon nView Properties under nView Destop Manager. Click the Enable button to crowd several open application windows on all the nView Desktop Manager features. With nView you connect two monitors. Step 2: Click Enable. Accessing the nView Properties Pages: To access the nView... your applications. in your applications so you extra desktop areas on which to run your system tray and select nView Properties under nView Desktop Manager. GV-N95 Series Graphics Accelerator - 28 -
Manual
Page 29
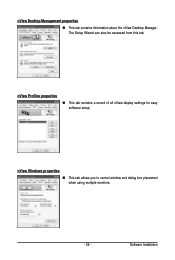
nView Windows properties „ This tab allows you to control window and dialog box placement when using multiple monitors. - 29 - Software Installation nView Desktop Management properties „ This tab contains information about the nView Desktop Manager. nView Profiles properties „ This tab contains a record of all nView display settings for easy software setup. The Setup Wizard can also be accessed from this tab.
nView Windows properties „ This tab allows you to control window and dialog box placement when using multiple monitors. - 29 - Software Installation nView Desktop Management properties „ This tab contains information about the nView Desktop Manager. nView Profiles properties „ This tab contains a record of all nView display settings for easy software setup. The Setup Wizard can also be accessed from this tab.
Manual
Page 31
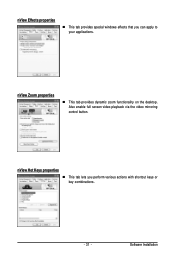
Software Installation Also enable full screen video playback via the video mirroring control button. nView Effects properties „ This tab provides special windows effects that you perform various actions with shortcut keys or key combinations. - 31 - nView Hot Keys properties „ This tab lets you can apply to your applications. nView Zoom properties „ This tab provides dynamic zoom functionality on the desktop.
Software Installation Also enable full screen video playback via the video mirroring control button. nView Effects properties „ This tab provides special windows effects that you perform various actions with shortcut keys or key combinations. - 31 - nView Hot Keys properties „ This tab lets you can apply to your applications. nView Zoom properties „ This tab provides dynamic zoom functionality on the desktop.
Manual
Page 33
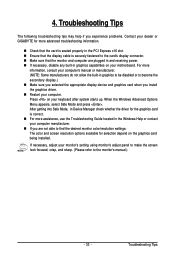
... the display cable is correct. „ For more assistance, use the Troubleshooting Guide located in the Windows Help or contact your motherboard. Troubleshooting Tips When the Windows Advanced Options Menu appears, select Safe Mode and press . 4. For more advanced troubleshooting information. „...132; Make sure you selected the appropriate display device and graphics card when you experience problems. Contact your dealer or GIGABYTE for selection depend on your computer. Press on the graphics card being installed. Troubleshooting Tips The following troubleshooting tips may...
... the display cable is correct. „ For more assistance, use the Troubleshooting Guide located in the Windows Help or contact your motherboard. Troubleshooting Tips When the Windows Advanced Options Menu appears, select Safe Mode and press . 4. For more advanced troubleshooting information. „...132; Make sure you selected the appropriate display device and graphics card when you experience problems. Contact your dealer or GIGABYTE for selection depend on your computer. Press on the graphics card being installed. Troubleshooting Tips The following troubleshooting tips may...

Manual
Page 35
Appendix 5.2. Resolutions and Color Depth Tables (In Windows XP) Display Screen Resolution 320 x 200 320 x 240 400 x 300 480 x 360 512 x 384 640 x 400 (16:10) 640 x 480 720 x 480 720 x 576 800 x ...
Appendix 5.2. Resolutions and Color Depth Tables (In Windows XP) Display Screen Resolution 320 x 200 320 x 240 400 x 300 480 x 360 512 x 384 640 x 400 (16:10) 640 x 480 720 x 480 720 x 576 800 x ...
