
Manual
Page 6
... 256 MB 0 MB 256 MB 512 MB 256 MB 0 MB 256 MB 1 GB 512 MB 256 MB 768 MB (For GV-N84STC-512I Rev2.0 only) Windows Vista &Windows7 System Memory On board graphics memory (MB) Shared system memory (MB) Total graphics memory (MB) 1GB 2GB 4GB ...GeForceTM 8400 GS Graphics Processing Unit (GPU) • Supports PCI Express 2.0 • Integrated with 512MB GDDR2 memory (For GV-N84S-512I Rev3.0/GV-N84STC-1GI only) • Integrated with 128MB GDDR3 memory (For GV-N84STC-512I Rev2.0 only) • Supports DirectX 10.1 • Supports 1 HDMI connector • Supports 1 Dual-Link DVI-I connector...
... 256 MB 0 MB 256 MB 512 MB 256 MB 0 MB 256 MB 1 GB 512 MB 256 MB 768 MB (For GV-N84STC-512I Rev2.0 only) Windows Vista &Windows7 System Memory On board graphics memory (MB) Shared system memory (MB) Total graphics memory (MB) 1GB 2GB 4GB ...GeForceTM 8400 GS Graphics Processing Unit (GPU) • Supports PCI Express 2.0 • Integrated with 512MB GDDR2 memory (For GV-N84S-512I Rev3.0/GV-N84STC-1GI only) • Integrated with 128MB GDDR3 memory (For GV-N84STC-512I Rev2.0 only) • Supports DirectX 10.1 • Supports 1 HDMI connector • Supports 1 Dual-Link DVI-I connector...
Manual
Page 7
Windows® Vista - Windows® XP with Service Pack 2 (SP2) - Intel® Pentium®/CoreTM 2 or AMD AthlonTM/PhenomTM - 128 MB of system memory; 2 GB or more for software installation (CD-ROM or DVD-ROM drive) - Introduction Windows® XP Professional x64 Edition - 7 - A 300 Watt power supply or above is recommended • Operating System - Optical drive for best performance - Minimum System Requirements • Hardware - Windows® 7 - 1.2.
Windows® Vista - Windows® XP with Service Pack 2 (SP2) - Intel® Pentium®/CoreTM 2 or AMD AthlonTM/PhenomTM - 128 MB of system memory; 2 GB or more for software installation (CD-ROM or DVD-ROM drive) - Introduction Windows® XP Professional x64 Edition - 7 - A 300 Watt power supply or above is recommended • Operating System - Optical drive for best performance - Minimum System Requirements • Hardware - Windows® 7 - 1.2.
Manual
Page 13
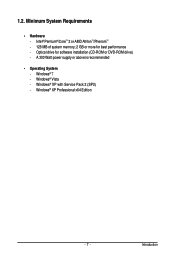
... installing the operating system, insert the driver disk into your system has installed DirectX 9 or later version. 2. Step 2: Click the Next button. Users who run Windows XP with Service Pack 2 or above do not need to My Computer, double-click the optical drive and execute the setup.exe program.) Step 1: Click... separately. - 13 - Software Installation Notice the following guidelines before installing the drivers: 1. The driver Autorun screen is automatically displayed which looks like that shown in Windows XP, you must install DirectX first. 3. Software Installation
... installing the operating system, insert the driver disk into your system has installed DirectX 9 or later version. 2. Step 2: Click the Next button. Users who run Windows XP with Service Pack 2 or above do not need to My Computer, double-click the optical drive and execute the setup.exe program.) Step 1: Click... separately. - 13 - Software Installation Notice the following guidelines before installing the drivers: 1. The driver Autorun screen is automatically displayed which looks like that shown in Windows XP, you must install DirectX first. 3. Software Installation

Manual
Page 15
Select Display Settings to change the resolution. Software Installation 3.2. You can click the item to adjust the screen resolution and color quality settings. You can move the slider to change the color quality. Display Properties Pages Display Settings (Resolutions and Color Quality for advanced settings. - 15 - Click the Advanced button for Windows) To access Display Settings page, right-click on desktop and select Personalize, then the Personalization windows will show up.
Select Display Settings to change the resolution. Software Installation 3.2. You can click the item to adjust the screen resolution and color quality settings. You can move the slider to change the color quality. Display Properties Pages Display Settings (Resolutions and Color Quality for advanced settings. - 15 - Click the Advanced button for Windows) To access Display Settings page, right-click on desktop and select Personalize, then the Personalization windows will show up.

Manual
Page 16
Right-click on the desktop and select Personalize, and then the Control Panel\Appearance Personalization\Personalization window will show up. Select Display Settings. After clicking the Advanced Settings button in Display Settings, you can right-click on the desktop and... card settings. When the Display Settings dialog box appears, click Advanced Settings. The NVIDIA Control Panel is used to access the NVIDIA Control Panel. GV-N84 Series Graphics Accelerator - 16 - Accessing NVIDIA Control Panel After installation of the display driver, right-click on the desktop and select NVIDIA Control...
Right-click on the desktop and select Personalize, and then the Control Panel\Appearance Personalization\Personalization window will show up. Select Display Settings. After clicking the Advanced Settings button in Display Settings, you can right-click on the desktop and... card settings. When the Display Settings dialog box appears, click Advanced Settings. The NVIDIA Control Panel is used to access the NVIDIA Control Panel. GV-N84 Series Graphics Accelerator - 16 - Accessing NVIDIA Control Panel After installation of the display driver, right-click on the desktop and select NVIDIA Control...
Manual
Page 21
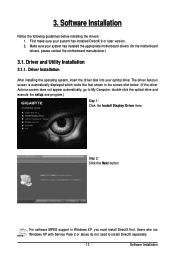
... modes here. • Only use of the same desktop. (2) Configured independently from two monitors on both display (Clone) Clone mode indicates that both displays in Windows XP. - 21 - Clone Mode Dualview Mode Software Installation
... modes here. • Only use of the same desktop. (2) Configured independently from two monitors on both display (Clone) Clone mode indicates that both displays in Windows XP. - 21 - Clone Mode Dualview Mode Software Installation
Manual
Page 22
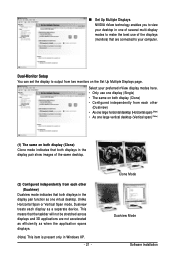
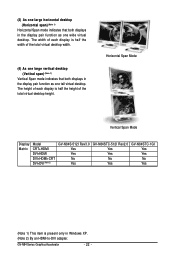
... Horizontal Span Mode Vertical Span Mode Display Matrix Model CRT+HDMI DVI+HDMI DVI+HDMI+CRT DVI+DVI (Note 2) GV-N84S-512I Rev3.0 Yes Yes No Yes GV-N84STC-512I Rev2.0 Yes Yes No Yes GV-N84STC-1GI Yes Yes No Yes (Note 1) This item is present only in the display pair function as one tall ...the height of the total virtual desktop width. (4) As one large vertical desktop (Vertical span) (Note 1) Vertical Span mode indicates that both displays in Windows XP. (Note 2) By an HDMI-to-DVI adapter. The width of each display is half the width of the total virtual desktop height.
... Horizontal Span Mode Vertical Span Mode Display Matrix Model CRT+HDMI DVI+HDMI DVI+HDMI+CRT DVI+DVI (Note 2) GV-N84S-512I Rev3.0 Yes Yes No Yes GV-N84STC-512I Rev2.0 Yes Yes No Yes GV-N84STC-1GI Yes Yes No Yes (Note 1) This item is present only in the display pair function as one tall ...the height of the total virtual desktop width. (4) As one large vertical desktop (Vertical span) (Note 1) Vertical Span mode indicates that both displays in Windows XP. (Note 2) By an HDMI-to-DVI adapter. The width of each display is half the width of the total virtual desktop height.
Manual
Page 23
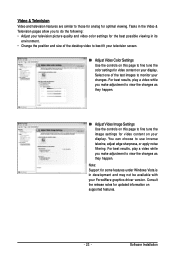
... Settings Use the controls on this page to fine tune the color settings for video content on your display. Note: Support for some features under Windows Vista is in development and may not be available with your changes. You can choose to view the changes as they happen. Consult the release...
... Settings Use the controls on this page to fine tune the color settings for video content on your display. Note: Support for some features under Windows Vista is in development and may not be available with your changes. You can choose to view the changes as they happen. Consult the release...

Manual
Page 24
...being installed. 4. Troubleshooting Tips The following troubleshooting tips may help if you install the graphics driver. „ Restart your dealer or GIGABYTE for selection depend on your monitor's setting using monitor's adjust panel to make the screen look focused, crisp, and sharp. (... receiving power. „ If necessary, disable any built-in graphics to be disabled or to the monitor's manual.) GV-N84 Series Graphics Accelerator - 24 - If necessary, adjust your keyboard after system starts up. When the Windows Advanced Options Menu appears, select Safe Mode and press .
...being installed. 4. Troubleshooting Tips The following troubleshooting tips may help if you install the graphics driver. „ Restart your dealer or GIGABYTE for selection depend on your monitor's setting using monitor's adjust panel to make the screen look focused, crisp, and sharp. (... receiving power. „ If necessary, disable any built-in graphics to be disabled or to the monitor's manual.) GV-N84 Series Graphics Accelerator - 24 - If necessary, adjust your keyboard after system starts up. When the Windows Advanced Options Menu appears, select Safe Mode and press .
