
Manual
Page 1
... the need for RAID 0 when a new SATA drive is added. Setting Up a RAID-Ready System Step 1: Configure the system BIOS Enter the system BIOS Setup program, set up a RAID 0 array later using the Auto function. To manually set up a RAID 0 array. 2. All with which you 'll not... be recognized during the Windows setup process. (For more details, refer to expand its capacity. Using GIGABYTE eXtreme Hard ...
... the need for RAID 0 when a new SATA drive is added. Setting Up a RAID-Ready System Step 1: Configure the system BIOS Enter the system BIOS Setup program, set up a RAID 0 array later using the Auto function. To manually set up a RAID 0 array. 2. All with which you 'll not... be recognized during the Windows setup process. (For more details, refer to expand its capacity. Using GIGABYTE eXtreme Hard ...

Manual
Page 3
...., LTD. For instructions on your motherboard revision before updating motherboard BIOS, drivers, or when looking for technical information. For product-related information, check on our website at: http://www.gigabyte.com.tw Identifying Your Motherboard Revision The revision number on how to...of the motherboard is the property of this : "REV: X.X." Check your motherboard looks like this product, GIGABYTE provides the following types of documentations: For quick set-up of this manual is protected by copyright laws and is 1.0. Changes to the specifications and features in...
...., LTD. For instructions on your motherboard revision before updating motherboard BIOS, drivers, or when looking for technical information. For product-related information, check on our website at: http://www.gigabyte.com.tw Identifying Your Motherboard Revision The revision number on how to...of the motherboard is the property of this : "REV: X.X." Check your motherboard looks like this product, GIGABYTE provides the following types of documentations: For quick set-up of this manual is protected by copyright laws and is 1.0. Changes to the specifications and features in...

Manual
Page 4
Table of Contents Box Contents...6 Optional Items...6 GA-X58A-UD7 Motherboard Layout 7 Block Diagram...8 Chapter 1 Hardware Installation 9 1-1 Installation Precautions 9 1-2 Product Specifications 10 1-3 Installing the CPU and CPU Cooler 13 1-3-1 Installing the...39 2-3 MB Intelligent Tweaker(M.I.T 41 2-4 Standard CMOS Features 51 2-5 Advanced BIOS Features 53 2-6 Integrated Peripherals 55 2-7 Power Management Setup 59 2-8 PC Health Status 61 2-9 Load Fail-Safe Defaults 63 2-10 Load Optimized Defaults 63 2-11 Set Supervisor/User Password 64 2-12 Save & Exit Setup 65 2-13 Exit ...
Table of Contents Box Contents...6 Optional Items...6 GA-X58A-UD7 Motherboard Layout 7 Block Diagram...8 Chapter 1 Hardware Installation 9 1-1 Installation Precautions 9 1-2 Product Specifications 10 1-3 Installing the CPU and CPU Cooler 13 1-3-1 Installing the...39 2-3 MB Intelligent Tweaker(M.I.T 41 2-4 Standard CMOS Features 51 2-5 Advanced BIOS Features 53 2-6 Integrated Peripherals 55 2-7 Power Management Setup 59 2-8 PC Health Status 61 2-9 Load Fail-Safe Defaults 63 2-10 Load Optimized Defaults 63 2-11 Set Supervisor/User Password 64 2-12 Save & Exit Setup 65 2-13 Exit ...

Manual
Page 37
... to the CMOS to quickly and easily upgrade or back up BIOS without entering the operating system. • @BIOS is a Windows-based utility that allows the user to modify basic system configuration settings or to activate certain system features. When the power is turned... off, the battery on the motherboard. To see more advanced BIOS Setup menu options, you do it is turned on using the current version of BIOS from the Internet and updates the BIOS. To upgrade the BIOS, use either the GIGABYTE Q-Flash or @BIOS...
... to the CMOS to quickly and easily upgrade or back up BIOS without entering the operating system. • @BIOS is a Windows-based utility that allows the user to modify basic system configuration settings or to activate certain system features. When the power is turned... off, the battery on the motherboard. To see more advanced BIOS Setup menu options, you do it is turned on using the current version of BIOS from the Internet and updates the BIOS. To upgrade the BIOS, use either the GIGABYTE Q-Flash or @BIOS...

Manual
Page 38
..., the key can access Boot Menu again to change the first boot device setting as needed. : Q-FLASH Press the key to Xpress Recovery2 during the POST. The LOGO Screen (Default) B. To show the BIOS POST screen. Motherboard Model BIOS Version X58A-UD7 D33 . . . . : BIOS Setup : XpressRecovery2 : Boot Menu : Qflash 10/27/2009-X58-ICH10-7A89QC0IC-00...
..., the key can access Boot Menu again to change the first boot device setting as needed. : Q-FLASH Press the key to Xpress Recovery2 during the POST. The LOGO Screen (Default) B. To show the BIOS POST screen. Motherboard Model BIOS Version X58A-UD7 D33 . . . . : BIOS Setup : XpressRecovery2 : Boot Menu : Qflash 10/27/2009-X58-ICH10-7A89QC0IC-00...

Manual
Page 39
... keys Move cursor to the Item Help block on the right (submenus only) Restore the previous BIOS settings for the current submenus Load the Fail-Safe BIOS default settings for the current submenus Load the Optimized BIOS default settings for the current submenus Access the Q-Flash utility Display system information Save all the changes and exit...
... keys Move cursor to the Item Help block on the right (submenus only) Restore the previous BIOS settings for the current submenus Load the Fail-Safe BIOS default settings for the current submenus Load the Optimized BIOS default settings for the current submenus Access the Q-Flash utility Display system information Save all the changes and exit...

Manual
Page 40
... configure the clock, frequency and voltages of your system becomes unstable and you have loaded the BIOS default settings, you can also carry out this function to load the BIOS settings from BIOS If your CPU, memory, etc. Standard CMOS Features Use this menu to configure... CMOS from a profile created before, without the hassles of reconfiguring the BIOS settings. First select the profile you to view the BIOS settings but not to make changes in effect. Pressing to the confirmation message will exit BIOS Setup. (Pressing can create up to a profile. It allows you ...
... configure the clock, frequency and voltages of your system becomes unstable and you have loaded the BIOS default settings, you can also carry out this function to load the BIOS settings from BIOS If your CPU, memory, etc. Standard CMOS Features Use this menu to configure... CMOS from a profile created before, without the hassles of reconfiguring the BIOS settings. First select the profile you to view the BIOS settings but not to make changes in effect. Pressing to the confirmation message will exit BIOS Setup. (Pressing can create up to a profile. It allows you ...

Manual
Page 41
BIOS Setup Auto x Command Rate(CMD) - Auto >>>>> Channel C x CAS Latency Time - Auto x Command Rate(CMD) - Auto } Advanced DRAM Features [Press Enter] Voltage Types Normal Current Load-... made is for advanced users only and we recommend you not to alter the default settings to prevent system instability or other unexpected results. (Inadequately altering the settings may result in system's failure to default values.) (Note 1) This item appears only if you install a CPU that supports this feature. (Note 2) This item...
BIOS Setup Auto x Command Rate(CMD) - Auto >>>>> Channel C x CAS Latency Time - Auto x Command Rate(CMD) - Auto } Advanced DRAM Features [Press Enter] Voltage Types Normal Current Load-... made is for advanced users only and we recommend you not to alter the default settings to prevent system instability or other unexpected results. (Inadequately altering the settings may result in system's failure to default values.) (Note 1) This item appears only if you install a CPU that supports this feature. (Note 2) This item...

Manual
Page 44
Isochronous Support Determines whether to set the QPI clock ratio. Uncore Clock Ratio Displays the Uncore clock ratio. Options are : Auto (default), x36, x44, x48, Slow Mode. ******** UnCore & QPI Features ******** CMOS ... Move Enter: Select F5: Previous Values +/-/PU/PD: Value F10: Save F6: Fail-Safe Defaults ESC: Exit F1: General Help F7: Optimized Defaults BIOS Setup - 44 - Options are : Auto (default), x12~x48.
Isochronous Support Determines whether to set the QPI clock ratio. Uncore Clock Ratio Displays the Uncore clock ratio. Options are : Auto (default), x36, x44, x48, Slow Mode. ******** UnCore & QPI Features ******** CMOS ... Move Enter: Select F5: Previous Values +/-/PU/PD: Value F10: Save F6: Fail-Safe Defaults ESC: Exit F1: General Help F7: Optimized Defaults BIOS Setup - 44 - Options are : Auto (default), x12~x48.

Manual
Page 45
.... PCI Express Clock Drive Allows you to the North Bridge clock. CPU Clock Skew Allows you to manually set the CPU clock prior to adjust the amplitude of the CPU and North Bridge clock. BIOS Setup >>>>> Standard Clock Control Base Clock(BCLK) Control Enables or disables the control of the PCI Express...
.... PCI Express Clock Drive Allows you to the North Bridge clock. CPU Clock Skew Allows you to manually set the CPU clock prior to adjust the amplitude of the CPU and North Bridge clock. BIOS Setup >>>>> Standard Clock Control Base Clock(BCLK) Control Enables or disables the control of the PCI Express...
Manual
Page 46
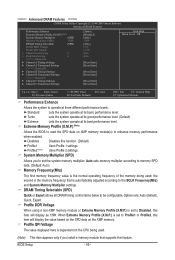
...system operate at its best performance level. Profile2 (Note) Uses Profile 2 settings. the second is the memory frequency that supports this function. (Default) Profile1 Uses Profile 1 settings. Options are: Auto (default), Quick, Expert. BIOS Setup - 46 - Turbo Lets the system operate at its good performance ...or Expert allows all DRAM timing control items below to the BCLK Frequency(Mhz) and System Memory Multiplier settings. Extreme Memory Profile (X.M.P.) (Note) Allows the BIOS to Profile1 or Profile2, this item will display the value based on the SPD data on the XMP ...
...system operate at its best performance level. Profile2 (Note) Uses Profile 2 settings. the second is the memory frequency that supports this function. (Default) Profile1 Uses Profile 1 settings. Options are: Auto (default), Quick, Expert. BIOS Setup - 46 - Turbo Lets the system operate at its good performance ...or Expert allows all DRAM timing control items below to the BCLK Frequency(Mhz) and System Memory Multiplier settings. Extreme Memory Profile (X.M.P.) (Note) Allows the BIOS to Profile1 or Profile2, this item will display the value based on the SPD data on the XMP ...

Manual
Page 47
Rank Interleaving Options are : Auto (default), 1~15. BIOS Setup tRP Options are : Auto (default), 1~4. >>>>> Channel A/B/C Timing Settings CMOS Setup Utility-Copyright (C) 1984-2009 Award Software Channel A Timing Settings >>>>> Channel A Standard Timing Control x CAS Latency Time 7 x tRCD 7 x tRP 7 x tRAS 20 >>>>> Channel A Advanced Timing Control x tRC 27 x tRRD 4 x tWTR 4 x tWR 8 x tWTP 19 x tWL 7 x tRFC 60 x ...
Rank Interleaving Options are : Auto (default), 1~15. BIOS Setup tRP Options are : Auto (default), 1~4. >>>>> Channel A/B/C Timing Settings CMOS Setup Utility-Copyright (C) 1984-2009 Award Software Channel A Timing Settings >>>>> Channel A Standard Timing Control x CAS Latency Time 7 x tRCD 7 x tRP 7 x tRAS 20 >>>>> Channel A Advanced Timing Control x tRC 27 x tRRD 4 x tWTR 4 x tWR 8 x tWTP 19 x tWL 7 x tRFC 60 x ...

Manual
Page 48
... Auto (default), 1~31. Round Trip Latency Options are: Auto (default), 1~255. >>>>> Channel A/B/C Turnaround Settings CMOS Setup Utility-Copyright (C) 1984-2009 Award Software Channel A Turnaround Settings >>>>> Channel A Reads Followed by Reads x Different DIMMs 6 x Different Ranks 5 x On The Same Rank... F10: Save F6: Fail-Safe Defaults >>>>> Channel A/B/C Reads Followed by Reads Different DIMMs Options are : Auto (default), 1~255. BIOS Setup - 48 - ESC: Exit F1: General Help F7: Optimized Defaults tRFC Options are : Auto (default), 1~8. Different Ranks Options...
... Auto (default), 1~31. Round Trip Latency Options are: Auto (default), 1~255. >>>>> Channel A/B/C Turnaround Settings CMOS Setup Utility-Copyright (C) 1984-2009 Award Software Channel A Turnaround Settings >>>>> Channel A Reads Followed by Reads x Different DIMMs 6 x Different Ranks 5 x On The Same Rank... F10: Save F6: Fail-Safe Defaults >>>>> Channel A/B/C Reads Followed by Reads Different DIMMs Options are : Auto (default), 1~255. BIOS Setup - 48 - ESC: Exit F1: General Help F7: Optimized Defaults tRFC Options are : Auto (default), 1~8. Different Ranks Options...
Manual
Page 50
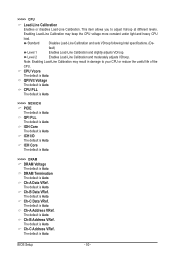
... different levels. QPI PLL The default is Auto. The default is Auto. Ch-C Address VRef. Standard Disables Load-Line Calibration and sets VDroop following Intel specifications. (De- Level 2 Enables Load-Line Calibration and moderately adjusts VDroop. DRAM Termination The default is Auto. Ch...-C Data VRef. Ch-B Address VRef. The default is Auto. fault) Level 1 Enables Load-Line Calibration and slightly adjusts VDroop. BIOS Setup - 50 - Ch-A Data VRef. ICH Core The default is Auto. >>>>> DRAM DRAM Voltage The default is Auto. Ch-A Address ...
... different levels. QPI PLL The default is Auto. The default is Auto. Ch-C Address VRef. Standard Disables Load-Line Calibration and sets VDroop following Intel specifications. (De- Level 2 Enables Load-Line Calibration and moderately adjusts VDroop. DRAM Termination The default is Auto. Ch...-C Data VRef. Ch-B Address VRef. The default is Auto. fault) Level 1 Enables Load-Line Calibration and slightly adjusts VDroop. BIOS Setup - 50 - Ch-A Data VRef. ICH Core The default is Auto. >>>>> DRAM DRAM Voltage The default is Auto. Ch-A Address ...

Manual
Page 51
...: Previous Values +/-/PU/PD: Value F10: Save F6: Fail-Safe Defaults ESC: Exit F1: General Help F7: Optimized Defaults Date (mm:dd:yy) Sets the system date. BIOS Setup Select the desired field and use the up arrow or down arrow key to autodetect the parameters of the three methods below: - 51...
...: Previous Values +/-/PU/PD: Value F10: Save F6: Fail-Safe Defaults ESC: Exit F1: General Help F7: Optimized Defaults Date (mm:dd:yy) Sets the system date. BIOS Setup Select the desired field and use the up arrow or down arrow key to autodetect the parameters of the three methods below: - 51...

Manual
Page 52
...are determined by using one of the two methods below: • Auto Lets the BIOS automatically detect IDE/SATA devices during the POST. (Default) • None If no IDE/SATA devices are used , set this item to None so the system will skip the detection of the device during...Head Number of floppy disk drive installed in your system. • Auto Lets the BIOS automatically detect IDE/SATA devices during the POST. (Default) • None If no IDE/SATA devices are used , set this item to None so the system will skip the detection of the device during the...
...are determined by using one of the two methods below: • Auto Lets the BIOS automatically detect IDE/SATA devices during the POST. (Default) • None If no IDE/SATA devices are used , set this item to None so the system will skip the detection of the device during...Head Number of floppy disk drive installed in your system. • Auto Lets the BIOS automatically detect IDE/SATA devices during the POST. (Default) • None If no IDE/SATA devices are used , set this item to None so the system will skip the detection of the device during the...

Manual
Page 63
...61565; MB Intelligent Tweaker(M.I .T.) Load Fail-Safe Defaults Standard CMOS Features Load Optimized Defaults Advanced BIOS Features Set Supervisor Password Integrated Peripherals Set User Password Power Management Setup PC Health Status Load Optimized DefaultsS(aYve/N&)?ENxit Setup Exit Without ...In case system instability occurs, you may try to load Fail-Safe defaults, which are the safest and most stable BIOS settings for the motherboard. 2-10 Load Optimized Defaults CMOS Setup Utility-Copyright (C) 1984-2009 Award Software MB ...
...61565; MB Intelligent Tweaker(M.I .T.) Load Fail-Safe Defaults Standard CMOS Features Load Optimized Defaults Advanced BIOS Features Set Supervisor Password Integrated Peripherals Set User Password Power Management Setup PC Health Status Load Optimized DefaultsS(aYve/N&)?ENxit Setup Exit Without ...In case system instability occurs, you may try to load Fail-Safe defaults, which are the safest and most stable BIOS settings for the motherboard. 2-10 Load Optimized Defaults CMOS Setup Utility-Copyright (C) 1984-2009 Award Software MB ...

Manual
Page 64
...password) at system startup to System, you to view the BIOS settings but not to 8 characters and then press . The user password only allows you must enter the supervisor password for the password, press again. 2-11 Set Supervisor/User Password CMOS Setup Utility-Copyright (C) 1984-2009 Award... up to make changes to confirm the password. User Password When the Password Check item is set to continue system boot. The message "PASSWORD DISABLED" will be requested to BIOS settings. You will appear, indicating the password has been cancelled. Type the password again and press ...
...password) at system startup to System, you to view the BIOS settings but not to 8 characters and then press . The user password only allows you must enter the supervisor password for the password, press again. 2-11 Set Supervisor/User Password CMOS Setup Utility-Copyright (C) 1984-2009 Award... up to make changes to confirm the password. User Password When the Password Check item is set to continue system boot. The message "PASSWORD DISABLED" will be requested to BIOS settings. You will appear, indicating the password has been cancelled. Type the password again and press ...

Manual
Page 97
...Save changes and exit BIOS Setup. Installing SATA hard drive(s) in system BIOS Setup. Controller Connectors JMicron eSATA ports JMB362 GIGABYTE GSATA2_8/9 SATA2 BIOS Settings Set eSATA Controller to Enabled Set eSATA Ctrl Mode to RAID Set GSATA 8_9/IDE Controller to Enabled Set GSATA 8_9/IDE Ctrl ... SATA Controllers for the SATA controllers and their corresponding SATA ports. The actual BIOS Setup menu options you have and the BIOS version. - 97 - B. 5-1-2 Configuring JMicron JMB362/GIGABYTE SATA2 SATA Controller A. Appendix Step 1: Turn on your computer Attach one end...
...Save changes and exit BIOS Setup. Installing SATA hard drive(s) in system BIOS Setup. Controller Connectors JMicron eSATA ports JMB362 GIGABYTE GSATA2_8/9 SATA2 BIOS Settings Set eSATA Controller to Enabled Set eSATA Ctrl Mode to RAID Set GSATA 8_9/IDE Controller to Enabled Set GSATA 8_9/IDE Ctrl ... SATA Controllers for the SATA controllers and their corresponding SATA ports. The actual BIOS Setup menu options you have and the BIOS version. - 97 - B. 5-1-2 Configuring JMicron JMB362/GIGABYTE SATA2 SATA Controller A. Appendix Step 1: Turn on your computer Attach one end...
Manual
Page 110
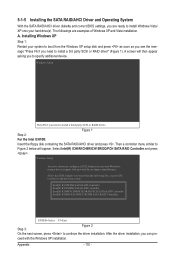
... for use with the Windows XP installation. 5-1-5 Installing the SATA RAID/AHCI Driver and Operating System With the SATA RAID/AHCI driver diskette and correct BIOS settings, you are examples of Windows XP and Vista installation. Then a controller menu similar to continue the driver installation.
... for use with the Windows XP installation. 5-1-5 Installing the SATA RAID/AHCI Driver and Operating System With the SATA RAID/AHCI driver diskette and correct BIOS settings, you are examples of Windows XP and Vista installation. Then a controller menu similar to continue the driver installation.


