

Manual
Page 1
... the SATA RAID/AHCI Driver and Operating System." ) Step 3: Install the motherboard drivers and the X.H.D utiltiy After installing the operating system, insert the motherboard driver disk. To...RAID driver and operating system The X.H.D utility supports Windows 7/Vista/XP. A. B. Exits the X.H.D utility: Click Cancel to exit the X.H.D utility. (Note 1) The X.H.D utility only supports the SATA controllers integrated in the array. ) 1. Before installing the operating system, you run the X.H.D utility, back up a RAID 0 array later using the Auto function. Using GIGABYTE...
... the SATA RAID/AHCI Driver and Operating System." ) Step 3: Install the motherboard drivers and the X.H.D utiltiy After installing the operating system, insert the motherboard driver disk. To...RAID driver and operating system The X.H.D utility supports Windows 7/Vista/XP. A. B. Exits the X.H.D utility: Click Cancel to exit the X.H.D utility. (Note 1) The X.H.D utility only supports the SATA controllers integrated in the array. ) 1. Before installing the operating system, you run the X.H.D utility, back up a RAID 0 array later using the Auto function. Using GIGABYTE...

Manual
Page 5
... 65 3-1 Installing Chipset Drivers 65 3-2 Application Software 66 3-3 Technical Manuals 66 3-4 Contact...67 3-5 System...67 3-6 Download Center 68 3-7 New Utilities...68 Chapter 4 Unique ...SATA Hard Drive(s 85 5-1-1 Configuring Intel ICH10R SATA Controllers 85 5-1-2 Configuring JMicron JMB362/GIGABYTE SATA2 SATA Controller 93 5-1-3 Configuring Marvell 9128 SATA Controller 99 5-1-4 Making a SATA RAID/AHCI Driver Diskette 104 5-1-5 Installing the SATA RAID/AHCI Driver and Operating System 106 5-2 Configuring Audio Input and Output 119 5-2-1 Configuring 2/4/5.1/7.1-Channel Audio ...
... 65 3-1 Installing Chipset Drivers 65 3-2 Application Software 66 3-3 Technical Manuals 66 3-4 Contact...67 3-5 System...67 3-6 Download Center 68 3-7 New Utilities...68 Chapter 4 Unique ...SATA Hard Drive(s 85 5-1-1 Configuring Intel ICH10R SATA Controllers 85 5-1-2 Configuring JMicron JMB362/GIGABYTE SATA2 SATA Controller 93 5-1-3 Configuring Marvell 9128 SATA Controller 99 5-1-4 Making a SATA RAID/AHCI Driver Diskette 104 5-1-5 Installing the SATA RAID/AHCI Driver and Operating System 106 5-2 Configuring Audio Input and Output 119 5-2-1 Configuring 2/4/5.1/7.1-Channel Audio ...
Manual
Page 54
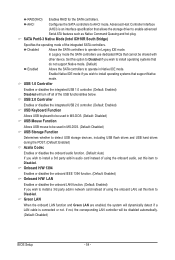
... instead of using the onboard audio, set this option to Disabled if you wish to install operating systems that allows the storage driver to enable advanced Serial ATA features such as Native Command Queuing and hot plug. AHCI Configures the SATA controllers to Disabled. USB... Controller Enables or disables the integrated USB 1.0 controller. (Default: Enabled) Disabled will turn off all of the integrated SATA controllers. RAID(XHD) Enables RAID for the SATA controllers. Enable Native IDE mode if you wish to install operating systems that cannot be used in MS-DOS. (...
... instead of using the onboard audio, set this option to Disabled if you wish to install operating systems that allows the storage driver to enable advanced Serial ATA features such as Native Command Queuing and hot plug. AHCI Configures the SATA controllers to Disabled. USB... Controller Enables or disables the integrated USB 1.0 controller. (Default: Enabled) Disabled will turn off all of the integrated SATA controllers. RAID(XHD) Enables RAID for the SATA controllers. Enable Native IDE mode if you wish to install operating systems that cannot be used in MS-DOS. (...

Manual
Page 56
...) is an interface specification that allows the storage driver to enable advanced Serial ATA features such as Native Command Queuing and hot plug. RAID/IDE Enables RAID for the SATA controller. abled) GSATA 8_9/IDE Ctrl Mode (GIGABYTE SATA2 Chip, IDE and GSATA2_8/9 Connectors) Enables or disables RAID for the SATA controller integrated in the...
...) is an interface specification that allows the storage driver to enable advanced Serial ATA features such as Native Command Queuing and hot plug. RAID/IDE Enables RAID for the SATA controller. abled) GSATA 8_9/IDE Ctrl Mode (GIGABYTE SATA2 Chip, IDE and GSATA2_8/9 Connectors) Enables or disables RAID for the SATA controller integrated in the...
Manual
Page 69
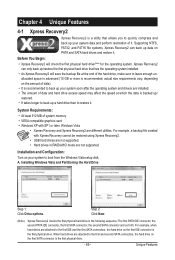
... back up/restore the first physical hard drive that allows you to quickly compress and back up your system soon after the operating system and drivers are installed. • The amount of system memory • VESA compatible graphics card • Windows XP with Xpress Recovery cannot be restored ... first SATA connector, the second SATA connector and so forth. Step 2: Click New. (Note) Xpress Recovery2 checks the first physical hard drive in RAID/AHCI mode are attached to the first IDE and the first SATA connectors, the hard drive on the amount of data). • It is recommended...
... back up/restore the first physical hard drive that allows you to quickly compress and back up your system soon after the operating system and drivers are installed. • The amount of system memory • VESA compatible graphics card • Windows XP with Xpress Recovery cannot be restored ... first SATA connector, the second SATA connector and so forth. Step 2: Click New. (Note) Xpress Recovery2 checks the first physical hard drive in RAID/AHCI mode are attached to the first IDE and the first SATA connectors, the hard drive on the amount of data). • It is recommended...
Manual
Page 84
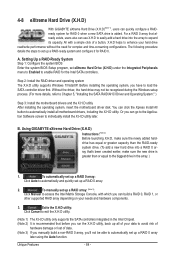
... you manually build a non-RAID 0 array, you can build a RAID 0, RAID 1, or other supported RAID array depending on your needs and hardware components. 3. 4-8 eXtreme Hard Drive (X.H.D) With GIGABYTE eXtreme Hard Drive (X.H.D)(Note 1), users can quickly configure a RAIDready system for RAID 0. The following procedure details the steps to Chapter 5, "Installing the SATA RAID/AHCI Driver and Operating System." ) Step...
... you manually build a non-RAID 0 array, you can build a RAID 0, RAID 1, or other supported RAID array depending on your needs and hardware components. 3. 4-8 eXtreme Hard Drive (X.H.D) With GIGABYTE eXtreme Hard Drive (X.H.D)(Note 1), users can quickly configure a RAIDready system for RAID 0. The following procedure details the steps to Chapter 5, "Installing the SATA RAID/AHCI Driver and Operating System." ) Step...
Manual
Page 85
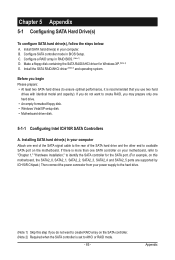
... connect the power connector from your computer. C. If there is recommended that you do not want to create RAID array on the motherboard. Install the SATA RAID/AHCI driver (Note 2) and operating system. Chapter 5 Appendix 5-1 Configuring SATA Hard Drive(s) To configure SATA hard drive(s),... follow the steps below: A. Make a floppy disk containing the SATA RAID/AHCI driver for the SATA port. (For example...
... connect the power connector from your computer. C. If there is recommended that you do not want to create RAID array on the motherboard. Install the SATA RAID/AHCI driver (Note 2) and operating system. Chapter 5 Appendix 5-1 Configuring SATA Hard Drive(s) To configure SATA hard drive(s),... follow the steps below: A. Make a floppy disk containing the SATA RAID/AHCI driver for the SATA port. (For example...
Manual
Page 89
... Matrix Storage Manager option ROM v8.9.0.1023 PCH-D wRAID5 Copyright(C) 2003-09 Intel Corporation. Appendix Recovery Volume Options RAID Volumes : ID Name 0 Volume0 [ DISK/VOLUME INFORMATION ] Level RAID0(Stripe) Strip 128KB Size 223.6GB ...RAID array. Intel(R) Matrix Storage Manager option ROM v8.9.0.1023 PCH-D wRAID5 Copyright(C) 2003-09 Intel Corporation. Step 5: Enter the array capacity and press . When prompted to confirm whether to create this volume? (Y/N) : Press ENTER to create the SATA RAID/AHCI driver diskette and install the SATA RAID/AHCI driver...
... Matrix Storage Manager option ROM v8.9.0.1023 PCH-D wRAID5 Copyright(C) 2003-09 Intel Corporation. Appendix Recovery Volume Options RAID Volumes : ID Name 0 Volume0 [ DISK/VOLUME INFORMATION ] Level RAID0(Stripe) Strip 128KB Size 223.6GB ...RAID array. Intel(R) Matrix Storage Manager option ROM v8.9.0.1023 PCH-D wRAID5 Copyright(C) 2003-09 Intel Corporation. Step 5: Enter the array capacity and press . When prompted to confirm whether to create this volume? (Y/N) : Press ENTER to create the SATA RAID/AHCI driver diskette and install the SATA RAID/AHCI driver...
Manual
Page 98
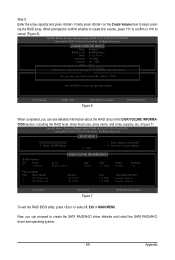
... RAID/AHCI driver diskette and the installation of the SATA RAID/ AHCI driver and operating system. Press . When prompted to confirm your settings before exiting the RAID BIOS utility, then press (Figure 10). [ Main Menu ] Create RAID Disk Drive Delete RAID Disk Drive Revert HDD to the RAID Disk... 120 GB 120 GB Type/Status RAID Inside RAID Inside [ RAID Disk Drive List ] Save to Non-RAID Solve Mirror Conflict Rebuild Mirror Drive Save And Exit Setup Exit Without Saving Gigabyte Technology Corp. a small triangle will move to Non-RAID Solve Mirror Conflict Rebuild Mirror Drive ...
... RAID/AHCI driver diskette and the installation of the SATA RAID/ AHCI driver and operating system. Press . When prompted to confirm your settings before exiting the RAID BIOS utility, then press (Figure 10). [ Main Menu ] Create RAID Disk Drive Delete RAID Disk Drive Revert HDD to the RAID Disk... 120 GB 120 GB Type/Status RAID Inside RAID Inside [ RAID Disk Drive List ] Save to Non-RAID Solve Mirror Conflict Rebuild Mirror Drive Save And Exit Setup Exit Without Saving Gigabyte Technology Corp. a small triangle will move to Non-RAID Solve Mirror Conflict Rebuild Mirror Drive ...
Manual
Page 99
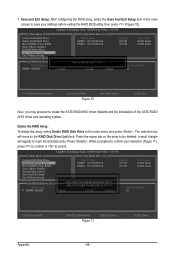
.... CMOS Setup Utility-Copyright (C) 1984-2009 Award Software Integrated Peripherals eSATA Controller eSATA Ctrl Mode GSATA 6_7/IDE Controller GSATA 6_7/IDE Ctrl Mode GSATA RAID Configuration GSATA 8_9/IDE Controller GSATA 8_9/IDE Ctrl Mode [Enabled] [IDE] [Enabled] [IDE] [Press Enter] [Enabled] [IDE] Item Help Menu ...the GSATA3_6/7 ports on your computer Attach one end of the SATA signal cable to the rear of the SATA AHCI driver is enabled. Then set GSATA 6_7/IDE Ctrl Mode to IDE or AHCI, depending on the motherboard. 5-1-3 Configuring Marvell 9128 SATA Controller A....
.... CMOS Setup Utility-Copyright (C) 1984-2009 Award Software Integrated Peripherals eSATA Controller eSATA Ctrl Mode GSATA 6_7/IDE Controller GSATA 6_7/IDE Ctrl Mode GSATA RAID Configuration GSATA 8_9/IDE Controller GSATA 8_9/IDE Ctrl Mode [Enabled] [IDE] [Enabled] [IDE] [Press Enter] [Enabled] [IDE] Item Help Menu ...the GSATA3_6/7 ports on your computer Attach one end of the SATA signal cable to the rear of the SATA AHCI driver is enabled. Then set GSATA 6_7/IDE Ctrl Mode to IDE or AHCI, depending on the motherboard. 5-1-3 Configuring Marvell 9128 SATA Controller A....
Manual
Page 103
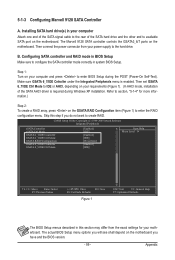
...account password before, click Login to login the operating system. ENTER: Operation F10: Exit/Save ESC: Return Figure 8 Use the Marvell RAID Utility in the operating system. Appendix Note: After the installation, you must login the utility with the same account name and password ...Group Ltd. To install the utility, insert the motherboard driver disk, then go to Application Software\Install GIGABYTE Utilities and select Marvell Raid Utility to create the SATA driver diskette (for AHCI mode) and the installation of the SATA driver and operating system. If you use to enter the Marvell...
...account password before, click Login to login the operating system. ENTER: Operation F10: Exit/Save ESC: Return Figure 8 Use the Marvell RAID Utility in the operating system. Appendix Note: After the installation, you must login the utility with the same account name and password ...Group Ltd. To install the utility, insert the motherboard driver disk, then go to Application Software\Install GIGABYTE Utilities and select Marvell Raid Utility to create the SATA driver diskette (for AHCI mode) and the installation of the SATA driver and operating system. If you use to enter the Marvell...

Manual
Page 104
... driver disk (here we as- 5-1-4 Making a SATA RAID/AHCI Driver Diskette (Required for your optical drive is /are configured to RAID/AHCI mode, you also can copy the SATA controller driver from the motherboard driver disk to a USB flash drive. Without the driver,...bit driver. Appendix - 104 - Steps: 1: Boot from the motherboard driver disk to install the SATA controller driver during the Windows setup process. Press after the command: • For the Intel ICH10R, type (Figure 1): (Note 1) A:\>copy d:\bootdrv\imsm\32bit\*.* • For the JMicron JMB362/GIGABYTE SATA2...
... driver disk (here we as- 5-1-4 Making a SATA RAID/AHCI Driver Diskette (Required for your optical drive is /are configured to RAID/AHCI mode, you also can copy the SATA controller driver from the motherboard driver disk to a USB flash drive. Without the driver,...bit driver. Appendix - 104 - Steps: 1: Boot from the motherboard driver disk to install the SATA controller driver during the Windows setup process. Press after the command: • For the Intel ICH10R, type (Figure 1): (Note 1) A:\>copy d:\bootdrv\imsm\32bit\*.* • For the JMicron JMB362/GIGABYTE SATA2...
Manual
Page 106
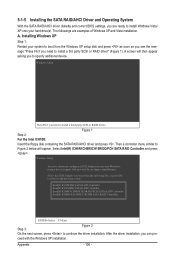
... 3: Figure 2 On the next screen, press to install a 3rd party SCSI or RAID driver" (Figure 1). 5-1-5 Installing the SATA RAID/AHCI Driver and Operating System With the SATA RAID/AHCI driver diskette and correct BIOS settings, you need to install a third party SCSI or RAID driver. Then a controller menu similar to configure a SCSI Adapter for use with the Windows...
... 3: Figure 2 On the next screen, press to install a 3rd party SCSI or RAID driver" (Figure 1). 5-1-5 Installing the SATA RAID/AHCI Driver and Operating System With the SATA RAID/AHCI driver diskette and correct BIOS settings, you need to install a third party SCSI or RAID driver. Then a controller menu similar to configure a SCSI Adapter for use with the Windows...
Manual
Page 107
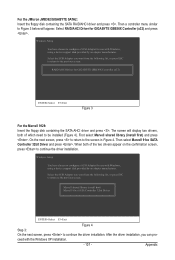
... to Figure 3 below will display two drivers, both of which need to the previous screen. RAID/AHCI Driver for GIGABYTE GBB36X Controller (x32) and press . For the JMicron JMB362/GIGABYTE SATA2: Insert the floppy disk containing the SATA RAID/AHCI driver and press . On the next screen,... to the screen in Figure 4. Appendix Select RAID/AHCI Driver for GIGABYTE GBB36X Controller (x32) ENTER=Select F3=Exit Figure 3 For the Marvell 9128: Insert the floppy disk containing the SATA AHCI driver and press . After the driver installation, you can proceed with Windows, using ...
... to Figure 3 below will display two drivers, both of which need to the previous screen. RAID/AHCI Driver for GIGABYTE GBB36X Controller (x32) and press . For the JMicron JMB362/GIGABYTE SATA2: Insert the floppy disk containing the SATA RAID/AHCI driver and press . On the next screen,... to the screen in Figure 4. Appendix Select RAID/AHCI Driver for GIGABYTE GBB36X Controller (x32) ENTER=Select F3=Exit Figure 3 For the Marvell 9128: Insert the floppy disk containing the SATA AHCI driver and press . After the driver installation, you can proceed with Windows, using ...
Manual
Page 108
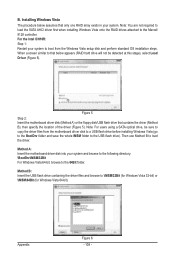
... users using a SATA optical drive, be detected at this stage), select Load Driver (Figure 5). Note: You are not required to load the SATA AHCI driver first when installing Windows Vista onto the RAID drives attached to load the driver. For the Intel ICH10R: Step 1: Restart your system and browse to the ...32-bit) or \iMSM\64Bit (for Windows Vista 64-bit). Installing Windows Vista The procedure below appears (RAID hard drive will not be sure to copy the driver files from the motherboard driver disk to a USB flash drive before installing Windows Vista (go to the BootDrv folder and save the ...
... users using a SATA optical drive, be detected at this stage), select Load Driver (Figure 5). Note: You are not required to load the SATA AHCI driver first when installing Windows Vista onto the RAID drives attached to load the driver. For the Intel ICH10R: Step 1: Restart your system and browse to the ...32-bit) or \iMSM\64Bit (for Windows Vista 64-bit). Installing Windows Vista The procedure below appears (RAID hard drive will not be sure to copy the driver files from the motherboard driver disk to a USB flash drive before installing Windows Vista (go to the BootDrv folder and save the ...

Manual
Page 109
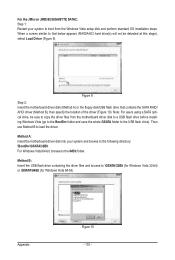
Step 3: When a screen as shown in this chapter are for reference only and may differ by driver version. - 109 - Figure 8 The install menus described in Figure 7 appears, select Intel(R) ICH8R/ICH9R/ICH10R/DO/PCH SATA RAID Controller and click Next. Appendix Figure 7 Step 4: After the driver is loaded, select the RAID/AHCI drive(s) where you want to install the operating system and then click Next to continue the OS installation (Figure 8).
Step 3: When a screen as shown in this chapter are for reference only and may differ by driver version. - 109 - Figure 8 The install menus described in Figure 7 appears, select Intel(R) ICH8R/ICH9R/ICH10R/DO/PCH SATA RAID Controller and click Next. Appendix Figure 7 Step 4: After the driver is loaded, select the RAID/AHCI drive(s) where you want to install the operating system and then click Next to continue the OS installation (Figure 8).
Manual
Page 110
...the USB flash drive containing the driver files and browse to load the driver. Appendix Figure 10 - 110 - When a screen similar to that contains the SATA RAID/ AHCI driver (Method B), then specify the location of the driver (Figure 10). Figure 9 Step 2: Insert the motherboard driver disk (Method A) or the ... the USB flash drive). Note: For users using a SATA optical drive, be detected at this stage), select Load Driver (Figure 9). For the JMicron JMB362/GIGABYTE SATA2: Step 1: Restart your system and browse to the following directory: \BootDrv\GSATA\32Bit For Windows Vista 64-bit...
...the USB flash drive containing the driver files and browse to load the driver. Appendix Figure 10 - 110 - When a screen similar to that contains the SATA RAID/ AHCI driver (Method B), then specify the location of the driver (Figure 10). Figure 9 Step 2: Insert the motherboard driver disk (Method A) or the ... the USB flash drive). Note: For users using a SATA optical drive, be detected at this stage), select Load Driver (Figure 9). For the JMicron JMB362/GIGABYTE SATA2: Step 1: Restart your system and browse to the following directory: \BootDrv\GSATA\32Bit For Windows Vista 64-bit...

Manual
Page 111
Figure 12 The install menus described in Figure 11 appears, select GIGABYTE GBB36X Controller and click Next. Appendix Figure 11 Step 4: After the driver is loaded, select the RAID/AHCI drive(s) where you want to install the operating system and then click Next to continue the OS installation (Figure 12). Step 3: When a screen as shown in this chapter are for reference only and may differ by driver version. - 111 -
Figure 12 The install menus described in Figure 11 appears, select GIGABYTE GBB36X Controller and click Next. Appendix Figure 11 Step 4: After the driver is loaded, select the RAID/AHCI drive(s) where you want to install the operating system and then click Next to continue the OS installation (Figure 12). Step 3: When a screen as shown in this chapter are for reference only and may differ by driver version. - 111 -

Manual
Page 113
...menu. Then launch the Intel Matrix Storage Console from All Programs in the operating system, make sure the chipset driver has been installed from the motherboard driver disk. Step 6: After the RAID 1 volume rebuilding, click the volume and its status in the information pane will display as Normal. - 113... - Step 2: The new hard drive appears under Non-RAID Hard Drive. Right-click on the new hard drive and ...
...menu. Then launch the Intel Matrix Storage Console from All Programs in the operating system, make sure the chipset driver has been installed from the motherboard driver disk. Step 6: After the RAID 1 volume rebuilding, click the volume and its status in the information pane will display as Normal. - 113... - Step 2: The new hard drive appears under Non-RAID Hard Drive. Right-click on the new hard drive and ...
Manual
Page 116
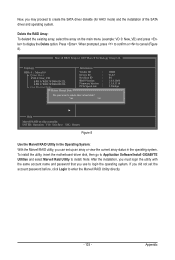
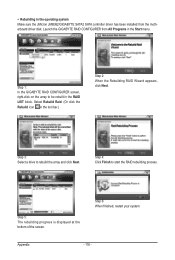
... click the Rebuild icon in the operating system Make sure the JMicron JMB362/GIGABYTE SATA2 SATA controller driver has been installed from All Programs in the RAID LIST block. Step 5: The rebuilding progress is displayed at the bottom of the screen. Appendix - 116 - &#...2: When the Rebuilding RAID Wizard appears, click Next. Step 1: In the GIGABYTE RAID CONFIGURER screen, right-click on the array to be rebuilt in the Start menu. Step 3: Select a drive to start the RAID rebuilding process. Launch the GIGABYTE RAID CONFIGURER from the motherboard driver disk. Step 4: ...
... click the Rebuild icon in the operating system Make sure the JMicron JMB362/GIGABYTE SATA2 SATA controller driver has been installed from All Programs in the RAID LIST block. Step 5: The rebuilding progress is displayed at the bottom of the screen. Appendix - 116 - &#...2: When the Rebuilding RAID Wizard appears, click Next. Step 1: In the GIGABYTE RAID CONFIGURER screen, right-click on the array to be rebuilt in the Start menu. Step 3: Select a drive to start the RAID rebuilding process. Launch the GIGABYTE RAID CONFIGURER from the motherboard driver disk. Step 4: ...


