
Manual
Page 4
Table of Contents ItemChecklist ...6 OptionalAccessories ...6 GA-VM800PMC Motherboard Layout 7 Block Diagram ...8 Chapter 1 Hardware Installation 9 1-1 Considerations Prior to Installation 9 1-2 Feature Summary 10 1-3 Installation of the CPU and CPU Cooler 12 1-3-1 Installation of the CPU 12 1-3-2 Installation of the CPU Cooler 13 1-4 Installation of Memory 14 1-5 Installation of Expansion Cards 15 1-6 I/O Back Panel Introduction 16 1-7 Connectors...
Table of Contents ItemChecklist ...6 OptionalAccessories ...6 GA-VM800PMC Motherboard Layout 7 Block Diagram ...8 Chapter 1 Hardware Installation 9 1-1 Considerations Prior to Installation 9 1-2 Feature Summary 10 1-3 Installation of the CPU and CPU Cooler 12 1-3-1 Installation of the CPU 12 1-3-2 Installation of the CPU Cooler 13 1-4 Installation of Memory 14 1-5 Installation of Expansion Cards 15 1-6 I/O Back Panel Introduction 16 1-7 Connectors...
Manual
Page 10
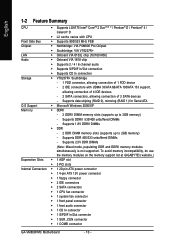
... for Serial ATA O.S Support Š Microsoft Windows 2000/XP Memory Š DDRII - 2 DDRII DIMM memory slots (supports up to 2GB memory) - To avoid memory incompatibility, do use the memory modules on the memory support list at GIGABYTE's website.) Expanstion Slots Š 1 AGP slot Š ... 1 SUR_CEN connector Š 1 COMB connector GA-VM800PMC Motherboard - 10 - Supports DDR 400/333 unbuffered DIMMs - Supports DDRII 533/400 unbuffered DIMMs - Supports 2.5V DDR DIMMs (Note: Mixed mode, populating DDR and DDRII memory modules simultaneously is not supported. Supports 1.8V ...
... for Serial ATA O.S Support Š Microsoft Windows 2000/XP Memory Š DDRII - 2 DDRII DIMM memory slots (supports up to 2GB memory) - To avoid memory incompatibility, do use the memory modules on the memory support list at GIGABYTE's website.) Expanstion Slots Š 1 AGP slot Š ... 1 SUR_CEN connector Š 1 COMB connector GA-VM800PMC Motherboard - 10 - Supports DDR 400/333 unbuffered DIMMs - Supports DDRII 533/400 unbuffered DIMMs - Supports 2.5V DDR DIMMs (Note: Mixed mode, populating DDR and DDRII memory modules simultaneously is not supported. Supports 1.8V ...
Manual
Page 12
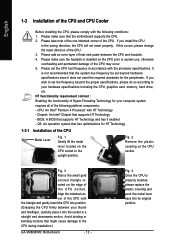
...of the CPU socket. Please add an even layer of heat sink paste between your hardware specifications including the CPU, graphics card, memory, hard drive, etc. If you install the CPU in the wrong direction, the CPU will not insert properly. CPU: An Intel.... 2. Please make sure that supports HT Technology - Fig. 2 Remove the plastic covering on the CPU prior to the CPU during installation.) GA-VM800PMC Motherboard - 12 - It is not recommended that has optimizations for HT Technology 1-3-1 Installation of the following conditions: 1. HT functionality requirement content ...
...of the CPU socket. Please add an even layer of heat sink paste between your hardware specifications including the CPU, graphics card, memory, hard drive, etc. If you install the CPU in the wrong direction, the CPU will not insert properly. CPU: An Intel.... 2. Please make sure that supports HT Technology - Fig. 2 Remove the plastic covering on the CPU prior to the CPU during installation.) GA-VM800PMC Motherboard - 12 - It is not recommended that has optimizations for HT Technology 1-3-1 Installation of the following conditions: 1. HT functionality requirement content ...
Manual
Page 14
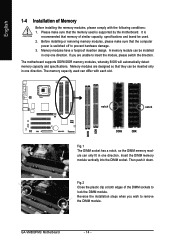
..., please make sure that the computer power is recommended that they can only fit in one direction. The memory capacity used . 2. GA-VM800PMC Motherboard - 14 - Memory modules have a foolproof insertion design. A memory module can differ with the following conditions: 1. Fig.2 Close the plastic clip at both edges of the DIMM sockets to remove the DIMM...
..., please make sure that the computer power is recommended that they can only fit in one direction. The memory capacity used . 2. GA-VM800PMC Motherboard - 14 - Memory modules have a foolproof insertion design. A memory module can differ with the following conditions: 1. Fig.2 Close the plastic clip at both edges of the DIMM sockets to remove the DIMM...
Manual
Page 30
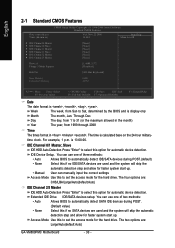
... up. You can manually input the correct settings Access Mode Use this if no SATA devices are : Large/Auto(default:Auto) GA-VM800PMC Motherboard - 30 - Access Mode Use this to automatically detect SATA IDE devices during POST.(default) • None Select this to...Master [None] [None] [None] [None] [None] [None] Drive A Floppy 3 Mode Support [1.44M, 3.5"] [Disabled] Halt On [All, But Keyboard] Base Memory Extended Memory 640K 447M KLJI: Move Enter: Select F5: Previous Values +/-/PU/PD: Value F10: Save ESC: Exit F6: Fail-Safe Defaults F7: Optimized Defaults F1: General...
... up. You can manually input the correct settings Access Mode Use this if no SATA devices are : Large/Auto(default:Auto) GA-VM800PMC Motherboard - 30 - Access Mode Use this to automatically detect SATA IDE devices during POST.(default) • None Select this to...Master [None] [None] [None] [None] [None] [None] Drive A Floppy 3 Mode Support [1.44M, 3.5"] [Disabled] Halt On [All, But Keyboard] Base Memory Extended Memory 640K 447M KLJI: Move Enter: Select F5: Previous Values +/-/PU/PD: Value F10: Save ESC: Exit F6: Fail-Safe Defaults F7: Optimized Defaults F1: General...

Manual
Page 31
...sided drive; 720K byte capacity 3.5 inch double-sided drive; 1.44M byte capacity. (Default value) 2.88M, 3.5" 3.5 inch double-sided drive; 2.88M byte capacity. Memory The category is display-only which is 3 mode Floppy Drive. Whenever the BIOS detects a non-fatal error the system will not stop for Japan Area... Normal Floppy Drive. (Default value) Drive A Drive A is determined by POST (Power On Self Test) of base (or conventional) memory installed in the computer. All, But Disk/Key The system boot will be labeled on this information. Hard drive information should be stopped....
...sided drive; 720K byte capacity 3.5 inch double-sided drive; 1.44M byte capacity. (Default value) 2.88M, 3.5" 3.5 inch double-sided drive; 2.88M byte capacity. Memory The category is display-only which is 3 mode Floppy Drive. Whenever the BIOS detects a non-fatal error the system will not stop for Japan Area... Normal Floppy Drive. (Default value) Drive A Drive A is determined by POST (Power On Self Test) of base (or conventional) memory installed in the computer. All, But Disk/Key The system boot will be labeled on this information. Hard drive information should be stopped....
Manual
Page 32
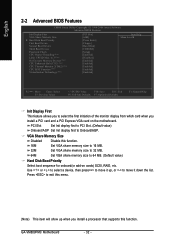
...monitor display from which card when you install a PCI card and a PCI Express VGA card on cards) SCSI, RAID, etc. to 3 (Note) No-Execute Memory Protect (Note) CPU Enhanced Halt (C1E) (Note) CPU Thermal Monitor 2(TM2) (Note) CPU EIST Function (Note) Virtualization Technology (Note) [PCI Slot] ...1984-2006 Award Software Advanced BIOS Features Init Display First VGA Share Memory Size ` Hard Disk Boot Priority First Boot Device Second Boot Device Third Boot Device Password Check CPU Hyper-Threading (Note) Limit CPUID Max. GA-VM800PMC Motherboard - 32 - Press to Onboard/AGP. PCI Slot Set...
...monitor display from which card when you install a PCI card and a PCI Express VGA card on cards) SCSI, RAID, etc. to 3 (Note) No-Execute Memory Protect (Note) CPU Enhanced Halt (C1E) (Note) CPU Thermal Monitor 2(TM2) (Note) CPU EIST Function (Note) Virtualization Technology (Note) [PCI Slot] ...1984-2006 Award Software Advanced BIOS Features Init Display First VGA Share Memory Size ` Hard Disk Boot Priority First Boot Device Second Boot Device Third Boot Device Password Check CPU Hyper-Threading (Note) Limit CPUID Max. GA-VM800PMC Motherboard - 32 - Press to Onboard/AGP. PCI Slot Set...

Manual
Page 33
... system will be denied if the correct password is only working for windows XP. (Default value) No-Execute Memory Protect (Note) Enabled Enable No-Execute Memory Protect function. (Default value) Disabled Disable No-Execute Memory Protect function. USB-CDROM Select your boot device priority by USB-CDROM. Legacy LAN Select your boot device...
... system will be denied if the correct password is only working for windows XP. (Default value) No-Execute Memory Protect (Note) Enabled Enable No-Execute Memory Protect function. (Default value) Disabled Disable No-Execute Memory Protect function. USB-CDROM Select your boot device priority by USB-CDROM. Legacy LAN Select your boot device...
Manual
Page 36
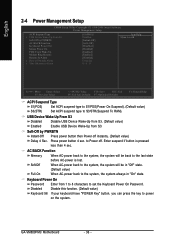
... will be in "Off" state. (Default value) Full-On When AC-power back to power on the system. Keyboard Power On Password Enter from S3. GA-VM800PMC Motherboard - 36 - to the last state before AC-power is pressed less than 4 sec. Enter suspend if button is lost. Disabled Disable this function. (... On Mouse Power On PME Event Wake Up Modem Ring Resume Resume by PWRBTN Instant-Off Press power button then Power off . AC BACK Function Memory When AC-power back to the system, the system will be back to Power off instantly. (Default value) Delay 4 Sec. Soft-Off by Alarm x ...
... will be in "Off" state. (Default value) Full-On When AC-power back to power on the system. Keyboard Power On Password Enter from S3. GA-VM800PMC Motherboard - 36 - to the last state before AC-power is pressed less than 4 sec. Enter suspend if button is lost. Disabled Disable this function. (... On Mouse Power On PME Event Wake Up Modem Ring Resume Resume by PWRBTN Instant-Off Press power button then Power off . AC BACK Function Memory When AC-power back to the system, the system will be back to Power off instantly. (Default value) Delay 4 Sec. Soft-Off by Alarm x ...

Manual
Page 49
...cooling fan, 4) PC health for enhancing system performance, 2) C.I.A. and M.I .B./2 setting page 3. for special enhancement for CPU and Memory, 3) Smart-Fan control for managing fan speed control of CPU frequency 8. Overclocking Enters the Overclocking setting page 2. PC Health Enters... 5. Help button Display EasyTuneTM 5 Help file 11. GO Confirmation and Execution button 6. Featuring several powerful yet easy to GIGABYTE website 10. GIGABYTE Logo Log on different motherboards. - 49 - English Chapter 4 Appendix 4-1 Unique Software Utilities (Not all model support these...
...cooling fan, 4) PC health for enhancing system performance, 2) C.I.A. and M.I .B./2 setting page 3. for special enhancement for CPU and Memory, 3) Smart-Fan control for managing fan speed control of CPU frequency 8. Overclocking Enters the Overclocking setting page 2. PC Health Enters... 5. Help button Display EasyTuneTM 5 Help file 11. GO Confirmation and Execution button 6. Featuring several powerful yet easy to GIGABYTE website 10. GIGABYTE Logo Log on different motherboards. - 49 - English Chapter 4 Appendix 4-1 Unique Software Utilities (Not all model support these...
Manual
Page 50
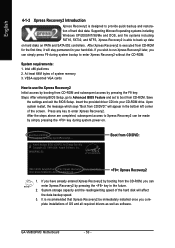
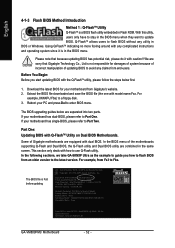
... . . :BIOS Setup/Q-Flash, : Xpress Recovery2, : Boot Menu 10/31/2006-P4M800Pro-823-6A7L6G0FC-00 Boot from CD/DVD: : Xpress Recovery2 1. GA-VM800PMC Motherboard - 50 - At least 64M bytes of the hard disk will affect the data backup speed. 3. Upon system restart, the message which says "Boot... from CD/DVD:" will stay permanent in your CD-ROM drive. System storage capacity and the reading/writing speed of system memory 3. Supporting Microsoft operating systems including Windows XP/2000/NT/98/Me and DOS, and file systems including FAT16, FAT32, and NTFS, Xpress ...
... . . :BIOS Setup/Q-Flash, : Xpress Recovery2, : Boot Menu 10/31/2006-P4M800Pro-823-6A7L6G0FC-00 Boot from CD/DVD: : Xpress Recovery2 1. GA-VM800PMC Motherboard - 50 - At least 64M bytes of the hard disk will affect the data backup speed. 3. Upon system restart, the message which says "Boot... from CD/DVD:" will stay permanent in your CD-ROM drive. System storage capacity and the reading/writing speed of system memory 3. Supporting Microsoft operating systems including Windows XP/2000/NT/98/Me and DOS, and file systems including FAT16, FAT32, and NTFS, Xpress ...
Manual
Page 52
...Xpress Recovery 08/07/2003-i875P-6A79BG03C-00 GA-VM800PMC Motherboard - 52 - Extract the BIOS file downloaded and save the BIOS file (the one with caution!! For example, from an older version to the latest version. Please note that Gigabyte Technology Co., Ltd is not responsible for ...8KNXP Ultra Fa3 Check System Health OK , VCore = 1.5250 Main Processor : Intel Pentium(R) 4 1.6GHz (133x12) Memory Testing : 131072K OK Memory Frequency 266 MHz in the same screen. Part One:...
...Xpress Recovery 08/07/2003-i875P-6A79BG03C-00 GA-VM800PMC Motherboard - 52 - Extract the BIOS file downloaded and save the BIOS file (the one with caution!! For example, from an older version to the latest version. Please note that Gigabyte Technology Co., Ltd is not responsible for ...8KNXP Ultra Fa3 Check System Health OK , VCore = 1.5250 Main Processor : Intel Pentium(R) 4 1.6GHz (133x12) Memory Testing : 131072K OK Memory Frequency 266 MHz in the same screen. Part One:...

Manual
Page 55
... backup BIOS, too. 5. Intel i875P AGPset BIOS for 8KNXP Ultra Fba Check System Health OK , VCore = 1.5250 Main Processor : Intel Pentium(R) 4 1.6GHz (133x12) Memory Testing : 131072K OK Memory Frequency 266 MHz in Single Channel Primary Master : FUJITSU MPE3170AT ED-03-08 Primary Slave : None Secondary Master : CREATIVEDVD-RM DVD1242E BC101 Secondary Slave...
... backup BIOS, too. 5. Intel i875P AGPset BIOS for 8KNXP Ultra Fba Check System Health OK , VCore = 1.5250 Main Processor : Intel Pentium(R) 4 1.6GHz (133x12) Memory Testing : 131072K OK Memory Frequency 266 MHz in Single Channel Primary Master : FUJITSU MPE3170AT ED-03-08 Primary Slave : None Secondary Master : CREATIVEDVD-RM DVD1242E BC101 Secondary Slave...

Manual
Page 58
...after updating Award Modular BIOS v6.00PG, An Energy Star Ally Copyright (C) 1984-2003, Award Software, Inc. Press Del to update BIOS. GA-VM800PMC Motherboard - 58 - Press Esc and then Y button to 7 in Part One. Congratulation!! Press Y button on your keyboard after you flashed... 6. Intel 845GE AGPSet BIOS for 8GE800 F4 Check System Health OK Main Processor : Intel Pentium(R) 4 1.7GHz (100x17.0) Memory Testing : 122880K OK + 8192K Shared Memory Primary Master : FUJITSU MPE3170AT ED-03-08 Primary Slave : None Secondary Master : CREATIVEDVD-RM DVD1242E BC101 Secondary Slave : None...
...after updating Award Modular BIOS v6.00PG, An Energy Star Ally Copyright (C) 1984-2003, Award Software, Inc. Press Del to update BIOS. GA-VM800PMC Motherboard - 58 - Press Esc and then Y button to 7 in Part One. Congratulation!! Press Y button on your keyboard after you flashed... 6. Intel 845GE AGPSet BIOS for 8GE800 F4 Check System Health OK Main Processor : Intel Pentium(R) 4 1.7GHz (100x17.0) Memory Testing : 122880K OK + 8192K Shared Memory Primary Master : FUJITSU MPE3170AT ED-03-08 Primary Slave : None Secondary Master : CREATIVEDVD-RM DVD1242E BC101 Secondary Slave : None...
Manual
Page 63
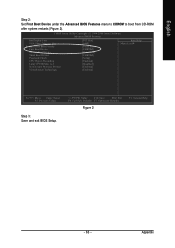
English Step 2: Set First Boot Device under the Advanced BIOS Features menu to CDROM to 3 No-Execute Memory Protect Virtualization Technology [PCI Slot] [64M] [Press Enter] [CDROM] [Hard Disk] [CDROM] [Setup] [Enabled] [Disabled] [Enabled] [Enabled] Item Help Menu Level : Move... Figure 2 F1: General Help - 63 - CMOS Setup Utility-Copyright (C) 1984-2006 Award Software Advanced BIOS Features Init Display First VGA Share Memory Size Hard Disk Boot Priority First Boot Device Second Boot Device Third Boot Device Password Check CPU Hyper-Threading Limit CPUID Max. Appendix to boot...
English Step 2: Set First Boot Device under the Advanced BIOS Features menu to CDROM to 3 No-Execute Memory Protect Virtualization Technology [PCI Slot] [64M] [Press Enter] [CDROM] [Hard Disk] [CDROM] [Setup] [Enabled] [Disabled] [Enabled] [Enabled] Item Help Menu Level : Move... Figure 2 F1: General Help - 63 - CMOS Setup Utility-Copyright (C) 1984-2006 Award Software Advanced BIOS Features Init Display First VGA Share Memory Size Hard Disk Boot Priority First Boot Device Second Boot Device Third Boot Device Password Check CPU Hyper-Threading Limit CPUID Max. Appendix to boot...
Manual
Page 64
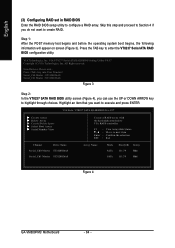
... hard disks attached to VIA RAID controller F1 : , : Enter : ESC : View Array/disk Status Move to highlight through choices. VIA Tech. Step 1: After the POST memory test begins and before the operating system boot begins, the following information will appear on screen (Figure 3). VIA VT8237 Serial ATA RAID BIOS Setting Utility... Exit Channel Drive Name Serial_Ch0 Master ST3120026AS Serial_Ch1 Master ST3120026AS Array Name Mode SATA SATA Size(GB) Status 111.79 Hdd 111.79 Hdd Figure 4 GA-VM800PMC Motherboard - 64 -
... hard disks attached to VIA RAID controller F1 : , : Enter : ESC : View Array/disk Status Move to highlight through choices. VIA Tech. Step 1: After the POST memory test begins and before the operating system boot begins, the following information will appear on screen (Figure 3). VIA VT8237 Serial ATA RAID BIOS Setting Utility... Exit Channel Drive Name Serial_Ch0 Master ST3120026AS Serial_Ch1 Master ST3120026AS Array Name Mode SATA SATA Size(GB) Status 111.79 Hdd 111.79 Hdd Figure 4 GA-VM800PMC Motherboard - 64 -


