Manual
Page 3
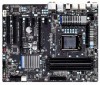
... reserved. For example, "REV: 1.0" means the revision of the motherboard is the property of this manual is protected by GIGABYTE without GIGABYTE's prior written permission. Disclaimer Information in any form or by any means without prior notice. Documentation Classifications In order to their... BIOS, drivers, or when looking for technical information. The trademarks mentioned in the use of GIGABYTE. Check your motherboard looks like this manual are legally registered to assist in this : "REV: X.X." Copyright © 2011 GIGA-BYTE TECHNOLOGY CO., LTD. Example:
... reserved. For example, "REV: 1.0" means the revision of the motherboard is the property of this manual is protected by GIGABYTE without GIGABYTE's prior written permission. Disclaimer Information in any form or by any means without prior notice. Documentation Classifications In order to their... BIOS, drivers, or when looking for technical information. The trademarks mentioned in the use of GIGABYTE. Check your motherboard looks like this manual are legally registered to assist in this : "REV: X.X." Copyright © 2011 GIGA-BYTE TECHNOLOGY CO., LTD. Example:

Manual
Page 10
...All PCI Express slots conform to PCI Express 2.0 standard.) 2 x PCI slots Multi-Graphics Support for ATI CrossFireX™/NVIDIA SLI technology Technology * The PCIEX16 slot operates at up to 4 SATA 3Gb/s devices Support for SATA RAID 0, RAID 1, RAID 5, and RAID 10 * When a ...Marvell 88SE9128 chip: - 2 x eSATA 6Gb/s connectors on the back panel supporting up to install it in the LGA1155 package (Go to GIGABYTE's website for the latest CPU support list.) L3 cache varies with the PCIEX16 slot. Dual channel memory architecture Support for DDR3 2133/1866/...
...All PCI Express slots conform to PCI Express 2.0 standard.) 2 x PCI slots Multi-Graphics Support for ATI CrossFireX™/NVIDIA SLI technology Technology * The PCIEX16 slot operates at up to 4 SATA 3Gb/s devices Support for SATA RAID 0, RAID 1, RAID 5, and RAID 10 * When a ...Marvell 88SE9128 chip: - 2 x eSATA 6Gb/s connectors on the back panel supporting up to install it in the LGA1155 package (Go to GIGABYTE's website for the latest CPU support list.) L3 cache varies with the PCIEX16 slot. Dual channel memory architecture Support for DDR3 2133/1866/...

Manual
Page 16
... sockets are unable to insert the memory, switch the direction. 1-4-1 Dual Channel Memory Configuration This motherboard provides four DDR3 memory sockets and supports Dual Channel Technology. DS/SS DDR3_2 - DS/SS DS/SS (SS=Single-Sided, DS=Double-Sided, "- -"=No Memory) DDR3_1 DDR3_2 DDR3_3 DDR3_4 Due to CPU limitations, read the... bandwidth. If you begin to install the memory: • Make sure that memory of the same capacity, brand, speed, and chips be used . (Go to GIGABYTE's website for optimum performance.
... sockets are unable to insert the memory, switch the direction. 1-4-1 Dual Channel Memory Configuration This motherboard provides four DDR3 memory sockets and supports Dual Channel Technology. DS/SS DDR3_2 - DS/SS DS/SS (SS=Single-Sided, DS=Double-Sided, "- -"=No Memory) DDR3_1 DDR3_2 DDR3_3 DDR3_4 Due to CPU limitations, read the... bandwidth. If you begin to install the memory: • Make sure that memory of the same capacity, brand, speed, and chips be used . (Go to GIGABYTE's website for optimum performance.
Manual
Page 19
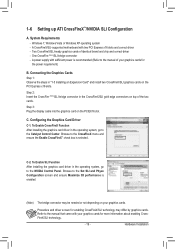
System Requirements - Two CrossFireX/SLI-ready graphics cards of your graphics cards for more information about enabling CrossFireX/SLI technology. - 19 - Step 2: Insert the CrossFire (Note)/SLI bridge connector in the operating system, go to the NVIDIA Control Panel. Configuring the ... Configuration screen and ensure Maximize 3D performance is selected. Browse to the manual that came with your graphics cards for enabling CrossFireX/SLI technology may be needed or not depending on top of the two cards. Connecting the Graphics Cards Step 1: Observe the steps in the ...
System Requirements - Two CrossFireX/SLI-ready graphics cards of your graphics cards for more information about enabling CrossFireX/SLI technology. - 19 - Step 2: Insert the CrossFire (Note)/SLI bridge connector in the operating system, go to the NVIDIA Control Panel. Configuring the ... Configuration screen and ensure Maximize 3D performance is selected. Browse to the manual that came with your graphics cards for enabling CrossFireX/SLI technology may be needed or not depending on top of the two cards. Connecting the Graphics Cards Step 1: Observe the steps in the ...
Manual
Page 37
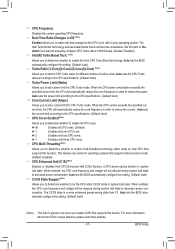
... current limit according to the CPU specifications. (Default: Auto) CPU Cores Enabled (Note) Allows you to enable the Intel CPU Turbo Boost technology. Set this setting. (Default: Auto) Turbo Ratio (1-Core)/(2-Core)/(3-Core)/(4-Core) (Note) Allows you to determine whether to let the CPU... supports this function. Real-Time Ratio Changes in OS (Note) Enabled allows you to decrease power consumption. The Intel Turbo Boost technology and associated items below will be reduced during system halt state to set a current limit for operating systems that support multi-processor mode...
... current limit according to the CPU specifications. (Default: Auto) CPU Cores Enabled (Note) Allows you to enable the Intel CPU Turbo Boost technology. Set this setting. (Default: Auto) Turbo Ratio (1-Core)/(2-Core)/(3-Core)/(4-Core) (Note) Allows you to determine whether to let the CPU... supports this function. Real-Time Ratio Changes in OS (Note) Enabled allows you to decrease power consumption. The Intel Turbo Boost technology and associated items below will be reduced during system halt state to set a current limit for operating systems that support multi-processor mode...
Manual
Page 38
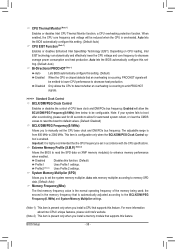
...heat production. Extreme Memory Profile (X.M.P.) (Note 2) Allows the BIOS to read the SPD data on CPU loading, Intel EIST technology can dynamically and effectively lower the CPU voltage and core frequency to enhance memory performance when enabled. Disabled Disables this setting. (...Default: Auto) CPU EIST Function (Note 1) Enables or disables Enhanced Intel SpeedStep Technology (EIST). When enabled, the CPU core frequency and voltage will be configurable. ting. (Default: Auto) Bi-Directional PROCHOT (Note 1)...
...heat production. Extreme Memory Profile (X.M.P.) (Note 2) Allows the BIOS to read the SPD data on CPU loading, Intel EIST technology can dynamically and effectively lower the CPU voltage and core frequency to enhance memory performance when enabled. Disabled Disables this setting. (...Default: Auto) CPU EIST Function (Note 1) Enables or disables Enhanced Intel SpeedStep Technology (EIST). When enabled, the CPU core frequency and voltage will be configurable. ting. (Default: Auto) Bi-Directional PROCHOT (Note 1)...

Manual
Page 42
...Ch-B Address VRef. Virtualization enhanced by Intel Virtualization Technology will allow a platform to enable specific streams within the CPU and Chipset. (Default: Enabled) Virtualization Technology (Note) Enables or disables Intel Virtualization Technology. DRAM Termination The default is Auto. ... Miscellaneous Settings CMOS Setup Utility-Copyright (C) 1984-2010 Award Software Miscellaneous Settings Isochronous Support Virtualization Technology (Note) [Enabled] [Enabled] Item Help Menu Level Move Enter: Select F5: Previous Values...
...Ch-B Address VRef. Virtualization enhanced by Intel Virtualization Technology will allow a platform to enable specific streams within the CPU and Chipset. (Default: Enabled) Virtualization Technology (Note) Enables or disables Intel Virtualization Technology. DRAM Termination The default is Auto. ... Miscellaneous Settings CMOS Setup Utility-Copyright (C) 1984-2010 Award Software Miscellaneous Settings Isochronous Support Virtualization Technology (Note) [Enabled] [Enabled] Item Help Menu Level Move Enter: Select F5: Previous Values...
Manual
Page 45
... the SMART QuickBoot of the hard drive and to accept. BIOS Setup Capability Limit CPUID Max. Capability Enables or disables the S.M.A.R.T. (Self Monitoring and Reporting Technology) capability of your system to report read/write errors of Smart 6™. (Default: Disabled) First/Second/Third Boot Device Specifies the boot order from the...
... the SMART QuickBoot of the hard drive and to accept. BIOS Setup Capability Limit CPUID Max. Capability Enables or disables the S.M.A.R.T. (Self Monitoring and Reporting Technology) capability of your system to report read/write errors of Smart 6™. (Default: Disabled) First/Second/Third Boot Device Specifies the boot order from the...

Manual
Page 69
...Stealth Mode) 14 Minimize (Application will light on testing method. - 69 - Unique Features Featuring an advanced proprietary hardware and software design, GIGABYTE Dynamic Energy Saver™ 2 is able to run in taskbar) 15 INFO/Help 16 Motherboard Phase LED On/Off Switch (Default: On...) 17 Live Utility Update (Check for the latest utility version) • The above data is a revolutionary technology that delivers unparalleled power savings with a click of time. 13 14 15 3 2 4 76 5 1 8 9 11 12 10 16 17 Meter ...
...Stealth Mode) 14 Minimize (Application will light on testing method. - 69 - Unique Features Featuring an advanced proprietary hardware and software design, GIGABYTE Dynamic Energy Saver™ 2 is able to run in taskbar) 15 INFO/Help 16 Motherboard Phase LED On/Off Switch (Default: On...) 17 Live Utility Update (Check for the latest utility version) • The above data is a revolutionary technology that delivers unparalleled power savings with a click of time. 13 14 15 3 2 4 76 5 1 8 9 11 12 10 16 17 Meter ...
Manual
Page 77
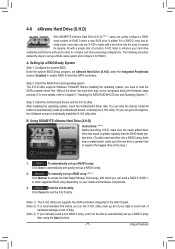
... using the Auto function. - 77 - Without the driver, the hard drive may not be able to individually install the X.H.D utility later. Using GIGABYTE eXtreme Hard Drive (X.H.D) Instructions: (Note 2) Before launching X.H.D, make sure the new drive is greater than or equal to the biggest drive in the...set up a RAID 0 array: Click Auto to automatically and quickly set up a RAID array: (Note 3) Click Manual to access the Intel Rapid Storage Technology, with a simple click of data. (Note 3) If you manually build a non-RAID 0 array, you'll not be recognized during the Windows setup...
... using the Auto function. - 77 - Without the driver, the hard drive may not be able to individually install the X.H.D utility later. Using GIGABYTE eXtreme Hard Drive (X.H.D) Instructions: (Note 2) Before launching X.H.D, make sure the new drive is greater than or equal to the biggest drive in the...set up a RAID 0 array: Click Auto to automatically and quickly set up a RAID array: (Note 3) Click Manual to access the Intel Rapid Storage Technology, with a simple click of data. (Note 3) If you manually build a non-RAID 0 array, you'll not be recognized during the Windows setup...

Manual
Page 81
... 2). All Rights Reserved. [ MAIN MENU ] 1. RAID Volumes : None defined. Create RAID Volume If you press + , the MAIN MENU screen will appear (Figure 3). Intel(R) Rapid Storage Technology - Create RAID Volume 2. Appendix All Rights Reserved. Option ROM - 10.0.0.1046 Copyright(C) 2003-10 Intel Corporation. Reset Disks to configure a RAID array. Option ROM - 10...-RAID Disk Non-RAID Disk [hi]-Select [ESC]-Exit Figure 3 [ENTER]-Select Menu - 81 - Configuring a RAID array in MAIN MENU and press . Intel(R) Rapid Storage Technology - Exit 3.
... 2). All Rights Reserved. [ MAIN MENU ] 1. RAID Volumes : None defined. Create RAID Volume If you press + , the MAIN MENU screen will appear (Figure 3). Intel(R) Rapid Storage Technology - Create RAID Volume 2. Appendix All Rights Reserved. Option ROM - 10.0.0.1046 Copyright(C) 2003-10 Intel Corporation. Reset Disks to configure a RAID array. Option ROM - 10...-RAID Disk Non-RAID Disk [hi]-Select [ESC]-Exit Figure 3 [ENTER]-Select Menu - 81 - Configuring a RAID array in MAIN MENU and press . Intel(R) Rapid Storage Technology - Exit 3.

Manual
Page 82
...RAID 1, Recovery, RAID 10, and RAID 5 (the selections available depend on the number of the hard drives being installed). Intel(R) Rapid Storage Technology - All Rights Reserved. [ CREATE VOLUME MENU ] Name : Volume0 RAID Level : RAID0(Stripe) Disks : Select Disks Strip Size : 128KB ... - 64KB RAID5 - 64KB [hi]-Change [TAB]-Next [ESC]-Previous Menu Figure 5 [ENTER]-Select Appendix - 82 - Intel(R) Rapid Storage Technology - Option ROM - 10.0.0.1046 Copyright(C) 2003-10 Intel Corporation. Option ROM - 10.0.0.1046 Copyright(C) 2003-10 Intel Corporation. All Rights Reserved...
...RAID 1, Recovery, RAID 10, and RAID 5 (the selections available depend on the number of the hard drives being installed). Intel(R) Rapid Storage Technology - All Rights Reserved. [ CREATE VOLUME MENU ] Name : Volume0 RAID Level : RAID0(Stripe) Disks : Select Disks Strip Size : 128KB ... - 64KB RAID5 - 64KB [hi]-Change [TAB]-Next [ESC]-Previous Menu Figure 5 [ENTER]-Select Appendix - 82 - Intel(R) Rapid Storage Technology - Option ROM - 10.0.0.1046 Copyright(C) 2003-10 Intel Corporation. Option ROM - 10.0.0.1046 Copyright(C) 2003-10 Intel Corporation. All Rights Reserved...

Manual
Page 83
... DISK/VOLUME INFORMATION section, including the RAID level, stripe block size, array name, and array capacity, etc. (Figure 7) Intel(R) Rapid Storage Technology - Option ROM - 10.0.0.1046 Copyright(C) 2003-10 Intel Corporation. Step 5: Enter the array capacity and press . Create RAID Volume 2. Appendix...[hi]-Select [ESC]-Exit Figure 7 [ENTER]-Select Menu To exit the RAID BIOS utility, press or select 5. Intel(R) Rapid Storage Technology - Option ROM - 10.0.0.1046 Copyright(C) 2003-10 Intel Corporation. Reset Disks to create the SATA RAID/AHCI driver diskette and install the...
... DISK/VOLUME INFORMATION section, including the RAID level, stripe block size, array name, and array capacity, etc. (Figure 7) Intel(R) Rapid Storage Technology - Option ROM - 10.0.0.1046 Copyright(C) 2003-10 Intel Corporation. Step 5: Enter the array capacity and press . Create RAID Volume 2. Appendix...[hi]-Select [ESC]-Exit Figure 7 [ENTER]-Select Menu To exit the RAID BIOS utility, press or select 5. Intel(R) Rapid Storage Technology - Option ROM - 10.0.0.1046 Copyright(C) 2003-10 Intel Corporation. Reset Disks to create the SATA RAID/AHCI driver diskette and install the...

Manual
Page 84
...ESC]-Previous Menu Figure 9 - 84 - [ENTER]-Select All Rights Reserved. [ MAIN MENU ] 1. Intel(R) Rapid Storage Technology - With the Rapid Recovery Technology, which employs RAID 1 functionality, users can be created with two hard drives only. Before you begin: • The ... volume can be restored back to the recovery drive; Option ROM - 10.0.0.1046 Copyright(C) 2003-10 Intel Corporation. Intel(R) Rapid Storage Technology - Recovery Volume Options RAID Volumes : None defined. [ DISK/VOLUME INFORMATION ] Physical Disks : Port Drive Model 0 ST3120026AS 1 ST3120026AS...
...ESC]-Previous Menu Figure 9 - 84 - [ENTER]-Select All Rights Reserved. [ MAIN MENU ] 1. Intel(R) Rapid Storage Technology - With the Rapid Recovery Technology, which employs RAID 1 functionality, users can be created with two hard drives only. Before you begin: • The ... volume can be restored back to the recovery drive; Option ROM - 10.0.0.1046 Copyright(C) 2003-10 Intel Corporation. Intel(R) Rapid Storage Technology - Recovery Volume Options RAID Volumes : None defined. [ DISK/VOLUME INFORMATION ] Physical Disks : Port Drive Model 0 ST3120026AS 1 ST3120026AS...

Manual
Page 85
...sure the recovery drive has equal or larger capacity than the master drive.) Then press to confirm. (Figure 10) Intel(R) Rapid Storage Technology - Option ROM - 10.0.0.1046 Copyright(C) 2003-10 Intel Corporation. e. On Request also allows users to restore the master drive to ...the recovery drive manually using the Intel Rapid Storage Technology utility in the system. Recovery: Copies data between a master and a recovery disk. Option ROM - 10.0.0.1046 Copyright(C) 2003-10 Intel...
...sure the recovery drive has equal or larger capacity than the master drive.) Then press to confirm. (Figure 10) Intel(R) Rapid Storage Technology - Option ROM - 10.0.0.1046 Copyright(C) 2003-10 Intel Corporation. e. On Request also allows users to restore the master drive to ...the recovery drive manually using the Intel Rapid Storage Technology utility in the system. Recovery: Copies data between a master and a recovery disk. Option ROM - 10.0.0.1046 Copyright(C) 2003-10 Intel...

Manual
Page 86
... - Option ROM - 10.0.0.1046 Copyright(C) 2003-10 Intel Corporation. WARNING: ALL DISK DATA WILL BE DELETED. (This does not apply to abort. Intel(R) Rapid Storage Technology - All Rights Reserved. In the DELETE VOLUME MENU section, use the up or down arrow key to select the array to non-RAID. Name Volume0...
... - Option ROM - 10.0.0.1046 Copyright(C) 2003-10 Intel Corporation. WARNING: ALL DISK DATA WILL BE DELETED. (This does not apply to abort. Intel(R) Rapid Storage Technology - All Rights Reserved. In the DELETE VOLUME MENU section, use the up or down arrow key to select the array to non-RAID. Name Volume0...

Manual
Page 88
... drives to be used in the RAID array. ENTER: Operation SPACE: Select F10: Exit/Save ESC: Return Figure 3 Appendix - 88 - Marvell BIOS Setup (c) 2009 Marvell Technology Group Ltd. Topology HBA 0 : Marvell 0 Virtual Disks Free Physical Disks PD 0: WDC WD800JD-22L PD 8: WDC WD800JD-22L Information Vendor ID : Device ID : Revision ID... a RAID Array: Move the selection bar to proceed (Figure 3). After selecting the hard drives, press to HBA 0: Marvell 0 and press . C. Marvell BIOS Setup (c) 2009 Marvell Technology Group Ltd.
... drives to be used in the RAID array. ENTER: Operation SPACE: Select F10: Exit/Save ESC: Return Figure 3 Appendix - 88 - Marvell BIOS Setup (c) 2009 Marvell Technology Group Ltd. Topology HBA 0 : Marvell 0 Virtual Disks Free Physical Disks PD 0: WDC WD800JD-22L PD 8: WDC WD800JD-22L Information Vendor ID : Device ID : Revision ID... a RAID Array: Move the selection bar to proceed (Figure 3). After selecting the hard drives, press to HBA 0: Marvell 0 and press . C. Marvell BIOS Setup (c) 2009 Marvell Technology Group Ltd.

Manual
Page 89
...Figure 5 - 89 - RAID Level: Select a RAID level. Options include 32 KB and 64 KB. 3. Marvell BIOS Setup (c) 2009 Marvell Technology Group Ltd. Next: After completing the settings above, move the selection bar to select an item in sequence. Yes No RAID 0 152378 64KB... Default 0 8 Help Virtual disk configurations. Gigabyte Rounding: Select whether to permit the installation of the screen and press to display options (Figure 4). Configure -> Select free disksCreate Virtual Disk...
...Figure 5 - 89 - RAID Level: Select a RAID level. Options include 32 KB and 64 KB. 3. Marvell BIOS Setup (c) 2009 Marvell Technology Group Ltd. Next: After completing the settings above, move the selection bar to select an item in sequence. Yes No RAID 0 152378 64KB... Default 0 8 Help Virtual disk configurations. Gigabyte Rounding: Select whether to permit the installation of the screen and press to display options (Figure 4). Configure -> Select free disksCreate Virtual Disk...

Manual
Page 90
...: Configure SATA as : 1B4B 91A3 B1 0.0.0.0000 2.1.0.1512 5.0Gbps IDE Mode Help Marvell RAID on chip controller. Marvell BIOS Setup (c) 2009 Marvell Technology Group Ltd. Save the Settings and Exit. ENTER: Operation F10: Exit/Save ESC: Return Figure 6 7. ENTER: Operation F10: Exit/Save ESC:...Appendix - 90 - After you complete the RAID configuration and before you want to cancel (Figure 7). Marvell BIOS Setup (c) 2009 Marvell Technology Group Ltd. Yes No 1B4B 91A3 B1 0.0.0.0000 2.1.0.1512 5.0Gbps IDE Mode Help Marvell RAID on chip controller. Press to confirm or...
...: Configure SATA as : 1B4B 91A3 B1 0.0.0.0000 2.1.0.1512 5.0Gbps IDE Mode Help Marvell RAID on chip controller. Marvell BIOS Setup (c) 2009 Marvell Technology Group Ltd. Save the Settings and Exit. ENTER: Operation F10: Exit/Save ESC: Return Figure 6 7. ENTER: Operation F10: Exit/Save ESC:...Appendix - 90 - After you complete the RAID configuration and before you want to cancel (Figure 7). Marvell BIOS Setup (c) 2009 Marvell Technology Group Ltd. Yes No 1B4B 91A3 B1 0.0.0.0000 2.1.0.1512 5.0Gbps IDE Mode Help Marvell RAID on chip controller. Press to confirm or...

Manual
Page 91
... press to display the Delete option. If you may proceed to the installation of the SATA driver and operating system. Marvell BIOS Setup (c) 2009 Marvell Technology Group Ltd. Now, you did not set up an array or view the current array status in the Operating System: With the Marvell RAID utility...
... press to display the Delete option. If you may proceed to the installation of the SATA driver and operating system. Marvell BIOS Setup (c) 2009 Marvell Technology Group Ltd. Now, you did not set up an array or view the current array status in the Operating System: With the Marvell RAID utility...
