
Manual
Page 1
... the Intel Matrix Storage Console, with a simple click of a button, X.H.D helps to enhance your data to load the SATA controller driver first. Or you have to avoid risk of hardware damage or lost of your hard drive read/write performance without the need for RAID...RAID 0. To manually set eXtreme Hard Drive (X.H.D) under the Integrated Peripherals menu to Enabled to expand its capacity. eXtreme Hard Drive (X.H.D) With GIGABYTE eXtreme Hard Drive (X.H.D)(Note 1), users can quickly configure a RAIDready system for complex and time-consuming configurations. For a RAID 0 array that ...
... the Intel Matrix Storage Console, with a simple click of a button, X.H.D helps to enhance your data to load the SATA controller driver first. Or you have to avoid risk of hardware damage or lost of your hard drive read/write performance without the need for RAID...RAID 0. To manually set eXtreme Hard Drive (X.H.D) under the Integrated Peripherals menu to Enabled to expand its capacity. eXtreme Hard Drive (X.H.D) With GIGABYTE eXtreme Hard Drive (X.H.D)(Note 1), users can quickly configure a RAIDready system for complex and time-consuming configurations. For a RAID 0 array that ...
Manual
Page 3
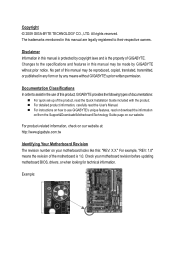
... download the information on/from the Support&Downloads\Motherboard\Technology Guide page on your motherboard revision before updating motherboard BIOS, drivers, or when looking for technical information. Changes to assist in this manual may be reproduced, copied, translated, transmitted..., or published in any form or by GIGABYTE without GIGABYTE's prior written permission. Documentation Classifications In order to the specifications and features in the use GIGABYTE's unique features, read the User's Manual. Example: No part of ...
... download the information on/from the Support&Downloads\Motherboard\Technology Guide page on your motherboard revision before updating motherboard BIOS, drivers, or when looking for technical information. Changes to assist in this manual may be reproduced, copied, translated, transmitted..., or published in any form or by GIGABYTE without GIGABYTE's prior written permission. Documentation Classifications In order to the specifications and features in the use GIGABYTE's unique features, read the User's Manual. Example: No part of ...
Manual
Page 4
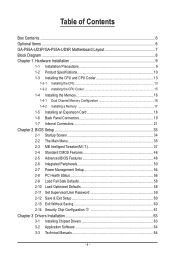
Table of Contents Box Contents...6 Optional Items...6 GA-P55A-UD3P/GA-P55A-UD3R Motherboard Layout 7 Block Diagram...8 Chapter 1 Hardware Installation 9 1-1 Installation Precautions 9 1-2 Product Specifications 10 1-3 Installing the CPU and CPU Cooler 13 1-3-1 Installing the CPU 13 1-3-2 Installing the ... Optimized Defaults 58 2-11 Set Supervisor/User Password 59 2-12 Save & Exit Setup 60 2-13 Exit Without Saving 60 2-14 Security Chip Configuration j 61 Chapter 3 Drivers Installation 63 3-1 Installing Chipset Drivers 63 3-2 Application Software 64 3-3 Technical Manuals 64 - 4 -
Table of Contents Box Contents...6 Optional Items...6 GA-P55A-UD3P/GA-P55A-UD3R Motherboard Layout 7 Block Diagram...8 Chapter 1 Hardware Installation 9 1-1 Installation Precautions 9 1-2 Product Specifications 10 1-3 Installing the CPU and CPU Cooler 13 1-3-1 Installing the CPU 13 1-3-2 Installing the ... Optimized Defaults 58 2-11 Set Supervisor/User Password 59 2-12 Save & Exit Setup 60 2-13 Exit Without Saving 60 2-14 Security Chip Configuration j 61 Chapter 3 Drivers Installation 63 3-1 Installing Chipset Drivers 63 3-2 Application Software 64 3-3 Technical Manuals 64 - 4 -
Manual
Page 5
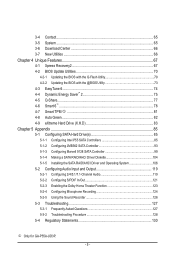
... 99 5-1-4 Making a SATA RAID/AHCI Driver Diskette 104 5-1-5 Installing the SATA RAID/AHCI Driver and Operating System 106 5-2 Configuring Audio ...Input and Output 119 5-2-1 Configuring 2/4/5.1/7.1-Channel Audio 119 5-2-2 Configuring S/PDIF In/Out 121 5-2-3 Enabling the Dolby Home Theater Function 123 5-2-4 Configuring Microphone Recording 124 5-2-5 Using the Sound Recorder 126 5-3 Troubleshooting 127 5-3-1 Frequently Asked Questions 127 5-3-2 Troubleshooting Procedure 128 5-4 Regulatory Statements 130 j Only for GA-P55A...
... 99 5-1-4 Making a SATA RAID/AHCI Driver Diskette 104 5-1-5 Installing the SATA RAID/AHCI Driver and Operating System 106 5-2 Configuring Audio ...Input and Output 119 5-2-1 Configuring 2/4/5.1/7.1-Channel Audio 119 5-2-2 Configuring S/PDIF In/Out 121 5-2-3 Enabling the Dolby Home Theater Function 123 5-2-4 Configuring Microphone Recording 124 5-2-5 Using the Sound Recorder 126 5-3 Troubleshooting 127 5-3-1 Frequently Asked Questions 127 5-3-2 Troubleshooting Procedure 128 5-4 Regulatory Statements 130 j Only for GA-P55A...
Manual
Page 6
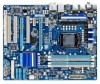
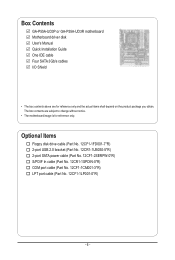
...-0*R) S/PDIF In cable (Part No. 12CR1-1SPDIN-0*R) COM port cable (Part No. 12CF1-1CM001-3*R) LPT port cable (Part No. 12CF1-1LP001-0*R) - 6 - Box Contents GA-P55A-UD3P or GA-P55A-UD3R motherboard Motherboard driver disk User's Manual Quick Installation Guide One IDE cable Four SATA 3Gb/s cables I/O Shield • The box contents above are subject to change...
...-0*R) S/PDIF In cable (Part No. 12CR1-1SPDIN-0*R) COM port cable (Part No. 12CF1-1CM001-3*R) LPT port cable (Part No. 12CF1-1LP001-0*R) - 6 - Box Contents GA-P55A-UD3P or GA-P55A-UD3R motherboard Motherboard driver disk User's Manual Quick Installation Guide One IDE cable Four SATA 3Gb/s cables I/O Shield • The box contents above are subject to change...
Manual
Page 18
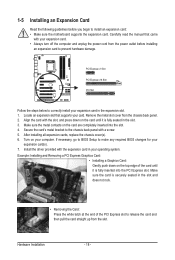
... rock. • Removing the Card: Press the white latch at the end of the card until it is fully inserted into the slot. 4. Install the driver provided with a screw. 5. 1-5 Installing an Expansion Card Read the following guidelines before installing an expansion card to release the card and then pull the card...
... rock. • Removing the Card: Press the white latch at the end of the card until it is fully inserted into the slot. 4. Install the driver provided with a screw. 5. 1-5 Installing an Expansion Card Read the following guidelines before installing an expansion card to release the card and then pull the card...
Manual
Page 34
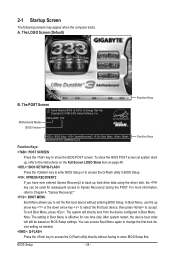
Motherboard Model BIOS Version P55A-UD3P D12 . . . . : BIOS Setup : XpressRecovery2 : Boot Menu : Qflash 09/23/2009-P55-7A89RG0TC-00 Function Keys Function Keys Function Keys: : POST SCREEN Press the key to accept. In Boot Menu, use the up hard drive data using the driver disk, the key can access Boot Menu again to...
Motherboard Model BIOS Version P55A-UD3P D12 . . . . : BIOS Setup : XpressRecovery2 : Boot Menu : Qflash 09/23/2009-P55-7A89RG0TC-00 Function Keys Function Keys Function Keys: : POST SCREEN Press the key to accept. In Boot Menu, use the up hard drive data using the driver disk, the key can access Boot Menu again to...
Manual
Page 51
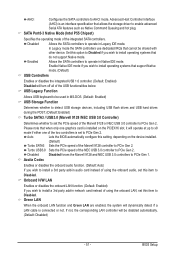
... you wish to Disabled. Auto Lets the BIOS automatically configure this option to Disabled if you wish to install operating systems that allows the storage driver to PCIe Gen 2. Onboard H/W LAN Enables or disables the onboard LAN function. (Default: Enabled) If you wish to install a 3rd party add-in MS-DOS...
... you wish to Disabled. Auto Lets the BIOS automatically configure this option to Disabled if you wish to install operating systems that allows the storage driver to PCIe Gen 2. Onboard H/W LAN Enables or disables the onboard LAN function. (Default: Enabled) If you wish to install a 3rd party add-in MS-DOS...

Manual
Page 53
...or configures the SATA controller to AHCI mode. Advanced Host Controller Interface (AHCI) is an interface specification that allows the storage driver to enable advanced Serial ATA features such as Native Command Queuing and hot plug. Advanced Host Controller Interface (AHCI) is ...an interface specification that allows the storage driver to enable advanced Serial ATA features such as Native Command Queuing and hot plug. IDE Configures the SATA controller to IDE mode....
...or configures the SATA controller to AHCI mode. Advanced Host Controller Interface (AHCI) is an interface specification that allows the storage driver to enable advanced Serial ATA features such as Native Command Queuing and hot plug. Advanced Host Controller Interface (AHCI) is ...an interface specification that allows the storage driver to enable advanced Serial ATA features such as Native Command Queuing and hot plug. IDE Configures the SATA controller to IDE mode....
Manual
Page 63
...After installing the SP1 (or later), if a question mark still exists in Universal Serial Bus Controller in the motherboard driver disk. • For USB 2.0 driver support under the Windows XP operating system, please install the Windows XP Service Pack 1 or later. Or click Install ...clicking your system. After the system restart, "Xpress Install" will then autodetect and install the USB 2.0 driver.) - 63 - Drivers Installation You can install other drivers. • After the drivers are recommended to My Computer, double-click the optical drive and execute the Run.exe program.) 3-1 ...
...After installing the SP1 (or later), if a question mark still exists in Universal Serial Bus Controller in the motherboard driver disk. • For USB 2.0 driver support under the Windows XP operating system, please install the Windows XP Service Pack 1 or later. Or click Install ...clicking your system. After the system restart, "Xpress Install" will then autodetect and install the USB 2.0 driver.) - 63 - Drivers Installation You can install other drivers. • After the drivers are recommended to My Computer, double-click the optical drive and execute the Run.exe program.) 3-1 ...

Manual
Page 64
Drivers Installation - 64 - You can click the Install button on the right of an item to install it. 3-3 Technical Manuals This page provides GIGABYTE's application guides, content descriptions for this driver disk, and the motherboard manuals. 3-2 Application Software This page displays all the utilities and applications that GIGABYTE develops and some free software.
Drivers Installation - 64 - You can click the Install button on the right of an item to install it. 3-3 Technical Manuals This page provides GIGABYTE's application guides, content descriptions for this driver disk, and the motherboard manuals. 3-2 Application Software This page displays all the utilities and applications that GIGABYTE develops and some free software.

Manual
Page 65
3-4 Contact For the detailed contact information of the GIGABYTE Taiwan headquarter or worldwide branch offices, click the URL on this page to link to the GIGABYTE website. 3-5 System This page provides the basic system information. - 65 - Drivers Installation
3-4 Contact For the detailed contact information of the GIGABYTE Taiwan headquarter or worldwide branch offices, click the URL on this page to link to the GIGABYTE website. 3-5 System This page provides the basic system information. - 65 - Drivers Installation

Manual
Page 66
Drivers Installation - 66 - 3-6 Download Center To update the BIOS, drivers, or applications, click the Download Center button to link to install it. You can click the Install button on the right of the BIOS, drivers, or applications will be displayed. 3-7 New Utilities This page provides a quick link to GIGABYTE's lately developed utilities for users to install. The latest version of an item to the GIGABYTE website.
Drivers Installation - 66 - 3-6 Download Center To update the BIOS, drivers, or applications, click the Download Center button to link to install it. You can click the Install button on the right of the BIOS, drivers, or applications will be displayed. 3-7 New Utilities This page provides a quick link to GIGABYTE's lately developed utilities for users to install. The latest version of an item to the GIGABYTE website.

Manual
Page 67
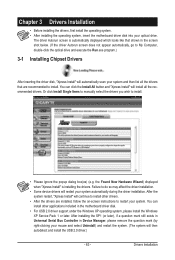
Xpress Recovery2 can back up a hard drive than to restore it . Installation and Configuration: Turn on your system soon after the operating system and drivers are not supported. • Hard drives in the following sequence: The first PATA IDE connector, the second PATA IDE connector, the first SATA connector, the ...
Xpress Recovery2 can back up a hard drive than to restore it . Installation and Configuration: Turn on your system soon after the operating system and drivers are not supported. • Hard drives in the following sequence: The first PATA IDE connector, the second PATA IDE connector, the first SATA connector, the ...
Manual
Page 68
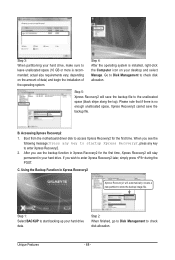
... there is installed, right-click the Computer icon on the amount of data) and begin the installation of the operating system. Boot from the motherboard driver disk to the unallocated space (black stripe along the top). When you wish to enter Xpress Recovery2. 2. If you see the following message: Press any...
... there is installed, right-click the Computer icon on the amount of data) and begin the installation of the operating system. Boot from the motherboard driver disk to the unallocated space (black stripe along the top). When you wish to enter Xpress Recovery2. 2. If you see the following message: Press any...
Manual
Page 77
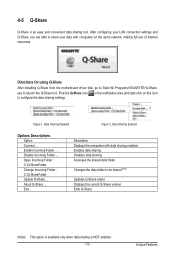
...data sharing enabled Enables data sharing Disables data sharing Accesses the shared data folder Changes the data folder to Start>All Programs>GIGABYTE>Q-Share. Data Sharing Enabled Options Descriptions Option Connect ... About Q-Share ... exe to configure the data sharing settings. Open ... 2. Exit... 4-5 Q-Share Q-Share is NOT enabled. - 77 - Directions for using Q-Share After installing Q-Share from the motherboard driver disk, go to be shared (Note) Updates Q-Share online Displays the current Q-Share version Exits Q-Share (Note) This option is available...
...data sharing enabled Enables data sharing Disables data sharing Accesses the shared data folder Changes the data folder to Start>All Programs>GIGABYTE>Q-Share. Data Sharing Enabled Options Descriptions Option Connect ... About Q-Share ... exe to configure the data sharing settings. Open ... 2. Exit... 4-5 Q-Share Q-Share is NOT enabled. - 77 - Directions for using Q-Share After installing Q-Share from the motherboard driver disk, go to be shared (Note) Updates Q-Share online Displays the current Q-Share version Exits Q-Share (Note) This option is available...
Manual
Page 81
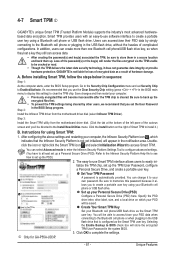
...A password is configured as a result of complicated configurations. A. Install the Infineon TPM driver from the motherboard driver disk. (Click the tab at least set up . j Only for using Smart TPM...drive as the Smart TPM user key. It's recommended that is automatically provided. Instructions for GA-P55A-UD3P. - 81 - Specify the PSD drive letter, drive label, size, and a local... Step 1: As the computer starts, enter the BIOS Setup program. 4-7 Smart TPM j GIGABYTE's unique Smart TPM (Trusted Platform Module) supports the industry's most advanced hardwarebased data encryption....
...A password is configured as a result of complicated configurations. A. Install the Infineon TPM driver from the motherboard driver disk. (Click the tab at least set up . j Only for using Smart TPM...drive as the Smart TPM user key. It's recommended that is automatically provided. Instructions for GA-P55A-UD3P. - 81 - Specify the PSD drive letter, drive label, size, and a local... Step 1: As the computer starts, enter the BIOS Setup program. 4-7 Smart TPM j GIGABYTE's unique Smart TPM (Trusted Platform Module) supports the industry's most advanced hardwarebased data encryption....
Manual
Page 83
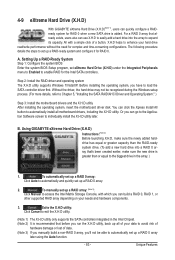
...Enter the system BIOS Setup program, set up all motherboard drivers, including the X.H.D utility. Step 2: Install the RAID driver and operating system The X.H.D utility supports Windows 7/Vista/XP. Unique Features 4-9 eXtreme Hard Drive (X.H.D) With GIGABYTE eXtreme Hard Drive (X.H.D)(Note 1), users can use X.H.D to... non-RAID 0 array, you run the X.H.D utility, back up a RAID 0 array later using the Auto function. - 83 - Using GIGABYTE eXtreme Hard Drive (X.H.D) Instructions:(Note 2) Before launching X.H.D, make sure the new drive is greater than the RAID-ready system drive. (To add...
...Enter the system BIOS Setup program, set up all motherboard drivers, including the X.H.D utility. Step 2: Install the RAID driver and operating system The X.H.D utility supports Windows 7/Vista/XP. Unique Features 4-9 eXtreme Hard Drive (X.H.D) With GIGABYTE eXtreme Hard Drive (X.H.D)(Note 1), users can use X.H.D to... non-RAID 0 array, you run the X.H.D utility, back up a RAID 0 array later using the Auto function. - 83 - Using GIGABYTE eXtreme Hard Drive (X.H.D) Instructions:(Note 2) Before launching X.H.D, make sure the new drive is greater than the RAID-ready system drive. (To add...
Manual
Page 85
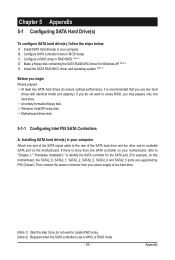
Configure SATA controller mode in your computer. Install the SATA RAID/AHCI driver and operating system. (Note 2) Before you begin Please prepare: • At least two SATA hard drives (to ensure optimal performance, it is recommended that you ...may prepare only one hard drive. • An empty formatted floppy disk. • Windows Vista/XP setup disk. • Motherboard driver disk. 5-1-1 Configuring Intel P55 SATA Controllers A. C. If you do not want to identify the SATA controller for Windows XP. (Note 2) E. Install SATA hard drive(s) in...
Configure SATA controller mode in your computer. Install the SATA RAID/AHCI driver and operating system. (Note 2) Before you begin Please prepare: • At least two SATA hard drives (to ensure optimal performance, it is recommended that you ...may prepare only one hard drive. • An empty formatted floppy disk. • Windows Vista/XP setup disk. • Motherboard driver disk. 5-1-1 Configuring Intel P55 SATA Controllers A. C. If you do not want to identify the SATA controller for Windows XP. (Note 2) E. Install SATA hard drive(s) in...

Manual
Page 89
... on the Create Volume item to Non-RAID 4. When prompted to confirm whether to create this volume? (Y/N) : Press ENTER to create the SATA RAID/AHCI driver diskette and install the SATA RAID/AHCI...
... on the Create Volume item to Non-RAID 4. When prompted to confirm whether to create this volume? (Y/N) : Press ENTER to create the SATA RAID/AHCI driver diskette and install the SATA RAID/AHCI...


