
Manual
Page 1
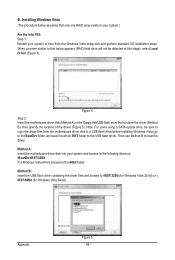
... array, you have to access the Intel Matrix Storage Console, with a simple click of your needs and hardware components. 3. Using GIGABYTE eXtreme Hard Drive (X.H.D) Instructions:(Note 2) Before launching X.H.D, make sure the new drive is added. Setting Up a RAID-Ready System ... Xpress Install All button to Chapter 5, "Installing the SATA RAID/AHCI Driver and Operating System." ) Step 3: Install the motherboard drivers and the X.H.D utiltiy After installing the operating system, insert the motherboard driver disk. Before installing the operating system, you 'll not be recognized ...
... array, you have to access the Intel Matrix Storage Console, with a simple click of your needs and hardware components. 3. Using GIGABYTE eXtreme Hard Drive (X.H.D) Instructions:(Note 2) Before launching X.H.D, make sure the new drive is added. Setting Up a RAID-Ready System ... Xpress Install All button to Chapter 5, "Installing the SATA RAID/AHCI Driver and Operating System." ) Step 3: Install the motherboard drivers and the X.H.D utiltiy After installing the operating system, insert the motherboard driver disk. Before installing the operating system, you 'll not be recognized ...
Manual
Page 3
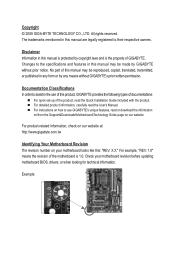
...use of this manual may be made by GIGABYTE without GIGABYTE's prior written permission. For product-related information, check on our website at: http://www.gigabyte.com.tw Identifying Your Motherboard Revision The revision number on our website. The...Example: For detailed product information, carefully read or download the information on/from the Support&Downloads\Motherboard\Technology Guide page on your motherboard revision before updating motherboard BIOS, drivers, or when looking for technical information. Changes to their respective owners. Copyright © 2009 ...
...use of this manual may be made by GIGABYTE without GIGABYTE's prior written permission. For product-related information, check on our website at: http://www.gigabyte.com.tw Identifying Your Motherboard Revision The revision number on our website. The...Example: For detailed product information, carefully read or download the information on/from the Support&Downloads\Motherboard\Technology Guide page on your motherboard revision before updating motherboard BIOS, drivers, or when looking for technical information. Changes to their respective owners. Copyright © 2009 ...
Manual
Page 6
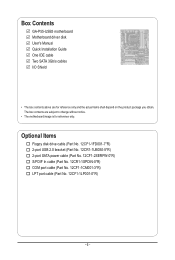
...(Part No. 12CR1-1SPDIN-0*R) COM port cable (Part No. 12CF1-1CM001-3*R) LPT port cable (Part No. 12CF1-1LP001-0*R) - 6 - Box Contents GA-P55-USB3 motherboard Motherboard driver disk User's Manual Quick Installation Guide One IDE cable Two SATA 3Gb/s cables I/O Shield • The box contents above are subject to change without ...notice. • The motherboard image is for reference only and the actual items shall depend on the product package you obtain. The box contents are for reference only...
...(Part No. 12CR1-1SPDIN-0*R) COM port cable (Part No. 12CF1-1CM001-3*R) LPT port cable (Part No. 12CF1-1LP001-0*R) - 6 - Box Contents GA-P55-USB3 motherboard Motherboard driver disk User's Manual Quick Installation Guide One IDE cable Two SATA 3Gb/s cables I/O Shield • The box contents above are subject to change without ...notice. • The motherboard image is for reference only and the actual items shall depend on the product package you obtain. The box contents are for reference only...
Manual
Page 18
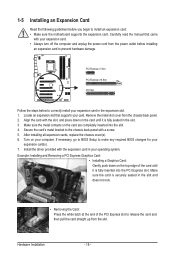
... turn off the computer and unplug the power cord from the power outlet before you begin to install an expansion card: • Make sure the motherboard supports the expansion card. After installing all expansion cards, replace the chassis cover(s). 6. Locate an expansion slot that came with a screw. 5. Turn... on the card are completely inserted into the PCI Express slot. Install the driver provided with the slot, and press down on the card until it is fully seated in the slot and does not rock. • Removing the...
... turn off the computer and unplug the power cord from the power outlet before you begin to install an expansion card: • Make sure the motherboard supports the expansion card. After installing all expansion cards, replace the chassis cover(s). 6. Locate an expansion slot that came with a screw. 5. Turn... on the card are completely inserted into the PCI Express slot. Install the driver provided with the slot, and press down on the card until it is fully seated in the slot and does not rock. • Removing the...
Manual
Page 34
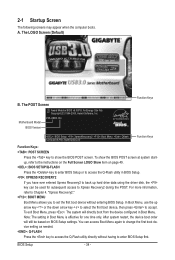
...effective for subsequent access to Xpress Recovery2 during the POST. You can be used for one time only. Motherboard Model BIOS Version P55-USB3 D4 . . . . : BIOS Setup : XpressRecovery2 : Boot Menu : Qflash 12/04/2009-P55-7A89TG0DC-00 Function Keys Function Keys Function Keys: : POST SCREEN Press the key to show the BIOS... the instructions on the Full Screen LOGO Show item on BIOS Setup settings. In Boot Menu, use the up hard drive data using the driver disk, the key can access Boot Menu again to change the first boot device setting as needed. : Q-FLASH Press the key to enter...
...effective for subsequent access to Xpress Recovery2 during the POST. You can be used for one time only. Motherboard Model BIOS Version P55-USB3 D4 . . . . : BIOS Setup : XpressRecovery2 : Boot Menu : Qflash 12/04/2009-P55-7A89TG0DC-00 Function Keys Function Keys Function Keys: : POST SCREEN Press the key to show the BIOS... the instructions on the Full Screen LOGO Show item on BIOS Setup settings. In Boot Menu, use the up hard drive data using the driver disk, the key can access Boot Menu again to change the first boot device setting as needed. : Q-FLASH Press the key to enter...
Manual
Page 50
...the SATA controllers to IDE mode. (Default) RAID(XHD) Enables RAID for P55 Chipset. (Note) On H55 Chipset motherboards, this option to Disabled if you wish to install operating systems that allows the storage driver to be used in Native IDE mode. Disabled Allows the SATA controllers to ...in the Intel P55/H55 Chipset or configures the SATA controllers to Enabled, the PCH SATA Control Mode item below . In Legacy mode the SATA controllers use dedicated IRQs that do not support Native mode. BIOS Setup - 50 - For details on using the GIGABYTE X.H.D utility, refer...
...the SATA controllers to IDE mode. (Default) RAID(XHD) Enables RAID for P55 Chipset. (Note) On H55 Chipset motherboards, this option to Disabled if you wish to install operating systems that allows the storage driver to be used in Native IDE mode. Disabled Allows the SATA controllers to ...in the Intel P55/H55 Chipset or configures the SATA controllers to Enabled, the PCH SATA Control Mode item below . In Legacy mode the SATA controllers use dedicated IRQs that do not support Native mode. BIOS Setup - 50 - For details on using the GIGABYTE X.H.D utility, refer...
Manual
Page 61
... - Failure to restart your system and then list all the recommended drivers. The driver Autorun screen is installing the drivers. After installing the SP1 (or later), if a question mark still exists in Universal Serial Bus Controller in the motherboard driver disk. • For USB 2.0 driver support under the Windows XP operating system, please install the Windows...
... - Failure to restart your system and then list all the recommended drivers. The driver Autorun screen is installing the drivers. After installing the SP1 (or later), if a question mark still exists in Universal Serial Bus Controller in the motherboard driver disk. • For USB 2.0 driver support under the Windows XP operating system, please install the Windows...
Manual
Page 62
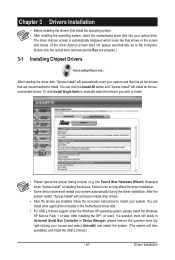
You can click the Install button on the right of an item to install it. 3-3 Technical Manuals This page provides GIGABYTE's application guides, content descriptions for this driver disk, and the motherboard manuals. Drivers Installation - 62 - 3-2 Application Software This page displays all the utilities and applications that GIGABYTE develops and some free software.
You can click the Install button on the right of an item to install it. 3-3 Technical Manuals This page provides GIGABYTE's application guides, content descriptions for this driver disk, and the motherboard manuals. Drivers Installation - 62 - 3-2 Application Software This page displays all the utilities and applications that GIGABYTE develops and some free software.
Manual
Page 66
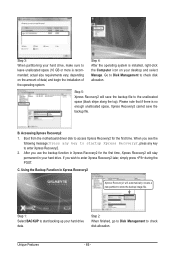
... Recovery2 will stay permanent in Xpress Recovery2 Xpress Recovery2 will save the backup file. C. B. Using the Backup Function in your hard drive. Boot from the motherboard driver disk to the unallocated space (black stripe along the top). When you wish to store the backup image file. Step 5: Xpress Recovery2 will automatically create...
... Recovery2 will stay permanent in Xpress Recovery2 Xpress Recovery2 will save the backup file. C. B. Using the Backup Function in your hard drive. Boot from the motherboard driver disk to the unallocated space (black stripe along the top). When you wish to store the backup image file. Step 5: Xpress Recovery2 will automatically create...
Manual
Page 75
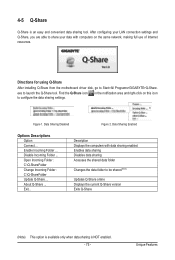
...ShareFolder Change Incoming Folder : C:\Q-ShareFolder Update Q-Share ... About Q-Share ... Directions for using Q-Share After installing Q-Share from the motherboard driver disk, go to configure the data sharing settings. in the notification area and right-click on the same network, making full use... Folder ... Exit... 4-5 Q-Share Q-Share is NOT enabled. - 75 - Find the Q-Share icon to Start>All Programs>GIGABYTE>Q-Share. After configuring your LAN connection settings and Q-Share, you are able to share your data with data sharing enabled Enables ...
...ShareFolder Change Incoming Folder : C:\Q-ShareFolder Update Q-Share ... About Q-Share ... Directions for using Q-Share After installing Q-Share from the motherboard driver disk, go to configure the data sharing settings. in the notification area and right-click on the same network, making full use... Folder ... Exit... 4-5 Q-Share Q-Share is NOT enabled. - 75 - Find the Q-Share icon to Start>All Programs>GIGABYTE>Q-Share. After configuring your LAN connection settings and Q-Share, you are able to share your data with data sharing enabled Enables ...

Manual
Page 80
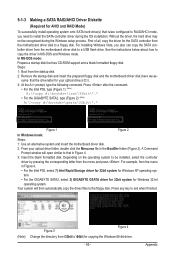
...drive in the Intel Chipset. (Note 2) It is recommended that before you run the X.H.D utility, back up all motherboard drivers, including the X.H.D utility. Using GIGABYTE eXtreme Hard Drive (X.H.D) Instructions:(Note 2) Before launching X.H.D, make sure the newly added harddrive has equal or greater capacity...to automatically set eXtreme Hard Drive (X.H.D) under the Integrated Peripherals menu to Enabled to set up a RAID-ready system and configure it for P55 Chipset. (Note 1) The X.H.D utility only supports the SATA controllers integrated in the array. ) 1. You can build a RAID 0,...
...drive in the Intel Chipset. (Note 2) It is recommended that before you run the X.H.D utility, back up all motherboard drivers, including the X.H.D utility. Using GIGABYTE eXtreme Hard Drive (X.H.D) Instructions:(Note 2) Before launching X.H.D, make sure the newly added harddrive has equal or greater capacity...to automatically set eXtreme Hard Drive (X.H.D) under the Integrated Peripherals menu to Enabled to set up a RAID-ready system and configure it for P55 Chipset. (Note 1) The X.H.D utility only supports the SATA controllers integrated in the array. ) 1. You can build a RAID 0,...
Manual
Page 81
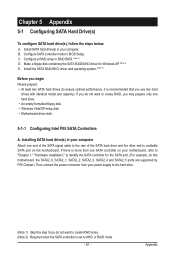
...If you may prepare only one hard drive. • An empty formatted floppy disk. • Windows Vista/XP setup disk. • Motherboard driver disk. 5-1-1 Configuring Intel P55 SATA Controllers A. Configure SATA controller mode in your computer Attach one SATA controller on your power supply to the hard drive. (Note 1) ... you use two hard drives with identical model and capacity). Make a floppy disk containing the SATA RAID/AHCI driver for the SATA port. (For example, on the motherboard. If there is recommended that you do not want to create RAID array. (Note 2) Required when the ...
...If you may prepare only one hard drive. • An empty formatted floppy disk. • Windows Vista/XP setup disk. • Motherboard driver disk. 5-1-1 Configuring Intel P55 SATA Controllers A. Configure SATA controller mode in your computer Attach one SATA controller on your power supply to the hard drive. (Note 1) ... you use two hard drives with identical model and capacity). Make a floppy disk containing the SATA RAID/AHCI driver for the SATA port. (For example, on the motherboard. If there is recommended that you do not want to create RAID array. (Note 2) Required when the ...
Manual
Page 95
... (Figure 3). Press after the command: • For the Intel P55, type (Figure 1): (Note) A:\>copy d:\bootdrv\irst\32bit\*.* • For the GIGABYTE SATA2, type (Figure 2): (Note) A:\>copy d:\bootdrv\gsata\32bit\*.* Figure 1 Figure 2 In Windows mode: Steps: 1: Use an alternative system and insert the motherboard driver disk. 2: From your optical drive is /are configured to a USB...
... (Figure 3). Press after the command: • For the Intel P55, type (Figure 1): (Note) A:\>copy d:\bootdrv\irst\32bit\*.* • For the GIGABYTE SATA2, type (Figure 2): (Note) A:\>copy d:\bootdrv\gsata\32bit\*.* Figure 1 Figure 2 In Windows mode: Steps: 1: Use an alternative system and insert the motherboard driver disk. 2: From your optical drive is /are configured to a USB...
Manual
Page 98
Figure 4 Step 2: Insert the motherboard driver disk (Method A) or the floppy disk/USB flash drive that below assumes that only one RAID array exists in your system.) For the Intel P55: Step 1: Restart your system and browse to the following directory: \BootDrv\iRST\32Bit For Windows... Vista 64-bit, browse to that contains the driver (Method B), then specify the location of the driver (Figure 5). B. Method A: Insert the motherboard driver disk into your system...
Figure 4 Step 2: Insert the motherboard driver disk (Method A) or the floppy disk/USB flash drive that below assumes that only one RAID array exists in your system.) For the Intel P55: Step 1: Restart your system and browse to the following directory: \BootDrv\iRST\32Bit For Windows... Vista 64-bit, browse to that contains the driver (Method B), then specify the location of the driver (Figure 5). B. Method A: Insert the motherboard driver disk into your system...

Manual
Page 100
...hard drive(s) will not be sure to copy the driver files from the Windows Vista setup disk and perform standard OS installation steps. Method A: Insert the motherboard driver disk into your system to boot from the motherboard driver disk to a USB flash drive before installing Windows Vista... (go to the BootDrv folder and save the whole GSATA folder to the USB flash drive). When a screen similar to that contains the SATA RAID/ AHCI driver (Method B), then specify the location of the driver (Figure 9). For the GIGABYTE...
...hard drive(s) will not be sure to copy the driver files from the Windows Vista setup disk and perform standard OS installation steps. Method A: Insert the motherboard driver disk into your system to boot from the motherboard driver disk to a USB flash drive before installing Windows Vista... (go to the BootDrv folder and save the whole GSATA folder to the USB flash drive). When a screen similar to that contains the SATA RAID/ AHCI driver (Method B), then specify the location of the driver (Figure 9). For the GIGABYTE...
Manual
Page 103
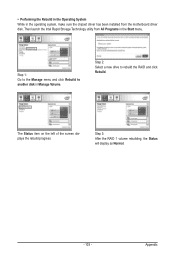
• Performing the Rebuild in the Operating System While in the operating system, make sure the chipset driver has been installed from All Programs in Manage Volume. Step 2: Select a new drive to another disk in the Start menu. Step 3: After the RAID 1 volume ... 1: Go to the Manage menu and click Rebuild to rebuild the RAID and click Rebuild. Then launch the Intel Rapid Stroage Technology utility from the motherboard driver disk.
• Performing the Rebuild in the Operating System While in the operating system, make sure the chipset driver has been installed from All Programs in Manage Volume. Step 2: Select a new drive to another disk in the Start menu. Step 3: After the RAID 1 volume ... 1: Go to the Manage menu and click Rebuild to rebuild the RAID and click Rebuild. Then launch the Intel Rapid Stroage Technology utility from the motherboard driver disk.
Manual
Page 106
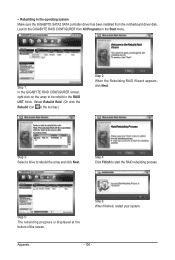
... process. Step 5: The rebuilding progress is displayed at the bottom of the screen. Launch the GIGABYTE RAID CONFIGURER from All Programs in the operating system Make sure the GIGABYTE SATA2 SATA controller driver has been installed from the motherboard driver disk. Appendix - 106 - • Rebuilding in the Start menu. Select Rebuild Raid. (Or click the...
... process. Step 5: The rebuilding progress is displayed at the bottom of the screen. Launch the GIGABYTE RAID CONFIGURER from All Programs in the operating system Make sure the GIGABYTE SATA2 SATA controller driver has been installed from the motherboard driver disk. Appendix - 106 - • Rebuilding in the Start menu. Select Rebuild Raid. (Or click the...

Manual
Page 107
5-2 Configuring Audio Input and Output 5-2-1 Configuring 2/4/5.1/7.1-Channel Audio The motherboard provides six audio jacks on both of the front and back panel..., and etc. Configuring Speakers (The following for each jack through the audio driver. The picture to the following instructions use Windows Vista as the example operating system.) Step 1: After installing the ...audio driver, the HD Audio Manager icon will be simultaneously processed. Double-click the icon to access the...
5-2 Configuring Audio Input and Output 5-2-1 Configuring 2/4/5.1/7.1-Channel Audio The motherboard provides six audio jacks on both of the front and back panel..., and etc. Configuring Speakers (The following for each jack through the audio driver. The picture to the following instructions use Windows Vista as the example operating system.) Step 1: After installing the ...audio driver, the HD Audio Manager icon will be simultaneously processed. Double-click the icon to access the...
Manual
Page 114
...: Power error Appendix - 114 - 5-3 Troubleshooting 5-3-1 Frequently Asked Questions To read more details, go to the Support&Downloads\Motherboard\FAQ page on GIGABYTE's website. In the Main Menu, press + to the CMOS, which will clear the CMOS values after the computer shuts ...battery from the battery holder to stop supplying power to show the advanced options. Then install the onboard HD audio driver from the motherboard driver disk or download the audio driver from Microsoft's website. Q: In the BIOS Setup program, why are hidden in My Computer > Properties > Hardware ...
...: Power error Appendix - 114 - 5-3 Troubleshooting 5-3-1 Frequently Asked Questions To read more details, go to the Support&Downloads\Motherboard\FAQ page on GIGABYTE's website. In the Main Menu, press + to the CMOS, which will clear the CMOS values after the computer shuts ...battery from the battery holder to stop supplying power to show the advanced options. Then install the onboard HD audio driver from the motherboard driver disk or download the audio driver from Microsoft's website. Q: In the BIOS Setup program, why are hidden in My Computer > Properties > Hardware ...


