
Manual
Page 1
...Integrated Peripherals menu to Enabled to enhance your data to avoid risk of hardware damage or lost of data. (Note 3) If you manually build a non-RAID 0 array, you can click the Xpress Install All button to Chapter 5, "Installing the SATA RAID/AHCI Driver ...quickly configure a RAIDready system for RAID 0. Before installing the operating system, you run the X.H.D utility, back up all motherboard drivers, including the X.H.D utility. Using GIGABYTE eXtreme Hard Drive (X.H.D) Instructions:(Note 2) Before launching X.H.D, make sure the new drive is greater than the RAID-ready system...
...Integrated Peripherals menu to Enabled to enhance your data to avoid risk of hardware damage or lost of data. (Note 3) If you manually build a non-RAID 0 array, you can click the Xpress Install All button to Chapter 5, "Installing the SATA RAID/AHCI Driver ...quickly configure a RAIDready system for RAID 0. Before installing the operating system, you run the X.H.D utility, back up all motherboard drivers, including the X.H.D utility. Using GIGABYTE eXtreme Hard Drive (X.H.D) Instructions:(Note 2) Before launching X.H.D, make sure the new drive is greater than the RAID-ready system...
Manual
Page 1
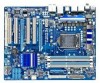
GA-P55-UD3P GA-P55-UD3R LGA1156 socket motherboard for Intel® Core™ i7 processor family/ Intel® Core™ i5 processor family User's Manual Rev. 1001 12ME-P55UD3P-1001R
GA-P55-UD3P GA-P55-UD3R LGA1156 socket motherboard for Intel® Core™ i7 processor family/ Intel® Core™ i5 processor family User's Manual Rev. 1001 12ME-P55UD3P-1001R

Manual
Page 3
... the product, read or download the information on/from the Support&Downloads\Motherboard\Technology Guide page on our website. Check your motherboard looks like this manual is protected by GIGABYTE without GIGABYTE's prior written permission. Documentation Classifications In order to use of this product, GIGABYTE provides the following types of documentations: For quick set-up of...
... the product, read or download the information on/from the Support&Downloads\Motherboard\Technology Guide page on our website. Check your motherboard looks like this manual is protected by GIGABYTE without GIGABYTE's prior written permission. Documentation Classifications In order to use of this product, GIGABYTE provides the following types of documentations: For quick set-up of...
Manual
Page 6
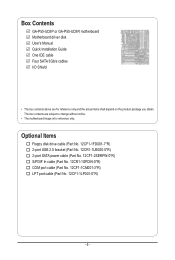
... port cable (Part No. 12CF1-1CM001-3*R) LPT port cable (Part No. 12CF1-1LP001-0*R) - 6 - The box contents are for reference only. Box Contents GA-P55-UD3P or GA-P55-UD3R motherboard Motherboard driver disk User's Manual Quick Installation Guide One IDE cable Four SATA 3Gb/s cables I/O Shield • The box contents above are subject to change without notice. •...
... port cable (Part No. 12CF1-1CM001-3*R) LPT port cable (Part No. 12CF1-1LP001-0*R) - 6 - The box contents are for reference only. Box Contents GA-P55-UD3P or GA-P55-UD3R motherboard Motherboard driver disk User's Manual Quick Installation Guide One IDE cable Four SATA 3Gb/s cables I/O Shield • The box contents above are subject to change without notice. •...
Manual
Page 9
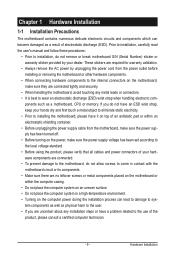
..., please consult a certified computer technician. - 9 - Hardware Installation Prior to installation, carefully read the user's manual and follow these procedures: • Prior to installation, do not remove or break motherboard S/N (Serial Number) sticker or warranty sticker provided by unplugging the power cord from the... warranty validation. • Always remove the AC power by your hardware components are connected. • To prevent damage to the motherboard, do not have an ESD wrist strap, keep your hands dry and first touch a metal object to eliminate static electricity. &#...
..., please consult a certified computer technician. - 9 - Hardware Installation Prior to installation, carefully read the user's manual and follow these procedures: • Prior to installation, do not remove or break motherboard S/N (Serial Number) sticker or warranty sticker provided by unplugging the power cord from the... warranty validation. • Always remove the AC power by your hardware components are connected. • To prevent damage to the motherboard, do not have an ESD wrist strap, keep your hands dry and first touch a metal object to eliminate static electricity. &#...

Manual
Page 15
...Hardware Installation Check that the Male and Female push pins are joined closely. (Refer to correctly install the CPU cooler on the motherboard. (The following procedure uses Intel® boxed cooler as the picture above shows, the installation is to the CPU. Use... CPU Cooler Follow the steps below to your CPU cooler installation manual for instructions on installing the cooler.) Step 5: After the installation, check the back of the motherboard. Step 4: You should hear a "click" when pushing down on the motherboard. Inadequately removing the CPU cooler may adhere to install.) Step ...
...Hardware Installation Check that the Male and Female push pins are joined closely. (Refer to correctly install the CPU cooler on the motherboard. (The following procedure uses Intel® boxed cooler as the picture above shows, the installation is to the CPU. Use... CPU Cooler Follow the steps below to your CPU cooler installation manual for instructions on installing the cooler.) Step 5: After the installation, check the back of the motherboard. Step 4: You should hear a "click" when pushing down on the motherboard. Inadequately removing the CPU cooler may adhere to install.) Step ...
Manual
Page 18
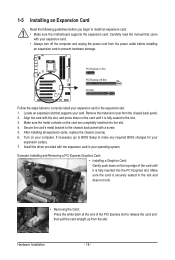
...install your operating system. Remove the metal slot cover from the power outlet before you begin to install an expansion card: • Make sure the motherboard supports the expansion card. Align the card with the expansion card in your expansion card in the expansion slot. 1. Install the driver provided with the.... Turn on the card are completely inserted into the PCI Express slot. After installing all expansion cards, replace the chassis cover(s). 6. Carefully read the manual that supports your expansion card(s). 7. Make sure the card is fully inserted into the slot. 4.
...install your operating system. Remove the metal slot cover from the power outlet before you begin to install an expansion card: • Make sure the motherboard supports the expansion card. Align the card with the expansion card in your expansion card in the expansion slot. 1. Install the driver provided with the.... Turn on the card are completely inserted into the PCI Express slot. After installing all expansion cards, replace the chassis cover(s). 6. Carefully read the manual that supports your expansion card(s). 7. Make sure the card is fully inserted into the slot. 4.
Manual
Page 28
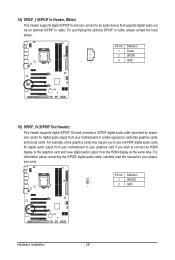
... the local dealer. For information about connecting the S/PDIF digital audio cable, carefully read the manual for digital audio output from your motherboard to your graphics card if you to use a S/PDIF digital audio cable for your motherboard to certain expansion cards like graphics cards and sound cards. Definition 1 Power 2 SPDIFI 3 GND 1 15...
... the local dealer. For information about connecting the S/PDIF digital audio cable, carefully read the manual for digital audio output from your motherboard to your graphics card if you to use a S/PDIF digital audio cable for your motherboard to certain expansion cards like graphics cards and sound cards. Definition 1 Power 2 SPDIFI 3 GND 1 15...
Manual
Page 30
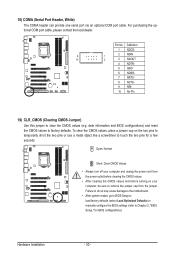
... to Chapter 2, "BIOS Setup," for a few seconds. Failure to do so may cause damage to the motherboard. • After system restart, go to BIOS Setup to load factory defaults (select Load Optimized Defaults) or manually configure the BIOS settings (refer to clear the CMOS values (e.g. Open: Normal Short: Clear CMOS Values •...
... to Chapter 2, "BIOS Setup," for a few seconds. Failure to do so may cause damage to the motherboard. • After system restart, go to BIOS Setup to load factory defaults (select Load Optimized Defaults) or manually configure the BIOS settings (refer to clear the CMOS values (e.g. Open: Normal Short: Clear CMOS Values •...
Manual
Page 63
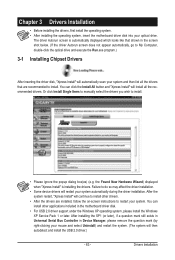
...8226; After installing the operating system, insert the motherboard driver disk into your mouse and select Uninstall) and restart the system. (The system will then autodetect and install the USB 2.0 driver.) - 63 - Or click Install Single Items to manually select the drivers you wish to do so ...may affect the driver installation. • Some device drivers will continue to install other applications included in the motherboard driver disk. • For USB 2.0 driver support under the ...
...8226; After installing the operating system, insert the motherboard driver disk into your mouse and select Uninstall) and restart the system. (The system will then autodetect and install the USB 2.0 driver.) - 63 - Or click Install Single Items to manually select the drivers you wish to do so ...may affect the driver installation. • Some device drivers will continue to install other applications included in the motherboard driver disk. • For USB 2.0 driver support under the ...
Manual
Page 64
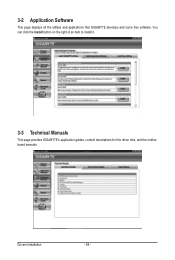
You can click the Install button on the right of an item to install it. 3-3 Technical Manuals This page provides GIGABYTE's application guides, content descriptions for this driver disk, and the motherboard manuals. 3-2 Application Software This page displays all the utilities and applications that GIGABYTE develops and some free software. Drivers Installation - 64 -
You can click the Install button on the right of an item to install it. 3-3 Technical Manuals This page provides GIGABYTE's application guides, content descriptions for this driver disk, and the motherboard manuals. 3-2 Application Software This page displays all the utilities and applications that GIGABYTE develops and some free software. Drivers Installation - 64 -
Manual
Page 70
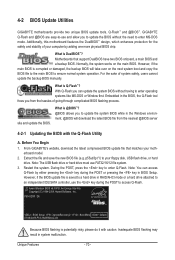
... XpressRecovery2 : Boot Menu : Qflash 07/08/2009-P55-7A89RG0JC-00 Because BIOS flashing is corrupted or damaged, the backup BIOS will download the latest BIOS file from the hassles of going through complicated BIOS flashing process. GIGABYTE Q-Flash and @BIOS are easy-to an independent ... operation. Unique Features - 70 - Additionally, this motherboard features the DualBIOS™ design, which enhances protection for the safety and stability of system safety, users cannot update the backup BIOS manually. From GIGABYTE's website, download the latest compressed BIOS update file ...
... XpressRecovery2 : Boot Menu : Qflash 07/08/2009-P55-7A89RG0JC-00 Because BIOS flashing is corrupted or damaged, the backup BIOS will download the latest BIOS file from the hassles of going through complicated BIOS flashing process. GIGABYTE Q-Flash and @BIOS are easy-to an independent ... operation. Unique Features - 70 - Additionally, this motherboard features the DualBIOS™ design, which enhances protection for the safety and stability of system safety, users cannot update the backup BIOS manually. From GIGABYTE's website, download the latest compressed BIOS update file ...
Manual
Page 73
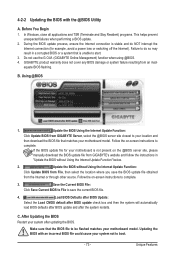
... to your location and then download the BIOS file that matches your motherboard model. Make sure that is not present on the @BIOS server site, please manually download the BIOS update file from GIGABYTE Server, select the @BIOS server site closest to complete. Update the... BIOS Using the Internet Update Function: Click Update BIOS from GIGABYTE's website and follow the instructions in a corrupted BIOS...
... to your location and then download the BIOS file that matches your motherboard model. Make sure that is not present on the @BIOS server site, please manually download the BIOS update file from GIGABYTE Server, select the @BIOS server site closest to complete. Update the... BIOS Using the Internet Update Function: Click Update BIOS from GIGABYTE's website and follow the instructions in a corrupted BIOS...

Manual
Page 109
...Channel Audio Configurations: Refer to be simultaneously processed. 5-2 Configuring Audio Input and Output 5-2-1 Configuring 2/4/5.1/7.1-Channel Audio The motherboard provides six audio jacks on both of the front and back panel audio connections simultaneously. HD Audio features multistreaming capabilities...at the same time. Configuring Speakers (The following for microphone functionality. • Audio signals will appear in jack and manually configure the jack for multi-channel speaker configurations. • 2-channel audio: Headphone or Line out. • 4-channel...
...Channel Audio Configurations: Refer to be simultaneously processed. 5-2 Configuring Audio Input and Output 5-2-1 Configuring 2/4/5.1/7.1-Channel Audio The motherboard provides six audio jacks on both of the front and back panel audio connections simultaneously. HD Audio features multistreaming capabilities...at the same time. Configuring Speakers (The following for microphone functionality. • Audio signals will appear in jack and manually configure the jack for multi-channel speaker configurations. • 2-channel audio: Headphone or Line out. • 4-channel...
Manual
Page 119
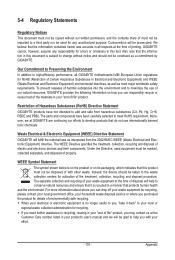
...- The separate collection and recycling of your product's user's manual and we at the time of electric and electronic devices and their components. Contravention will fulfill the national laws as a commitment by GIGABYTE. The WEEE Directive specifies the treatment, collection, recycling and ...this text. To prevent releases of harmful substances into the environment and to develop products that the information in all GIGABYTE motherboards fulfill European Union regulations for details of life" product, you need further assistance in recycling, reusing in a manner...
...- The separate collection and recycling of your product's user's manual and we at the time of electric and electronic devices and their components. Contravention will fulfill the national laws as a commitment by GIGABYTE. The WEEE Directive specifies the treatment, collection, recycling and ...this text. To prevent releases of harmful substances into the environment and to develop products that the information in all GIGABYTE motherboards fulfill European Union regulations for details of life" product, you need further assistance in recycling, reusing in a manner...


