Manual
Page 1
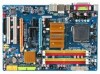
GA-N650SLI-DS4L LGA775 socket motherboard for Intel® CoreTM processor family/ Intel® Pentium® processor family/Intel® Celeron® processor family User's Manual Rev. 1001 12ME-N650DS4L-1001R
GA-N650SLI-DS4L LGA775 socket motherboard for Intel® CoreTM processor family/ Intel® Pentium® processor family/Intel® Celeron® processor family User's Manual Rev. 1001 12ME-N650DS4L-1001R
Manual
Page 3
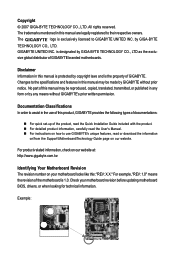
...and features in this product, GIGABYTE provides the following types of documentations: „ For quick set-up of GIGABYTE. For example, "REV: 1.0" means the revision of the motherboard is exclusively licensed to use of this manual are legally registered to their ...respective owners. The logo is 1.0. No part of GIGABYTE branded motherboards. Disclaimer Information in any means without prior notice. GIGABYTE UNITED INC. Example: For product-related information, check...
...and features in this product, GIGABYTE provides the following types of documentations: „ For quick set-up of GIGABYTE. For example, "REV: 1.0" means the revision of the motherboard is exclusively licensed to use of this manual are legally registered to their ...respective owners. The logo is 1.0. No part of GIGABYTE branded motherboards. Disclaimer Information in any means without prior notice. GIGABYTE UNITED INC. Example: For product-related information, check...
Manual
Page 6
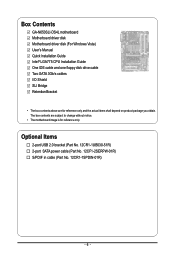
...) 2-port SATA power cable (Part No. 12CF1-2SERPW-01R) S/PDIF in cable (Part No. 12CR1-1SPDIN-01R) - 6 - Box Contents GA-N650SLI-DS4L motherboard Motherboard driver disk Motherboard driver disk (For Windows Vista) User's Manual Quick Installation Guide Intel® LGA775 CPU Installation Guide One IDE cable and one floppy disk drive cable Two SATA...
...) 2-port SATA power cable (Part No. 12CF1-2SERPW-01R) S/PDIF in cable (Part No. 12CR1-1SPDIN-01R) - 6 - Box Contents GA-N650SLI-DS4L motherboard Motherboard driver disk Motherboard driver disk (For Windows Vista) User's Manual Quick Installation Guide Intel® LGA775 CPU Installation Guide One IDE cable and one floppy disk drive cable Two SATA...
Manual
Page 9
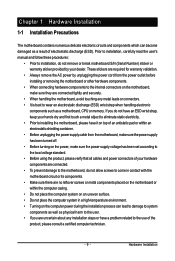
... handling the motherboard, avoid touching any installation steps or have a problem related to the use of your dealer. Prior to installation, carefully read the user's manual and follow these procedures: • Prior to installation, do not remove or break motherboard S/N (Serial Number) sticker or warranty sticker provided by unplugging the power...
... handling the motherboard, avoid touching any installation steps or have a problem related to the use of your dealer. Prior to installation, carefully read the user's manual and follow these procedures: • Prior to installation, do not remove or break motherboard S/N (Serial Number) sticker or warranty sticker provided by unplugging the power...
Manual
Page 15
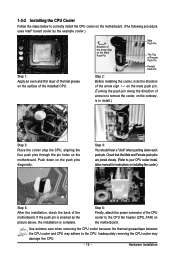
... uses Intel® boxed cooler as the picture above, the installation is complete. Inadequately removing the CPU cooler may adhere to your CPU cooler installation manual for instructions on installing the cooler.) Step 5: After the installation, check the back of the installed CPU. Check that the Male and Female push pins...
... uses Intel® boxed cooler as the picture above, the installation is complete. Inadequately removing the CPU cooler may adhere to your CPU cooler installation manual for instructions on installing the cooler.) Step 5: After the installation, check the back of the installed CPU. Check that the Male and Female push pins...
Manual
Page 18
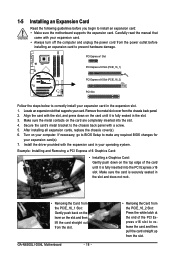
...up from the slot. 1-5 Installing an Expansion Card Read the following guidelines before installing an expansion card to prevent hardware damage. Carefully read the manual that supports your card. Align the card with a screw. 5. If necessary, go to BIOS Setup to the chassis back panel with the... at the end of the card until it is fully inserted into the slot. 4. Make sure the metal contacts on your expansion card(s). 7. GA-N650SLI-DS4L Motherboard - 18 - • Removing the Card from the slot. Secure the card's metal bracket to make any required BIOS changes for your ...
...up from the slot. 1-5 Installing an Expansion Card Read the following guidelines before installing an expansion card to prevent hardware damage. Carefully read the manual that supports your card. Align the card with a screw. 5. If necessary, go to BIOS Setup to the chassis back panel with the... at the end of the card until it is fully inserted into the slot. 4. Make sure the metal contacts on your expansion card(s). 7. GA-N650SLI-DS4L Motherboard - 18 - • Removing the Card from the slot. Secure the card's metal bracket to make any required BIOS changes for your ...
Manual
Page 21
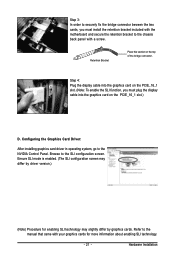
Browse to the manual that came with your graphics cards for enabling SLI technology may slightly differ by graphics cards. Ensure SLI mode is enabled. (The SLI configuration screen ...
Browse to the manual that came with your graphics cards for enabling SLI technology may slightly differ by graphics cards. Ensure SLI mode is enabled. (The SLI configuration screen ...
Manual
Page 32
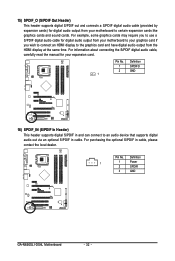
... to the graphics card and have digital audio output from the HDMI display at the same time. Definition 1 1 Power 2 SPDIFI 3 GND GA-N650SLI-DS4L Motherboard - 32 - Pin No. For purchasing the optional S/PDIF in cable. For example, some graphics cards may require you wish to connect...via an optional S/PDIF in cable, please contact the local dealer. For information about connecting the S/PDIF digital audio cable, carefully read the manual for digital audio output from your expansion card. Pin No. 15) SPDIF_O (S/PDIF Out Header) This header supports digital S/PDIF out and...
... to the graphics card and have digital audio output from the HDMI display at the same time. Definition 1 1 Power 2 SPDIFI 3 GND GA-N650SLI-DS4L Motherboard - 32 - Pin No. For purchasing the optional S/PDIF in cable. For example, some graphics cards may require you wish to connect...via an optional S/PDIF in cable, please contact the local dealer. For information about connecting the S/PDIF digital audio cable, carefully read the manual for digital audio output from your expansion card. Pin No. 15) SPDIF_O (S/PDIF Out Header) This header supports digital S/PDIF out and...
Manual
Page 34
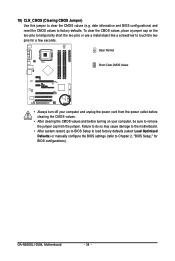
... to BIOS Setup to load factory defaults (select Load Optimized Defaults) or manually configure the BIOS settings (refer to factory defaults. To clear the CMOS values, place a jumper cap on your computer and unplug the power cord from the jumper. GA-N650SLI-DS4L Motherboard - 34 - 19) CLR_CMOS (Clearing CMOS Jumper) Use this jumper to...
... to BIOS Setup to load factory defaults (select Load Optimized Defaults) or manually configure the BIOS settings (refer to factory defaults. To clear the CMOS values, place a jumper cap on your computer and unplug the power cord from the jumper. GA-N650SLI-DS4L Motherboard - 34 - 19) CLR_CMOS (Clearing CMOS Jumper) Use this jumper to...
Manual
Page 39
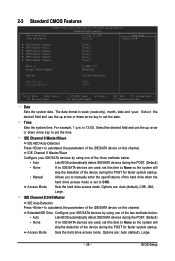
.../Slave IDE HDD Auto-Detection Press to autodetect the parameters of the IDE/SATA device on this item to None so the system will • Manual skip the detection of the hard drive when the Access Mode hard drive access mode is 13:0:0. Options are : Auto (default), CHS, LBA, Large. IDE.... Allows you to set this channel. Time Sets the system time. Select the desired field and use the up arrow or down arrow key to manually enter the specifications of the device during the POST for faster system startup. The date format is week (read-only), month, date and year. ...
.../Slave IDE HDD Auto-Detection Press to autodetect the parameters of the IDE/SATA device on this item to None so the system will • Manual skip the detection of the hard drive when the Access Mode hard drive access mode is 13:0:0. Options are : Auto (default), CHS, LBA, Large. IDE.... Allows you to set this channel. Time Sets the system time. Select the desired field and use the up arrow or down arrow key to manually enter the specifications of the device during the POST for faster system startup. The date format is week (read-only), month, date and year. ...
Manual
Page 40
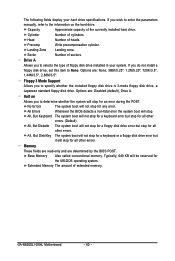
... type of heads. Halt on the hard drive. Cylinder Number of sectors. Extended Memory The amount of the currently installed hard drive. GA-N650SLI-DS4L Motherboard - 40 - Capacity Approximate capacity of extended memory. Head Number of floppy disk drive installed in your hard drive specifications. Memory ...only and are determined by the BIOS POST. If you to the information on Allows you wish to enter the parameters manually, refer to determine whether the system will be reserved for an error during the POST. Typically, 640 KB will stop for ...
... type of heads. Halt on the hard drive. Cylinder Number of sectors. Extended Memory The amount of the currently installed hard drive. GA-N650SLI-DS4L Motherboard - 40 - Capacity Approximate capacity of extended memory. Head Number of floppy disk drive installed in your hard drive specifications. Memory ...only and are determined by the BIOS POST. If you to the information on Allows you wish to enter the parameters manually, refer to determine whether the system will be reserved for an error during the POST. Typically, 640 KB will stop for ...

Manual
Page 52
... in system's failure to optimize the system voltage settings. GA-N650SLI-DS4L Motherboard - 52 - 2-9 MB Intelligent Tweaker(M.I.T.) CMOS Setup Utility-Copyright (C) 1984-2007 Award Software MB Intelligent Tweaker(M.I.T.) ` System Clock Setting [Press Enter] CPU Clock Ratio (Note) [16X] ******** System Voltage Optimized ******** System Voltage Control [Manual] DDR2 Voltage Control [Normal] NB/HT-Link Voltage [Normal...
... in system's failure to optimize the system voltage settings. GA-N650SLI-DS4L Motherboard - 52 - 2-9 MB Intelligent Tweaker(M.I.T.) CMOS Setup Utility-Copyright (C) 1984-2007 Award Software MB Intelligent Tweaker(M.I.T.) ` System Clock Setting [Press Enter] CPU Clock Ratio (Note) [16X] ******** System Voltage Optimized ******** System Voltage Control [Manual] DDR2 Voltage Control [Normal] NB/HT-Link Voltage [Normal...
Manual
Page 53
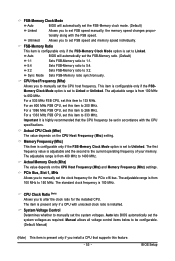
... is the current operating frequency of your memory. PCIe Bus, Slot 1, MHz Allows you to 1400 MHz. System Voltage Control Determines whether to manually set the FSB-Memory ratio. (Default) 1:1 Sets FSB-Memory ratio to 1:1. 5:4 Sets FSB-Memory ratio to 5:4. 3:2 Sets FSB-Memory ...BIOS will automatically set the FSB-Memory clock mode. (Default) Linked Allows you install a CPU that the CPU frequency be configurable. (Default: Manual) (Note) This item is set the system voltages as required. Important It is highly recommended that supports this feature. - 53 - Auto ...
... is the current operating frequency of your memory. PCIe Bus, Slot 1, MHz Allows you to 1400 MHz. System Voltage Control Determines whether to manually set the FSB-Memory ratio. (Default) 1:1 Sets FSB-Memory ratio to 1:1. 5:4 Sets FSB-Memory ratio to 5:4. 3:2 Sets FSB-Memory ...BIOS will automatically set the FSB-Memory clock mode. (Default) Linked Allows you install a CPU that the CPU frequency be configurable. (Default: Manual) (Note) This item is set the system voltages as required. Important It is highly recommended that supports this feature. - 53 - Auto ...

Manual
Page 61
Drivers Installation 3-4 Hardware Information This page provides information about the hardware devices on this motherboard. 3-5 Contact Us Check the contacts information of the GIGABYTE headquarter in Taiwan and the overseas branch offices on the last page of this manual. - 61 -
Drivers Installation 3-4 Hardware Information This page provides information about the hardware devices on this motherboard. 3-5 Contact Us Check the contacts information of the GIGABYTE headquarter in Taiwan and the overseas branch offices on the last page of this manual. - 61 -
Manual
Page 72
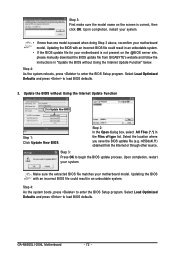
... process. Update the BIOS without Using the Internet Update Function" below. n650ds4l.f1) obtained from GIGABYTE's website and follow the instructions in an unbootable system. • If the BIOS update file for your system. GA-N650SLI-DS4L Motherboard - 72 - Updating the BIOS with an incorrect BIOS file could result in "Update the... is present when doing Step 3 above, recomfirm your motherboard model. Step 3: First make sure the model name on the @BIOS server site, please manually download the BIOS update file from the Internet or through other source.
... process. Update the BIOS without Using the Internet Update Function" below. n650ds4l.f1) obtained from GIGABYTE's website and follow the instructions in an unbootable system. • If the BIOS update file for your system. GA-N650SLI-DS4L Motherboard - 72 - Updating the BIOS with an incorrect BIOS file could result in "Update the... is present when doing Step 3 above, recomfirm your motherboard model. Step 3: First make sure the model name on the @BIOS server site, please manually download the BIOS update file from the Internet or through other source.

Manual
Page 77
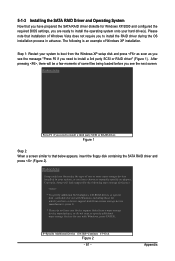
Figure 3 Step 2: The Define a New Array screen is created. You can manually set the striping block size. Define a New Array - Appendix C. Striping Block: Optimal Free Disks Port Disk Model 1.0 ST3120026AS 1.1 ST3120026AS Capacity 111.79GB 111.79GB Array ...
Figure 3 Step 2: The Define a New Array screen is created. You can manually set the striping block size. Define a New Array - Appendix C. Striping Block: Optimal Free Disks Port Disk Model 1.0 ST3120026AS 1.1 ST3120026AS Capacity 111.79GB 111.79GB Array ...
Manual
Page 81
... does not require you need to install the RAID driver during the OS installation process in advance. Step 1: Restart your system, or you need to manually specify an adapter. Please note that installation of one or more mass storage devices installed in your system to boot from a mass storage device manufacturer...
... does not require you need to install the RAID driver during the OS installation process in advance. Step 1: Restart your system, or you need to manually specify an adapter. Please note that installation of one or more mass storage devices installed in your system to boot from a mass storage device manufacturer...

Manual
Page 84
.... (Note) 2/4/5.1/7.1-Channel Audio Configurations: Refer to MP3 music, have both the front and back panel audio connectors active simultaneously. A. GA-N650SLI-DS4L Motherboard - 84 - The integrated HD (High Definition) audio provides Center/Subwoofer Speaker Out Rear Speaker Out Line In Front Speaker Out...XP as the example operating system.) Step 1: After installing the audio driver, the Audio Manager icon will appear in jack and manually configure the jack for each jack through the audio driver. Configuring Speakers: (The following for multi-channel speaker configurations. •...
.... (Note) 2/4/5.1/7.1-Channel Audio Configurations: Refer to MP3 music, have both the front and back panel audio connectors active simultaneously. A. GA-N650SLI-DS4L Motherboard - 84 - The integrated HD (High Definition) audio provides Center/Subwoofer Speaker Out Rear Speaker Out Line In Front Speaker Out...XP as the example operating system.) Step 1: After installing the audio driver, the Audio Manager icon will appear in jack and manually configure the jack for each jack through the audio driver. Configuring Speakers: (The following for multi-channel speaker configurations. •...

Manual
Page 94
... text. GIGABYTE cannot, however, assume any unauthorized purpose. To prevent releases of harmful substances into the environment and to maximize the use internationally banned toxic chemicals. The separate collection and recycling of your effort. Instead, the device should not be prosecuted. GA-N650SLI-DS4L Motherboard -...regulations for recycling. Š If you need further assistance in recycling, reusing in your product's user's manual and we at GIGABYTE are continuing our efforts to high-efficiency performance, all respects at the time of electric and electronic devices...
... text. GIGABYTE cannot, however, assume any unauthorized purpose. To prevent releases of harmful substances into the environment and to maximize the use internationally banned toxic chemicals. The separate collection and recycling of your effort. Instead, the device should not be prosecuted. GA-N650SLI-DS4L Motherboard -...regulations for recycling. Š If you need further assistance in recycling, reusing in your product's user's manual and we at GIGABYTE are continuing our efforts to high-efficiency performance, all respects at the time of electric and electronic devices...


