Manual
Page 1
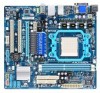
GA-MA78LM-S2H/ GA-MA78LM-S2 AM2+/AM2 socket motherboard for AMD Phenom™ II processor/ AMD Phenom™ processor/ AMD Athlon™ II processor/ AMD Athlon™ processor/ AMD Sempron™ processor User's Manual Rev. 1001 12ME-MA78L2H-1001R
GA-MA78LM-S2H/ GA-MA78LM-S2 AM2+/AM2 socket motherboard for AMD Phenom™ II processor/ AMD Phenom™ processor/ AMD Athlon™ II processor/ AMD Athlon™ processor/ AMD Sempron™ processor User's Manual Rev. 1001 12ME-MA78L2H-1001R

Manual
Page 7
GA-MA78LM-S2H/GA-MA78LM-S2 Motherboard Layout DVI VGA KB(Note)_USB ATX_12V CPU_FAN Socket AM2 M_BIOS B_BIOS ATX IT8718 HDMIj R_USB USB IDE FDD LAN AUDIO F_AUDIO PCIEX1 AMD 760G DDR2_1 DDR2_2 PCIEX16 RTL8111D PCI1 GA-MA78LM-S2H/GA-MA78LM-S2 CD_IN CODEC PCI2 BAT AMD SB710 SATA2_0 COM SATA2_3 SATA2_2 SATA2_1 F_PANEL SPDIF_IO SYS_FAN CLR_CMOS F_USB2 F_USB1 j Only for GA-MA78LM-S2H (Note) Use this port to connect a PS/2 keyboard or PS/2 mouse. - 7 -
GA-MA78LM-S2H/GA-MA78LM-S2 Motherboard Layout DVI VGA KB(Note)_USB ATX_12V CPU_FAN Socket AM2 M_BIOS B_BIOS ATX IT8718 HDMIj R_USB USB IDE FDD LAN AUDIO F_AUDIO PCIEX1 AMD 760G DDR2_1 DDR2_2 PCIEX16 RTL8111D PCI1 GA-MA78LM-S2H/GA-MA78LM-S2 CD_IN CODEC PCI2 BAT AMD SB710 SATA2_0 COM SATA2_3 SATA2_2 SATA2_1 F_PANEL SPDIF_IO SYS_FAN CLR_CMOS F_USB2 F_USB1 j Only for GA-MA78LM-S2H (Note) Use this port to connect a PS/2 keyboard or PS/2 mouse. - 7 -
Manual
Page 10
... Graphics Audio North Bridge: AMD 760G South Bridge: AMD SB710 2 x 1.8V DDR2 DIMM sockets supporting up to GIGABYTE's website for the latest memory support list.) Integrated in the South Bridge Up to 12 USB 2.0/1.1 ports (8 on the back panel, 4 via the USB...-D port (Note 2) (Note 3) - 1 x HDMI port j(Note 3) Realtek ALC888B codec High Definition Audio 2/4/5.1/7.1-channel (Note 4) Support for S/PDIF Out Support for S/PDIF In Support for GA-MA78LM-S2H Hardware Installation - 10 -
... Graphics Audio North Bridge: AMD 760G South Bridge: AMD SB710 2 x 1.8V DDR2 DIMM sockets supporting up to GIGABYTE's website for the latest memory support list.) Integrated in the South Bridge Up to 12 USB 2.0/1.1 ports (8 on the back panel, 4 via the USB...-D port (Note 2) (Note 3) - 1 x HDMI port j(Note 3) Realtek ALC888B codec High Definition Audio 2/4/5.1/7.1-channel (Note 4) Support for S/PDIF Out Support for S/PDIF In Support for GA-MA78LM-S2H Hardware Installation - 10 -

Manual
Page 13
...A Small Triangle Mark Denotes Pin One of the CPU may locate the notches on both sides of the CPU and alignment keys on the CPU socket.) • Apply an even and thin layer of thermal grease on the computer if the CPU cooler is not recommended that the motherboard supports ...the CPU. (Go to GIGABYTE's website for the peripherals. Hardware Installation age of the Socket AM2 Socket A Small Triangle Marking Denotes CPU Pin One AM3/AM2+/AM2 CPU - 13 - Locate the pin one of the CPU. ...
...A Small Triangle Mark Denotes Pin One of the CPU may locate the notches on both sides of the CPU and alignment keys on the CPU socket.) • Apply an even and thin layer of thermal grease on the computer if the CPU cooler is not recommended that the motherboard supports ...the CPU. (Go to GIGABYTE's website for the peripherals. Hardware Installation age of the Socket AM2 Socket A Small Triangle Marking Denotes CPU Pin One AM3/AM2+/AM2 CPU - 13 - Locate the pin one of the CPU. ...

Manual
Page 14
... orientation if this occurs. The CPU cannot fit in if oriented incorrectly. Follow the steps below to correctly install the CPU into the motherboard CPU socket. • Before installing the CPU, make sure to turn off the computer and unplug the power cord from the power outlet to prevent damage to... the CPU. • Do not force the CPU into their holes. Once the CPU is positioned into its socket, place one (small triangle marking) with the triangle mark on the middle of the CPU, lowering the locking lever and latching it into the...
... orientation if this occurs. The CPU cannot fit in if oriented incorrectly. Follow the steps below to correctly install the CPU into the motherboard CPU socket. • Before installing the CPU, make sure to turn off the computer and unplug the power cord from the power outlet to prevent damage to... the CPU. • Do not force the CPU into their holes. Once the CPU is positioned into its socket, place one (small triangle marking) with the triangle mark on the middle of the CPU, lowering the locking lever and latching it into the...

Manual
Page 16
... unable to insert the memory, switch the direction. 1-4-1 Dual Channel Memory Configuration This motherboard provides two DDR2 memory sockets and supports Dual Channel Technology. Hardware Installation - 16 - A memory module can be used . It is recommended that memory of the same capacity, ...Channel mode with two memory modules, it is recommended that the motherboard supports the memory. Dual Channel mode cannot be used . (Go to GIGABYTE's website for the latest memory support list.) • Always turn off the computer and unplug the power cord from the power outlet before ...
... unable to insert the memory, switch the direction. 1-4-1 Dual Channel Memory Configuration This motherboard provides two DDR2 memory sockets and supports Dual Channel Technology. Hardware Installation - 16 - A memory module can be used . It is recommended that memory of the same capacity, ...Channel mode with two memory modules, it is recommended that the motherboard supports the memory. Dual Channel mode cannot be used . (Go to GIGABYTE's website for the latest memory support list.) • Always turn off the computer and unplug the power cord from the power outlet before ...

Manual
Page 17
...a notch, so it vertically into place when the memory module is securely inserted. - 17 - Step 2: The clips at both ends of the memory socket. Step 1: Note the orientation of the memory, push down on the socket. Place the memory module on the memory and insert it can only fit in the memory... sockets. Spread the retaining clips at both ends of the socket will snap into the memory socket. Hardware Installation DDR2 DIMMs are not compatible to DDR DIMMs. Be sure to the memory module. Follow the steps below ...
...a notch, so it vertically into place when the memory module is securely inserted. - 17 - Step 2: The clips at both ends of the memory socket. Step 1: Note the orientation of the memory, push down on the socket. Place the memory module on the memory and insert it can only fit in the memory... sockets. Spread the retaining clips at both ends of the socket will snap into the memory socket. Hardware Installation DDR2 DIMMs are not compatible to DDR DIMMs. Be sure to the memory module. Follow the steps below ...

Manual
Page 89
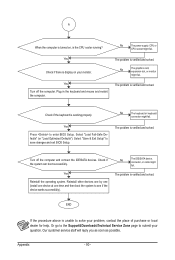
... start the computer. Appendix Is the power connector of the CPU cooler connected to the CPU securely. No Correctly insert the memory into the memory socket. Remove all peripherals, connecting cables, and power cord etc. No Check if the CPU cooler is securely seated in the expansion slot and power connectors...
... start the computer. Appendix Is the power connector of the CPU cooler connected to the CPU securely. No Correctly insert the memory into the memory socket. Remove all peripherals, connecting cables, and power cord etc. No Check if the CPU cooler is securely seated in the expansion slot and power connectors...
Manual
Page 90
.... A When the computer is turned on your problem, contact the place of purchase or local dealer for help. No The power supply, CPU or CPU socket might fail. Plug in the keyboard and mouse and restart the computer. The problem is the CPU cooler running? Turn off the computer. Or go...
.... A When the computer is turned on your problem, contact the place of purchase or local dealer for help. No The power supply, CPU or CPU socket might fail. Plug in the keyboard and mouse and restart the computer. The problem is the CPU cooler running? Turn off the computer. Or go...

