Manual
Page 12
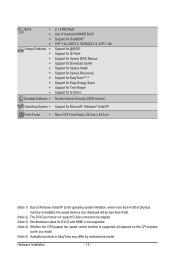
... for Time Repair Support for Q-Share Norton Internet Security (OEM version) Operating System w Support for Microsoft® Windows® Vista/XP Form Factor w Micro ATX Form Factor; 24.3cm x 24.3cm (Note 1) Due to Windows Vista/XP 32-bit operating system limitation, when more than 4 GB of physical memory is installed, the...
... for Time Repair Support for Q-Share Norton Internet Security (OEM version) Operating System w Support for Microsoft® Windows® Vista/XP Form Factor w Micro ATX Form Factor; 24.3cm x 24.3cm (Note 1) Due to Windows Vista/XP 32-bit operating system limitation, when more than 4 GB of physical memory is installed, the...
Manual
Page 19
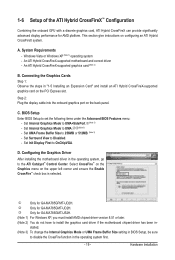
...go to install the graphics card driver if the motherboard chipset driver has been in the operating system first. - 19 - l Only for GA-MA785GPMT-UD2H. Connecting the Graphics Cards Step 1: Observe the steps in BIOS Setup, be sure to OnChipVGA. C. k Only for AMD platform. Hardware ...install AMD chipset driver version 8.51 or later. (Note 2) You do not have to the ATI Catalyst™ Control Center. A. Windows Vista or Windows XP (Note 1) operating system - This section give instructions on the PCI Express slot. An ATI Hybrid CrossFireX-supported motherboard and correct...
...go to install the graphics card driver if the motherboard chipset driver has been in the operating system first. - 19 - l Only for GA-MA785GPMT-UD2H. Connecting the Graphics Cards Step 1: Observe the steps in BIOS Setup, be sure to OnChipVGA. C. k Only for AMD platform. Hardware ...install AMD chipset driver version 8.51 or later. (Note 2) You do not have to the ATI Catalyst™ Control Center. A. Windows Vista or Windows XP (Note 1) operating system - This section give instructions on the PCI Express slot. An ATI Hybrid CrossFireX-supported motherboard and correct...

Manual
Page 20
...actual resolutions supported depend on the monitor being used. • After installing the HDMI device, make sure the default device for sound playback is from Windows Vista.) • Please note the HDMI audio output only supports AC3, DTS and 2-channel-LPCM formats. (AC3 and DTS require the use of an... external decoder for decoding.) In Windows Vista, select Start>Control Panel>Sound, select Realtek HDMI Output and then click Set Default. (Note 1) The DVI-D port does not support D-Sub ...
...actual resolutions supported depend on the monitor being used. • After installing the HDMI device, make sure the default device for sound playback is from Windows Vista.) • Please note the HDMI audio output only supports AC3, DTS and 2-channel-LPCM formats. (AC3 and DTS require the use of an... external decoder for decoding.) In Windows Vista, select Start>Control Panel>Sound, select Realtek HDMI Output and then click Set Default. (Note 1) The DVI-D port does not support D-Sub ...

Manual
Page 35
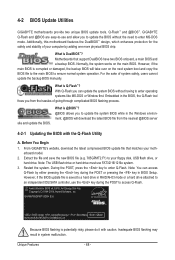
...modify basic system configuration settings or to quickly and easily upgrade or back up BIOS without entering the operating system. • @BIOS is a Windows-based utility that searches and downloads the latest version of BIOS from the Internet and updates the BIOS. To flash the BIOS, do not encounter... POST. BIOS Setup When the power is turned off, the battery on . For instructions on the motherboard. To upgrade the BIOS, use either the GIGABYTE Q-Flash or @BIOS utility. • Q-Flash allows the user to activate certain system features. To see more advanced BIOS Setup menu options, you ...
...modify basic system configuration settings or to quickly and easily upgrade or back up BIOS without entering the operating system. • @BIOS is a Windows-based utility that searches and downloads the latest version of BIOS from the Internet and updates the BIOS. To flash the BIOS, do not encounter... POST. BIOS Setup When the power is turned off, the battery on . For instructions on the motherboard. To upgrade the BIOS, use either the GIGABYTE Q-Flash or @BIOS utility. • Q-Flash allows the user to activate certain system features. To see more advanced BIOS Setup menu options, you ...

Manual
Page 49
... appears off. (Default: Disabled) Backup BIOS Image to HDD Allows the system to copy the BIOS image file to silently perform unattended tasks while in Windows XP Media Center operating system.
... appears off. (Default: Disabled) Backup BIOS Image to HDD Allows the system to copy the BIOS image file to silently perform unattended tasks while in Windows XP Media Center operating system.

Manual
Page 51
... detecting at about 2m on a specified pair of wires, the Status field will show Short and then length shown will show 0m, as shown in Windows mode or when the LAN Boot ROM is detected on the LAN cable connected to the motherboard, the Status fields of all four pairs of...
... detecting at about 2m on a specified pair of wires, the Status field will show Short and then length shown will show 0m, as shown in Windows mode or when the LAN Boot ROM is detected on the LAN cable connected to the motherboard, the Status fields of all four pairs of...

Manual
Page 53
... MS-DOS mode using the power button. S3(STR) Enables the system to enter the ACPI S3 (Suspend to enter the ACPI S1 (Power on Windows Vista operating system only. - 53 - BIOS Setup S1(POS) Enables the system to RAM) sleep state (default). Soft-Off by Power button Configures the way...
... MS-DOS mode using the power button. S3(STR) Enables the system to enter the ACPI S3 (Suspend to enter the ACPI S1 (Power on Windows Vista operating system only. - 53 - BIOS Setup S1(POS) Enables the system to RAM) sleep state (default). Soft-Off by Power button Configures the way...
Manual
Page 54
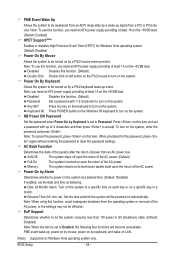
...) Double Click Double click on left button on the PS/2 mouse to turn on the system. Keyboard 98 Press POWER button on the Windows 98 keyboard to turn on the +5VSB lead. Disabled Disables this item. Power On By Keyboard Allows the system to be turned on ...lead. Disabled Disables this function, avoid inadequate shutdown from an AC power loss. When prompted for Windows Vista operating system. (Default: Enabled) Power On By Mouse Allows the system to be turned on Windows Vista operating system only. Note: When using this function. (Default) Password Set a password with ...
...) Double Click Double click on left button on the PS/2 mouse to turn on the system. Keyboard 98 Press POWER button on the Windows 98 keyboard to turn on the +5VSB lead. Disabled Disables this item. Power On By Keyboard Allows the system to be turned on ...lead. Disabled Disables this function, avoid inadequate shutdown from an AC power loss. When prompted for Windows Vista operating system. (Default: Enabled) Power On By Mouse Allows the system to be turned on Windows Vista operating system only. Note: When using this function. (Default) Password Set a password with ...
Manual
Page 61
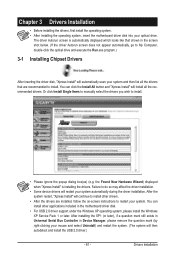
... "Xpress Install" is automatically displayed which looks like that shown in the motherboard driver disk. • For USB 2.0 driver support under the Windows XP operating system, please install the Windows XP Service Pack 1 or later. Chapter 3 Drivers Installation • Before installing the drivers, first install the operating system. • After installing the...
... "Xpress Install" is automatically displayed which looks like that shown in the motherboard driver disk. • For USB 2.0 driver support under the Windows XP operating system, please install the Windows XP Service Pack 1 or later. Chapter 3 Drivers Installation • Before installing the drivers, first install the operating system. • After installing the...

Manual
Page 65
...first physical drive. - 65 - System Requirements: • At least 512 MB of system memory • VESA compatible graphics card • Windows XP with Xpress Recovery cannot be restored using Xpress Recovery2. • USB hard drives are different utilities. For example, a backup file created ...with SP1 or later, Windows Vista • Xpress Recovery and Xpress Recovery2 are not supported. • Hard drives in the following sequence: The first PATA IDE connector...
...first physical drive. - 65 - System Requirements: • At least 512 MB of system memory • VESA compatible graphics card • Windows XP with Xpress Recovery cannot be restored using Xpress Recovery2. • USB hard drives are different utilities. For example, a backup file created ...with SP1 or later, Windows Vista • Xpress Recovery and Xpress Recovery2 are not supported. • Hard drives in the following sequence: The first PATA IDE connector...
Manual
Page 68
... without the need to enter operating systems like MS-DOS or Window first. Embedded in BIOS Setup. Restart the system. GA-MA785GPMT-UD2H E3c . . . . : BIOS Setup : XpressRecovery2 : Boot Menu : Qflash 06/05/2009-RS785-SB710-7A66BG03C-00 Because BIOS flashing is Q-Flash™? GIGABYTE Q-Flash and @BIOS are easy-to-use FAT32/16/12 file...
... without the need to enter operating systems like MS-DOS or Window first. Embedded in BIOS Setup. Restart the system. GA-MA785GPMT-UD2H E3c . . . . : BIOS Setup : XpressRecovery2 : Boot Menu : Qflash 06/05/2009-RS785-SB710-7A66BG03C-00 Because BIOS flashing is Q-Flash™? GIGABYTE Q-Flash and @BIOS are easy-to-use FAT32/16/12 file...

Manual
Page 71
...Using the Internet Update Function: Click Update BIOS from File, then select the location where you save the BIOS update file obtained from GIGABYTE Server, select the @BIOS server site closest to save the current BIOS file. 4. 4-2-2 Updating the BIOS with an incorrect BIOS...then download the BIOS file that matches your motherboard model. C. In Windows, close all applications and TSR (Terminate and Stay Resident) programs. This helps prevent unexpected failures when performing a BIOS update. 2. GIGABYTE product warranty does not cover any BIOS damage or system failure resulting from...
...Using the Internet Update Function: Click Update BIOS from File, then select the location where you save the BIOS update file obtained from GIGABYTE Server, select the @BIOS server site closest to save the current BIOS file. 4. 4-2-2 Updating the BIOS with an incorrect BIOS...then download the BIOS file that matches your motherboard model. C. In Windows, close all applications and TSR (Terminate and Stay Resident) programs. This helps prevent unexpected failures when performing a BIOS update. 2. GIGABYTE product warranty does not cover any BIOS damage or system failure resulting from...

Manual
Page 72
...the core clock and memory clock for CPU and memory information, letting users read their system settings or do overclock/overvoltage in Windows environment. The Smart tab allows you to change system clock settings and voltages settings using the sliders. • Easy Boost ...wav file). (Note) Before enabling Easy Boost, right-click the EasyTune 6 icon in EasyTune 6 may differ by motherboard model. 4-3 EasyTune 6 GIGABYTE's EasyTune 6 is a simple and easy-to-use interface that you fully know each function of EasyTune 6, or system instability or other unexpected results ...
...the core clock and memory clock for CPU and memory information, letting users read their system settings or do overclock/overvoltage in Windows environment. The Smart tab allows you to change system clock settings and voltages settings using the sliders. • Easy Boost ...wav file). (Note) Before enabling Easy Boost, right-click the EasyTune 6 icon in EasyTune 6 may differ by motherboard model. 4-3 EasyTune 6 GIGABYTE's EasyTune 6 is a simple and easy-to-use interface that you fully know each function of EasyTune 6, or system instability or other unexpected results ...

Manual
Page 76
...) and click the Copy button to restore the file(s)/directory(ies) or click Restore to quickly back up and restore your system data in the Windows Vista operating system. System Restore Choose a system restore point using the navigation bar on the right or at the bottom of the screen to be...
...) and click the Copy button to restore the file(s)/directory(ies) or click Restore to quickly back up and restore your system data in the Windows Vista operating system. System Restore Choose a system restore point using the navigation bar on the right or at the bottom of the screen to be...

Manual
Page 77
...). Then connect the power connector from your computer Attach one hard drive. • An empty formatted floppy disk. • Windows Vista/XP setup disk. • Motherboard driver disk. 5-1-1 Configuring the Onboard SATA Controller A. Make a floppy disk containing the SATA RAID.../AHCI driver for Windows XP. (Note 2) E. Chapter 5 Appendix 5-1 Configuring SATA Hard Drive(s) To configure SATA hard drive(s), follow the steps below: A. B. Configure...
...). Then connect the power connector from your computer Attach one hard drive. • An empty formatted floppy disk. • Windows Vista/XP setup disk. • Motherboard driver disk. 5-1-1 Configuring the Onboard SATA Controller A. Make a floppy disk containing the SATA RAID.../AHCI driver for Windows XP. (Note 2) E. Chapter 5 Appendix 5-1 Configuring SATA Hard Drive(s) To configure SATA hard drive(s), follow the steps below: A. B. Configure...

Manual
Page 79
... ] View Drive Assignments 1 ] Define LD 2 ] Delete LD 3 ] Controller Configuration 4 ] [ Keys Available ] Press 1..4 to enter the Controller Configuration window. Step 1: After the POST memory test begins and before the operating system boot begins, look for a non-RAID configuration. All rights reserved. Configuring RAID set...to enter the RAID BIOS setup utility. To create an array, press to enter the Delete LD window. Appendix To delete an array, press to enter the Define LD window. To view the disk drives assigned to arrays, press to enter the View Drive Assignments...
... ] View Drive Assignments 1 ] Define LD 2 ] Delete LD 3 ] Controller Configuration 4 ] [ Keys Available ] Press 1..4 to enter the Controller Configuration window. Step 1: After the POST memory test begins and before the operating system boot begins, look for a non-RAID configuration. All rights reserved. Configuring RAID set...to enter the RAID BIOS setup utility. To create an array, press to enter the Delete LD window. Appendix To delete an array, press to enter the Define LD window. To view the disk drives assigned to arrays, press to enter the View Drive Assignments...

Manual
Page 80
...---- LD 7 ---- LD 9 ---- LD No RAID Mode [ Define LD Menu ] Total Drv LD 1 RAID 0 0 Stripe Block: 64 KB Gigabyte Boundary: ON [ Drives Assignments ] Channel:ID Drive Model 1:Mas WDC WD800JD-22LSA0 2:Mas WDC WD800JD-22LSA0 Capabilities SATA 3G SATA 3G Fast Init: ON...4 [Enter] Select In Figure 4, use the up or down arrow key to move to a logical disk set and press to enter the Define LD Menu window (Figure 4). Option ROM Utility (c) 2008 Advanced Micro Devices, Inc. LD 10 ---- LD 6 ---- LD 2 ---- Create Arrays Manually To create a new ...
...---- LD 7 ---- LD 9 ---- LD No RAID Mode [ Define LD Menu ] Total Drv LD 1 RAID 0 0 Stripe Block: 64 KB Gigabyte Boundary: ON [ Drives Assignments ] Channel:ID Drive Model 1:Mas WDC WD800JD-22LSA0 2:Mas WDC WD800JD-22LSA0 Capabilities SATA 3G SATA 3G Fast Init: ON...4 [Enter] Select In Figure 4, use the up or down arrow key to move to a logical disk set and press to enter the Define LD Menu window (Figure 4). Option ROM Utility (c) 2008 Advanced Micro Devices, Inc. LD 10 ---- LD 6 ---- LD 2 ---- Create Arrays Manually To create a new ...

Manual
Page 81
... Assignment LD 1-1 LD 1-2 [h] Up [i] Down [ESC] Exit [ Keys Available ] [Ctrl+H] Secure Erase [PgUp/Dn] Page Change Figure 8 - 81 - Press + keys to Y. Then, the window below will appear. The window below will see the newlycreated array. 9. Figure 6 6. Press + to set the capacity of the disk. Press to return to Main Menu and press...
... Assignment LD 1-1 LD 1-2 [h] Up [i] Down [ESC] Exit [ Keys Available ] [Ctrl+H] Secure Erase [PgUp/Dn] Page Change Figure 8 - 81 - Press + keys to Y. Then, the window below will appear. The window below will see the newlycreated array. 9. Figure 6 6. Press + to set the capacity of the disk. Press to return to Main Menu and press...
Manual
Page 83
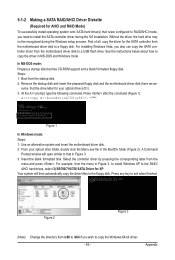
...OS installation. In MS-DOS mode: Prepare a startup disk that in the BootDrv folder (Figure 2). Your system will open similar to copy the Windows 64-bit driver. - 83 - Appendix Press any key to the floppy disk. sume that the drive letter for AHCI and RAID Mode) ... floppy disk. Steps: 1: Boot from the menu and press . Press after the command (Figure 1): A:\>copy d:\bootdrv\sb750\x86\*.* (Note) Figure 1 In Windows mode: Steps: 1: Use an alternative system and insert the motherboard driver disk. 2: From your optical drive is /are configured to RAID/AHCI mode, you need...
...OS installation. In MS-DOS mode: Prepare a startup disk that in the BootDrv folder (Figure 2). Your system will open similar to copy the Windows 64-bit driver. - 83 - Appendix Press any key to the floppy disk. sume that the drive letter for AHCI and RAID Mode) ... floppy disk. Steps: 1: Boot from the menu and press . Press after the command (Figure 1): A:\>copy d:\bootdrv\sb750\x86\*.* (Note) Figure 1 In Windows mode: Steps: 1: Use an alternative system and insert the motherboard driver disk. 2: From your optical drive is /are configured to RAID/AHCI mode, you need...
Manual
Page 84
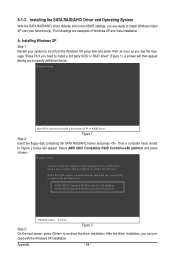
...Press F6 if you need to the previous screen. After the driver installation, you to configure a SCSI Adapter for use with the Windows XP installation. ceed with Windows, using a device support disk provided by an adapter manufacturer. A. Appendix - 84 - Then a controller menu similar to continue ... then appear asking you can pro- Figure 1 Step 2: Insert the floppy disk containing the SATA RAID/AHCI driver and press . Windows Setup You have chosen to specify additional device. 5-1-3 Installing the SATA RAID/AHCI Driver and Operating System With the SATA RAID/AHCI driver...
...Press F6 if you need to the previous screen. After the driver installation, you to configure a SCSI Adapter for use with the Windows XP installation. ceed with Windows, using a device support disk provided by an adapter manufacturer. A. Appendix - 84 - Then a controller menu similar to continue ... then appear asking you can pro- Figure 1 Step 2: Insert the floppy disk containing the SATA RAID/AHCI driver and press . Windows Setup You have chosen to specify additional device. 5-1-3 Installing the SATA RAID/AHCI Driver and Operating System With the SATA RAID/AHCI driver...


