Manual
Page 1
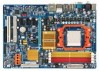
GA-MA770-DS3/ GA-MA770-S3 AM2+/AM2 socket motherboard for AMD PhenomTM FX processor/ AMD PhenomTM processor/ AMD AthlonTM 64 FX processor/ AMD AthlonTM 64 X2 Dual-Core processor/ AMD AthlonTM 64 processor/AMD SempronTM processor User's Manual Rev. 1003 12ME-MA770S3-1003R
GA-MA770-DS3/ GA-MA770-S3 AM2+/AM2 socket motherboard for AMD PhenomTM FX processor/ AMD PhenomTM processor/ AMD AthlonTM 64 FX processor/ AMD AthlonTM 64 X2 Dual-Core processor/ AMD AthlonTM 64 processor/AMD SempronTM processor User's Manual Rev. 1003 12ME-MA770S3-1003R
Manual
Page 3
...-BYTE TECHNOLOGY CO., LTD as the exclu- For example, "REV: 1.0" means the revision of GIGABYTE branded motherboards. GIGABYTE UNITED INC. is exclusively licensed to the specifications and features in this manual may be made by any form or by GIGABYTE without GIGABYTE's prior written permission. Copyright © 2008 GIGA-BYTE TECHNOLOGY CO., LTD. Changes to...
...-BYTE TECHNOLOGY CO., LTD as the exclu- For example, "REV: 1.0" means the revision of GIGABYTE branded motherboards. GIGABYTE UNITED INC. is exclusively licensed to the specifications and features in this manual may be made by any form or by GIGABYTE without GIGABYTE's prior written permission. Copyright © 2008 GIGA-BYTE TECHNOLOGY CO., LTD. Changes to...
Manual
Page 6
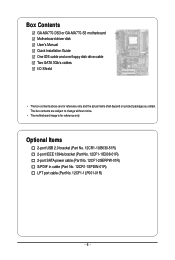
... No. 12CR1-1SPDIN-01R) LPT port cable (Part No. 12CF1-1LP001-01R) - 6 - The box contents are for reference only. Box Contents GA-MA770-DS3 or GA-MA770-S3 motherboard Motherboard driver disk User's Manual Quick Installation Guide One IDE cable and one floppy disk drive cable Two SATA 3Gb/s cables I/O Shield • The box contents above...
... No. 12CR1-1SPDIN-01R) LPT port cable (Part No. 12CF1-1LP001-01R) - 6 - The box contents are for reference only. Box Contents GA-MA770-DS3 or GA-MA770-S3 motherboard Motherboard driver disk User's Manual Quick Installation Guide One IDE cable and one floppy disk drive cable Two SATA 3Gb/s cables I/O Shield • The box contents above...

Manual
Page 9
... (ESD) wrist strap when handling electronic components such as a result of the product, please consult a certified computer technician. - 9 - Prior to installation, carefully read the user's manual and follow these procedures: • Prior to installation, do not allow screws to come in a high-temperature environment. • Turning on the computer power during...
... (ESD) wrist strap when handling electronic components such as a result of the product, please consult a certified computer technician. - 9 - Prior to installation, carefully read the user's manual and follow these procedures: • Prior to installation, do not allow screws to come in a high-temperature environment. • Turning on the computer power during...

Manual
Page 15
... the steps below to correctly install the CPU cooler on the CPU. (The following procedure uses the GIGABYTE cooler as the picture above shows) to lock into place. (Refer to your CPU cooler installation manual for instructions on installing the cooler.) Step 5: Finally, attach the power connector of the CPU cooler to...
... the steps below to correctly install the CPU cooler on the CPU. (The following procedure uses the GIGABYTE cooler as the picture above shows) to lock into place. (Refer to your CPU cooler installation manual for instructions on installing the cooler.) Step 5: Finally, attach the power connector of the CPU cooler to...
Manual
Page 18
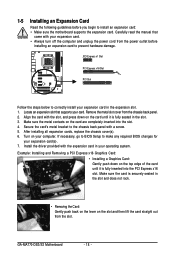
... • Removing the Card: Gently push back on the lever on the card are completely inserted into the PCI Express x16 slot. GA-MA770-DS3/S3 Motherboard - 18 - Remove the metal slot cover from the power outlet before you begin to install an expansion card: • Make...: Installing and Removing a PCI Express x16 Graphics Card: • Installing a Graphics Card: Gently push down on your card. Carefully read the manual that supports your computer. Install the driver provided with your operating system. Locate an expansion slot that came with the expansion card in the slot....
... • Removing the Card: Gently push back on the lever on the card are completely inserted into the PCI Express x16 slot. GA-MA770-DS3/S3 Motherboard - 18 - Remove the metal slot cover from the power outlet before you begin to install an expansion card: • Make...: Installing and Removing a PCI Express x16 Graphics Card: • Installing a Graphics Card: Gently push down on your card. Carefully read the manual that supports your computer. Install the driver provided with your operating system. Locate an expansion slot that came with the expansion card in the slot....
Manual
Page 28
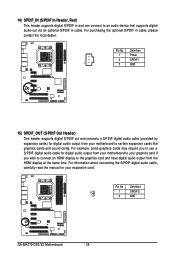
... audio cable (provided by expansion cards) for your expansion card. For information about connecting the S/PDIF digital audio cable, carefully read the manual for digital audio output from your graphics card if you to use a S/PDIF digital audio cable for digital audio output from the HDMI ... HDMI display to an audio device that supports digital audio out via an optional S/PDIF in cable. Pin No. Definition 1 1 SPDIFO 2 GND GA-MA770-DS3/S3 Motherboard - 28 - For purchasing the optional S/PDIF in cable, please contact the local dealer. 14) SPDIF_IN (S/PDIF In Header, Red) This ...
... audio cable (provided by expansion cards) for your expansion card. For information about connecting the S/PDIF digital audio cable, carefully read the manual for digital audio output from your graphics card if you to use a S/PDIF digital audio cable for digital audio output from the HDMI ... HDMI display to an audio device that supports digital audio out via an optional S/PDIF in cable. Pin No. Definition 1 1 SPDIFO 2 GND GA-MA770-DS3/S3 Motherboard - 28 - For purchasing the optional S/PDIF in cable, please contact the local dealer. 14) SPDIF_IN (S/PDIF In Header, Red) This ...
Manual
Page 31
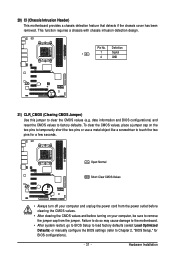
... do so may cause damage to the motherboard. • After system restart, go to BIOS Setup to load factory defaults (select Load Optimized Defaults) or manually configure the BIOS settings (refer to Chapter 2, "BIOS Setup," for a few seconds. To clear the CMOS values, place a jumper cap on your computer, be sure...
... do so may cause damage to the motherboard. • After system restart, go to BIOS Setup to load factory defaults (select Load Optimized Defaults) or manually configure the BIOS settings (refer to Chapter 2, "BIOS Setup," for a few seconds. To clear the CMOS values, place a jumper cap on your computer, be sure...

Manual
Page 37
...set the date. Options are : Auto (default), CHS, LBA, Large. Select the desired field and use the up arrow or down arrow key to manually enter the specifications of the device during the POST for faster system startup. IDE Channel 0 Master/Slave Configure your IDE/SATA devices by using one... of the three methods below : • Auto Lets BIOS automatically detect IDE/SATA devices during the POST for faster system startup. • Manual Allows you to set to autodetect the parameters of the IDE/SATA device on this item to None so the system will skip the detection...
...set the date. Options are : Auto (default), CHS, LBA, Large. Select the desired field and use the up arrow or down arrow key to manually enter the specifications of the device during the POST for faster system startup. IDE Channel 0 Master/Slave Configure your IDE/SATA devices by using one... of the three methods below : • Auto Lets BIOS automatically detect IDE/SATA devices during the POST for faster system startup. • Manual Allows you to set to autodetect the parameters of the IDE/SATA device on this item to None so the system will skip the detection...
Manual
Page 38
...of the currently installed hard drive. Floppy 3 Mode Support Allows you to the information on Allows you wish to enter the parameters manually, refer to specify whether the installed floppy disk drive is 3-mode floppy disk drive, a Japanese standard floppy disk drive. Halt ...25", 720K/3.5", 1.44M/3.5", 2.88M/3.5". Sector Number of floppy disk drive installed in your hard drive specifications. Typically, 640 KB will stop. GA-MA770-DS3/S3 Motherboard - 38 - All, But Disk/Key The system boot will not stop for a keyboard or a floppy disk drive error but it ...
...of the currently installed hard drive. Floppy 3 Mode Support Allows you to the information on Allows you wish to enter the parameters manually, refer to specify whether the installed floppy disk drive is 3-mode floppy disk drive, a Japanese standard floppy disk drive. Halt ...25", 720K/3.5", 1.44M/3.5", 2.88M/3.5". Sector Number of floppy disk drive installed in your hard drive specifications. Typically, 640 KB will stop. GA-MA770-DS3/S3 Motherboard - 38 - All, But Disk/Key The system boot will not stop for a keyboard or a floppy disk drive error but it ...
Manual
Page 49
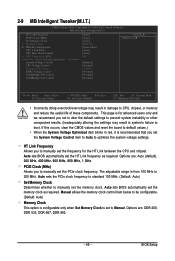
... set the memory clock as required. Auto sets the PCIe clock frequency to standard 100 MHz. (Default: Auto) Set Memory Clock Determines whether to manually set the PCIe clock frequency. Options are : Auto (default), 200 MHz, 400 MHz, 600 MHz, 800 MHz, 1 GHz. 2-9 MB Intelligent... Normal CPU Vcore DDR2 Voltage Control NorthBridge Volt Control SouthBridge Volt Control ******** [Auto] [Auto] [Auto] DDR 533 [Press Enter] [Auto] [Auto] 200 [Manual] [Normal] 1.3500V [Normal] [Normal] [Normal] Item Help Menu Level` KLJI: Move Enter: Select F5: Previous Values +/-/PU/PD: Value F10: Save F6...
... set the memory clock as required. Auto sets the PCIe clock frequency to standard 100 MHz. (Default: Auto) Set Memory Clock Determines whether to manually set the PCIe clock frequency. Options are : Auto (default), 200 MHz, 400 MHz, 600 MHz, 800 MHz, 1 GHz. 2-9 MB Intelligent... Normal CPU Vcore DDR2 Voltage Control NorthBridge Volt Control SouthBridge Volt Control ******** [Auto] [Auto] [Auto] DDR 533 [Press Enter] [Auto] [Auto] 200 [Manual] [Normal] 1.3500V [Normal] [Normal] [Normal] Item Help Menu Level` KLJI: Move Enter: Select F5: Previous Values +/-/PU/PD: Value F10: Save F6...

Manual
Page 50
... are : 1T (default), 2T. CAS# latency Options are: 3T, 4T (default), 5T, 6T. 1T/2T Command Timing Options are : Auto (default), Manual. TwTr Command Delay Options are : 3T, 4T (default), 5T, 6T. Row Cycle Time Options are: 11T~26T. (Default: 17T) RAS to CAS R/W...Previous Values +/-/PU/PD: Value F10: Save F6: Fail-Safe Defaults ESC: Exit F1: General Help F7: Optimized Defaults DDRII Timing Items Manual allows all DDRII Timing items below to RAS Delay Options are : 5T~18T. (Default: 12T) GA-MA770-DS3/S3 Motherboard - 50 - Precharge Time Options are: 2T (default), 3T.
... are : 1T (default), 2T. CAS# latency Options are: 3T, 4T (default), 5T, 6T. 1T/2T Command Timing Options are : Auto (default), Manual. TwTr Command Delay Options are : 3T, 4T (default), 5T, 6T. Row Cycle Time Options are: 11T~26T. (Default: 17T) RAS to CAS R/W...Previous Values +/-/PU/PD: Value F10: Save F6: Fail-Safe Defaults ESC: Exit F1: General Help F7: Optimized Defaults DDRII Timing Items Manual allows all DDRII Timing items below to RAS Delay Options are : 5T~18T. (Default: 12T) GA-MA770-DS3/S3 Motherboard - 50 - Precharge Time Options are: 2T (default), 3T.
Manual
Page 51
...Volt Control Allows you to set memory voltage. Manual allows the CPU Frequency (Mhz) item below to manually set the CPU host frequency. Manual allows all voltage control items below to be configurable. (Default: Manual) CPU Voltage Control Allows you to be ...Increasing CPU voltage may result in accordance with the CPU specifications. ******** System Voltage Optimized ******** System Voltage Control Determines whether to manually set the North Bridge voltage. Normal Supplies the North Bridge voltage as required. BIOS Setup Auto lets BIOS automatically set the ...
...Volt Control Allows you to set memory voltage. Manual allows the CPU Frequency (Mhz) item below to manually set the CPU host frequency. Manual allows all voltage control items below to be configurable. (Default: Manual) CPU Voltage Control Allows you to be ...Increasing CPU voltage may result in accordance with the CPU specifications. ******** System Voltage Optimized ******** System Voltage Control Determines whether to manually set the North Bridge voltage. Normal Supplies the North Bridge voltage as required. BIOS Setup Auto lets BIOS automatically set the ...

Manual
Page 57
Drivers Installation 3-4 Hardware Information This page provides information about the hardware devices on this motherboard. 3-5 Contact Us Check the contacts information of the GIGABYTE headquarter in Taiwan and the overseas branch offices on the last page of this manual. - 57 -
Drivers Installation 3-4 Hardware Information This page provides information about the hardware devices on this motherboard. 3-5 Contact Us Check the contacts information of the GIGABYTE headquarter in Taiwan and the overseas branch offices on the last page of this manual. - 57 -
Manual
Page 68
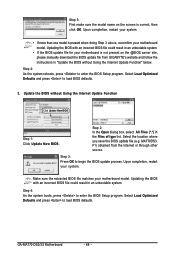
...Function" below. Select the location where you save the BIOS update file (e.g. F1) obtained from GIGABYTE's website and follow the instructions in "Update the BIOS without Using the Internet Update Function Click Update... then click OK. Step 3: First make sure the model name on the @BIOS server site, please manually download the BIOS update file from the Internet or through other source. Step 2: In the Open dialog ... sure the extracted BIOS file matches your system. MA770DS3. GA-MA770-DS3/S3 Motherboard - 68 - Select Load Optimized Defaults and press to load BIOS defaults. 3.
...Function" below. Select the location where you save the BIOS update file (e.g. F1) obtained from GIGABYTE's website and follow the instructions in "Update the BIOS without Using the Internet Update Function Click Update... then click OK. Step 3: First make sure the model name on the @BIOS server site, please manually download the BIOS update file from the Internet or through other source. Step 2: In the Open dialog ... sure the extracted BIOS file matches your system. MA770DS3. GA-MA770-DS3/S3 Motherboard - 68 - Select Load Optimized Defaults and press to load BIOS defaults. 3.

Manual
Page 74
... KB Gigabyte Boundary: ON Fast Init: OFF Cache Mode: WriteThru [ Drives Assignments ] Channel:ID Drive Model 1:Mas WDC WD800JD-22LSA0 2:Mas WDC WD800JD-22LSA0 Capacity (MB) 80026 80026 Assignment N N [K] Up [L] Down [ Keys Available ] [ESC] Exit [Space] Change Option Figure 5 [Ctrl-Y] Save GA-MA770-DS3/S3 Motherboard - 74 - LD 4 ---- LD 3 ---- LD 8 ---- ---- ----- ---- ----- ---- ----- ---- ----- ---- ----- ---- ----- ---- ----- ---- ----- Create Arrays Manually To create...
... KB Gigabyte Boundary: ON Fast Init: OFF Cache Mode: WriteThru [ Drives Assignments ] Channel:ID Drive Model 1:Mas WDC WD800JD-22LSA0 2:Mas WDC WD800JD-22LSA0 Capacity (MB) 80026 80026 Assignment N N [K] Up [L] Down [ Keys Available ] [ESC] Exit [Space] Change Option Figure 5 [Ctrl-Y] Save GA-MA770-DS3/S3 Motherboard - 74 - LD 4 ---- LD 3 ---- LD 8 ---- ---- ----- ---- ----- ---- ----- ---- ----- ---- ----- ---- ----- ---- ----- ---- ----- Create Arrays Manually To create...
Manual
Page 78
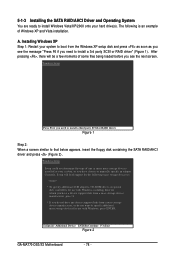
... in your system, or you need to manually specify an adapter. Currently, Setup will be a few moments of Windows XP and Vista installation. After pressing , there will load support for use with Windows, press ENTER. S=Specify Additional Device ENTER=Continue F3=Exit Figure 2 GA-MA770-DS3/S3 Motherboard - 78 - Installing Windows XP Step 1: Restart...
... in your system, or you need to manually specify an adapter. Currently, Setup will be a few moments of Windows XP and Vista installation. After pressing , there will load support for use with Windows, press ENTER. S=Specify Additional Device ENTER=Continue F3=Exit Figure 2 GA-MA770-DS3/S3 Motherboard - 78 - Installing Windows XP Step 1: Restart...
Manual
Page 83
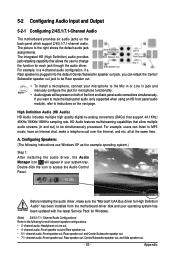
.../ Subwoofer speaker out jack to be Rear speaker out. • To install a microphone, connect your microphone to the Mic in or Line in jack and manually configure the jack for High Definition Audio" has been installed from the motherboard driver disk and your system tray. A. Configuring Speakers: (The following for multi...
.../ Subwoofer speaker out jack to be Rear speaker out. • To install a microphone, connect your microphone to the Mic in or Line in jack and manually configure the jack for High Definition Audio" has been installed from the motherboard driver disk and your system tray. A. Configuring Speakers: (The following for multi...

Manual
Page 93
... Equipment) directive. Under the Directive, used for RoHS (Restriction of must not be imparted to a third party nor be prosecuted. GIGABYTE cannot, however, assume any unauthorized purpose. Also note that the information in this document is subject to change without our written permission,...service or where you purchased the product for recycling. Š If you with your product's user's manual and we at the time of our natural resources, GIGABYTE provides the following information on its packaging, which indicates that this text. Contravention will help you need further...
... Equipment) directive. Under the Directive, used for RoHS (Restriction of must not be imparted to a third party nor be prosecuted. GIGABYTE cannot, however, assume any unauthorized purpose. Also note that the information in this document is subject to change without our written permission,...service or where you purchased the product for recycling. Š If you with your product's user's manual and we at the time of our natural resources, GIGABYTE provides the following information on its packaging, which indicates that this text. Contravention will help you need further...


