Manual
Page 3
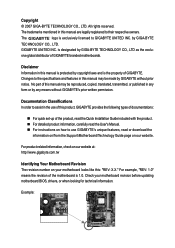
... detailed product information, carefully read the User's Manual. „ For instructions on your motherboard revision before updating motherboard BIOS, drivers, or when looking for technical information. GIGABYTE UNITED INC. For example, "REV: 1.0" means the revision of GIGABYTE branded motherboards. No part of this product, GIGABYTE provides the following types of documentations: „ For quick set-up of...
... detailed product information, carefully read the User's Manual. „ For instructions on your motherboard revision before updating motherboard BIOS, drivers, or when looking for technical information. GIGABYTE UNITED INC. For example, "REV: 1.0" means the revision of GIGABYTE branded motherboards. No part of this product, GIGABYTE provides the following types of documentations: „ For quick set-up of...
Manual
Page 6
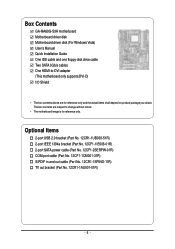
... in and out cable (Part No. 12CR1-1SPINO-11R) TV out bracket (Part No. 12CR1-1AU001-01R) - 6 - Box Contents GA-MA69G-S3H motherboard Motherboard driver disk Motherboard driver disk (For Windows Vista) User's Manual Quick Installation Guide One IDE cable and one floppy disk drive cable Two SATA 3Gb/s cables One HDMI...-to change without notice. • The motherboard image is for reference only and the actual items shall depend on ...
... in and out cable (Part No. 12CR1-1SPINO-11R) TV out bracket (Part No. 12CR1-1AU001-01R) - 6 - Box Contents GA-MA69G-S3H motherboard Motherboard driver disk Motherboard driver disk (For Windows Vista) User's Manual Quick Installation Guide One IDE cable and one floppy disk drive cable Two SATA 3Gb/s cables One HDMI...-to change without notice. • The motherboard image is for reference only and the actual items shall depend on ...
Manual
Page 18
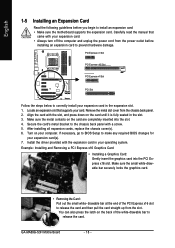
...2. Example: Installing and Removing a PCI Express x16 Graphics Card: • Installing a Graphics Card: Gently insert the graphics card into the slot. 4. GA-MA69G-S3H Motherboard - 18 - Carefully read the manual that supports your expansion card. • Always turn off the computer and unplug the power cord from the power... into the PCI Express x16 slot. drawable bar at the end of the white-drawable bar to release the card. Install the driver provided with your card. Remove the metal slot cover from the slot. Make sure the small white-drawable bar securely locks the ...
...2. Example: Installing and Removing a PCI Express x16 Graphics Card: • Installing a Graphics Card: Gently insert the graphics card into the slot. 4. GA-MA69G-S3H Motherboard - 18 - Carefully read the manual that supports your expansion card. • Always turn off the computer and unplug the power cord from the power... into the PCI Express x16 slot. drawable bar at the end of the white-drawable bar to release the card. Install the driver provided with your card. Remove the metal slot cover from the slot. Make sure the small white-drawable bar securely locks the ...
Manual
Page 34
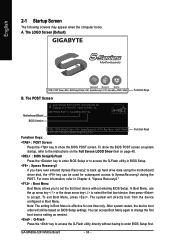
... to enter BIOS Setup or to access the Q-Flash utility in Boot Menu. In Boot Menu, use the up hard drive data using the motherboard driver disk, the key can access Boot Menu again to change the first boot device setting as needed. : Q-Flash Press the key to show... time only. The system will still be used for subsequent access to the instructions on the Full Screen LOGO Show item on BIOS Setup settings. A. GA-MA69G-S3H Motherboard - 34 - To exit Boot Menu, press . English 2-1 Startup Screen The following screens may appear when the computer boots. After system restart, the...
... to enter BIOS Setup or to access the Q-Flash utility in Boot Menu. In Boot Menu, use the up hard drive data using the motherboard driver disk, the key can access Boot Menu again to change the first boot device setting as needed. : Q-Flash Press the key to show... time only. The system will still be used for subsequent access to the instructions on the Full Screen LOGO Show item on BIOS Setup settings. A. GA-MA69G-S3H Motherboard - 34 - To exit Boot Menu, press . English 2-1 Startup Screen The following screens may appear when the computer boots. After system restart, the...
Manual
Page 42
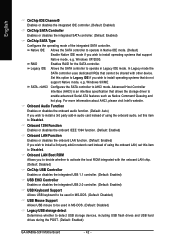
... Boot ROM Allows you wish to install operating systems that allows the storage driver to AHCI mode. Set this item to detect USB storage devices, including USB flash drives and USB hard drives during the POST. (Default: Enabled) GA-MA69G-S3H Motherboard - 42 - Native IDE Allows the SATA controller to activate the boot ROM integrated...
... Boot ROM Allows you wish to install operating systems that allows the storage driver to AHCI mode. Set this item to detect USB storage devices, including USB flash drives and USB hard drives during the POST. (Default: Enabled) GA-MA69G-S3H Motherboard - 42 - Native IDE Allows the SATA controller to activate the boot ROM integrated...

Manual
Page 55
... Windows XP as the example operating system.) • After installing the operating system, insert the motherboard driver disk into your mouse and select Uninstall) and restart the system. (The system will then autodetect and install the USB 2.0 driver.) - 55 - Or you wish to install. After installing the SP1 (or later), if a question mark...
... Windows XP as the example operating system.) • After installing the operating system, insert the motherboard driver disk into your mouse and select Uninstall) and restart the system. (The system will then autodetect and install the USB 2.0 driver.) - 55 - Or you wish to install. After installing the SP1 (or later), if a question mark...
Manual
Page 56
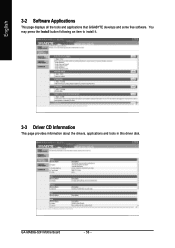
GA-MA69G-S3H Motherboard - 56 - English 3-2 Software Applications This page displays all the tools and applications that GIGABYTE develops and some free software. You may press the Install button following an item to install it. 3-3 Driver CD Information This page provides information about the drivers, applications and tools in this driver disk.
GA-MA69G-S3H Motherboard - 56 - English 3-2 Software Applications This page displays all the tools and applications that GIGABYTE develops and some free software. You may press the Install button following an item to install it. 3-3 Driver CD Information This page provides information about the drivers, applications and tools in this driver disk.
Manual
Page 57
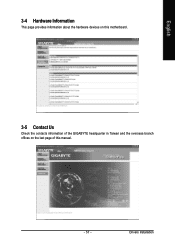
English 3-4 Hardware Information This page provides information about the hardware devices on this motherboard. 3-5 Contact Us Check the contacts information of the GIGABYTE headquarter in Taiwan and the overseas branch offices on the last page of this manual. - 57 - Drivers Installation
English 3-4 Hardware Information This page provides information about the hardware devices on this motherboard. 3-5 Contact Us Check the contacts information of the GIGABYTE headquarter in Taiwan and the overseas branch offices on the last page of this manual. - 57 - Drivers Installation
Manual
Page 62
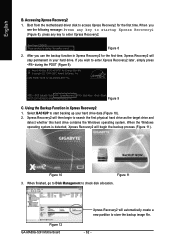
...partition to enter Xpress Recovery2 later, simply press during the POST (Figure 9). Figure 12 GA-MA69G-S3H Motherboard Xpress Recovery2 will stay permanent in Xpress Recovery2 1. Boot from the motherboard driver disk to start backing up your hard drive. Award Modular BIOS v6.00PG, An ...finished, go to Disk Management to enter Xpress Recovery2. . . AMD RS690 BIOS for the first time. Select BACKUP to access Xpress Recovery2 for GA-MA69G-S3H F1a . . . . : BIOS Setup/Q-Flash : XpressRecovery2 : Boot Menu : Qflash 04/27/2007-RS690G-SB600-6A669G02C-00 Figure 9 C. English...
...partition to enter Xpress Recovery2 later, simply press during the POST (Figure 9). Figure 12 GA-MA69G-S3H Motherboard Xpress Recovery2 will stay permanent in Xpress Recovery2 1. Boot from the motherboard driver disk to start backing up your hard drive. Award Modular BIOS v6.00PG, An ...finished, go to Disk Management to enter Xpress Recovery2. . . AMD RS690 BIOS for the first time. Select BACKUP to access Xpress Recovery2 for GA-MA69G-S3H F1a . . . . : BIOS Setup/Q-Flash : XpressRecovery2 : Boot Menu : Qflash 04/27/2007-RS690G-SB600-6A669G02C-00 Figure 9 C. English...
Manual
Page 67
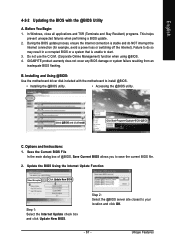
...helps prevent unexpected failures when performing a BIOS update. 2. GIGABYTE product warranty does not cover any BIOS damage or system failure resulting from an inadequate BIOS flashing. Installing and Using @BIOS: Use the motherboard driver disk included with the @BIOS Utility A. Update the ... you to install @BIOS. • Installing the @BIOS utility. • Accessing the @BIOS utility. English 4-2-2 Updating the BIOS with the motherboard to save the current BIOS file. 2. Do not use the C.O.M. (Corporate Online Management) function when using @BIOS. 4. Select @BIOS and ...
...helps prevent unexpected failures when performing a BIOS update. 2. GIGABYTE product warranty does not cover any BIOS damage or system failure resulting from an inadequate BIOS flashing. Installing and Using @BIOS: Use the motherboard driver disk included with the @BIOS Utility A. Update the ... you to install @BIOS. • Installing the @BIOS utility. • Accessing the @BIOS utility. English 4-2-2 Updating the BIOS with the motherboard to save the current BIOS file. 2. Do not use the C.O.M. (Corporate Online Management) function when using @BIOS. 4. Select @BIOS and ...

Manual
Page 71
...drive(s) in your computer Attach one hard drive. • An empty formatted floppy disk. • Windows Vista/XP/2000 setup disk. • Motherboard driver disk. 5-1-1 Configuring the Onboard SATA Controller A. English Chapter 5 Appendix 5-1 Configuring SATA Hard Drive(s) To configure SATA hard drive(s), follow the steps below...least two SATA hard drives (to ensure optimal performance, it is recommended that you do not want to create RAID array on the motherboard. Appendix Then connect the power connector from your power supply to AHCI or RAID mode. - 71 - C . Make a floppy disk ...
...drive(s) in your computer Attach one hard drive. • An empty formatted floppy disk. • Windows Vista/XP/2000 setup disk. • Motherboard driver disk. 5-1-1 Configuring the Onboard SATA Controller A. English Chapter 5 Appendix 5-1 Configuring SATA Hard Drive(s) To configure SATA hard drive(s), follow the steps below...least two SATA hard drives (to ensure optimal performance, it is recommended that you do not want to create RAID array on the motherboard. Appendix Then connect the power connector from your power supply to AHCI or RAID mode. - 71 - C . Make a floppy disk ...

Manual
Page 77
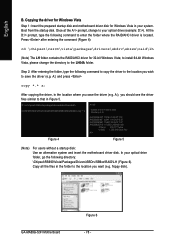
...77 - Figure 1 Figure 2 (Note) For users without a startup disk: Use an alternative system and insert the motherboard driver disk. See the instructions below about how to copy the driver in Figure 2, select (4) SB600 SATA for the AMD SB600 SATA controller.Your system will open similar to that in ...the A:\> prompt, change to exit when finished. Without the driver, the hard drive may not be recognized during the OS installation. Boot from the motherboard driver disk to the floppy disk. Select the controller driver by pressing the corresponding letter from the menu in MS-...
...77 - Figure 1 Figure 2 (Note) For users without a startup disk: Use an alternative system and insert the motherboard driver disk. See the instructions below about how to copy the driver in Figure 2, select (4) SB600 SATA for the AMD SB600 SATA controller.Your system will open similar to that in ...the A:\> prompt, change to exit when finished. Without the driver, the hard drive may not be recognized during the OS installation. Boot from the motherboard driver disk to the floppy disk. Select the controller driver by pressing the corresponding letter from the menu in MS-...
Manual
Page 78
... the D:\> prompt, type the following directory: \Chipset\RS690\Vista\Packages\Drivers\SBDrv\SB6xx\RAID\LH (Figure 6). GA-MA69G-S3H Motherboard Figure 6 - 78 - A:) and press copy *.* a: After copying the driver, in Figure 5. A:), you should see the driver files similar to enter the folder where the RAID/AHCI driver is located. floppy disk). English B. In your optical drive folder, go...
... the D:\> prompt, type the following directory: \Chipset\RS690\Vista\Packages\Drivers\SBDrv\SB6xx\RAID\LH (Figure 6). GA-MA69G-S3H Motherboard Figure 6 - 78 - A:) and press copy *.* a: After copying the driver, in Figure 5. A:), you should see the driver files similar to enter the folder where the RAID/AHCI driver is located. floppy disk). English B. In your optical drive folder, go...
Manual
Page 80
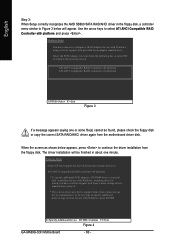
... ENTER. S=Specify Additional Device ENTER=Continue F3=Exit Figure 4 GA-MA69G-S3H Motherboard - 80 - Windows Setup Setup will load support for use with Windows, using a device support disk provided by an adapter manufacturer. The driver installation will appear. ATI AHCI Compatible RAID Controller-x86 platform ATI...return to the previous screen. Select the SCSI Adapter you do not want from the motherboard driver disk. English Step 3: When Setup correctly recognizes the AMD SB600 SATA RAID/AHCI driver in about one or some file(s) cannot be finished in the floppy disk, a ...
... ENTER. S=Specify Additional Device ENTER=Continue F3=Exit Figure 4 GA-MA69G-S3H Motherboard - 80 - Windows Setup Setup will load support for use with Windows, using a device support disk provided by an adapter manufacturer. The driver installation will appear. ATI AHCI Compatible RAID Controller-x86 platform ATI...return to the previous screen. Select the SCSI Adapter you do not want from the motherboard driver disk. English Step 3: When Setup correctly recognizes the AMD SB600 SATA RAID/AHCI driver in about one or some file(s) cannot be finished in the floppy disk, a ...

Manual
Page 82
Figure 6 Step 2: Specify the location where the driver is saved, such as your system to that below appears (RAID or AHCI hard drive(s) will not be detected at this stage), select Loading Drivers. (Figure 6). Figure 7 GA-MA69G-S3H Motherboard - 82 - English B. Installing Windows Vista Step 1: Restart your floppy disk (Figure 7). When a screen similar to boot from the Windows Vista setup disk and perform standard OS installation steps.
Figure 6 Step 2: Specify the location where the driver is saved, such as your system to that below appears (RAID or AHCI hard drive(s) will not be detected at this stage), select Loading Drivers. (Figure 6). Figure 7 GA-MA69G-S3H Motherboard - 82 - English B. Installing Windows Vista Step 1: Restart your floppy disk (Figure 7). When a screen similar to boot from the Windows Vista setup disk and perform standard OS installation steps.
Manual
Page 84
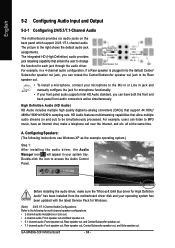
...and Center/Subwoofer speaker out. • 7.1 channel audio: Front speaker out, Rear speaker out, Center/Subwoofer speaker out, and Side speaker out. GA-MA69G-S3H Motherboard - 84 - Side Speaker Out Mic In For example, in a 4-channel audio configuration, if a Rear speaker is plugged into the default Center/...digital-to-analog converters (DACs) that allows the user to be simultaneously processed. all at the same time. Before installing the audio driver, make a telephone call over the Internet, and etc. A. Double-click the icon to the right shows the default audio jack assignments...
...and Center/Subwoofer speaker out. • 7.1 channel audio: Front speaker out, Rear speaker out, Center/Subwoofer speaker out, and Side speaker out. GA-MA69G-S3H Motherboard - 84 - Side Speaker Out Mic In For example, in a 4-channel audio configuration, if a Rear speaker is plugged into the default Center/...digital-to-analog converters (DACs) that allows the user to be simultaneously processed. all at the same time. Before installing the audio driver, make a telephone call over the Internet, and etc. A. Double-click the icon to the right shows the default audio jack assignments...
Manual
Page 88
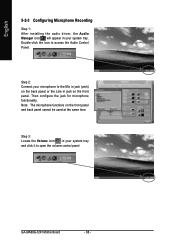
English 5-2-3 Configuring Microphone Recording Step 1: After installing the audio driver, the Audio Manager icon will appear in your microphone to the Mic in jack (pink) on the back panel or the Line in your system ... jack on the front panel and back panel cannot be used at the same time. Double-click the icon to open the volume control panel GA-MA69G-S3H Motherboard - 88 - Step 2: Connect your system tray.
English 5-2-3 Configuring Microphone Recording Step 1: After installing the audio driver, the Audio Manager icon will appear in your microphone to the Mic in jack (pink) on the back panel or the Line in your system ... jack on the front panel and back panel cannot be used at the same time. Double-click the icon to open the volume control panel GA-MA69G-S3H Motherboard - 88 - Step 2: Connect your system tray.

Manual
Page 92
... view when Catalyst Control Center is launched for the first time. You can right-click on the desktop to select ATI CATALYST(R) Control Center. GA-MA69G-S3H Motherboard - 92 - Right-click the icon to the basic settings and advanced features of your system tray. The EasySetup Wizard will find an ATI ...your ATI graphics products. English Setting Your TV as the Primary Display Through ATI Catalyst Control Center Step 1: Make sure the ATI VGA driver has been installed. Step 2: After the installation, you will assist you can switch between Basic View and Advanced View at any time.
... view when Catalyst Control Center is launched for the first time. You can right-click on the desktop to select ATI CATALYST(R) Control Center. GA-MA69G-S3H Motherboard - 92 - Right-click the icon to the basic settings and advanced features of your system tray. The EasySetup Wizard will find an ATI ...your ATI graphics products. English Setting Your TV as the Primary Display Through ATI Catalyst Control Center Step 1: Make sure the ATI VGA driver has been installed. Step 2: After the installation, you will assist you can switch between Basic View and Advanced View at any time.
Manual
Page 95
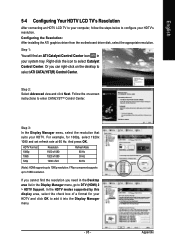
... x720 Refresh Rate 60 Hz 30 Hz 60 Hz (Note): HDMI supports up to 1080i resolution. Configuring the Resolution: After installing the ATI graphics driver from the motherboard driver disk, select the appropriate resolution. Step 2: Select Advanced view and click Next. For example, for your HDTV. YPbpr component supports up to 1080p resolution...
... x720 Refresh Rate 60 Hz 30 Hz 60 Hz (Note): HDMI supports up to 1080i resolution. Configuring the Resolution: After installing the ATI graphics driver from the motherboard driver disk, select the appropriate resolution. Step 2: Select Advanced view and click Next. For example, for your HDTV. YPbpr component supports up to 1080p resolution...


