
Manual
Page 3
...\Technology Guide page on your motherboard revision before updating motherboard BIOS, drivers, or when looking for technical information. GIGABYTE UNITED INC. For example, "REV: 1.0" means the revision of GIGABYTE. by GIGA-BYTE TECHNOLOGY CO., LTD as the exclu- Disclaimer ...reproduced, copied, translated, transmitted, or published in this product, GIGABYTE provides the following types of GIGABYTE branded motherboards. For product-related information, check on our website at: http://www.gigabyte.com.tw Identifying Your Motherboard Revision The revision number on our...
...\Technology Guide page on your motherboard revision before updating motherboard BIOS, drivers, or when looking for technical information. GIGABYTE UNITED INC. For example, "REV: 1.0" means the revision of GIGABYTE. by GIGA-BYTE TECHNOLOGY CO., LTD as the exclu- Disclaimer ...reproduced, copied, translated, transmitted, or published in this product, GIGABYTE provides the following types of GIGABYTE branded motherboards. For product-related information, check on our website at: http://www.gigabyte.com.tw Identifying Your Motherboard Revision The revision number on our...
Manual
Page 5
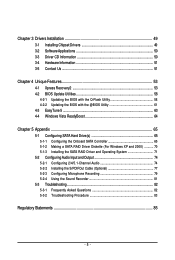
... 49 3-1 Installing Chipset Drivers 49 3-2 Software Applications 50 3-3 Driver CD Information 50 3-4 Hardware Information 51 3-5 Contact Us ...51 Chapter 4 Unique Features 53 4-1 Xpress Recovery2 53 4-2 BIOS Update Utilities 58 ...5 Appendix ...65 5-1 Configuring SATA Hard Drive(s 65 5-1-1 Configuring the Onboard SATA Controller 65 5-1-2 Making a SATA RAID Driver Diskette (For Windows XP and 2000 70 5-1-3 Installing the SATA RAID Driver and Operating System 71 5-2 Configuring Audio Input and Output 74 5-2-1 Configuring 2/4/5.1-Channel Audio 74 5-2-2 Installing the S/PDIFOut Cable...
... 49 3-1 Installing Chipset Drivers 49 3-2 Software Applications 50 3-3 Driver CD Information 50 3-4 Hardware Information 51 3-5 Contact Us ...51 Chapter 4 Unique Features 53 4-1 Xpress Recovery2 53 4-2 BIOS Update Utilities 58 ...5 Appendix ...65 5-1 Configuring SATA Hard Drive(s 65 5-1-1 Configuring the Onboard SATA Controller 65 5-1-2 Making a SATA RAID Driver Diskette (For Windows XP and 2000 70 5-1-3 Installing the SATA RAID Driver and Operating System 71 5-2 Configuring Audio Input and Output 74 5-2-1 Configuring 2/4/5.1-Channel Audio 74 5-2-2 Installing the S/PDIFOut Cable...
Manual
Page 6
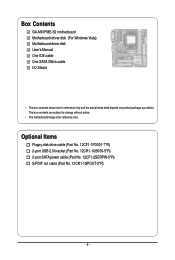
... (Part No. 12CR1-1UB030-5*R) 2-port SATA power cable (Part No. 12CF1-2SERPW-0*R) S/PDIF out cable (Part No. 12CR1-1SPOUT-0*R) - 6 - Box Contents GA-M61PME-S2 motherboard Motherboard driver disk (For Windows Vista) Motherboard driver disk User's Manual One IDE cable One SATA 3Gb/s cable I/O Shield • The box contents above are subject to change without notice...
... (Part No. 12CR1-1UB030-5*R) 2-port SATA power cable (Part No. 12CF1-2SERPW-0*R) S/PDIF out cable (Part No. 12CR1-1SPOUT-0*R) - 6 - Box Contents GA-M61PME-S2 motherboard Motherboard driver disk (For Windows Vista) Motherboard driver disk User's Manual One IDE cable One SATA 3Gb/s cable I/O Shield • The box contents above are subject to change without notice...

Manual
Page 17
... with your expansion card(s). 7. Secure the card's metal bracket to install an expansion card: • Make sure the motherboard supports the expansion card. Install the driver provided with the slot, and press down on the slot and then lift the card straight out from the slot. - 17 - PCI Express x16 Slot...
... with your expansion card(s). 7. Secure the card's metal bracket to install an expansion card: • Make sure the motherboard supports the expansion card. Install the driver provided with the slot, and press down on the slot and then lift the card straight out from the slot. - 17 - PCI Express x16 Slot...
Manual
Page 30
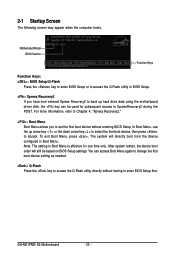
...driver disk, the key can access Boot Menu again to change the first boot device setting as needed. : Q-Flash Press the key to access the Q-Flash utility directly without having to set the first boot device without entering BIOS Setup. The system will still be used for one time only. GA-M61PME-S2... Motherboard - 30 - Motherboard Model BIOS Version Award Modular BIOS v6.00PG, An Energy Star Ally Copyright (C) 1984-2007, Award Software, Inc. M61PME-S2 D1a . . . . : BIOS Setup/Q-Flash : XpressRecovery2 : Boot ...
...driver disk, the key can access Boot Menu again to change the first boot device setting as needed. : Q-Flash Press the key to access the Q-Flash utility directly without having to set the first boot device without entering BIOS Setup. The system will still be used for one time only. GA-M61PME-S2... Motherboard - 30 - Motherboard Model BIOS Version Award Modular BIOS v6.00PG, An Energy Star Ally Copyright (C) 1984-2007, Award Software, Inc. M61PME-S2 D1a . . . . : BIOS Setup/Q-Flash : XpressRecovery2 : Boot ...

Manual
Page 35
... function. With virtualization, one computer system can function as multiple virtual systems. (Default: Disabled) AMD K8 Cool&Quiet control Auto Lets the AMD Cool'n'Quiet driver dynamically adjust the CPU clock and VIA to Disabled reduce heat output from the installed hard drives. Password Check Specifies whether a password is required for...
... function. With virtualization, one computer system can function as multiple virtual systems. (Default: Disabled) AMD K8 Cool&Quiet control Auto Lets the AMD Cool'n'Quiet driver dynamically adjust the CPU clock and VIA to Disabled reduce heat output from the installed hard drives. Password Check Specifies whether a password is required for...
Manual
Page 49
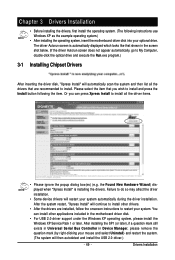
...the system. (The system will automatically scan the system and then list all the driver items. • Please ignore the popup dialog box(es) (e.g. Drivers Installation The driver Autorun screen is installing the drivers. Or you wish to restart your optional drive. After the system restart, "Xpress...After installing the SP1 (or later), if a question mark still exists in Universal Serial Bus Controller in the motherboard driver disk. • For USB 2.0 driver support under the Windows XP operating system, please install the Windows XP Service Pack 1 or later. You can press ...
...the system. (The system will automatically scan the system and then list all the driver items. • Please ignore the popup dialog box(es) (e.g. Drivers Installation The driver Autorun screen is installing the drivers. Or you wish to restart your optional drive. After the system restart, "Xpress...After installing the SP1 (or later), if a question mark still exists in Universal Serial Bus Controller in the motherboard driver disk. • For USB 2.0 driver support under the Windows XP operating system, please install the Windows XP Service Pack 1 or later. You can press ...
Manual
Page 50
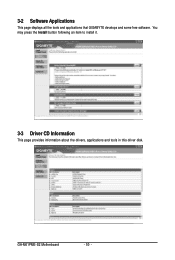
You may press the Install button following an item to install it. 3-3 Driver CD Information This page provides information about the drivers, applications and tools in this driver disk. 3-2 Software Applications This page displays all the tools and applications that GIGABYTE develops and some free software. GA-M61PME-S2 Motherboard - 50 -
You may press the Install button following an item to install it. 3-3 Driver CD Information This page provides information about the drivers, applications and tools in this driver disk. 3-2 Software Applications This page displays all the tools and applications that GIGABYTE develops and some free software. GA-M61PME-S2 Motherboard - 50 -
Manual
Page 51
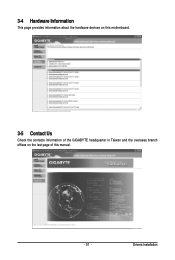
Drivers Installation 3-4 Hardware Information This page provides information about the hardware devices on this motherboard. 3-5 Contact Us Check the contacts information of the GIGABYTE headquarter in Taiwan and the overseas branch offices on the last page of this manual. - 51 -
Drivers Installation 3-4 Hardware Information This page provides information about the hardware devices on this motherboard. 3-5 Contact Us Check the contacts information of the GIGABYTE headquarter in Taiwan and the overseas branch offices on the last page of this manual. - 51 -
Manual
Page 53
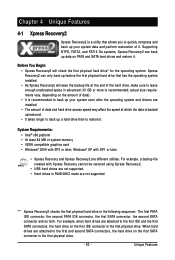
... back up /restore the first physical hard drive that allows you to quickly compress and back up your system soon after the operating system and drivers are installed. • The amount of it. Windows® XP with SP1 or later • Xpress Recovery and Xpress Recovery2 are not supported. For example...
... back up /restore the first physical hard drive that allows you to quickly compress and back up your system soon after the operating system and drivers are installed. • The amount of it. Windows® XP with SP1 or later • Xpress Recovery and Xpress Recovery2 are not supported. For example...
Manual
Page 56
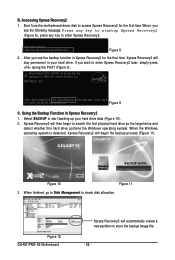
... (Figure 11). Figure 8 2. M61PME-S2 D1a . . . . : BIOS Setup/Q-Flash : XpressRecovery2 : Boot Menu : Qflash 12/17/2007-NV-MCP61-6A61KG09C-00 Figure 9 C. Accessing Xpress Recovery2 1. Boot from the motherboard driver disk to startup XpressRecovery2..... Figure 10... Figure 11 3. Select BACKUP to store the backup image file. - 56 - When the Windows operating system is detected, Xpress Recovery2 will automatically create a new partition to start backing up your hard drive. Figure 12 GA-M61PME-S2...
... (Figure 11). Figure 8 2. M61PME-S2 D1a . . . . : BIOS Setup/Q-Flash : XpressRecovery2 : Boot Menu : Qflash 12/17/2007-NV-MCP61-6A61KG09C-00 Figure 9 C. Accessing Xpress Recovery2 1. Boot from the motherboard driver disk to startup XpressRecovery2..... Figure 10... Figure 11 3. Select BACKUP to store the backup image file. - 56 - When the Windows operating system is detected, Xpress Recovery2 will automatically create a new partition to start backing up your hard drive. Figure 12 GA-M61PME-S2...
Manual
Page 61
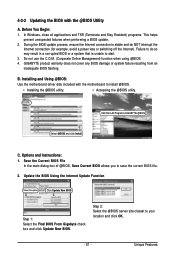
... to your location and click OK. - 61 - Installing and Using @BIOS: Use the motherboard driver disk included with the @BIOS Utility A. Click Start>All Programs>GIGABYTE>@BIOS Select @BIOS and click Install. B. Before You Begin: 1. Save the Current BIOS File In...• Accessing the @BIOS utility. Do not use the C.O.M. (Corporate Online Management) function when using @BIOS. 4. C. Unique Features GIGABYTE product warranty does not cover any BIOS damage or system failure resulting from an inadequate BIOS flashing. 4-2-2 Updating the BIOS with the motherboard to...
... to your location and click OK. - 61 - Installing and Using @BIOS: Use the motherboard driver disk included with the @BIOS Utility A. Click Start>All Programs>GIGABYTE>@BIOS Select @BIOS and click Install. B. Before You Begin: 1. Save the Current BIOS File In...• Accessing the @BIOS utility. Do not use the C.O.M. (Corporate Online Management) function when using @BIOS. 4. C. Unique Features GIGABYTE product warranty does not cover any BIOS damage or system failure resulting from an inadequate BIOS flashing. 4-2-2 Updating the BIOS with the motherboard to...

Manual
Page 65
B. Configure SATA controller mode in RAID BIOS. (Note) D. Make a floppy disk containing the SATA RAID driver. (Note) E. Appendix Install the SATA RAID driver (Note) and operating system. Install SATA hard drive(s) in your computer Attach one hard drive. • An empty formatted... floppy disk. • Windows Vista/XP/2000 setup disk. • Motherboard driver disk. 5-1-1 Configuring the Onboard SATA Controller A. Installing SATA hard drive(s) in your power supply to the hard drive. (Note) Skip this step...
B. Configure SATA controller mode in RAID BIOS. (Note) D. Make a floppy disk containing the SATA RAID driver. (Note) E. Appendix Install the SATA RAID driver (Note) and operating system. Install SATA hard drive(s) in your computer Attach one hard drive. • An empty formatted... floppy disk. • Windows Vista/XP/2000 setup disk. • Motherboard driver disk. 5-1-1 Configuring the Onboard SATA Controller A. Installing SATA hard drive(s) in your power supply to the hard drive. (Note) Skip this step...
Manual
Page 69
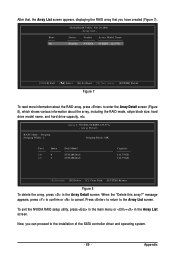
... NVIDIA RAID setup utility, press in the main menu or + in the Array Detail screen. Press to return to the installation of the SATA controller driver and operating system. - 69 - Now, you have created (Figure 7). Array List - Array Detail - When the "Delete this array?" Boot No MediaShield Utility Nov 20 2006...
... NVIDIA RAID setup utility, press in the main menu or + in the Array Detail screen. Press to return to the installation of the SATA controller driver and operating system. - 69 - Now, you have created (Figure 7). Array List - Array Detail - When the "Delete this array?" Boot No MediaShield Utility Nov 20 2006...
Manual
Page 70
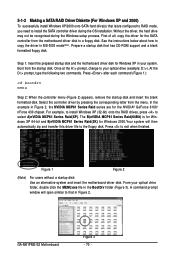
...cd bootdrv menu Step 2: When the controller menu (Figure 2) appears, remove the startup disk and insert the blank formatted disk. Select the controller driver by pressing the corresponding letter from the startup disk. From your system. Press to the floppy disk. Figure 1 Figure 2 (Note) For users...In the example in MS-DOS mode(Note). Boot from the menu. First of all, copy the driver for Windows XP in your optical drive folder, double click the MENU.exe file in Figure 2. Once at the A:\> prompt, change to a floppy disk. GA-M61PME-S2 Motherboard Figure 3 - 70 -
...cd bootdrv menu Step 2: When the controller menu (Figure 2) appears, remove the startup disk and insert the blank formatted disk. Select the controller driver by pressing the corresponding letter from the startup disk. From your system. Press to the floppy disk. Figure 1 Figure 2 (Note) For users...In the example in MS-DOS mode(Note). Boot from the menu. First of all, copy the driver for Windows XP in your optical drive folder, double click the MENU.exe file in Figure 2. Once at the A:\> prompt, change to a floppy disk. GA-M61PME-S2 Motherboard Figure 3 - 70 -
Manual
Page 71
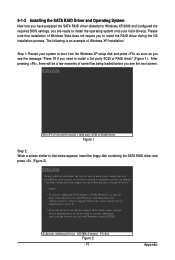
... Device ENTER=Continue F3=Exit Figure 2 - 71 - Appendix Figure 1 Step 2: When a screen similar to that you have chosen to install the RAID driver during the OS installation process. The following mass storage devices(s) * To specify additional SCSI adapters, CD-ROM drives, or special disk controllers for Windows XP.../2000 and configured the required BIOS settings, you need to install a 3rd party SCSI or RAID driver" (Figure 1). Windows Setup Setup could not determine the type of Windows Vista does not require you have prepared the SATA RAID...
... Device ENTER=Continue F3=Exit Figure 2 - 71 - Appendix Figure 1 Step 2: When a screen similar to that you have chosen to install the RAID driver during the OS installation process. The following mass storage devices(s) * To specify additional SCSI adapters, CD-ROM drives, or special disk controllers for Windows XP.../2000 and configured the required BIOS settings, you need to install a 3rd party SCSI or RAID driver" (Figure 1). Windows Setup Setup could not determine the type of Windows Vista does not require you have prepared the SATA RAID...
Manual
Page 72
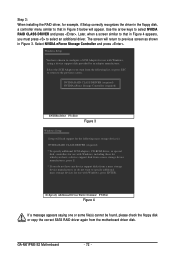
GA-M61PME-S2 Motherboard - 72 - S=Specify Additional Device Enter=Continue F3=Exit Figure 4 If a message appears saying one or some file(s) cannot be found, please check the floppy disk or copy the correct SATA RAID driver again from a mass storage device manufacturer, or do not want from the following... 3 below will appear. Use the arrow keys to previous screen as shown in Figure 4 appears, you want to select an additional driver. Later, when a screen similar to the previous screen. Select the SCSI Adapter you must press to specify additional mass storage devices for...
GA-M61PME-S2 Motherboard - 72 - S=Specify Additional Device Enter=Continue F3=Exit Figure 4 If a message appears saying one or some file(s) cannot be found, please check the floppy disk or copy the correct SATA RAID driver again from a mass storage device manufacturer, or do not want from the following... 3 below will appear. Use the arrow keys to previous screen as shown in Figure 4 appears, you want to select an additional driver. Later, when a screen similar to the previous screen. Select the SCSI Adapter you must press to specify additional mass storage devices for...
Manual
Page 73
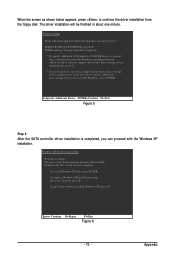
...with the Windows XP installation. Windows Setup Setup will be finished in about one minute. Appendix WindowsXP Professional Setup Welcome to continue the driver installation from the floppy disk. To repair a Windows XP installation using Recovery Console, press R. To set up Windows XP now, ...press ENTER. S=Specify Additional Device ENTER=Continue F3=Exit Figure 5 Step 4: After the SATA controller driver installation is completed, you do not have any device support disks from a mass storage device manufacturer, press S. * If you can proceed with...
...with the Windows XP installation. Windows Setup Setup will be finished in about one minute. Appendix WindowsXP Professional Setup Welcome to continue the driver installation from the floppy disk. To repair a Windows XP installation using Recovery Console, press R. To set up Windows XP now, ...press ENTER. S=Specify Additional Device ENTER=Continue F3=Exit Figure 5 Step 4: After the SATA controller driver installation is completed, you do not have any device support disks from a mass storage device manufacturer, press S. * If you can proceed with...
Manual
Page 74
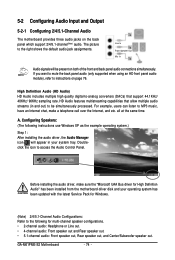
... out. HD Audio features multistreaming capabilities that support 44.1KHz/ 48KHz/ 96KHz sampling rate. Before installing the audio driver, make a telephone call over the Internet, and etc. GA-M61PME-S2 Motherboard - 74 - If you want to mute the back panel audio (only supported when using an HD front... panel audio module), refer to MP3 music, have an Internet chat, make sure the "Microsoft UAA Bus driver for Windows. (Note) 2/4/5.1-Channel Audio...
... out. HD Audio features multistreaming capabilities that support 44.1KHz/ 48KHz/ 96KHz sampling rate. Before installing the audio driver, make a telephone call over the Internet, and etc. GA-M61PME-S2 Motherboard - 74 - If you want to mute the back panel audio (only supported when using an HD front... panel audio module), refer to MP3 music, have an Internet chat, make sure the "Microsoft UAA Bus driver for Windows. (Note) 2/4/5.1-Channel Audio...
Manual
Page 79
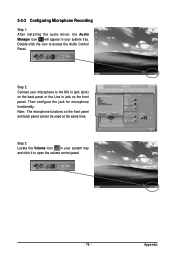
Double-click the icon to open the volume control panel - 79 - Then configure the jack for microphone functionality. Step 3: Locate the Volume icon in your system tray. Appendix Note: The microphone functions on the front panel and back panel cannot be used at the same time. Step 2: Connect your microphone to the Mic in jack (pink) on the back panel or the Line in your system tray and click it to access the Audio Control Panel. 5-2-3 Configuring Microphone Recording Step 1: After installing the audio driver, the Audio Manager icon will appear in jack on the front panel.
Double-click the icon to open the volume control panel - 79 - Then configure the jack for microphone functionality. Step 3: Locate the Volume icon in your system tray. Appendix Note: The microphone functions on the front panel and back panel cannot be used at the same time. Step 2: Connect your microphone to the Mic in jack (pink) on the back panel or the Line in your system tray and click it to access the Audio Control Panel. 5-2-3 Configuring Microphone Recording Step 1: After installing the audio driver, the Audio Manager icon will appear in jack on the front panel.


