Manual
Page 47
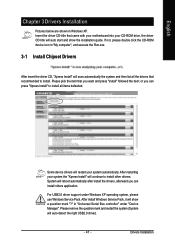
... Install" will scan automatically the system and then list all items defaulted. After restarting your system automatically. in Windows XP. After install Windows Service Pack, it will auto start and show a question mark "?" For USB2.0 driver support under "Device Manager". Please remove the question mark and restart the system (System will reboot automatically...
... Install" will scan automatically the system and then list all items defaulted. After restarting your system automatically. in Windows XP. After install Windows Service Pack, it will auto start and show a question mark "?" For USB2.0 driver support under "Device Manager". Please remove the question mark and restart the system (System will reboot automatically...
Manual
Page 52
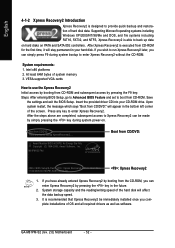
Supporting Microsoft operating systems including Windows XP/2000/NT/98/Me and DOS, and file systems including FAT16,...CD-ROM and subsequent access by pressing the key in the bottom left corner of OS and all required drivers as well as software. Upon system restart, the message which says "Boot from the CD-ROM, you...up data on hard disks on . . . M61PM-S2 F4d . . . . :BIOS Setup/Q-Flash, : Xpress Recovery2, : Boot Menu 11/22/2006-NV-MCP61-6A61KG02C-00 : Xpress Recovery2 1. GA-M61PM-S2 (rev. 2.0) Motherboard - 52 - Insert the provided driver CD into your hard disk. Press any key...
Supporting Microsoft operating systems including Windows XP/2000/NT/98/Me and DOS, and file systems including FAT16,...CD-ROM and subsequent access by pressing the key in the bottom left corner of OS and all required drivers as well as software. Upon system restart, the message which says "Boot from the CD-ROM, you...up data on hard disks on . . . M61PM-S2 F4d . . . . :BIOS Setup/Q-Flash, : Xpress Recovery2, : Boot Menu 11/22/2006-NV-MCP61-6A61KG02C-00 : Xpress Recovery2 1. GA-M61PM-S2 (rev. 2.0) Motherboard - 52 - Insert the provided driver CD into your hard disk. Press any key...

Manual
Page 53
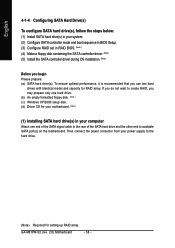
... to your motherboard manufacturer. - 53 - PATA IDE secondary channel c . SATA IDE channel 1 d. Appendix RESTORE: Restore the backed-up data from the driver CD before data backup. 2. USB hard disks are currently not supported. 6. SATA IDE channel 3 f. It is no backup file.) 4. On a few...backup file must be reserved. 3. Xpress Recovery2 will not appear if there is normal that data backup takes longer time than 128G under Windows 2000, be sure to execute the EnableBigLba.exe program from hard disk. 3. SATA IDE channel 2 e. When using hard disks with more...
... to your motherboard manufacturer. - 53 - PATA IDE secondary channel c . SATA IDE channel 1 d. Appendix RESTORE: Restore the backed-up data from the driver CD before data backup. 2. USB hard disks are currently not supported. 6. SATA IDE channel 3 f. It is no backup file.) 4. On a few...backup file must be reserved. 3. Xpress Recovery2 will not appear if there is normal that data backup takes longer time than 128G under Windows 2000, be sure to execute the EnableBigLba.exe program from hard disk. 3. SATA IDE channel 2 e. When using hard disks with more...
Manual
Page 58
... only one hard drive. (b) An empty formatted floppy disk. (Note ) (c) Windows XP/2000 setup disk. (d) Driver CD for your motherboard. (Note ) (1) Installing SATA hard drive(s) in RAID BIOS. (Note ) (4) Make a floppy disk containing the SATA controller driver. (Note ) (5) Install the SATA controller driver during OS installation. (Note ) Before you use two hard drives with... end to the hard drive. (Note) Required for RAID array. To ensure optimal performance, it is recommended that you begin Please prepare: (a) SATA hard drive(s). GA-M61PM-S2 (rev. 2.0) Motherboard - 58 -
... only one hard drive. (b) An empty formatted floppy disk. (Note ) (c) Windows XP/2000 setup disk. (d) Driver CD for your motherboard. (Note ) (1) Installing SATA hard drive(s) in RAID BIOS. (Note ) (4) Make a floppy disk containing the SATA controller driver. (Note ) (5) Install the SATA controller driver during OS installation. (Note ) Before you use two hard drives with... end to the hard drive. (Note) Required for RAID array. To ensure optimal performance, it is recommended that you begin Please prepare: (a) SATA hard drive(s). GA-M61PM-S2 (rev. 2.0) Motherboard - 58 -
Manual
Page 64
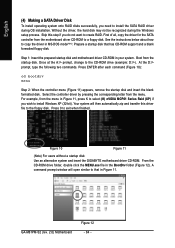
...Note) For users without a startup disk: Use an alternative system and insert the GIGABYTE motherboard driver CD-ROM. GA-M61PM-S2 (rev. 2.0) Motherboard Figure 12 - 64 - Step 1: Insert the prepared startup disk and motherboard driver CD-ROM in the BootDrv folder (Figure 12). Press ENTER after each command (...the blank formatted disk. Press 0 to copy the driver in Figure 11. A command prompt window will then automatically zip and transfer this step if you wish to install Windows XP (32-bit). English (4) Making a SATA Driver Disk To install operating system onto RAID disks successfully,...
...Note) For users without a startup disk: Use an alternative system and insert the GIGABYTE motherboard driver CD-ROM. GA-M61PM-S2 (rev. 2.0) Motherboard Figure 12 - 64 - Step 1: Insert the prepared startup disk and motherboard driver CD-ROM in the BootDrv folder (Figure 12). Press ENTER after each command (...the blank formatted disk. Press 0 to copy the driver in Figure 11. A command prompt window will then automatically zip and transfer this step if you wish to install Windows XP (32-bit). English (4) Making a SATA Driver Disk To install operating system onto RAID disks successfully,...
Manual
Page 65
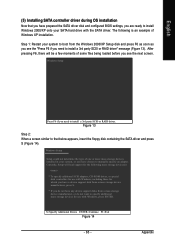
... a mass storage device manufacturer, press S. * If you do not have chosen to install a 3rd party SCSI or RAID driver. Appendix After pressing F6, there will load support for use with the SATA driver. Windows Setup Setup could not determine the type of some files being loaded before you see the "Press F6 if...
... a mass storage device manufacturer, press S. * If you do not have chosen to install a 3rd party SCSI or RAID driver. Appendix After pressing F6, there will load support for use with the SATA driver. Windows Setup Setup could not determine the type of some files being loaded before you see the "Press F6 if...
Manual
Page 66
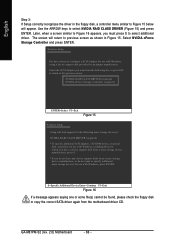
...return to configure a SCSI Adapter for use with Windows, including those for use with Windows, press ENTER. NVIDIA RAID CLASS DRIVER (required) NVIDIA nForce Storage Controller (required) ENTER=Select F3=Exit Figure 15 Windows Setup Setup will appear. S=Specify Additional Device Enter=... CLASS DRIVER (required) * To specify additional SCSI adapters, CD-ROM drives, or special disk controllers for which you have a device support disk from a mass storage device manufacturer, press S. * If you must press S to select NVIDIA RAID CLASS DRIVER (Figure 15) and press ENTER. GA-M61PM-S2 (rev...
...return to configure a SCSI Adapter for use with Windows, including those for use with Windows, press ENTER. NVIDIA RAID CLASS DRIVER (required) NVIDIA nForce Storage Controller (required) ENTER=Select F3=Exit Figure 15 Windows Setup Setup will appear. S=Specify Additional Device Enter=... CLASS DRIVER (required) * To specify additional SCSI adapters, CD-ROM drives, or special disk controllers for which you have a device support disk from a mass storage device manufacturer, press S. * If you must press S to select NVIDIA RAID CLASS DRIVER (Figure 15) and press ENTER. GA-M61PM-S2 (rev...
Manual
Page 67
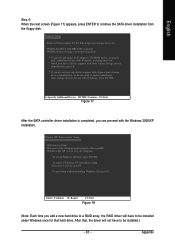
... run on your computer. To repair a Windows XP installation using Recovery Console, press R. To quit Setup without installing Windows XP, press F3. English Step 4: When the next screen (Figure 17) appears, press ENTER to continue the SATA driver installation from a mass storage device manufacturer, ...you add a new hard drive to a RAID array, the RAID driver will have to be installed under Windows once for that , the driver will load support for the following mass storage device(s): NVIDIA RAID CLASS DRIVER (required) NVIDIA nForce Storage Controller (required) * To specify additional ...
... run on your computer. To repair a Windows XP installation using Recovery Console, press R. To quit Setup without installing Windows XP, press F3. English Step 4: When the next screen (Figure 17) appears, press ENTER to continue the SATA driver installation from a mass storage device manufacturer, ...you add a new hard drive to a RAID array, the RAID driver will have to be installed under Windows once for that , the driver will load support for the following mass storage device(s): NVIDIA RAID CLASS DRIVER (required) NVIDIA nForce Storage Controller (required) * To specify additional ...
Manual
Page 68
all at up to 192 kHz/24-bit quality and multi-streaming applications, HD Audio is able to fucntion as shown in Windows XP) Center/Subwoofer Speaker Out Rear Speaker Out Side Speaker Out Line In Line Out (Front Speaker Out) Mic In Note that support ... to open the Audio Control Panel. For example, if a rear speaker is applied. English 4-1-5 2- / 4- / 6- / 8- The jack retasking capability supported by the audio software provided. GA-M61PM-S2 (rev. 2.0) Motherboard - 68 - STEP 1 : After installation of the audio driver, you should find the icon in and out) simultaneously.
all at up to 192 kHz/24-bit quality and multi-streaming applications, HD Audio is able to fucntion as shown in Windows XP) Center/Subwoofer Speaker Out Rear Speaker Out Side Speaker Out Line In Line Out (Front Speaker Out) Mic In Note that support ... to open the Audio Control Panel. For example, if a rear speaker is applied. English 4-1-5 2- / 4- / 6- / 8- The jack retasking capability supported by the audio software provided. GA-M61PM-S2 (rev. 2.0) Motherboard - 68 - STEP 1 : After installation of the audio driver, you should find the icon in and out) simultaneously.

Manual
Page 69
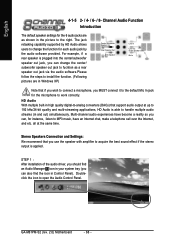
... is completed. 4 Channel Audio Setup STEP 1 : After installation of equipment is plugged into the rear Line Out jack, a small window will pop up and ask you what type of the audio driver, you should find an Audio Manager icon in your system tray (you can also find the icon in Control Panel...
... is completed. 4 Channel Audio Setup STEP 1 : After installation of equipment is plugged into the rear Line Out jack, a small window will pop up and ask you what type of the audio driver, you should find an Audio Manager icon in your system tray (you can also find the icon in Control Panel...

Manual
Page 70
...connected. The 4-channel audio setup is completed. 6 Channel Audio Setup STEP 1 : After installation of the audio driver, you should find an Audio Manager icon in your system tray (you what type of equipment is connected. GA-M61PM-S2 (rev. 2.0) Motherboard - 70 - Choose a device depending on the type of speaker connected (4-channel audio ... pop up and ask you what type of equipment is completed. Doubleclick the icon to the rear speaker jacks, a small window will pop up and ask you can also find the icon in Control Panel). STEP 3: After plugging in 6-channel speakers to open the ...
...connected. The 4-channel audio setup is completed. 6 Channel Audio Setup STEP 1 : After installation of the audio driver, you should find an Audio Manager icon in your system tray (you what type of equipment is connected. GA-M61PM-S2 (rev. 2.0) Motherboard - 70 - Choose a device depending on the type of speaker connected (4-channel audio ... pop up and ask you what type of equipment is completed. Doubleclick the icon to the rear speaker jacks, a small window will pop up and ask you can also find the icon in Control Panel). STEP 3: After plugging in 6-channel speakers to open the ...

Manual
Page 71
STEP 2: In the Audio Control Panel, click the Audio I/O tab. Doubleclick the icon to the rear speaker jacks, a small window will pop up and ask you can also find an Audio Manager icon in Control Panel). STEP 3: After plugging in 8-channel speakers to open the ... - In the upper left list, click 8CH Speaker. Appendix English The 8-channel audio setup is connected. 8 Channel Audio Setup STEP 1 : After installation of the audio driver, you should find the icon in your system tray (you what type of Front Speaker Out (Line Out), Rear Speaker Out, Center/Subwoofer Speaker Out...
STEP 2: In the Audio Control Panel, click the Audio I/O tab. Doubleclick the icon to the rear speaker jacks, a small window will pop up and ask you can also find an Audio Manager icon in Control Panel). STEP 3: After plugging in 8-channel speakers to open the ... - In the upper left list, click 8CH Speaker. Appendix English The 8-channel audio setup is connected. 8 Channel Audio Setup STEP 1 : After installation of the audio driver, you should find the icon in your system tray (you what type of Front Speaker Out (Line Out), Rear Speaker Out, Center/Subwoofer Speaker Out...


