Manual
Page 29
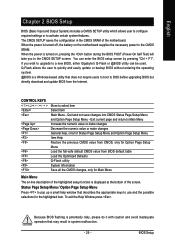
... that may result in the CMOS SRAM of the highlighted setup function is turned on the motherboard supplies the necessary power to a new BIOS, either Gigabyte's Q-Flash or @BIOS utility can enter the BIOS setup screen by pressing "Ctrl + F1". BIOS Setup You can be used. Because BIOS flashing is turned...
... that may result in the CMOS SRAM of the highlighted setup function is turned on the motherboard supplies the necessary power to a new BIOS, either Gigabyte's Q-Flash or @BIOS utility can enter the BIOS setup screen by pressing "Ctrl + F1". BIOS Setup You can be used. Because BIOS flashing is turned...
Manual
Page 32
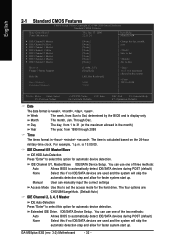
... set the access mode for automatic device detection. Manual User can manually input the correct settings Access Mode Use this option for the hard drive. GA-M55plus-S3G (rev. 3.0) Motherboard - 32 - Through Dec. is calculated based on the 24-hour military-time clock. Drive A Floppy 3 Mode Support... Master/Slave IDE HDD Auto-Detection Press "Enter" to 2098 KLJI: Move Enter: Select F5: Previous Values +/-/PU/PD: Value F10: Save F6: Fail-Safe Defaults ESC: Exit F1: General Help F7: Optimized Defaults Date The date format is display-only Month The month, Jan. IDE Channel...
... set the access mode for automatic device detection. Manual User can manually input the correct settings Access Mode Use this option for the hard drive. GA-M55plus-S3G (rev. 3.0) Motherboard - 32 - Through Dec. is calculated based on the 24-hour military-time clock. Drive A Floppy 3 Mode Support... Master/Slave IDE HDD Auto-Detection Press "Enter" to 2098 KLJI: Move Enter: Select F5: Previous Values +/-/PU/PD: Value F10: Save F6: Fail-Safe Defaults ESC: Exit F1: General Help F7: Optimized Defaults Date The date format is display-only Month The month, Jan. IDE Channel...

Manual
Page 34
... No Ext PEG] Item Help Menu Level` Select Hard Disk Boot Device Priority KLJI: Move Enter: Select F5: Previous Values +/-/PU/PD: Value F10: Save F6: Fail-Safe Defaults ESC: Exit F1: General Help F7: Optimized Defaults Hard Disk Boot Priority Select boot sequence for the type of floppy disk drive... installed is 40 or 80 tracks. Use < > or < > to select a device, then press to move it up, or to move it is 360K. (Default value) GA-M55plus-S3G (rev. 3.0) Motherboard - 34 - Disabled Disable this menu.
... No Ext PEG] Item Help Menu Level` Select Hard Disk Boot Device Priority KLJI: Move Enter: Select F5: Previous Values +/-/PU/PD: Value F10: Save F6: Fail-Safe Defaults ESC: Exit F1: General Help F7: Optimized Defaults Hard Disk Boot Priority Select boot sequence for the type of floppy disk drive... installed is 40 or 80 tracks. Use < > or < > to select a device, then press to move it up, or to move it is 360K. (Default value) GA-M55plus-S3G (rev. 3.0) Motherboard - 34 - Disabled Disable this menu.
Manual
Page 36
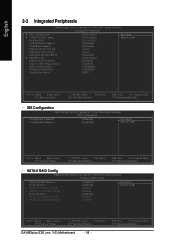
... [SPP] Item Help Menu Level` KLJI: Move Enter: Select F5: Previous Values +/-/PU/PD: Value F10: Save F6: Fail-Safe Defaults ESC: Exit F1: General Help F7: Optimized Defaults IDE Configuration CMOS Setup Utility-Copyright (C) 1984-2006...Item Help Menu Level` KLJI: Move Enter: Select F5: Previous Values +/-/PU/PD: Value F10: Save F6: Fail-Safe Defaults ESC: Exit F1: General Help F7: Optimized Defaults SATA-II RAID Config CMOS Setup Utility...Move Enter: Select F5: Previous Values +/-/PU/PD: Value F10: Save F6: Fail-Safe Defaults GA-M55plus-S3G (rev. 3.0) Motherboard - 36 -
... [SPP] Item Help Menu Level` KLJI: Move Enter: Select F5: Previous Values +/-/PU/PD: Value F10: Save F6: Fail-Safe Defaults ESC: Exit F1: General Help F7: Optimized Defaults IDE Configuration CMOS Setup Utility-Copyright (C) 1984-2006...Item Help Menu Level` KLJI: Move Enter: Select F5: Previous Values +/-/PU/PD: Value F10: Save F6: Fail-Safe Defaults ESC: Exit F1: General Help F7: Optimized Defaults SATA-II RAID Config CMOS Setup Utility...Move Enter: Select F5: Previous Values +/-/PU/PD: Value F10: Save F6: Fail-Safe Defaults GA-M55plus-S3G (rev. 3.0) Motherboard - 36 -
Manual
Page 38
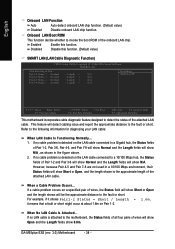
... Status = Normal / Length = N/A Item Help Menu Level` KLJI: Move Enter: Select F5: Previous Values +/-/PU/PD: Value F10: Save F6: Fail-Safe Defaults ESC: Exit F1: General Help F7: Optimized Defaults This motherboard incorporates cable diagnostic feature designed to a 10/100 Mbps hub, the...LAN Cable Is Functioning Normally... 1. When a Cable Problem Occurs... If no LAN cable is the approximate length of the onboard LAN chip. GA-M55plus-S3G (rev. 3.0) Motherboard - 38 - Disabled Disable this function. For example, if it shows Pair1-2 Status = Short / Length = ...
... Status = Normal / Length = N/A Item Help Menu Level` KLJI: Move Enter: Select F5: Previous Values +/-/PU/PD: Value F10: Save F6: Fail-Safe Defaults ESC: Exit F1: General Help F7: Optimized Defaults This motherboard incorporates cable diagnostic feature designed to a 10/100 Mbps hub, the...LAN Cable Is Functioning Normally... 1. When a Cable Problem Occurs... If no LAN cable is the approximate length of the onboard LAN chip. GA-M55plus-S3G (rev. 3.0) Motherboard - 38 - Disabled Disable this function. For example, if it shows Pair1-2 Status = Short / Length = ...
Manual
Page 40
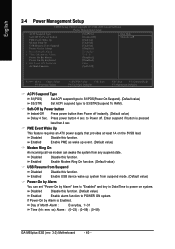
... 0 : 0 : 0 [Disabled] [Disabled] Enter [Soft-Off] Item Help Menu Level` KLJI: Move Enter: Select F5: Previous Values +/-/PU/PD: Value F10: Save F6: Fail-Safe Defaults ESC: Exit F1: General Help F7: Optimized Defaults ACPI Suspend Type S1(POS) S3(STR) Set ACPI suspend type to S1/POS... Suspend Power-On by Alarm x Day of Month Alarm : Everyday, 1~31 Time (hh: mm: ss) Alarm : (0~23) : (0~59) : (0~59) GA-M55plus-S3G (rev. 3.0) Motherboard - 40 - Disabled Disable this function. (Default value) Enabled Enable alarm function to S3/STR(Suspend To RAM). Soft-Off by Power button...
... 0 : 0 : 0 [Disabled] [Disabled] Enter [Soft-Off] Item Help Menu Level` KLJI: Move Enter: Select F5: Previous Values +/-/PU/PD: Value F10: Save F6: Fail-Safe Defaults ESC: Exit F1: General Help F7: Optimized Defaults ACPI Suspend Type S1(POS) S3(STR) Set ACPI suspend type to S1/POS... Suspend Power-On by Alarm x Day of Month Alarm : Everyday, 1~31 Time (hh: mm: ss) Alarm : (0~23) : (0~59) : (0~59) GA-M55plus-S3G (rev. 3.0) Motherboard - 40 - Disabled Disable this function. (Default value) Enabled Enable alarm function to S3/STR(Suspend To RAM). Soft-Off by Power button...

Manual
Page 42
GA-M55plus-S3G (rev. 3.0) Motherboard - 42 - Auto assign IRQ to PCI 3. (Default value) Set IRQ 3,4,5,7,9,10,11,12,14,15 to PCI 2. Auto assign IRQ to PCI 2. (Default ... [Auto] [Auto] [Auto] [Auto] Item Help Menu Level` Assign PCI IRQ For Device KLJI: Move Enter: Select F5: Previous Values +/-/PU/PD: Value F10: Save F6: Fail-Safe Defaults ESC: Exit F1: General Help F7: Optimized Defaults PCI 1 IRQ Assignment Auto 3,4,5,7,9,10,11,12,14,15 PCI 2 IRQ Assignment Auto 3,4,5,7,9,10...
GA-M55plus-S3G (rev. 3.0) Motherboard - 42 - Auto assign IRQ to PCI 3. (Default value) Set IRQ 3,4,5,7,9,10,11,12,14,15 to PCI 2. Auto assign IRQ to PCI 2. (Default ... [Auto] [Auto] [Auto] [Auto] Item Help Menu Level` Assign PCI IRQ For Device KLJI: Move Enter: Select F5: Previous Values +/-/PU/PD: Value F10: Save F6: Fail-Safe Defaults ESC: Exit F1: General Help F7: Optimized Defaults PCI 1 IRQ Assignment Auto 3,4,5,7,9,10,11,12,14,15 PCI 2 IRQ Assignment Auto 3,4,5,7,9,10...
Manual
Page 43
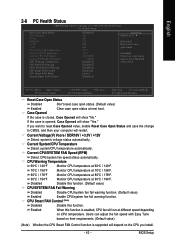
... Case Open Status and save the change to be Disabled at next boot KLJI: Move Enter: Select F5: Previous Values +/-/PU/PD: Value F10: Save F6: Fail-Safe Defaults ESC: Exit F1: General Help F7: Optimized Defaults Reset Case Open Status Disabled Don't reset case open status. (Default value) Enabled Case...
... Case Open Status and save the change to be Disabled at next boot KLJI: Move Enter: Select F5: Previous Values +/-/PU/PD: Value F10: Save F6: Fail-Safe Defaults ESC: Exit F1: General Help F7: Optimized Defaults Reset Case Open Status Disabled Don't reset case open status. (Default value) Enabled Case...
Manual
Page 44
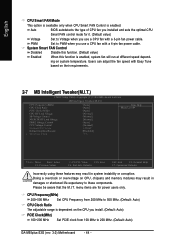
...CPU Smart FAN control mode for power users only. menu items are for it. (Default value) Voltage Set to 200 MHz. (Default: Auto) GA-M55plus-S3G (rev. 3.0) Motherboard - 44 - Users can adjust the fan speed with a 3-pin fan power cable. PWM Set to PWM when you install...[Normal] [Auto] [Normal] 1.5500V [Disabled] +1% Item Help Menu Level` KLJI: Move Enter: Select F5: Previous Values +/-/PU/PD: Value F10: Save F6: Fail-Safe Defaults ESC: Exit F1: General Help F7: Optimized Defaults Incorrectly using these components. English CPU Smart FAN Mode This option is available only...
...CPU Smart FAN control mode for power users only. menu items are for it. (Default value) Voltage Set to 200 MHz. (Default: Auto) GA-M55plus-S3G (rev. 3.0) Motherboard - 44 - Users can adjust the fan speed with a 3-pin fan power cable. PWM Set to PWM when you install...[Normal] [Auto] [Normal] 1.5500V [Disabled] +1% Item Help Menu Level` KLJI: Move Enter: Select F5: Previous Values +/-/PU/PD: Value F10: Save F6: Fail-Safe Defaults ESC: Exit F1: General Help F7: Optimized Defaults Incorrectly using these components. English CPU Smart FAN Mode This option is available only...
Manual
Page 66
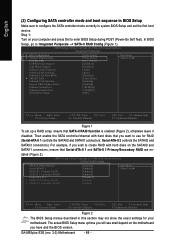
...Enabled] [Enabled] [Enabled] [Disabled] Enabled Enabled Item Help Menu Level : Move Enter: Select F5: Previous Values +/-/PU/PD: Value F10: Save F6: Fail-Safe Defaults ESC: Exit F1: General Help F7: Optimized Defaults Figure 2 The BIOS Setup menus described in system BIOS Setup and set up a ... with hard disks on the SATAII0 and SATAII1 connectors, ensure that Serial-ATA-II 1 and SATA-II 1 Primary/Secondary RAID are en- GA-M55plus-S3G (rev. 3.0) Motherboard - 66 - English (2) Configuring SATA controller mode and boot sequence in BIOS Setup Make sure to configure the SATA ...
...Enabled] [Enabled] [Enabled] [Disabled] Enabled Enabled Item Help Menu Level : Move Enter: Select F5: Previous Values +/-/PU/PD: Value F10: Save F6: Fail-Safe Defaults ESC: Exit F1: General Help F7: Optimized Defaults Figure 2 The BIOS Setup menus described in system BIOS Setup and set up a ... with hard disks on the SATAII0 and SATAII1 connectors, ensure that Serial-ATA-II 1 and SATA-II 1 Primary/Secondary RAID are en- GA-M55plus-S3G (rev. 3.0) Motherboard - 66 - English (2) Configuring SATA controller mode and boot sequence in BIOS Setup Make sure to configure the SATA ...
Manual
Page 67
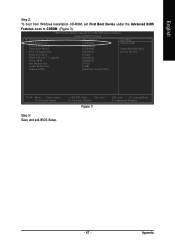
... Menu Level Select Hard Disk Boot Device Priority : Move Enter: Select F5: Previous Values Step 3: Save and exit BIOS Setup. +/-/PU/PD: Value F10: Save F6: Fail-Safe Defaults Figure 3 ESC: Exit F1: General Help F7: Optimized Defaults - 67 - English Step 2: To boot from Windows installation CD-ROM, set First Boot...
... Menu Level Select Hard Disk Boot Device Priority : Move Enter: Select F5: Previous Values Step 3: Save and exit BIOS Setup. +/-/PU/PD: Value F10: Save F6: Fail-Safe Defaults Figure 3 ESC: Exit F1: General Help F7: Optimized Defaults - 67 - English Step 2: To boot from Windows installation CD-ROM, set First Boot...
Manual
Page 68
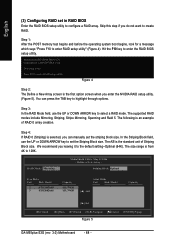
... Port Disk Model 2 ST3120026AS 3 ST3120026AS Capacity 111.79GB 111.79GB Array Disks Port Disk Model [ ] Add Capacity [ ] Del [ESC] Quit [F6] Back [F7] Finish [TAB] Navigate [ ] Select [ENTER] Popup Figure 5 GA-M55plus-S3G (rev. 3.0) Motherboard - 68 - Step 3: In the RAID Mode field, use the UP or DOWN ARROW key to the default setting--Optimal...
... Port Disk Model 2 ST3120026AS 3 ST3120026AS Capacity 111.79GB 111.79GB Array Disks Port Disk Model [ ] Add Capacity [ ] Del [ESC] Quit [F6] Back [F7] Finish [TAB] Navigate [ ] Select [ENTER] Popup Figure 5 GA-M55plus-S3G (rev. 3.0) Motherboard - 68 - Step 3: In the RAID Mode field, use the UP or DOWN ARROW key to the default setting--Optimal...
Manual
Page 69
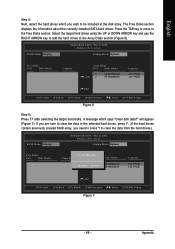
...Free Disks Port Disk Model Capacity Array Disks Port Disk Model 2 [ ] Add 3 ST3120026AS ST3120026AS Capacity 111.79GB 111.79GB [ ] Del [ESC] Quit [F6] Back [F7] Finish [TAB] Navigate [ ] Select [ENTER] Popup Figure 6 Step 6: Press F7 after selecting the target hard disks. The Free Disks section... Disk Model [Y[C] Yle]EaArSdddisk[Nd]a11tNa..01O?..MM ST3120026AS ST3120026AS [Y] YES [N] NO [ ] Del Capacity 111.79GB 111.79GB [ESC] Quit [F6] Back [F7] Finish [TAB] Navigate [ ] Select [ENTER] Popup Figure 7 - 69 - English Step 5: Next, select the hard drives which says "...
...Free Disks Port Disk Model Capacity Array Disks Port Disk Model 2 [ ] Add 3 ST3120026AS ST3120026AS Capacity 111.79GB 111.79GB [ ] Del [ESC] Quit [F6] Back [F7] Finish [TAB] Navigate [ ] Select [ENTER] Popup Figure 6 Step 6: Press F7 after selecting the target hard disks. The Free Disks section... Disk Model [Y[C] Yle]EaArSdddisk[Nd]a11tNa..01O?..MM ST3120026AS ST3120026AS [Y] YES [N] NO [ ] Del Capacity 111.79GB 111.79GB [ESC] Quit [F6] Back [F7] Finish [TAB] Navigate [ ] Select [ENTER] Popup Figure 7 - 69 - English Step 5: Next, select the hard drives which says "...

Manual
Page 72
...(s) * To specify additional SCSI adapters, CD-ROM drives, or special disk controllers for use with Windows, press ENTER. Windows Setup Press F6 if you need to install Windows 2000/XP onto your SATA hard drive with Windows, including those for the following is an example of Windows..., or do not have any device support disks from the Windows 2000/XP Setup disk and press F6 as soon as you see the next screen. S=Specify Additional Device ENTER=Continue F3=Exit Figure 14 GA-M55plus-S3G (rev. 3.0) Motherboard - 72 - Figure 13 Step 2: When a screen similar to specify additional ...
...(s) * To specify additional SCSI adapters, CD-ROM drives, or special disk controllers for use with Windows, press ENTER. Windows Setup Press F6 if you need to install Windows 2000/XP onto your SATA hard drive with Windows, including those for the following is an example of Windows..., or do not have any device support disks from the Windows 2000/XP Setup disk and press F6 as soon as you see the next screen. S=Specify Additional Device ENTER=Continue F3=Exit Figure 14 GA-M55plus-S3G (rev. 3.0) Motherboard - 72 - Figure 13 Step 2: When a screen similar to specify additional ...