User Manual
Page 69
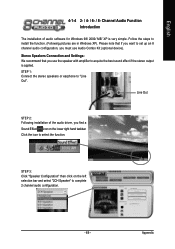
Stereo Speakers Connection and Settings: We recommend that if you want to set up an 8 channel audio configuration, you find a Sound Effect icon on the left selection bar and select "2CH Speaker" to install the function. (Following pictures are in Windows XP)....the icon to "Line Out". English 4-1-4 2- / 4- / 6- / 8- Channel Audio Function Introduction The installation of the audio driver, you must use the speaker with amplifier to acquire the best sound effect if the stereo output is very simple. STEP 1: Connect the stereo speakers or earphone to select the function. Appendix...
Stereo Speakers Connection and Settings: We recommend that if you want to set up an 8 channel audio configuration, you find a Sound Effect icon on the left selection bar and select "2CH Speaker" to install the function. (Following pictures are in Windows XP)....the icon to "Line Out". English 4-1-4 2- / 4- / 6- / 8- Channel Audio Function Introduction The installation of the audio driver, you must use the speaker with amplifier to acquire the best sound effect if the stereo output is very simple. STEP 1: Connect the stereo speakers or earphone to select the function. Appendix...
User Manual
Page 70
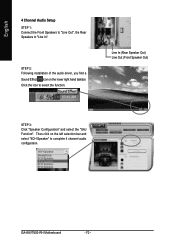
Click the icon to complete 4 channel audio configuration. GA-K8VT800-RH Motherboard - 70 - Line In (Rear Speaker Out) Line Out (Front Speaker Out) STEP 3: Click "Speaker Configuration" and select the "UAJ Function". Then click on the lower right hand taskbar. STEP 2: Following installation of the audio driver, you find a Sound Effect icon on the left selection bar and select "4CH Speaker" to select the function. English 4 Channel Audio Setup STEP 1: Connect the Front Speakers to "Line Out", the Rear Speakers to "Line In".
Click the icon to complete 4 channel audio configuration. GA-K8VT800-RH Motherboard - 70 - Line In (Rear Speaker Out) Line Out (Front Speaker Out) STEP 3: Click "Speaker Configuration" and select the "UAJ Function". Then click on the lower right hand taskbar. STEP 2: Following installation of the audio driver, you find a Sound Effect icon on the left selection bar and select "4CH Speaker" to select the function. English 4 Channel Audio Setup STEP 1: Connect the Front Speakers to "Line Out", the Rear Speakers to "Line In".

User Manual
Page 71
... Front Speakers to "Line Out", the Rear Speakers to "Line In", and the Center/Subwoofer Speakers to "MIC In". STEP 2: Following installation of the audio driver, you find a Sound Effect icon on the left selection bar and select "6CH Speaker" to select the function.
... Front Speakers to "Line Out", the Rear Speakers to "Line In", and the Center/Subwoofer Speakers to "MIC In". STEP 2: Following installation of the audio driver, you find a Sound Effect icon on the left selection bar and select "6CH Speaker" to select the function.
User Manual
Page 73
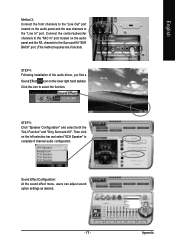
... menu, users can adjust sound option settings as desired. - 73 - Appendix English STEP 5: Click "Speaker Configuration" and select both the "UAJ Function" and "Only Surround-Kit". Method 2: Connect the front ... "Line In" port. Click the icon to the Surround-Kit "SUR BACK" port. (This method requires UAJ function) STEP 4: Following installation of the audio driver, you find a Sound Effect icon on the lower right hand taskbar. Connect the center/subwoofer channels to the "MIC In" port located on the audio panel and...
... menu, users can adjust sound option settings as desired. - 73 - Appendix English STEP 5: Click "Speaker Configuration" and select both the "UAJ Function" and "Only Surround-Kit". Method 2: Connect the front ... "Line In" port. Click the icon to the Surround-Kit "SUR BACK" port. (This method requires UAJ function) STEP 4: Following installation of the audio driver, you find a Sound Effect icon on the lower right hand taskbar. Connect the center/subwoofer channels to the "MIC In" port located on the audio panel and...


