User Manual
Page 18
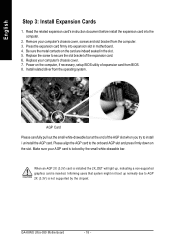
... are indeed seated in motherboard. 4. Please align the AGP card to AGP 2X (3.3V) is inserted. Power on the slot. Install related driver from BIOS. 8. Remove your computer's chassis cover. 7. GA-K8NS Ultra-939 Motherboard - 18 - Press the expansion card firmly into the computer. 2. Make sure your AGP card is installed the 2X_DET will light...
... are indeed seated in motherboard. 4. Please align the AGP card to AGP 2X (3.3V) is inserted. Power on the slot. Install related driver from BIOS. 8. Remove your computer's chassis cover. 7. GA-K8NS Ultra-939 Motherboard - 18 - Press the expansion card firmly into the computer. 2. Make sure your AGP card is installed the 2X_DET will light...
User Manual
Page 20
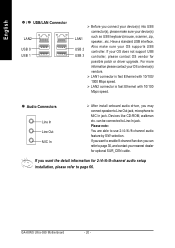
... 8-channel function you can be connected to Line-In jack. Audio Connectors Line In Line Out MIC In After install onboard audio driver, you want the detail information for 2-/4-/6-/8-channel audio setup installation, please refer to MIC In jack. Devices like CD-ROM, walkman... contact your nearest dealer for possible patch or driver upgrade. can refer to use 2-/4-/6-/8-channel audio feature by S/W selection. Also make sure your OS does not support USB controller, please contact OS vendor for optional SUR_CEN cable. GA-K8NS Ultra-939 Motherboard - 20 - LAN2 connector is fast...
... 8-channel function you can be connected to Line-In jack. Audio Connectors Line In Line Out MIC In After install onboard audio driver, you want the detail information for 2-/4-/6-/8-channel audio setup installation, please refer to MIC In jack. Devices like CD-ROM, walkman... contact your nearest dealer for possible patch or driver upgrade. can refer to use 2-/4-/6-/8-channel audio feature by S/W selection. Also make sure your OS does not support USB controller, please contact OS vendor for optional SUR_CEN cable. GA-K8NS Ultra-939 Motherboard - 20 - LAN2 connector is fast...
User Manual
Page 25
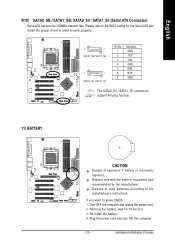
... by the manufacturer. Plug the power cord and turn ON the computer. - 25 - Remove the battery, wait for the Serial ATA and install the proper driver in order to the BIOS setting for 30 second. 3. If you want to the manufacturer's instructions. English 9/10) SATA0_SB / SATA1_SB;
... by the manufacturer. Plug the power cord and turn ON the computer. - 25 - Remove the battery, wait for the Serial ATA and install the proper driver in order to the BIOS setting for 30 second. 3. If you want to the manufacturer's instructions. English 9/10) SATA0_SB / SATA1_SB;

User Manual
Page 55
...it costs? But please remember, connected to internet at first, then you to store the BIOS source code correctly in the attached driver CD. Secondly, use Gigabyte, and @BIOS update your time and effort and save it ? This utility could not just do it will be carefully to ...a Windows utility. There are very experienced in motherboard industries. Or you to save you ever updated BIOS by yourself? Now, if you buy a Gigabyte's motherboard, you don't like many other BIOS update software, it comes! But of course you could help of time to do something right to update...
...it costs? But please remember, connected to internet at first, then you to store the BIOS source code correctly in the attached driver CD. Secondly, use Gigabyte, and @BIOS update your time and effort and save it ? This utility could not just do it will be carefully to ...a Windows utility. There are very experienced in motherboard industries. Or you to save you ever updated BIOS by yourself? Now, if you buy a Gigabyte's motherboard, you don't like many other BIOS update software, it comes! But of course you could help of time to do something right to update...

User Manual
Page 63
... a icon a Sound Effect icon on the left selection bar and select "2CH Speaker" to "Line Out". Channel Audio Function Introduction The installation of the audio driver, you use the speaker with amplifier to acquire the best sound effect if the stereo output is very simple. Please follow next step to select...
... a icon a Sound Effect icon on the left selection bar and select "2CH Speaker" to "Line Out". Channel Audio Function Introduction The installation of the audio driver, you use the speaker with amplifier to acquire the best sound effect if the stereo output is very simple. Please follow next step to select...

User Manual
Page 64
Then click on the lower right hand taskbar. Click the icon to "Line In". GA-K8NS Ultra-939 Motherboard - 64 - English 4 Channel Analog Audio Output Mode STEP 1 : Connect the front channels to "Line Out", the rear channels to select the function. STEP 2 : Following installation of the audio driver, you find a icon a Sound Effect icon on the left selection bar and select "4CH Speaker" to complete 4 channel audio configuration. Line Out Line In STEP 3 : Click "Speaker Configuration" and select the "UAJ Function".
Then click on the lower right hand taskbar. Click the icon to "Line In". GA-K8NS Ultra-939 Motherboard - 64 - English 4 Channel Analog Audio Output Mode STEP 1 : Connect the front channels to "Line Out", the rear channels to select the function. STEP 2 : Following installation of the audio driver, you find a icon a Sound Effect icon on the left selection bar and select "4CH Speaker" to complete 4 channel audio configuration. Line Out Line In STEP 3 : Click "Speaker Configuration" and select the "UAJ Function".

User Manual
Page 65
... configuration. - 65 - Line In STEP 3 : Click "Speaker Configuration" and select the "UAJ Function". Technical Reference MIC In Line Out STEP 2 : Following installation of the audio driver, you find a icon a Sound Effect icon on the left selection bar and select "6CH Speaker" to "MIC In".
... configuration. - 65 - Line In STEP 3 : Click "Speaker Configuration" and select the "UAJ Function". Technical Reference MIC In Line Out STEP 2 : Following installation of the audio driver, you find a icon a Sound Effect icon on the left selection bar and select "6CH Speaker" to "MIC In".

User Manual
Page 67
... to select the function. Click the icon to the Surround-Kit "SUR BACK" port. (This method requires UAJ function) STEP 4 : Following installation of the audio driver, you find a icon a Sound Effect icon on the lower right hand taskbar. Sound Effect Configuration: At the sound effect menu, users can adjust sound option...
... to select the function. Click the icon to the Surround-Kit "SUR BACK" port. (This method requires UAJ function) STEP 4 : Following installation of the audio driver, you find a icon a Sound Effect icon on the lower right hand taskbar. Sound Effect Configuration: At the sound effect menu, users can adjust sound option...

User Manual
Page 71
...this step, subsequent access to Xpress Recovery can restore the drive to its size. 6. Exit and Restart Build 2011 - 71 - Insert the provided driver CD into your CD drive, then save and exit the BIOS menu. When "Boot from CD: Xpress Recovery V1.0 (C) Copy Right 2003. Supports ...of only one OS 4. Execute Backup Utility 2. Verifying DMI Pool Data Boot from CD: Boot from CD:" appears, press any key to enter Xpress Recovery. GIGABYTE Technology CO. , Ltd. 1. Remove Backup Image 4. Set Password 5. Must be used to back up , please do not alter its original state. 1. ...
...this step, subsequent access to Xpress Recovery can restore the drive to its size. 6. Exit and Restart Build 2011 - 71 - Insert the provided driver CD into your CD drive, then save and exit the BIOS menu. When "Boot from CD: Xpress Recovery V1.0 (C) Copy Right 2003. Supports ...of only one OS 4. Execute Backup Utility 2. Verifying DMI Pool Data Boot from CD: Boot from CD:" appears, press any key to enter Xpress Recovery. GIGABYTE Technology CO. , Ltd. 1. Remove Backup Image 4. Set Password 5. Must be used to back up , please do not alter its original state. 1. ...
User Manual
Page 72
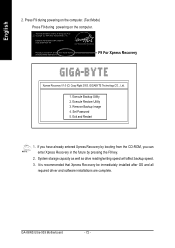
GIGABYTE Technology CO. , Ltd. 1. It is recommended that Xpress Recovery be immediately installed after OS and all required driver and software installations are complete. English 2. Press F9 during powering on the computer. (Text Mode) Press F9 during ...powering on the computer. Press DEL to enter SETUP / Q-Flash, F9 For Xpress Recovery 08/16/2002-I845GE-6A69YG01C-00 F9 For Xpress Recovery Xpress Recovery V1.0 (C) Copy Right 2003. GA-K8NS Ultra-939...
GIGABYTE Technology CO. , Ltd. 1. It is recommended that Xpress Recovery be immediately installed after OS and all required driver and software installations are complete. English 2. Press F9 during powering on the computer. (Text Mode) Press F9 during ...powering on the computer. Press DEL to enter SETUP / Q-Flash, F9 For Xpress Recovery 08/16/2002-I845GE-6A69YG01C-00 F9 For Xpress Recovery Xpress Recovery V1.0 (C) Copy Right 2003. GA-K8NS Ultra-939...

User Manual
Page 75
... to their appropriate location on steps 4 and 5 is provided. (For more detailed setup information, please visit our website at http:\\www.gigabyte.com.tw) Configuring the NVIDIA RAID BIOS The NVRAID BIOS setup lets you choose the RAID array type and which hard drives you to ... section on Integrated Peripherals). 4) Enter RAID setup in the BIOS and select the RAID type (For instance, enter F10 to select Silicon Image). 5) Complete driver installation. 6) Complete RAID utility installation. NVDIA RAID Utility Feb 13 2004 - Ctrl + S to select NVIDIA RAID; Define a New Array window appears (...
... to their appropriate location on steps 4 and 5 is provided. (For more detailed setup information, please visit our website at http:\\www.gigabyte.com.tw) Configuring the NVIDIA RAID BIOS The NVRAID BIOS setup lets you choose the RAID array type and which hard drives you to ... section on Integrated Peripherals). 4) Enter RAID setup in the BIOS and select the RAID type (For instance, enter F10 to select Silicon Image). 5) Complete driver installation. 6) Complete RAID utility installation. NVDIA RAID Utility Feb 13 2004 - Ctrl + S to select NVIDIA RAID; Define a New Array window appears (...

User Manual
Page 77
... shows various information about the array that the RAID setup has been configured from the RAID BIOS, the next step is to configure and load drivers under Windows. - 77 - You must choose Yes if the drives were previously used , RAID Mode, Striping Width, Disk Model Name, and disk capacity. At the...
... shows various information about the array that the RAID setup has been configured from the RAID BIOS, the next step is to configure and load drivers under Windows. - 77 - You must choose Yes if the drives were previously used , RAID Mode, Striping Width, Disk Model Name, and disk capacity. At the...
User Manual
Page 78
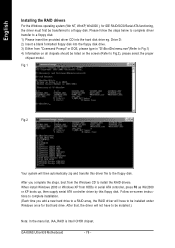
... have to be installed under Windows once for IDE RAID/SCSI/Serial ATA functioning, the driver must first be listed on the screen (Refer to install the RAID drivers. When install Windows 2000 or Windows XP from HDDs in "D:\BootDrv\menu.exe"(Refer to Fig.1) 4) Information on ... Prompt" or DOS, please type in serial ATA controller, press F6 as Win2000 or XP boots up, then supply serial ATA controller driver by this driver file to the floppy disk. GA-K8NS Ultra-939 Motherboard - 78 - Fig.1 Fig.2 (Note) Your system will not have to a floppy disk. After that hard drive. Drive D: ...
... have to be installed under Windows once for IDE RAID/SCSI/Serial ATA functioning, the driver must first be listed on the screen (Refer to install the RAID drivers. When install Windows 2000 or Windows XP from HDDs in "D:\BootDrv\menu.exe"(Refer to Fig.1) 4) Information on ... Prompt" or DOS, please type in serial ATA controller, press F6 as Win2000 or XP boots up, then supply serial ATA controller driver by this driver file to the floppy disk. GA-K8NS Ultra-939 Motherboard - 78 - Fig.1 Fig.2 (Note) Your system will not have to a floppy disk. After that hard drive. Drive D: ...

User Manual
Page 81
.... The "Xpress Install" uses the"Click and Go" technology to install the drivers automatically. Just select the drivers you install all components in the list. - 81 - INSTALL CHIPSET DRIVER This page shows the drivers that you want then click the "GO" button. The will restart your system... that came with your motherboard into your CD-ROM drive, the driver CD-title will continue to install other drivers. Click each item to install the driver manually or switch to the to install the drivers automatically. We recommend that need to be installed for you automatically....
.... The "Xpress Install" uses the"Click and Go" technology to install the drivers automatically. Just select the drivers you install all components in the list. - 81 - INSTALL CHIPSET DRIVER This page shows the drivers that you want then click the "GO" button. The will restart your system... that came with your motherboard into your CD-ROM drive, the driver CD-title will continue to install other drivers. Click each item to install the driver manually or switch to the to install the drivers automatically. We recommend that need to be installed for you automatically....
User Manual
Page 82
... the system (System will show a question mark "?" GA-K8NS Ultra-939 Motherboard - 82 - For USB2.0 driver support under "Device Manager". in XP. „ Marvell 10/100/1000 Base LAN Driver For Marvell 10/100/1000 LAN chip driver. „ RealTek AC97 Codec Driver Realtek audio driver. „ Silicon Image RAID Driver Serial-ATA RAID driver for Silicon Image. „ nVIDIA USB...
... the system (System will show a question mark "?" GA-K8NS Ultra-939 Motherboard - 82 - For USB2.0 driver support under "Device Manager". in XP. „ Marvell 10/100/1000 Base LAN Driver For Marvell 10/100/1000 LAN chip driver. „ RealTek AC97 Codec Driver Realtek audio driver. „ Silicon Image RAID Driver Serial-ATA RAID driver for Silicon Image. „ nVIDIA USB...

User Manual
Page 84
HARDWARE INFORMATION This page lists all device you have for details. CONTACT US Please see the last page for this CD title. GA-K8NS Ultra-939 Motherboard - 84 - English SOFTWARE INFORMATION This page list the contects of softwares and drivers in this motherboard.
HARDWARE INFORMATION This page lists all device you have for details. CONTACT US Please see the last page for this CD title. GA-K8NS Ultra-939 Motherboard - 84 - English SOFTWARE INFORMATION This page list the contects of softwares and drivers in this motherboard.

User Manual
Page 85
.../optical mouse still on the MB chipset. Answer: Please remember to the maximum volume? Question 7: Why do I fail to install RAID and ATA drivers under Win 2000 and XP on boards that you can take off power. 2. English FAQ Below is equipped with power/amplifier and try again later.... - 85 - Questions 2: Why is the light of electricity is still on -board battery to leak voltage to a floppy disk before installing drivers. Question 4: Why do I connect the boot HDD to enter BIOS and load Fail-Safe Defaults. 7. Press Del to IDE3 or IDE4 ? If not, please...
.../optical mouse still on the MB chipset. Answer: Please remember to the maximum volume? Question 7: Why do I fail to install RAID and ATA drivers under Win 2000 and XP on boards that you can take off power. 2. English FAQ Below is equipped with power/amplifier and try again later.... - 85 - Questions 2: Why is the light of electricity is still on -board battery to leak voltage to a floppy disk before installing drivers. Question 4: Why do I connect the boot HDD to enter BIOS and load Fail-Safe Defaults. 7. Press Del to IDE3 or IDE4 ? If not, please...


