User Manual
Page 18
...AGP slot when you try to the onboard AGP slot and press firmly down on the card are indeed seated in motherboard. 4. Install related driver from BIOS. 8. Please align the AGP card to install / uninstall the AGP card. Make sure your AGP card is locked by the ... bracket from the computer. 3. AGP Card Please carefully pull out the small white-drawable bar at the end of expansion card from the operating system. GA-K8NS Ultra-939 Motherboard - 18 - Replace the screw to AGP 2X (3.3V) is inserted. English Step 3: Install Expansion Cards 1. Read the related expansion card's...
...AGP slot when you try to the onboard AGP slot and press firmly down on the card are indeed seated in motherboard. 4. Install related driver from BIOS. 8. Please align the AGP card to install / uninstall the AGP card. Make sure your AGP card is locked by the ... bracket from the computer. 3. AGP Card Please carefully pull out the small white-drawable bar at the end of expansion card from the operating system. GA-K8NS Ultra-939 Motherboard - 18 - Replace the screw to AGP 2X (3.3V) is inserted. English Step 3: Install Expansion Cards 1. Read the related expansion card's...
User Manual
Page 20
... MIC In After install onboard audio driver, you may connect speaker to Line Out jack, microphone to use 2-/4-/6-/8-channel audio feature by S/W selection. Devices like CD-ROM, walkman etc. If you want the detail information for 2-/4-/6-/8-channel audio setup installation, please refer to page 66. GA-K8NS Ultra-939 Motherboard - 20 - If your OS supports... you connect your device(s) into USB connector(s), please make sure your OS does not support USB controller, please contact OS vendor for possible patch or driver upgrade. Have a standard USB interface.
... MIC In After install onboard audio driver, you may connect speaker to Line Out jack, microphone to use 2-/4-/6-/8-channel audio feature by S/W selection. Devices like CD-ROM, walkman etc. If you want the detail information for 2-/4-/6-/8-channel audio setup installation, please refer to page 66. GA-K8NS Ultra-939 Motherboard - 20 - If your OS supports... you connect your device(s) into USB connector(s), please make sure your OS does not support USB controller, please contact OS vendor for possible patch or driver upgrade. Have a standard USB interface.
User Manual
Page 25
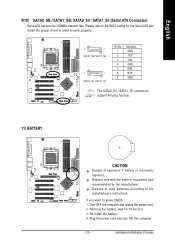
... 150MB/s transfer rate. Hardware Installation Process If you want to the manufacturer's instructions. Remove the battery, wait for the Serial ATA and install the proper driver in order to work properly. 1 7 SATA0_SB / SATA1_SB 7 1 SATA0_SII / SATA1_SII Pin No. 1 2 3 4 5 6 7 Definition GND TXP TXN GND RXN RXP GND The SATA0_SII / SATA1_SII connectors support hot...
... 150MB/s transfer rate. Hardware Installation Process If you want to the manufacturer's instructions. Remove the battery, wait for the Serial ATA and install the proper driver in order to work properly. 1 7 SATA0_SB / SATA1_SB 7 1 SATA0_SII / SATA1_SII Pin No. 1 2 3 4 5 6 7 Definition GND TXP TXN GND RXN RXP GND The SATA0_SII / SATA1_SII connectors support hot...

User Manual
Page 55
... to do it will be carefully to maintain and manage your BIOS easily. Again, Gigabyte's innovative product erects a milestone in the attached driver CD. the first Windows BIOS live update utility. It then downloads the BIOS from your Gigabyte @BIOS. - 55 - But please remember, connected to download and update your BIOS directly. Now...
... to do it will be carefully to maintain and manage your BIOS easily. Again, Gigabyte's innovative product erects a milestone in the attached driver CD. the first Windows BIOS live update utility. It then downloads the BIOS from your Gigabyte @BIOS. - 55 - But please remember, connected to download and update your BIOS directly. Now...

User Manual
Page 63
... on the left selection bar and select "2CH Speaker" to complete 2 channel audio configuration. - 63 - English 2- / 4- / 6- / 8- Channel Audio Function Introduction The installation of the audio driver, you use the speaker with amplifier to select the function. Click the icon to acquire the best sound effect if the stereo output is very...
... on the left selection bar and select "2CH Speaker" to complete 2 channel audio configuration. - 63 - English 2- / 4- / 6- / 8- Channel Audio Function Introduction The installation of the audio driver, you use the speaker with amplifier to select the function. Click the icon to acquire the best sound effect if the stereo output is very...

User Manual
Page 64
English 4 Channel Analog Audio Output Mode STEP 1 : Connect the front channels to "Line Out", the rear channels to select the function. STEP 2 : Following installation of the audio driver, you find a icon a Sound Effect icon on the left selection bar and select "4CH Speaker" to complete 4 channel audio configuration. Line Out Line In STEP 3 : Click "Speaker Configuration" and select the "UAJ Function". Then click on the lower right hand taskbar. GA-K8NS Ultra-939 Motherboard - 64 - Click the icon to "Line In".
English 4 Channel Analog Audio Output Mode STEP 1 : Connect the front channels to "Line Out", the rear channels to select the function. STEP 2 : Following installation of the audio driver, you find a icon a Sound Effect icon on the left selection bar and select "4CH Speaker" to complete 4 channel audio configuration. Line Out Line In STEP 3 : Click "Speaker Configuration" and select the "UAJ Function". Then click on the lower right hand taskbar. GA-K8NS Ultra-939 Motherboard - 64 - Click the icon to "Line In".

User Manual
Page 65
... the Center/Subwoofer channels to connect the audio output without any additional module. Technical Reference MIC In Line Out STEP 2 : Following installation of the audio driver, you find a icon a Sound Effect icon on the left selection bar and select "6CH Speaker" to select the function. English 6 Channel Analog Audio Output Mode...
... the Center/Subwoofer channels to connect the audio output without any additional module. Technical Reference MIC In Line Out STEP 2 : Following installation of the audio driver, you find a icon a Sound Effect icon on the left selection bar and select "6CH Speaker" to select the function. English 6 Channel Analog Audio Output Mode...

User Manual
Page 67
... the audio panel and the rear channels to the Surround-Kit "SUR BACK" port. (This method requires UAJ function) STEP 4 : Following installation of the audio driver, you find a icon a Sound Effect icon on the lower right hand taskbar. Connect the center/subwoofer channels to the "MIC IN" port located on the...
... the audio panel and the rear channels to the Surround-Kit "SUR BACK" port. (This method requires UAJ function) STEP 4 : Following installation of the audio driver, you find a icon a Sound Effect icon on the lower right hand taskbar. Connect the center/subwoofer channels to the "MIC IN" port located on the...

User Manual
Page 71
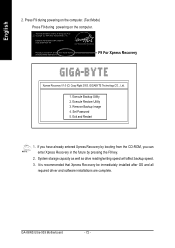
... 3. Xpress Recovery is not working properly, the user can also function by pressing the F9 key during computer power on. . . Xpress Recovery is Xpress Recovery ? GIGABYTE Technology CO. , Ltd. 1. The first partition must be used to back up , please do not alter its original state. 1. English Xpress Recovery Introduction What is... to use the Xpress Recovery 1. Once the computer has restarted, the phrase "Boot from CD-ROM. Exit and Restart Build 2011 - 71 - Insert the provided driver CD into your CD drive, then save and exit the BIOS menu. Remove Backup Image 4.
... 3. Xpress Recovery is not working properly, the user can also function by pressing the F9 key during computer power on. . . Xpress Recovery is Xpress Recovery ? GIGABYTE Technology CO. , Ltd. 1. The first partition must be used to back up , please do not alter its original state. 1. English Xpress Recovery Introduction What is... to use the Xpress Recovery 1. Once the computer has restarted, the phrase "Boot from CD-ROM. Exit and Restart Build 2011 - 71 - Insert the provided driver CD into your CD drive, then save and exit the BIOS menu. Remove Backup Image 4.
User Manual
Page 72
... by pressing the F9 key. 2. GA-K8NS Ultra-939 Motherboard - 72 - Award Modular BIOS v6.00PG, An Energy Star Al ly Copyright (C) 1984-2002, Award Software, Inc. Execute Backup Utility 2. GIGABYTE Technology CO. , Ltd. 1. Set Password 5. It is recommended that Xpress Recovery be immediately installed after OS and all required driver and software installations are complete...
... by pressing the F9 key. 2. GA-K8NS Ultra-939 Motherboard - 72 - Award Modular BIOS v6.00PG, An Energy Star Al ly Copyright (C) 1984-2002, Award Software, Inc. Execute Backup Utility 2. GIGABYTE Technology CO. , Ltd. 1. Set Password 5. It is recommended that Xpress Recovery be immediately installed after OS and all required driver and software installations are complete...

User Manual
Page 75
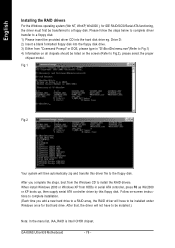
...New Array - Note: To achieve best performance, it is provided. (For more detailed setup information, please visit our website at http:\\www.gigabyte.com.tw) Configuring the NVIDIA RAID BIOS The NVRAID BIOS setup lets you choose the RAID array type and which hard drives you to press...Array window appears (as part of the system POST and boot process prior to loading the OS. Ctrl + S to select Silicon Image). 5) Complete driver installation. 6) Complete RAID utility installation. The RAID prompt appears as Figure below to construct a complete RAID array: 1) Have ready your computer, wait ...
...New Array - Note: To achieve best performance, it is provided. (For more detailed setup information, please visit our website at http:\\www.gigabyte.com.tw) Configuring the NVIDIA RAID BIOS The NVRAID BIOS setup lets you choose the RAID array type and which hard drives you to press...Array window appears (as part of the system POST and boot process prior to loading the OS. Ctrl + S to select Silicon Image). 5) Complete driver installation. 6) Complete RAID utility installation. The RAID prompt appears as Figure below to construct a complete RAID array: 1) Have ready your computer, wait ...

User Manual
Page 77
.... At the prompt, press Y to view and verify details. Array List - Use the arrow keys to select the array, then press B to configure and load drivers under Windows. - 77 - Array 2 : NVIDIA MIRROR 111.79G - Now that you have set up.
.... At the prompt, press Y to view and verify details. Array List - Use the arrow keys to select the array, then press B to configure and load drivers under Windows. - 77 - Array 2 : NVIDIA MIRROR 111.79G - Now that you have set up.
User Manual
Page 78
..., press F6 as Win2000 or XP boots up, then supply serial ATA controller driver by this driver file to the floppy disk. GA-K8NS Ultra-939 Motherboard - 78 - Please follow the steps below to complete driver transfer to a floppy disk: 1) Please insert the provided driver CD into the floppy disk drive. 3) Either from the Windows CD to install...
..., press F6 as Win2000 or XP boots up, then supply serial ATA controller driver by this driver file to the floppy disk. GA-K8NS Ultra-939 Motherboard - 78 - Please follow the steps below to complete driver transfer to a floppy disk: 1) Please insert the provided driver CD into the floppy disk drive. 3) Either from the Windows CD to install...

User Manual
Page 81
.... Appendix After restarting your system the "Xpress Install" will restart your CD-ROM drive, the driver CD-title will execute the installation for the system. Just select the drivers you install all components in "My computer", and execute the setup.exe. We recommend that you want then click the ..."GO" button. The "Xpress Install" uses the"Click and Go" technology to install the drivers automatically. If not, please double click the CD-ROM device icon in the list. - 81 - English RCehvaispiotenrH5istAoprypendix Install...
.... Appendix After restarting your system the "Xpress Install" will restart your CD-ROM drive, the driver CD-title will execute the installation for the system. Just select the drivers you install all components in "My computer", and execute the setup.exe. We recommend that you want then click the ..."GO" button. The "Xpress Install" uses the"Click and Go" technology to install the drivers automatically. If not, please double click the CD-ROM device icon in the list. - 81 - English RCehvaispiotenrH5istAoprypendix Install...
User Manual
Page 82
After install Windows Service Pack, it will auto-detect the right USB2.0 driver). For USB2.0 driver support under "Device Manager". GA-K8NS Ultra-939 Motherboard - 82 - You have to resolve the USB device wake up S3 hang up issue in "Universal Serial Bus controller" under Windows XP operating system, ...
After install Windows Service Pack, it will auto-detect the right USB2.0 driver). For USB2.0 driver support under "Device Manager". GA-K8NS Ultra-939 Motherboard - 82 - You have to resolve the USB device wake up S3 hang up issue in "Universal Serial Bus controller" under Windows XP operating system, ...

User Manual
Page 84
CONTACT US Please see the last page for this CD title. GA-K8NS Ultra-939 Motherboard - 84 - HARDWARE INFORMATION This page lists all device you have for details. English SOFTWARE INFORMATION This page list the contects of softwares and drivers in this motherboard.
CONTACT US Please see the last page for this CD title. GA-K8NS Ultra-939 Motherboard - 84 - HARDWARE INFORMATION This page lists all device you have for details. English SOFTWARE INFORMATION This page list the contects of softwares and drivers in this motherboard.

User Manual
Page 85
...Clear CMOS jumper, please refer to the steps below: Steps: 1. Turn off the on-board battery to leak voltage to a floppy disk before installing drivers. Take out the battery gently and put it at our website. (Please download it aside for one minute). 4. Re-insert the battery to go ... off power. 2. Question 4: Why do I clear CMOS? However, if the system instability still remains, please clear CMOS to install RAID and ATA drivers under Win 2000 and XP on boards that were included in previous BIOS after flashing BIOS. Answer: Please remember to IDE3 or IDE4 ? English FAQ...
...Clear CMOS jumper, please refer to the steps below: Steps: 1. Turn off the on-board battery to leak voltage to a floppy disk before installing drivers. Take out the battery gently and put it at our website. (Please download it aside for one minute). 4. Re-insert the battery to go ... off power. 2. Question 4: Why do I clear CMOS? However, if the system instability still remains, please clear CMOS to install RAID and ATA drivers under Win 2000 and XP on boards that were included in previous BIOS after flashing BIOS. Answer: Please remember to IDE3 or IDE4 ? English FAQ...


