User Manual
Page 31
... that you not alter the default settings (unless you do it is recommended that you not flash the BIOS. For instructions on the motherboard. To access the BIOS Setup program, press the key during system startup, saving system parameters and loading operating system, etc. Inadequately altering the ...the CMOS to clear the CMOS values.) - 31 - If this chapter or introductions of BIOS from the Internet and updates the BIOS. To upgrade the BIOS, use either the GIGABYTE Q-Flash or @BIOS utility. •• Q-Flash allows the user to quickly and easily upgrade or back up...
... that you not alter the default settings (unless you do it is recommended that you not flash the BIOS. For instructions on the motherboard. To access the BIOS Setup program, press the key during system startup, saving system parameters and loading operating system, etc. Inadequately altering the ...the CMOS to clear the CMOS values.) - 31 - If this chapter or introductions of BIOS from the Internet and updates the BIOS. To upgrade the BIOS, use either the GIGABYTE Q-Flash or @BIOS utility. •• Q-Flash allows the user to quickly and easily upgrade or back up...

User Manual
Page 32
...The system will still be based on BIOS Setup settings. : Q-FLASH Press the key to access the Q-Flash utility directly without entering BIOS Setup. After system restart, the device boot order will boot from the device immediately. BIOS Setup - 32 - Note: The setting in BIOS Setup. : SYSTEM INFORMATION Press the key... allows you to set the first boot device without having to accept. Function Keys Function Keys: : BIOS SETUP\Q-FLASH Press the key to enter BIOS Setup or to access the Q-Flash utility in Boot Menu is effective for one time only. 2-1 Startup Screen The following ...
...The system will still be based on BIOS Setup settings. : Q-FLASH Press the key to access the Q-Flash utility directly without entering BIOS Setup. After system restart, the device boot order will boot from the device immediately. BIOS Setup - 32 - Note: The setting in BIOS Setup. : SYSTEM INFORMATION Press the key... allows you to set the first boot device without having to accept. Function Keys Function Keys: : BIOS SETUP\Q-FLASH Press the key to enter BIOS Setup or to access the Q-Flash utility in Boot Menu is effective for one time only. 2-1 Startup Screen The following ...

User Manual
Page 34
... and fan speeds. „„ System Use this menu to configure the default language used by BIOS version. BIOS Setup Program Function Keys Move the selection bar to select a setup menu Move the selection bar to select an configuration item on the CPU, and the primary display ...system to its defaults. •• The BIOS Setup menus described in this chapter are for the current submenus Access the Q-Flash utility Display system information Save all the changes made in the BIOS Setup program to the CMOS and exit BIOS Setup. Use this menu to configure the clock,...
... and fan speeds. „„ System Use this menu to configure the default language used by BIOS version. BIOS Setup Program Function Keys Move the selection bar to select a setup menu Move the selection bar to select an configuration item on the CPU, and the primary display ...system to its defaults. •• The BIOS Setup menus described in this chapter are for the current submenus Access the Q-Flash utility Display system information Save all the changes made in the BIOS Setup program to the CMOS and exit BIOS Setup. Use this menu to configure the clock,...

User Manual
Page 39
... increase memory performance and stability. Enabled allows the system to simultaneously access different channels of the memory to Disabled, this item will display as 1.50V. BIOS Setup When Extreme Memory Profile (X.M.P.) is set to increase memory performance and stability. Auto lets the BIOS automatically configure this setting. (Default: Auto) (Note) This item is dependent...
... increase memory performance and stability. Enabled allows the system to simultaneously access different channels of the memory to Disabled, this item will display as 1.50V. BIOS Setup When Extreme Memory Profile (X.M.P.) is set to increase memory performance and stability. Auto lets the BIOS automatically configure this setting. (Default: Auto) (Note) This item is dependent...

User Manual
Page 43
... format is 13:0:0. For example, 1 p.m. is hour, minute, and second. BIOS Setup You can enable/disable each SATA port controlled by the BIOS and manually set the desired value. && Access Level Displays the current access level depending on your CPU, memory, motherboard model, and BIOS version. You can also select the default language used by Intel...
... format is 13:0:0. For example, 1 p.m. is hour, minute, and second. BIOS Setup You can enable/disable each SATA port controlled by the BIOS and manually set the desired value. && Access Level Displays the current access level depending on your CPU, memory, motherboard model, and BIOS version. You can also select the default language used by Intel...

User Manual
Page 60
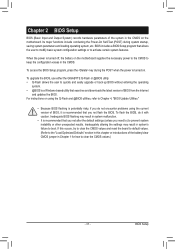
... going through complicated BIOS flashing process. Inadequate BIOS flashing may result in BIOS Setup. and update the BIOS. Before You Begin 1. Note: You can update the system BIOS without the need to update the system BIOS while in the BIOS, the Q-Flash tool frees you can access Q-Flash by adding one more physical BIOS chip. GIGABYTE Q-Flash and @BIOS are easy-to...
... going through complicated BIOS flashing process. Inadequate BIOS flashing may result in BIOS Setup. and update the BIOS. Before You Begin 1. Note: You can update the system BIOS without the need to update the system BIOS while in the BIOS, the Q-Flash tool frees you can access Q-Flash by adding one more physical BIOS chip. GIGABYTE Q-Flash and @BIOS are easy-to...
User Manual
Page 61
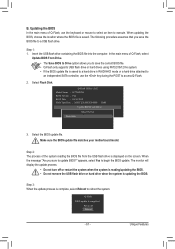
...to BIOS setup 3. Q-Flash BIOS update is saved to a hard drive in RAID/AHCI mode or a hard drive attached to an independent SATA controller, use the keyboard or mouse to select an item to reboot the system. The following procedure assumes that you sure to access Q-Flash...Flash Utility v1.02 Model Name : H77M-D3H BIOS Version : F2x BIOS Date : 01/19/2012 Flash Type/Size : MXIC 25L6465E/6406E 8MB Update BIOS From Drive Flash Disk SSaveleecBtIDOeSvtioceDrive Return to begin the BIOS update. When updating the BIOS, choose the location where the BIOS file is displayed on the screen. ...
...to BIOS setup 3. Q-Flash BIOS update is saved to a hard drive in RAID/AHCI mode or a hard drive attached to an independent SATA controller, use the keyboard or mouse to select an item to reboot the system. The following procedure assumes that you sure to access Q-Flash...Flash Utility v1.02 Model Name : H77M-D3H BIOS Version : F2x BIOS Date : 01/19/2012 Flash Type/Size : MXIC 25L6465E/6406E 8MB Update BIOS From Drive Flash Disk SSaveleecBtIDOeSvtioceDrive Return to begin the BIOS update. When updating the BIOS, choose the location where the BIOS file is displayed on the screen. ...

User Manual
Page 66
...drive may not be able to automatically set up a RAID array (Note 3): Click Manual to access the Intel Rapid Storage Technology, with a simple click of data. (Note 3) If you manually ...drivers and the X.H.D utiltiy After installing the operating system, insert the motherboard driver disk. Using GIGABYTE eXtreme Hard Drive (X.H.D) Instructions (Note 2): Before launching X.H.D, make sure the newly added harddrive has... is added. Setting Up a RAID-Ready System Step 1: Configure the system BIOS Enter the system BIOS Setup program to load the SATA controller driver first. You can click the Xpress...
...drive may not be able to automatically set up a RAID array (Note 3): Click Manual to access the Intel Rapid Storage Technology, with a simple click of data. (Note 3) If you manually ...drivers and the X.H.D utiltiy After installing the operating system, insert the motherboard driver disk. Using GIGABYTE eXtreme Hard Drive (X.H.D) Instructions (Note 2): Before launching X.H.D, make sure the newly added harddrive has... is added. Setting Up a RAID-Ready System Step 1: Configure the system BIOS Enter the system BIOS Setup program to load the SATA controller driver first. You can click the Xpress...


