Manual
Page 10
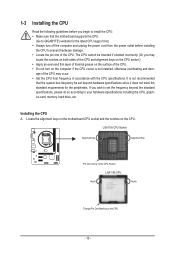
... Read the following guidelines before you begin to install the CPU: •• Make sure that the motherboard supports the CPU. (Go to GIGABYTE's website for the peripherals. age of the CPU. LGA1155 CPU Socket Alignment Key Alignment Key Pin One Corner of the CPU. ••... unplug the power cord from the power outlet before installing the CPU to your hardware specifications including the CPU, graphics card, memory, hard drive, etc. It is not installed, otherwise overheating and dam- The CPU cannot be set the frequency beyond hardware specifications since it does not...
... Read the following guidelines before you begin to install the CPU: •• Make sure that the motherboard supports the CPU. (Go to GIGABYTE's website for the peripherals. age of the CPU. LGA1155 CPU Socket Alignment Key Alignment Key Pin One Corner of the CPU. ••... unplug the power cord from the power outlet before installing the CPU to your hardware specifications including the CPU, graphics card, memory, hard drive, etc. It is not installed, otherwise overheating and dam- The CPU cannot be set the frequency beyond hardware specifications since it does not...
Manual
Page 12
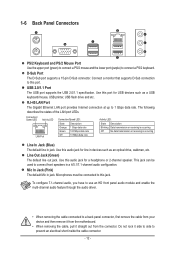
...Mic in jack. Connect a monitor that supports D-Sub connection to connect front speakers in devices such as a USB keyboard/mouse, USB printer, USB flash drive and etc. Use this port. Use this port for a headphone or 2-channel speaker. Line Out Jack (Green) The default line out jack. To...8226; When removing the cable connected to connect a PS/2 keyboard. Microphones must be used to this audio jack for USB devices such as an optical drive, walkman, etc. Use this jack. 1-6 Back Panel Connectors PS/2 Keyboard and PS/2 Mouse Port Use the upper port (green) to connect a PS...
...Mic in jack. Connect a monitor that supports D-Sub connection to connect front speakers in devices such as a USB keyboard/mouse, USB printer, USB flash drive and etc. Use this port. Use this port for a headphone or 2-channel speaker. Line Out Jack (Green) The default line out jack. To...8226; When removing the cable connected to connect a PS/2 keyboard. Microphones must be used to this audio jack for USB devices such as an optical drive, walkman, etc. Use this jack. 1-6 Back Panel Connectors PS/2 Keyboard and PS/2 Mouse Port Use the upper port (green) to connect a PS...

Manual
Page 15
... 1 GND 2 +12V 3 Sense 4 Speed Control DEBUGDEBUG PORT PORT •• Be sure to connect fan cables to the fan headers to prevent your SATA hard drive. Overheating may hang. Each SATA connector supports a single SATA device. SATA2 77 10 32 Pin No. 1 2 3 4 5 6 7 Definition GND TXP TXN GND RXN RXP GND 11...
... 1 GND 2 +12V 3 Sense 4 Speed Control DEBUGDEBUG PORT PORT •• Be sure to connect fan cables to the fan headers to prevent your SATA hard drive. Overheating may hang. Each SATA connector supports a single SATA device. SATA2 77 10 32 Pin No. 1 2 3 4 5 6 7 Definition GND TXP TXN GND RXN RXP GND 11...

Manual
Page 16
... chassis front panel. You may differ by issuing a beep code. This function requires a chassis with a chassis intrusion switch/sensor. Hard Drive Reset Activity LED Switch Power LED Chassis Intrusion Header •• MSG (Message/Power/Sleep LED): System Status LED Connects to the speaker...S1 sleep state. The front panel design may configure the way to turn off (S5). •• PW (Power Switch): Connects to the power switch on the chassis to the pin assignments below. A front panel module mainly consists of power switch, reset switch, power LED, hard drive...
... chassis front panel. You may differ by issuing a beep code. This function requires a chassis with a chassis intrusion switch/sensor. Hard Drive Reset Activity LED Switch Power LED Chassis Intrusion Header •• MSG (Message/Power/Sleep LED): System Status LED Connects to the speaker...S1 sleep state. The front panel design may configure the way to turn off (S5). •• PW (Power Switch): Connects to the power switch on the chassis to the pin assignments below. A front panel module mainly consists of power switch, reset switch, power LED, hard drive...
Manual
Page 29
... key to each SATA port controlled by the BIOS. && System Date Sets the system date. For example, only hard drive defined as the first priority on the Hard Drive BBS Priorities submenu will be prefixed with "UEFI:" string on the type of password protection used by Intel H61 Chipset. ...time format is set the desired value. && System Time Sets the system time. For example, you can set hard drive as the first priority (Boot Option #1) and DVD ROM drive as Administrator.) The Administrator level allows you to make changes to all . `` ATA Port Information This section provides information...
... key to each SATA port controlled by the BIOS. && System Date Sets the system date. For example, only hard drive defined as the first priority on the Hard Drive BBS Priorities submenu will be prefixed with "UEFI:" string on the type of password protection used by Intel H61 Chipset. ...time format is set the desired value. && System Time Sets the system time. For example, you can set hard drive as the first priority (Boot Option #1) and DVD ROM drive as Administrator.) The Administrator level allows you to make changes to all . `` ATA Port Information This section provides information...
Manual
Page 30
...Disabled for the computer, reducing exposure to viruses and malicious buffer overflow attacks when working with "UEFI:" string. && Hard Drive/CD/DVD ROM Drive/Floppy Drive/Network Device BBS Priorities Specifies the boot order for this item, type the password, and then press . This function may... you to determine which Option ROM to launch. With virtualization, one device for a specific device type, such as hard drives, optical drives, floppy disk drives, and devices that support Boot from the user password, the administrator password allows you to make changes to certain BIOS settings...
...Disabled for the computer, reducing exposure to viruses and malicious buffer overflow attacks when working with "UEFI:" string. && Hard Drive/CD/DVD ROM Drive/Floppy Drive/Network Device BBS Priorities Specifies the boot order for this item, type the password, and then press . This function may... you to determine which Option ROM to launch. With virtualization, one device for a specific device type, such as hard drives, optical drives, floppy disk drives, and devices that support Boot from the user password, the administrator password allows you to make changes to certain BIOS settings...

Manual
Page 32
&& Internal Graphics Memory Size Allows you to allocate the DVMT memory size of connected USB mass storage devices. You can emulate a USB flash drive as a floppy disk drive. (Default: Auto) - 32 - This should be enabled for full legacy support for an operating system without EHCI Hand-off Determines whether to set the onboard...
&& Internal Graphics Memory Size Allows you to allocate the DVMT memory size of connected USB mass storage devices. You can emulate a USB flash drive as a floppy disk drive. (Default: Auto) - 32 - This should be enabled for full legacy support for an operating system without EHCI Hand-off Determines whether to set the onboard...

Manual
Page 35
...that shown in the screen shot below. (If the driver Autorun screen does not appear automatically, go to My Computer, double-click the optical drive and execute the Run.exe program.) After inserting the driver disk, "Xpress Install" will automatically scan your system and then list all the ... are recommended to install. You can create up to 4 profiles and save as Setup Profile 1~ Setup Profile 4. && Load Profiles If your optical drive. && Exit Without Saving Press on this item and select Yes to load the optimal BIOS default settings. This exits the BIOS Setup without the hassles...
...that shown in the screen shot below. (If the driver Autorun screen does not appear automatically, go to My Computer, double-click the optical drive and execute the Run.exe program.) After inserting the driver disk, "Xpress Install" will automatically scan your system and then list all the ... are recommended to install. You can create up to 4 profiles and save as Setup Profile 1~ Setup Profile 4. && Load Profiles If your optical drive. && Exit Without Saving Press on this item and select Yes to load the optimal BIOS default settings. This exits the BIOS Setup without the hassles...


