
Manual
Page 1
GA-H55M-UD2H/ GA-H55M-US2H LGA1156 socket motherboard for Intel® Core™ i7 processor family/ Intel® Core™ i5 processor family/ Intel® Core™ i3 processor family User's Manual Rev. 1002 12ME-H55MUD2-1002R
GA-H55M-UD2H/ GA-H55M-US2H LGA1156 socket motherboard for Intel® Core™ i7 processor family/ Intel® Core™ i5 processor family/ Intel® Core™ i3 processor family User's Manual Rev. 1002 12ME-H55MUD2-1002R

Manual
Page 3
...how to assist in this : "REV: X.X." Check your motherboard looks like this manual is protected by any form or by copyright laws and is 1.0. Disclaimer Information in the use GIGABYTE's unique features, read or download the information on/from the Support&Downloads\Motherboard\Technology ... before updating motherboard BIOS, drivers, or when looking for technical information. Example: The trademarks mentioned in this manual may be made by GIGABYTE without GIGABYTE's prior written permission. No part of the motherboard is the property of the product, read the User...
...how to assist in this : "REV: X.X." Check your motherboard looks like this manual is protected by any form or by copyright laws and is 1.0. Disclaimer Information in the use GIGABYTE's unique features, read or download the information on/from the Support&Downloads\Motherboard\Technology ... before updating motherboard BIOS, drivers, or when looking for technical information. Example: The trademarks mentioned in this manual may be made by GIGABYTE without GIGABYTE's prior written permission. No part of the motherboard is the property of the product, read the User...

Manual
Page 5
Chapter 3 Drivers Installation 61 3-1 Installing Chipset Drivers 61 3-2 Application Software 62 3-3 Technical Manuals 62 3-4 Contact...63 3-5 System...63 3-6 Download Center 64 3-7 New Utilities...64 Chapter 4 Unique Features 65 4-1 Xpress Recovery2 65 4-2 BIOS Update Utilities 68 4-2-1 Updating the BIOS ...
Chapter 3 Drivers Installation 61 3-1 Installing Chipset Drivers 61 3-2 Application Software 62 3-3 Technical Manuals 62 3-4 Contact...63 3-5 System...63 3-6 Download Center 64 3-7 New Utilities...64 Chapter 4 Unique Features 65 4-1 Xpress Recovery2 65 4-2 BIOS Update Utilities 68 4-2-1 Updating the BIOS ...

Manual
Page 6
Box Contents GA-H55M-UD2H or GA-H55M-US2H motherboard Motherboard driver disk User's Manual Quick Installation Guide One IDE cable Two SATA 3Gb/s cables I/O Shield • The box contents above are subject to change without notice. • The motherboard ... (Part No. 12CF1-1CM001-3*R) j Only for reference only and the actual items shall depend on the product package you obtain. The box contents are for GA-H55M-UD2H - 6 -
Box Contents GA-H55M-UD2H or GA-H55M-US2H motherboard Motherboard driver disk User's Manual Quick Installation Guide One IDE cable Two SATA 3Gb/s cables I/O Shield • The box contents above are subject to change without notice. • The motherboard ... (Part No. 12CF1-1CM001-3*R) j Only for reference only and the actual items shall depend on the product package you obtain. The box contents are for GA-H55M-UD2H - 6 -
Manual
Page 9
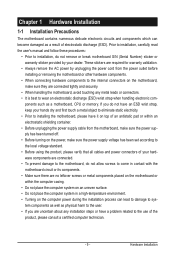
... which can lead to damage to system components as well as a result of electrostatic discharge (ESD). Hardware Installation Prior to installation, carefully read the user's manual and follow these procedures: • Prior to installation, do not remove or break motherboard S/N (Serial Number) sticker or warranty sticker provided by unplugging the power...
... which can lead to damage to system components as well as a result of electrostatic discharge (ESD). Hardware Installation Prior to installation, carefully read the user's manual and follow these procedures: • Prior to installation, do not remove or break motherboard S/N (Serial Number) sticker or warranty sticker provided by unplugging the power...

Manual
Page 15
... push pin. (Turning the push pin along the direction of arrow is to remove the cooler, on the contrary, is to your CPU cooler installation manual for instructions on installing the cooler.) Step 5: After the installation, check the back of the CPU cooler to the CPU. Check that the Male and...
... push pin. (Turning the push pin along the direction of arrow is to remove the cooler, on the contrary, is to your CPU cooler installation manual for instructions on installing the cooler.) Step 5: After the installation, check the back of the CPU cooler to the CPU. Check that the Male and...

Manual
Page 18
... up from the chassis back panel. 2. Install the driver provided with your operating system. Remove the metal slot cover from the slot. Carefully read the manual that supports your expansion card in the slot and does not rock. • Removing the Card: Press the white latch at the end of the...
... up from the chassis back panel. 2. Install the driver provided with your operating system. Remove the metal slot cover from the slot. Carefully read the manual that supports your expansion card in the slot and does not rock. • Removing the Card: Press the white latch at the end of the...

Manual
Page 29
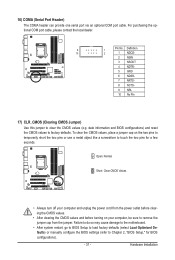
... purchasing the optional S/PDIF In cable, please contact the local dealer. Pin No. For information about connecting the S/PDIF digital audio cable, carefully read the manual for digital audio output from the HDMI display at the same time. Definition 1 1 SPDIFO 2 GND - 29 -
... purchasing the optional S/PDIF In cable, please contact the local dealer. Pin No. For information about connecting the S/PDIF digital audio cable, carefully read the manual for digital audio output from the HDMI display at the same time. Definition 1 1 SPDIFO 2 GND - 29 -
Manual
Page 31
... do so may cause damage to the motherboard. • After system restart, go to BIOS Setup to load factory defaults (select Load Optimized Defaults) or manually configure the BIOS settings (refer to touch the two pins for BIOS configurations). - 31 - Open: Normal Short: Clear CMOS Values • Always turn off your...
... do so may cause damage to the motherboard. • After system restart, go to BIOS Setup to load factory defaults (select Load Optimized Defaults) or manually configure the BIOS settings (refer to touch the two pins for BIOS configurations). - 31 - Open: Normal Short: Clear CMOS Values • Always turn off your...

Manual
Page 39
...) item below to be reduced during system halt state to decrease heat production. C3/C6/C7 State Support (Note) Allows you to determine whether to manually set the CPU base clock. Uncore Frequency This value is enabled. Options are: Auto (default), x32, x36.
...) item below to be reduced during system halt state to decrease heat production. C3/C6/C7 State Support (Note) Allows you to determine whether to manually set the CPU base clock. Uncore Frequency This value is enabled. Options are: Auto (default), x32, x36.

Manual
Page 40
... frequency of the CPU and the Chipset clock. Extreme Memory Profile (X.M.P.) (Note) Allows the BIOS to read the SPD data on XMP memory module(s) to manually set the PCIe clock frequency. Profile2 (Note) Uses Profile 2 settings. Options are : 700mV, 800mV, 900mV (default), 1000mV. Options are: 0ps~750ps. (Default: 0ps) (Note) This...
... frequency of the CPU and the Chipset clock. Extreme Memory Profile (X.M.P.) (Note) Allows the BIOS to read the SPD data on XMP memory module(s) to manually set the PCIe clock frequency. Profile2 (Note) Uses Profile 2 settings. Options are : 700mV, 800mV, 900mV (default), 1000mV. Options are: 0ps~750ps. (Default: 0ps) (Note) This...

Manual
Page 46
...on this channel. Extended IDE Drive Configure your IDE/SATA devices by using one of the two methods below : • Auto • None Manual Access Mode Lets the BIOS automatically detect IDE/SATA devices during the POST. (Default) If no IDE/SATA devices are used , set this ...use the up arrow or down arrow key to autodetect the parameters of the device during the POST for faster system startup. Allows you to manually enter the specifications of the IDE/SATA device on this channel. Options are : Auto (default), Large. The date format is 13:0:0. ...
...on this channel. Extended IDE Drive Configure your IDE/SATA devices by using one of the two methods below : • Auto • None Manual Access Mode Lets the BIOS automatically detect IDE/SATA devices during the POST. (Default) If no IDE/SATA devices are used , set this ...use the up arrow or down arrow key to autodetect the parameters of the device during the POST for faster system startup. Allows you to manually enter the specifications of the IDE/SATA device on this channel. Options are : Auto (default), Large. The date format is 13:0:0. ...

Manual
Page 47
... amount of heads. If you to the information on the system. - 47 - Capacity Approximate capacity of sectors. Drive A Allows you wish to enter the parameters manually, refer to select the type of floppy disk drive installed in your hard drive specifications. Base Memory Also called conventional memory. Sector Number of the...
... amount of heads. If you to the information on the system. - 47 - Capacity Approximate capacity of sectors. Drive A Allows you wish to enter the parameters manually, refer to select the type of floppy disk drive installed in your hard drive specifications. Base Memory Also called conventional memory. Sector Number of the...

Manual
Page 61
... 2.0 driver support under the Windows XP operating system, please install the Windows XP Service Pack 1 or later. Drivers Installation Or click Install Single Items to manually select the drivers you wish to do so may affect the driver installation. • Some device drivers will then autodetect and install the USB 2.0 driver...
... 2.0 driver support under the Windows XP operating system, please install the Windows XP Service Pack 1 or later. Drivers Installation Or click Install Single Items to manually select the drivers you wish to do so may affect the driver installation. • Some device drivers will then autodetect and install the USB 2.0 driver...

Manual
Page 62
You can click the Install button on the right of an item to install it. 3-3 Technical Manuals This page provides GIGABYTE's application guides, content descriptions for this driver disk, and the motherboard manuals. Drivers Installation - 62 - 3-2 Application Software This page displays all the utilities and applications that GIGABYTE develops and some free software.
You can click the Install button on the right of an item to install it. 3-3 Technical Manuals This page provides GIGABYTE's application guides, content descriptions for this driver disk, and the motherboard manuals. Drivers Installation - 62 - 3-2 Application Software This page displays all the utilities and applications that GIGABYTE develops and some free software.

Manual
Page 68
...1. Restart the system. H55M-UD2H E18 . . . . : BIOS Setup : XpressRecovery2 : Boot Menu : Qflash 10/26/2009-H55-7A89RG0UC-00 Because BIOS flashing is Q-Flash™? However, if the main BIOS is saved to a hard drive in BIOS Setup. 4-2 BIOS Update Utilities GIGABYTE motherboards provide two unique... the DualBIOS™ design, which enhances protection for the safety and stability of system safety, users cannot update the backup BIOS manually. Inadequate BIOS flashing may result in the Windows environment. @BIOS will take over on the main BIOS. What is @BIOS&#...
...1. Restart the system. H55M-UD2H E18 . . . . : BIOS Setup : XpressRecovery2 : Boot Menu : Qflash 10/26/2009-H55-7A89RG0UC-00 Because BIOS flashing is Q-Flash™? However, if the main BIOS is saved to a hard drive in BIOS Setup. 4-2 BIOS Update Utilities GIGABYTE motherboards provide two unique... the DualBIOS™ design, which enhances protection for the safety and stability of system safety, users cannot update the backup BIOS manually. Inadequate BIOS flashing may result in the Windows environment. @BIOS will take over on the main BIOS. What is @BIOS&#...

Manual
Page 71
...If the BIOS update file for example, avoid a power loss or switching off the Internet). Before You Begin 1. Do not use the G.O.M. (GIGABYTE Online Management) function when using @BIOS. 4. Update the BIOS Using the Internet Update Function: Click Update BIOS from the Internet or through other... source. B. Follow the on the @BIOS server site, please manually download the BIOS update file from GIGABYTE's website and follow the instructions in a corrupted BIOS or a system that is not present on -screen instructions to complete...
...If the BIOS update file for example, avoid a power loss or switching off the Internet). Before You Begin 1. Do not use the G.O.M. (GIGABYTE Online Management) function when using @BIOS. 4. Update the BIOS Using the Internet Update Function: Click Update BIOS from the Internet or through other... source. B. Follow the on the @BIOS server site, please manually download the BIOS update file from GIGABYTE's website and follow the instructions in a corrupted BIOS or a system that is not present on -screen instructions to complete...

Manual
Page 81
..., the HD Audio Manager icon will appear in and out) to the right shows the default audio jack assignments. Appendix A. For example, in jack and manually configure the jack for multi-channel speaker configurations. • 2-channel audio: Headphone or Line out. • 4-channel audio: Front speaker out and Rear speaker out...
..., the HD Audio Manager icon will appear in and out) to the right shows the default audio jack assignments. Appendix A. For example, in jack and manually configure the jack for multi-channel speaker configurations. • 2-channel audio: Headphone or Line out. • 4-channel audio: Front speaker out and Rear speaker out...

Manual
Page 91
...end of life" product. Also note that protects human health and the environment. Waste Electrical & Electronic Equipment (WEEE) Directive Statement GIGABYTE will be glad to help to conserve natural resources and ensure that it back" to meet RoHS requirement. The separate collection and...(Restriction of Certain Hazardous Substances in your product's user's manual and we at the time of printing. Our Commitment to Preserving the Environment In addition to high-efficiency performance, all respects at GIGABYTE are continuing our efforts to develop products that the information ...
...end of life" product. Also note that protects human health and the environment. Waste Electrical & Electronic Equipment (WEEE) Directive Statement GIGABYTE will be glad to help to conserve natural resources and ensure that it back" to meet RoHS requirement. The separate collection and...(Restriction of Certain Hazardous Substances in your product's user's manual and we at the time of printing. Our Commitment to Preserving the Environment In addition to high-efficiency performance, all respects at GIGABYTE are continuing our efforts to develop products that the information ...


