
Manual
Page 5
...; 2 73 4-5 Q-Share...75 4-6 Smart 6™ ...76 4-7 Auto Green...79 Chapter 5 Appendix...81 5-1 Configuring SATA Hard Drive(s 81 5-1-1 Configuring GIGABYTE SATA2 SATA Controller 81 5-1-2 Making a SATA RAID/AHCI Driver Diskette 88 5-1-3 Installing the SATA RAID/AHCI Driver and Operating System 89 5-2 Configuring Audio Input and Output 94 5-2-1 Configuring 2/4/5.1/7.1-Channel Audio 94 5-2-2 Configuring S/PDIF In...
...; 2 73 4-5 Q-Share...75 4-6 Smart 6™ ...76 4-7 Auto Green...79 Chapter 5 Appendix...81 5-1 Configuring SATA Hard Drive(s 81 5-1-1 Configuring GIGABYTE SATA2 SATA Controller 81 5-1-2 Making a SATA RAID/AHCI Driver Diskette 88 5-1-3 Installing the SATA RAID/AHCI Driver and Operating System 89 5-2 Configuring Audio Input and Output 94 5-2-1 Configuring 2/4/5.1/7.1-Channel Audio 94 5-2-2 Configuring S/PDIF In...
Manual
Page 10
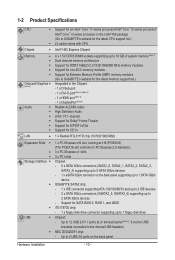
...i5 series processor/ Intel® Core™ i3 series processor in the LGA1156 package (Go to GIGABYTE's website for the latest CPU support list.) L3 cache varies with CPU Chipset Intel® H55 Express Chipset Memory w Onboard Graphics (Note 2) Audio ...Definition Audio 2/4/5.1/7.1-channel Support for Dolby® Home Theater Support for S/PDIF In/Out Support for SATA RAID 0, RAID 1, and JBOD w iTE IT8720 chip: - 1 x floppy disk drive connector supporting up to 2 SATA 3Gb/s devices -
...i5 series processor/ Intel® Core™ i3 series processor in the LGA1156 package (Go to GIGABYTE's website for the latest CPU support list.) L3 cache varies with CPU Chipset Intel® H55 Express Chipset Memory w Onboard Graphics (Note 2) Audio ...Definition Audio 2/4/5.1/7.1-channel Support for Dolby® Home Theater Support for S/PDIF In/Out Support for SATA RAID 0, RAID 1, and JBOD w iTE IT8720 chip: - 1 x floppy disk drive connector supporting up to 2 SATA 3Gb/s devices -
Manual
Page 26
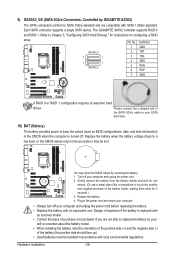
...your computer. • Always turn off your computer and unplug the power cord. 2. 9) GSATA2_5/6 (SATA 3Gb/s Connectors, Controlled by GIGABYTE SATA2) The SATA connectors conform to SATA 3Gb/s standard and are not able to replace the battery by your- Gently remove the battery ...to Chapter 5, "Configuring SATA Hard Drive(s)," for one . Danger of the battery holder, making them short for 5 seconds.) 3. The GIGABYTE SATA2 controller supports RAID 0 and RAID 1. Refer to a low level, or the CMOS values may not be accurate or may clear the CMOS values by removing the battery...
...your computer. • Always turn off your computer and unplug the power cord. 2. 9) GSATA2_5/6 (SATA 3Gb/s Connectors, Controlled by GIGABYTE SATA2) The SATA connectors conform to SATA 3Gb/s standard and are not able to replace the battery by your- Gently remove the battery ...to Chapter 5, "Configuring SATA Hard Drive(s)," for one . Danger of the battery holder, making them short for 5 seconds.) 3. The GIGABYTE SATA2 controller supports RAID 0 and RAID 1. Refer to a low level, or the CMOS values may not be accurate or may clear the CMOS values by removing the battery...
Manual
Page 52
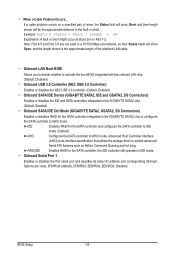
..., 3E8/IRQ4, 2E8/IRQ3, Disabled. Onboard LAN Boot ROM Allows you to decide whether to the fault or short. RAID/IDE Enables RAID for the SATA controller and configures the SATA controller to IDE mode. (Default) AHCI Configures the SATA controller to enable ...: Enabled) Onboard SATA/IDE Device (GIGABYTE SATA2, IDE and GSATA2_5/6 Connectors) Enables or disables the IDE and SATA controllers integrated in the GIGABYTE SATA2 chip. (Default: Enabled) Onboard SATA/IDE Ctrl Mode (GIGABYTE SATA2, GSATA2_5/6 Connectors) Enables or disables RAID for the SATA controller integrated in IDE...
..., 3E8/IRQ4, 2E8/IRQ3, Disabled. Onboard LAN Boot ROM Allows you to decide whether to the fault or short. RAID/IDE Enables RAID for the SATA controller and configures the SATA controller to IDE mode. (Default) AHCI Configures the SATA controller to enable ...: Enabled) Onboard SATA/IDE Device (GIGABYTE SATA2, IDE and GSATA2_5/6 Connectors) Enables or disables the IDE and SATA controllers integrated in the GIGABYTE SATA2 chip. (Default: Enabled) Onboard SATA/IDE Ctrl Mode (GIGABYTE SATA2, GSATA2_5/6 Connectors) Enables or disables RAID for the SATA controller integrated in IDE...

Manual
Page 65
... your system soon after the operating system and drivers are not supported. A. Step 2: Click New. (Note) Xpress Recovery2 checks the first physical hard drive in RAID/AHCI mode are installed. • The amount of data and hard drive access speed may affect the speed at the end of it . Chapter 4 Unique...
... your system soon after the operating system and drivers are not supported. A. Step 2: Click New. (Note) Xpress Recovery2 checks the first physical hard drive in RAID/AHCI mode are installed. • The amount of data and hard drive access speed may affect the speed at the end of it . Chapter 4 Unique...
Manual
Page 68
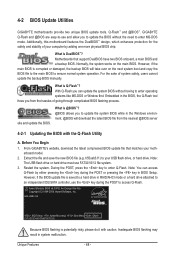
... Star Ally Copyright (C) 1984-2009, Award Software, Inc. H55-USB3 E4 . . . . : BIOS Setup : XpressRecovery2 : Boot Menu : Qflash 01/10/2010-H55-7A89TG0TC-00 Because BIOS flashing is corrupted or damaged, the... of going through complicated BIOS flashing process. What is saved to a hard drive in RAID/AHCI mode or a hard drive attached to -use and allow you can access Q-Flash... flashing may result in BIOS Setup. 4-2 BIOS Update Utilities GIGABYTE motherboards provide two unique BIOS update tools, Q-Flash™ and @BIOS™. GIGABYTE Q-Flash and @BIOS are easy-to an independent IDE/SATA...
... Star Ally Copyright (C) 1984-2009, Award Software, Inc. H55-USB3 E4 . . . . : BIOS Setup : XpressRecovery2 : Boot Menu : Qflash 01/10/2010-H55-7A89TG0TC-00 Because BIOS flashing is corrupted or damaged, the... of going through complicated BIOS flashing process. What is saved to a hard drive in RAID/AHCI mode or a hard drive attached to -use and allow you can access Q-Flash... flashing may result in BIOS Setup. 4-2 BIOS Update Utilities GIGABYTE motherboards provide two unique BIOS update tools, Q-Flash™ and @BIOS™. GIGABYTE Q-Flash and @BIOS are easy-to an independent IDE/SATA...
Manual
Page 69
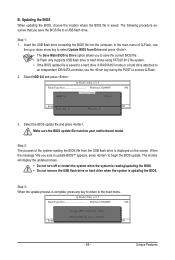
... is reading/updating the BIOS. • Do not remove the USB flash drive or hard drive when the system is saved to a hard drive in RAID/AHCI mode or a hard drive attached to an independent IDE/SATA controller, use the up or down arrow key to a USB flash drive. Step 2: The...
... is reading/updating the BIOS. • Do not remove the USB flash drive or hard drive when the system is saved to a hard drive in RAID/AHCI mode or a hard drive attached to an independent IDE/SATA controller, use the up or down arrow key to a USB flash drive. Step 2: The...
Manual
Page 81
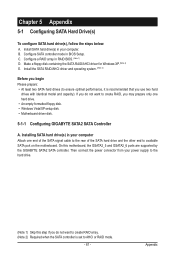
... Attach one hard drive. • An empty formatted floppy disk. • Windows Vista/XP setup disk. • Motherboard driver disk. 5-1-1 Configuring GIGABYTE SATA2 SATA Controller A. Installing SATA hard drive(s) in your power supply to the hard drive. (Note 1) Skip this motherboard, the GSATA2_5 and GSATA2_6 ports...SATA signal cable to the rear of the SATA hard drive and the other end to create RAID, you do not want to available SATA port on the motherboard. Install the SATA RAID/AHCI driver and operating system. (Note 2) Before you begin Please prepare: • At least...
... Attach one hard drive. • An empty formatted floppy disk. • Windows Vista/XP setup disk. • Motherboard driver disk. 5-1-1 Configuring GIGABYTE SATA2 SATA Controller A. Installing SATA hard drive(s) in your power supply to the hard drive. (Note 1) Skip this motherboard, the GSATA2_5 and GSATA2_6 ports...SATA signal cable to the rear of the SATA hard drive and the other end to create RAID, you do not want to available SATA port on the motherboard. Install the SATA RAID/AHCI driver and operating system. (Note 2) Before you begin Please prepare: • At least...
Manual
Page 82
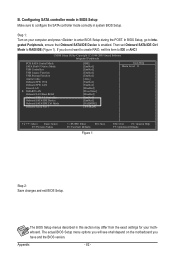
.../IDE Ctrl Mode Onboard Serial Port 1 [IDE] [Enabled] [Enabled] [Enabled] [Enabled] [Auto] [Enabled] [Enabled] [Disabled] [Press Enter] [Disabled] [Enabled] [Enabled] [RAID/IDE] [3F8/IRQ4] Item Help Menu Level Move Enter: Select F5: Previous Values +/-/PU/PD: Value F10: Save F6: Fail-Safe Defaults Figure 1 ESC... mode in this item to IDE or AHCI. Appendix - 82 - Step 1: Turn on the motherboard you do not want to create RAID, set Onboard SATA/IDE Ctrl Mode to enter BIOS Setup during the POST. Then set this section may differ from the exact settings for...
.../IDE Ctrl Mode Onboard Serial Port 1 [IDE] [Enabled] [Enabled] [Enabled] [Enabled] [Auto] [Enabled] [Enabled] [Disabled] [Press Enter] [Disabled] [Enabled] [Enabled] [RAID/IDE] [3F8/IRQ4] Item Help Menu Level Move Enter: Select F5: Previous Values +/-/PU/PD: Value F10: Save F6: Fail-Safe Defaults Figure 1 ESC... mode in this item to IDE or AHCI. Appendix - 82 - Step 1: Turn on the motherboard you do not want to create RAID, set Onboard SATA/IDE Ctrl Mode to enter BIOS Setup during the POST. Then set this section may differ from the exact settings for...

Manual
Page 83
... SATAII HOST Controller ROM v1.07.06 Copyright (C) 2005-2009 Gigabyte Technology Corp. (http://www.gigabyte.com) HDD0 : HDD1 : ST3120026AS ST3120026AS 120 GB 120 GB Non-RAID Non-RAID Press to execute and press . Gigabyte Technology Corp. Appendix Highlight the item that you can select ...a hard drive in the Main Menu block. Configuring a RAID array in RAID BIOS Enter the RAID BIOS setup utility to see detailed ...
... SATAII HOST Controller ROM v1.07.06 Copyright (C) 2005-2009 Gigabyte Technology Corp. (http://www.gigabyte.com) HDD0 : HDD1 : ST3120026AS ST3120026AS 120 GB 120 GB Non-RAID Non-RAID Press to execute and press . Gigabyte Technology Corp. Appendix Highlight the item that you can select ...a hard drive in the Main Menu block. Configuring a RAID array in RAID BIOS Enter the RAID BIOS setup utility to see detailed ...
Manual
Page 84
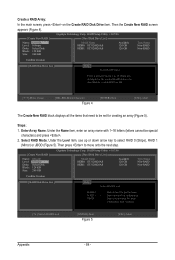
... displays all the items that need to move onto the next step. [ Create New RAID ] Name: Level: Disks: Block: Size: GRAID 0-Stripe Select Disk 128 KB 240 GB Gigabyte Technology Corp. Enter Array Name: Under the Name item, enter an array name with 1~16 letters...- Then press to be special characters) and press . 2. Select RAID Mode: Under the Level item, use up or down arrow key to select RAID 0 (Stripe), RAID 1 (Mirror) or JBOD (Figure 5). Then the Create New RAID screen appears (Figure 4). Gigabyte Technology Corp. Create a RAID Array: In the main screen, press on the Create...
... displays all the items that need to move onto the next step. [ Create New RAID ] Name: Level: Disks: Block: Size: GRAID 0-Stripe Select Disk 128 KB 240 GB Gigabyte Technology Corp. Enter Array Name: Under the Name item, enter an array name with 1~16 letters...- Then press to be special characters) and press . 2. Select RAID Mode: Under the Level item, use up or down arrow key to select RAID 0 (Stripe), RAID 1 (Mirror) or JBOD (Figure 5). Then the Create New RAID screen appears (Figure 4). Gigabyte Technology Corp. Create a RAID Array: In the main screen, press on the Create...

Manual
Page 85
...: Disks: Block: Size: GRAID 0-Stripe Select Disk 128 KB 240 GB Gigabyte Technology Corp. Press . Assign Array Disks: After a RAID mode is selected, RAID BIOS automatically assigns the two hard drives installed as the RAID drives. 4. RAID Setup Utility v1.07.06 [ Create New RAID ] Name: Level: Disks: Block: Size: GRAID 0-Stripe Select Disk 128 KB...
...: Disks: Block: Size: GRAID 0-Stripe Select Disk 128 KB 240 GB Gigabyte Technology Corp. Press . Assign Array Disks: After a RAID mode is selected, RAID BIOS automatically assigns the two hard drives installed as the RAID drives. 4. RAID Setup Utility v1.07.06 [ Create New RAID ] Name: Level: Disks: Block: Size: GRAID 0-Stripe Select Disk 128 KB...
Manual
Page 86
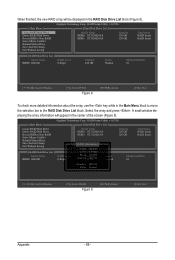
... information will be displayed in the RAID Disk Drive List block (Figure 8). When finished, the new RAID array will appear in the center of the screen (Figure 9). Gigabyte Technology Corp. RAID Setup Utility v1.07.06 [ Main Menu ] Create RAID Disk Drive Delete RAID Disk Drive Revert HDD to the RAID Disk Drive List block. Select the...
... information will be displayed in the RAID Disk Drive List block (Figure 8). When finished, the new RAID array will appear in the center of the screen (Figure 9). Gigabyte Technology Corp. RAID Setup Utility v1.07.06 [ Main Menu ] Create RAID Disk Drive Delete RAID Disk Drive Revert HDD to the RAID Disk Drive List block. Select the...

Manual
Page 87
... or to cancel. [ Main Menu ] Create RAID Disk Drive Delete RAID Disk Drive Revert HDD to Non-RAID Solve Mirror Conflict Rebuild Mirror Drive Save And Exit Setup Exit Without Saving Gigabyte Technology Corp. Press . Y Model Name RAID Level Capacity Status RDD0: GRAID 0-Stripe 240 GB... ] Model Name HDD0: ST3120026AS HDD1: ST3120026AS Capacity 120 GB 120 GB Type/Status RAID Inside RAID Inside [ RAID Disk Drive List ] Model Name } RDD0: GRAID ALL DATA ON THE RAID WILL LOST!! RAID Setup Utility v1.07.06 [ Hard Disk Drive List ] Model Name HDD0: ST3120026AS...
... or to cancel. [ Main Menu ] Create RAID Disk Drive Delete RAID Disk Drive Revert HDD to Non-RAID Solve Mirror Conflict Rebuild Mirror Drive Save And Exit Setup Exit Without Saving Gigabyte Technology Corp. Press . Y Model Name RAID Level Capacity Status RDD0: GRAID 0-Stripe 240 GB... ] Model Name HDD0: ST3120026AS HDD1: ST3120026AS Capacity 120 GB 120 GB Type/Status RAID Inside RAID Inside [ RAID Disk Drive List ] Model Name } RDD0: GRAID ALL DATA ON THE RAID WILL LOST!! RAID Setup Utility v1.07.06 [ Hard Disk Drive List ] Model Name HDD0: ST3120026AS...
Manual
Page 88
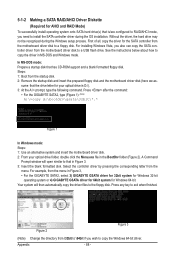
...for the SATA controller from \32bit to \64bit if you need to copy the Windows 64-bit driver. Press after the command: • For the GIGABYTE SATA2, type (Figure 1): (Note) A:\>copy d:\bootdrv\gsata\32bit\*.* Figure 1 In Windows mode: Steps: 1: Use an alternative system and insert the motherboard... driver disk. 2: From your optical drive is /are configured to RAID/AHCI mode, you wish to install the SATA controller driver during the Windows setup process. Without the driver, the hard drive may not be...
...for the SATA controller from \32bit to \64bit if you need to copy the Windows 64-bit driver. Press after the command: • For the GIGABYTE SATA2, type (Figure 1): (Note) A:\>copy d:\bootdrv\gsata\32bit\*.* Figure 1 In Windows mode: Steps: 1: Use an alternative system and insert the motherboard... driver disk. 2: From your optical drive is /are configured to RAID/AHCI mode, you wish to install the SATA controller driver during the Windows setup process. Without the driver, the hard drive may not be...
Manual
Page 89
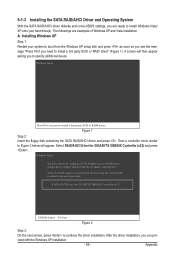
... want from the Windows XP setup disk and press as soon as you see the message "Press F6 if you need to the previous screen. RAID/AHCI Driver for GIGABYTE GBB36X Controller (x32) and press . Installing Windows XP Step 1: Restart your hard drive(s). 5-1-3 Installing the SATA... driver diskette and correct BIOS settings, you are examples of Windows XP and Vista installation. Select RAID/AHCI Driver for GIGABYTE GBB36X Controller (x32) ENTER=Select F3=Exit Figure 2 Step 3: On the next screen, press to install Windows Vista/ XP onto your system to boot from ...
... want from the Windows XP setup disk and press as soon as you see the message "Press F6 if you need to the previous screen. RAID/AHCI Driver for GIGABYTE GBB36X Controller (x32) and press . Installing Windows XP Step 1: Restart your hard drive(s). 5-1-3 Installing the SATA... driver diskette and correct BIOS settings, you are examples of Windows XP and Vista installation. Select RAID/AHCI Driver for GIGABYTE GBB36X Controller (x32) ENTER=Select F3=Exit Figure 2 Step 3: On the next screen, press to install Windows Vista/ XP onto your system to boot from ...

Manual
Page 90
...for Windows Vista 64-bit). Figure 3 Step 2: Insert the motherboard driver disk (Method A) or the floppy disk/USB flash drive that only one RAID array exists in your system.) Step 1: Restart your system and browse to the following directory: \BootDrv\GSATA\32Bit For Windows Vista 64-bit, ...the driver files and browse to load the driver. Appendix Figure 4 - 90 - When a screen similar to that below assumes that contains the SATA RAID/ AHCI driver (Method B), then specify the location of the driver (Figure 4). Method A: Insert the motherboard driver disk into your system to boot from...
...for Windows Vista 64-bit). Figure 3 Step 2: Insert the motherboard driver disk (Method A) or the floppy disk/USB flash drive that only one RAID array exists in your system.) Step 1: Restart your system and browse to the following directory: \BootDrv\GSATA\32Bit For Windows Vista 64-bit, ...the driver files and browse to load the driver. Appendix Figure 4 - 90 - When a screen similar to that below assumes that contains the SATA RAID/ AHCI driver (Method B), then specify the location of the driver (Figure 4). Method A: Insert the motherboard driver disk into your system to boot from...
Manual
Page 91
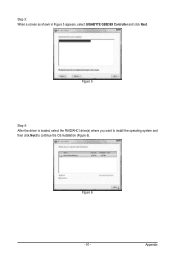
Figure 5 Step 4: After the driver is loaded, select the RAID/AHCI drive(s) where you want to install the operating system and then click Next to continue the OS installation (Figure 6). Figure 6 - 91 - Step 3: When a screen as shown in Figure 5 appears, select GIGABYTE GBB36X Controller and click Next. Appendix
Figure 5 Step 4: After the driver is loaded, select the RAID/AHCI drive(s) where you want to install the operating system and then click Next to continue the OS installation (Figure 6). Figure 6 - 91 - Step 3: When a screen as shown in Figure 5 appears, select GIGABYTE GBB36X Controller and click Next. Appendix
Manual
Page 92
... old one . When done, the status of the array will then move to Non-RAID Solve Mirror Conflict Rebuild Mirror Drive Save And Exit Setup Exit Without Saving Gigabyte Technology Corp. RAID Setup Utility v1.07.06 [ Hard Disk Drive List ] Model Name HDD0: ST3120026AS ...HDD1: ST3120026AS Capacity 120 GB 120 GB Type/Status RAID Inside Non-RAID [ RAID Disk Drive List ] Model Name RDD0: GRAID RAID Level 1-Mirror Capacity 120 ...
... old one . When done, the status of the array will then move to Non-RAID Solve Mirror Conflict Rebuild Mirror Drive Save And Exit Setup Exit Without Saving Gigabyte Technology Corp. RAID Setup Utility v1.07.06 [ Hard Disk Drive List ] Model Name HDD0: ST3120026AS ...HDD1: ST3120026AS Capacity 120 GB 120 GB Type/Status RAID Inside Non-RAID [ RAID Disk Drive List ] Model Name RDD0: GRAID RAID Level 1-Mirror Capacity 120 ...
Manual
Page 93
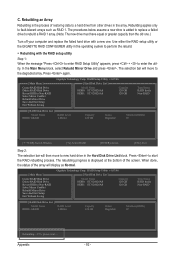
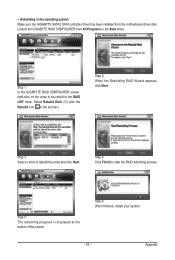
... rebuilt in the Start menu. Step 1: In the GIGABYTE RAID CONFIGURER screen, right-click on the array to start the RAID rebuilding process. Select Rebuild Raid. (Or click the Rebuild icon in the operating system Make sure the GIGABYTE SATA2 SATA controller driver has been installed from All Programs... in the RAID LIST block. Step 3: Select a drive to rebuild...
... rebuilt in the Start menu. Step 1: In the GIGABYTE RAID CONFIGURER screen, right-click on the array to start the RAID rebuilding process. Select Rebuild Raid. (Or click the Rebuild icon in the operating system Make sure the GIGABYTE SATA2 SATA controller driver has been installed from All Programs... in the RAID LIST block. Step 3: Select a drive to rebuild...


