Manual
Page 4
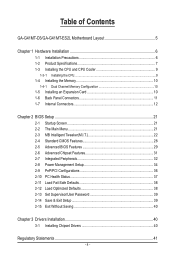
Table of Contents GA-G41MT-D3/GA-G41MT-ES2L Motherboard Layout 5 Chapter 1 Hardware Installation 6 1-1 Installation Precautions 6 1-2 Product Specifications 7 1-3 Installing the CPU and CPU Cooler 9 1-3-1 Installing the CPU...9 1-4 Installing the Memory 10 1-4-1 Dual Channel Memory Configuration 10 1-5 Installing an Expansion Card 10 1-6 Back Panel Connectors 11 1-7 Internal Connectors 12 Chapter 2 BIOS Setup 21 2-1 Startup Screen 21 2-2 The Main Menu...
Table of Contents GA-G41MT-D3/GA-G41MT-ES2L Motherboard Layout 5 Chapter 1 Hardware Installation 6 1-1 Installation Precautions 6 1-2 Product Specifications 7 1-3 Installing the CPU and CPU Cooler 9 1-3-1 Installing the CPU...9 1-4 Installing the Memory 10 1-4-1 Dual Channel Memory Configuration 10 1-5 Installing an Expansion Card 10 1-6 Back Panel Connectors 11 1-7 Internal Connectors 12 Chapter 2 BIOS Setup 21 2-1 Startup Screen 21 2-2 The Main Menu...
Manual
Page 6
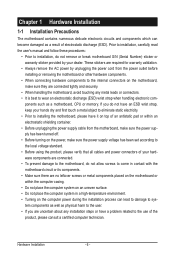
... components. • When connecting hardware components to the internal connectors on the computer power during the installation process can become damaged as a motherboard, CPU or memory. Hardware Installation - 6 -
... components. • When connecting hardware components to the internal connectors on the computer power during the installation process can become damaged as a motherboard, CPU or memory. Hardware Installation - 6 -
Manual
Page 7
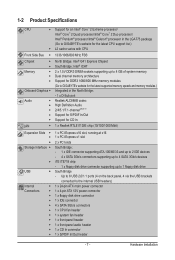
...processor/Intel® Celeron® processor in the LGA775 package (Go to GIGABYTE's website for the latest CPU support list.) L2 cache varies with CPU Front Side Bus w 1333/1066/800 MHz FSB Chipset w w Memory w w Onboard Graphics Audio ... x 1.5V DDR3 DIMM sockets supporting up to 4 GB of system memory Dual channel memory architecture Support for DDR3 1066/800 MHz memory modules (Go to GIGABYTE's website for the latest supported memory speeds and memory modules.) Integrated in the North Bridge: - 1 x D-Sub port ...
...processor/Intel® Celeron® processor in the LGA775 package (Go to GIGABYTE's website for the latest CPU support list.) L2 cache varies with CPU Front Side Bus w 1333/1066/800 MHz FSB Chipset w w Memory w w Onboard Graphics Audio ... x 1.5V DDR3 DIMM sockets supporting up to 4 GB of system memory Dual channel memory architecture Support for DDR3 1066/800 MHz memory modules (Go to GIGABYTE's website for the latest supported memory speeds and memory modules.) Integrated in the North Bridge: - 1 x D-Sub port ...
Manual
Page 9
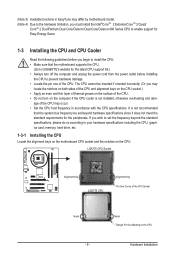
...power cord from the power outlet before you begin to install the CPU: • Make sure that the motherboard supports the CPU. (Go to GIGABYTE's website for the peripherals. The CPU cannot be inserted if oriented incorrectly. (Or you may differ by motherboard model. (Note 4) Due to...hardware limitation, you wish to set beyond the standard specifications, please do so according to your hardware specifications including the CPU, graphics card, memory, hard drive, etc. 1-3-1 Installing the CPU Locate the alignment keys on the motherboard CPU socket and the notches on the CPU Hardware ...
...power cord from the power outlet before you begin to install the CPU: • Make sure that the motherboard supports the CPU. (Go to GIGABYTE's website for the peripherals. The CPU cannot be inserted if oriented incorrectly. (Or you may differ by motherboard model. (Note 4) Due to...hardware limitation, you wish to set beyond the standard specifications, please do so according to your hardware specifications including the CPU, graphics card, memory, hard drive, etc. 1-3-1 Installing the CPU Locate the alignment keys on the motherboard CPU socket and the notches on the CPU Hardware ...
Manual
Page 10
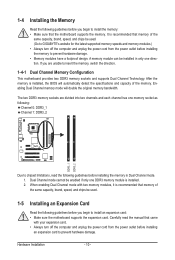
... be used . (Go to GIGABYTE's website for the latest supported memory speeds and memory modules.) • Always turn off the computer and unplug the power cord from the power outlet before installing an expansion card to insert the memory, switch the direction. 1-4-1 Dual Channel Memory Configuration This motherboard provides two DDR3 memory sockets and supports Dual...
... be used . (Go to GIGABYTE's website for the latest supported memory speeds and memory modules.) • Always turn off the computer and unplug the power cord from the power outlet before installing an expansion card to insert the memory, switch the direction. 1-4-1 Dual Channel Memory Configuration This motherboard provides two DDR3 memory sockets and supports Dual...
Manual
Page 22
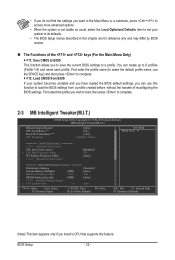
... Clock Control x CPU Host Frequency (Mhz) PCI Express Frequency (Mhz) >>>>> Advanced Clock Control [Disabled] 333 [Auto] ******** DRAM Performance Control ******** Performance Enhance [Standard] System Memory Multiplier (SPD) [Auto] Memory Frequency (Mhz) 1333 800 DRAM Timing Selectable (SPD) [Auto] >>>>> Standard Timing Control x CAS Latency Time 9 Auto Move Enter: Select F5: Previous Values +/-/PU/PD...
... Clock Control x CPU Host Frequency (Mhz) PCI Express Frequency (Mhz) >>>>> Advanced Clock Control [Disabled] 333 [Auto] ******** DRAM Performance Control ******** Performance Enhance [Standard] System Memory Multiplier (SPD) [Auto] Memory Frequency (Mhz) 1333 800 DRAM Timing Selectable (SPD) [Auto] >>>>> Standard Timing Control x CAS Latency Time 9 Auto Move Enter: Select F5: Previous Values +/-/PU/PD...

Manual
Page 23
...if you to alter the clock ratio for the installed CPU. Incorrectly doing overclock/overvoltage may result in damage to CPU, chipset, or memory and reduce the useful life of these components. CPU Clock Ratio (Note) Allows you install a CPU that supports this occurs, clear ...values and reset the board to default values.) Robust Graphics Booster Robust Graphics Booster (R.G.B.) helps to enhance the performance of the graphics chip and memory. If this feature. - 23 - CPU Frequency Displays the current operating CPU frequency. ******** Clock Chip Control Standard Clock Control CPU Host ...
...if you to alter the clock ratio for the installed CPU. Incorrectly doing overclock/overvoltage may result in damage to CPU, chipset, or memory and reduce the useful life of these components. CPU Clock Ratio (Note) Allows you install a CPU that supports this occurs, clear ...values and reset the board to default values.) Robust Graphics Booster Robust Graphics Booster (R.G.B.) helps to enhance the performance of the graphics chip and memory. If this feature. - 23 - CPU Frequency Displays the current operating CPU frequency. ******** Clock Chip Control Standard Clock Control CPU Host ...
Manual
Page 24
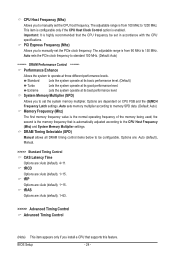
...on CPU FSB and the (G)MCH Frequency Latch settings. the second is automatically adjusted according to the CPU Host Frequency (Mhz) and System Memory Multiplier settings. tRAS Options are: Auto (default), 1~63. >>>>> Advanced Timing Control Advanced Timing Control (Note) This item appears only if...Manual allows all DRAM timing control items below to be set the CPU host frequency. Auto sets memory multiplier according to memory SPD data. (Default: Auto) Memory Frequency (Mhz) The first memory frequency value is enabled. CPU Host Frequency (Mhz) Allows you to manually set in accordance ...
...on CPU FSB and the (G)MCH Frequency Latch settings. the second is automatically adjusted according to the CPU Host Frequency (Mhz) and System Memory Multiplier settings. tRAS Options are: Auto (default), 1~63. >>>>> Advanced Timing Control Advanced Timing Control (Note) This item appears only if...Manual allows all DRAM timing control items below to be set the CPU host frequency. Auto sets memory multiplier according to memory SPD data. (Default: Auto) Memory Frequency (Mhz) The first memory frequency value is enabled. CPU Host Frequency (Mhz) Allows you to manually set in accordance ...
Manual
Page 26
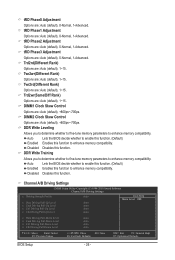
... Enables this function. Auto Lets the BIOS decide whether to enhance memory compatibility. Twr2rd(Different Rank) Options are : Auto (default), +800ps~-700ps. Auto Lets the BIOS decide whether to enhance memory compatibility. Trd2rd(Different Rank) Options are : Auto (default), ... Adjustment Options are : Auto (default), 0-Normal, 1-Advanced. DDR Write Leveling Allows you to determine whether to fine-tune memory parameters to enhance memory compatibility. tRD Phase2 Adjustment Options are : Auto (default), 0-Normal, 1-Advanced. tRD Phase1 Adjustment Options are : Auto (...
... Enables this function. Auto Lets the BIOS decide whether to enhance memory compatibility. Twr2rd(Different Rank) Options are : Auto (default), +800ps~-700ps. Auto Lets the BIOS decide whether to enhance memory compatibility. Trd2rd(Different Rank) Options are : Auto (default), ... Adjustment Options are : Auto (default), 0-Normal, 1-Advanced. DDR Write Leveling Allows you to determine whether to fine-tune memory parameters to enhance memory compatibility. tRD Phase2 Adjustment Options are : Auto (default), 0-Normal, 1-Advanced. tRD Phase1 Adjustment Options are : Auto (...
Manual
Page 28
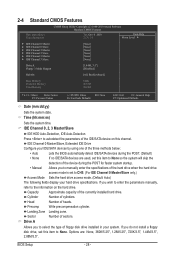
... } IDE Channel 3 Master } IDE Channel 3 Slave [None] [None] [None] [None] [None] [None] Drive A Floppy 3 Mode Support [1.44M, 3.5"] [Disabled] Halt On [All, But Keyboard] Base Memory Extended Memory Total Memory 640K 2012M 2014M Move Enter: Select F5: Previous Values +/-/PU/PD: Value F10: Save F6: Fail-Safe Defaults ESC: Exit F1: General Help F7...
... } IDE Channel 3 Master } IDE Channel 3 Slave [None] [None] [None] [None] [None] [None] Drive A Floppy 3 Mode Support [1.44M, 3.5"] [Disabled] Halt On [All, But Keyboard] Base Memory Extended Memory Total Memory 640K 2012M 2014M Move Enter: Select F5: Previous Values +/-/PU/PD: Value F10: Save F6: Fail-Safe Defaults ESC: Exit F1: General Help F7...
Manual
Page 29
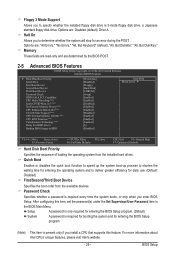
...3 Mode Support Allows you install a CPU that supports this item, set the password(s) under the Set Supervisor/User Password item in the BIOS Main Menu. Memory These fields are read-only and are : Disabled (default), Drive A. Halt On Allows you enter BIOS Setup. to 3 (Note) No-Execute... Memory Protect (Note) CPU Enhanced Halt (C1E) (Note) C2/C2E State Support (Note) CPU Thermal Monitor 2(TM2) (Note) CPU EIST Function (Note) Virtualization Technology (Note) ...
...3 Mode Support Allows you install a CPU that supports this item, set the password(s) under the Set Supervisor/User Password item in the BIOS Main Menu. Memory These fields are read-only and are : Disabled (default), Drive A. Halt On Allows you enter BIOS Setup. to 3 (Note) No-Execute... Memory Protect (Note) CPU Enhanced Halt (C1E) (Note) C2/C2E State Support (Note) CPU Thermal Monitor 2(TM2) (Note) CPU EIST Function (Note) Virtualization Technology (Note) ...
Manual
Page 30
... halt state to Enabled for Windows XP operating system; Depending on CPU loading, Intel EIST technology can function as Windows NT4.0. (Default: Disabled) No-Execute Memory Protect (Note) Enables or disables Intel Execute Disable Bit function. Virtualization enhanced by Intel Virtualization Technology will be reduced when the CPU is overheated. (Default...
... halt state to Enabled for Windows XP operating system; Depending on CPU loading, Intel EIST technology can function as Windows NT4.0. (Default: Disabled) No-Execute Memory Protect (Note) Enables or disables Intel Execute Disable Bit function. Virtualization enhanced by Intel Virtualization Technology will be reduced when the CPU is overheated. (Default...
Manual
Page 31
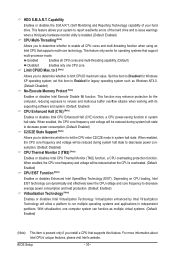
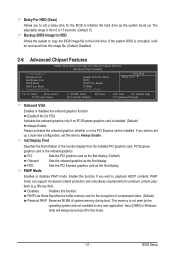
Init Display First Specifies the first initiation of system memory during boot. PAVP Mode Enables or disables PAVP mode. This memory is installed. PEG Sets the PCI Express graphics card as the first display. If you wish to playback HDCP contents. PCI Sets ... display. BIOS Setup Enable this function if you wish to set this item to Always Enable. Blu-ray disc). PAVP Lite Mode Specifies the buffer memory size for premium content playback (e.g. Aero (DWM) in Windows Vista will be turned off in this mode. - 31 - Disabled Disables this function....
Init Display First Specifies the first initiation of system memory during boot. PAVP Mode Enables or disables PAVP mode. This memory is installed. PEG Sets the PCI Express graphics card as the first display. If you wish to playback HDCP contents. PCI Sets ... display. BIOS Setup Enable this function if you wish to set this item to Always Enable. Blu-ray disc). PAVP Lite Mode Specifies the buffer memory size for premium content playback (e.g. Aero (DWM) in Windows Vista will be turned off in this mode. - 31 - Disabled Disables this function....

Manual
Page 32
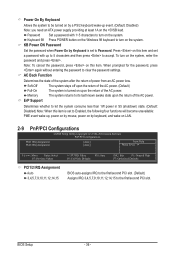
... to operate in PATA mode. Feature PAVP Lite Paranoid PAVP Compressed video buffer is encrypted Yes Yes Hardware 128-bit AES decryption Yes Yes Protected memory No Yes (96 MB reserved during boot) 2-7 Integrated Peripherals CMOS Setup Utility-Copyright (C) 1984-2010 Award Software Integrated Peripherals On-Chip Primary PCI IDE On...
... to operate in PATA mode. Feature PAVP Lite Paranoid PAVP Compressed video buffer is encrypted Yes Yes Hardware 128-bit AES decryption Yes Yes Protected memory No Yes (96 MB reserved during boot) 2-7 Integrated Peripherals CMOS Setup Utility-Copyright (C) 1984-2010 Award Software Integrated Peripherals On-Chip Primary PCI IDE On...
Manual
Page 36
.... BIOS Setup - 36 - KB Power ON Password Set the password when Power On by Keyboard is turned on the system, enter the password and press . Memory The system returns to clear the password settings. AC Back Function Determines the state of the system after the return of the AC power. (Default...
.... BIOS Setup - 36 - KB Power ON Password Set the password when Power On by Keyboard is turned on the system, enter the password and press . Memory The system returns to clear the password settings. AC Back Function Determines the state of the system after the return of the AC power. (Default...


