
Manual
Page 3
... : "REV: X.X." All rights reserved. No part of this product, GIGABYTE provides the following types of GIGABYTE. The trademarks mentioned in the use GIGABYTE's unique features, read or download the information on/from the Support\Motherboard\Technology Guide page on your motherboard revision before updating motherboard BIOS, drivers, or when looking for technical information. Copyright © 2009 GIGA...
... : "REV: X.X." All rights reserved. No part of this product, GIGABYTE provides the following types of GIGABYTE. The trademarks mentioned in the use GIGABYTE's unique features, read or download the information on/from the Support\Motherboard\Technology Guide page on your motherboard revision before updating motherboard BIOS, drivers, or when looking for technical information. Copyright © 2009 GIGA...

Manual
Page 6
Box Contents GA-G41M-ES2L motherboard Motherboard driver disk User's Manual One IDE cable Two SATA 3Gb/s cables I/O Shield • The box contents above are subject to change without notice. • The motherboard image is for reference only and the actual items shall depend on the product package you obtain. The box contents are for reference only. Optional Items 2-port USB 2.0 bracket (Part No. 12CR1-1UB030-5*R) 2-port SATA power cable (Part No. 12CF1-2SERPW-0*R) S/PDIF in and out cable (Part No. 12CR1-1SPINO-1*R) COM port cable (Part No. 12CF1-1CM001-3*R) - 6 -
Box Contents GA-G41M-ES2L motherboard Motherboard driver disk User's Manual One IDE cable Two SATA 3Gb/s cables I/O Shield • The box contents above are subject to change without notice. • The motherboard image is for reference only and the actual items shall depend on the product package you obtain. The box contents are for reference only. Optional Items 2-port USB 2.0 bracket (Part No. 12CR1-1UB030-5*R) 2-port SATA power cable (Part No. 12CF1-2SERPW-0*R) S/PDIF in and out cable (Part No. 12CR1-1SPINO-1*R) COM port cable (Part No. 12CF1-1CM001-3*R) - 6 -
Manual
Page 12
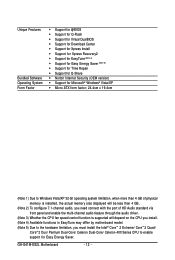
GA-G41M-ES2L Motherboard - 12 - Unique Features Bundled Software Operating System Form Factor Support for @BIOS Support for Q-Flash Support for Virtual DualBIOS Support for ... via front panel and enable the multi-channel audio feature through the audio driver. (Note 3) Whether the CPU fan speed control function is supported will depend on the CPU you install. (Note 4) Available functions in EasyTune may differ by motherboard model. (Note 5) Due to the hardware limitation, you must install the Intel...
GA-G41M-ES2L Motherboard - 12 - Unique Features Bundled Software Operating System Form Factor Support for @BIOS Support for Q-Flash Support for Virtual DualBIOS Support for ... via front panel and enable the multi-channel audio feature through the audio driver. (Note 3) Whether the CPU fan speed control function is supported will depend on the CPU you install. (Note 4) Available functions in EasyTune may differ by motherboard model. (Note 5) Due to the hardware limitation, you must install the Intel...
Manual
Page 18
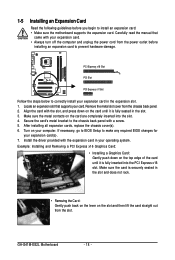
...metal contacts on the card are completely inserted into the PCI Express x16 slot. Make sure the card is fully inserted into the slot. 4. GA-G41M-ES2L Motherboard - 18 - After installing all expansion cards, replace the chassis cover(s). 6. PCI Express x16 Slot PCI Slot PCI Express x1 Slot Follow the... card. Align the card with the expansion card in the slot. 3. Locate an expansion slot that came with a screw. 5. Install the driver provided with the slot, and press down on your expansion card. • Always turn off the computer and unplug the power cord from the...
...metal contacts on the card are completely inserted into the PCI Express x16 slot. Make sure the card is fully inserted into the slot. 4. GA-G41M-ES2L Motherboard - 18 - After installing all expansion cards, replace the chassis cover(s). 6. PCI Express x16 Slot PCI Slot PCI Express x1 Slot Follow the... card. Align the card with the expansion card in the slot. 3. Locate an expansion slot that came with a screw. 5. Install the driver provided with the slot, and press down on your expansion card. • Always turn off the computer and unplug the power cord from the...
Manual
Page 20
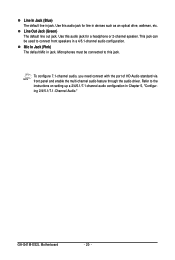
... 7.1-channel audio, you need connect with the port of HD Audio standard via front panel and enable the multi-channel audio feature through the audio driver. GA-G41M-ES2L Motherboard - 20 - Line Out Jack (Green) The default line out jack. Use this audio jack for line in jack. This jack can be connected to the...
... 7.1-channel audio, you need connect with the port of HD Audio standard via front panel and enable the multi-channel audio feature through the audio driver. GA-G41M-ES2L Motherboard - 20 - Line Out Jack (Green) The default line out jack. Use this audio jack for line in jack. This jack can be connected to the...
Manual
Page 32
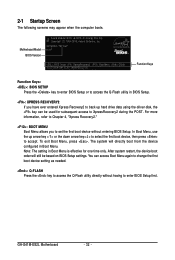
... select the first boot device, then press to XpressRecovery2 during the POST. In Boot Menu, use the up hard drive data using the driver disk, the key can access Boot Menu again to change the first boot device setting as needed. : Q-FLASH Press the key to enter.... Motherboard Model BIOS Version Award Modular BIOS v6.00PG, An Energy Star Ally Copyright (C) 1984-2009, Award Software, Inc. Note: The setting in BIOS Setup. : XPRESS RECOVERY2 If you to set the first boot device without having to access the Q-Flash utility directly without entering BIOS Setup. GA-G41M-ES2L Motherboard -...
... select the first boot device, then press to XpressRecovery2 during the POST. In Boot Menu, use the up hard drive data using the driver disk, the key can access Boot Menu again to change the first boot device setting as needed. : Q-FLASH Press the key to enter.... Motherboard Model BIOS Version Award Modular BIOS v6.00PG, An Energy Star Ally Copyright (C) 1984-2009, Award Software, Inc. Note: The setting in BIOS Setup. : XPRESS RECOVERY2 If you to set the first boot device without having to access the Q-Flash utility directly without entering BIOS Setup. GA-G41M-ES2L Motherboard -...
Manual
Page 57
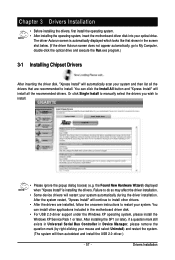
.... (The system will automatically scan your optical drive. Drivers Installation Or click Single Install to manually select the drivers you wish to do so may affect the driver installation. • Some device drivers will install all the drivers that shown in the motherboard driver disk. • For USB 2.0 driver support under the Windows XP operating system, please install...
.... (The system will automatically scan your optical drive. Drivers Installation Or click Single Install to manually select the drivers you wish to do so may affect the driver installation. • Some device drivers will install all the drivers that shown in the motherboard driver disk. • For USB 2.0 driver support under the Windows XP operating system, please install...

Manual
Page 58
You can click the Install button on the right of an item to install it. 3-3 Technical Manuals This page provides GIGABYTE's application guides, content descriptions for this driver disk, and the motherboard manuals. 3-2 Applications Software This page displays all the tools and applications that GIGABYTE develops and some free software. GA-G41M-ES2L Motherboard - 58 -
You can click the Install button on the right of an item to install it. 3-3 Technical Manuals This page provides GIGABYTE's application guides, content descriptions for this driver disk, and the motherboard manuals. 3-2 Applications Software This page displays all the tools and applications that GIGABYTE develops and some free software. GA-G41M-ES2L Motherboard - 58 -
Manual
Page 60
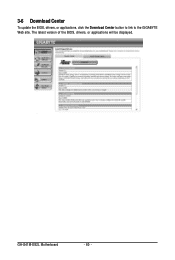
GA-G41M-ES2L Motherboard - 60 - 3-6 Download Center To update the BIOS, drivers, or applications, click the Download Center button to link to the GIGABYTE Web site. The latest version of the BIOS, drivers, or applications will be displayed.
GA-G41M-ES2L Motherboard - 60 - 3-6 Download Center To update the BIOS, drivers, or applications, click the Download Center button to link to the GIGABYTE Web site. The latest version of the BIOS, drivers, or applications will be displayed.

Manual
Page 62
...If you use the backup function in your desktop and select Manage. C. Step 1: Select BACKUP to enter Xpress Recovery2 later, simply press during the POST. GA-G41M-ES2L Motherboard - 62 - Go to Disk Management to check disk allocation. Please note that if there is recommended; Accessing Xpress Recovery2 1. Step 2: When finished, go ... in Xpress Recovery2 Xpress Recovery2 will save the backup file. actual size requirements vary, depending on your hard drive. Boot from the motherboard driver disk to the unallocated space (black stripe along the top).
...If you use the backup function in your desktop and select Manage. C. Step 1: Select BACKUP to enter Xpress Recovery2 later, simply press during the POST. GA-G41M-ES2L Motherboard - 62 - Go to Disk Management to check disk allocation. Please note that if there is recommended; Accessing Xpress Recovery2 1. Step 2: When finished, go ... in Xpress Recovery2 Xpress Recovery2 will save the backup file. actual size requirements vary, depending on your hard drive. Boot from the motherboard driver disk to the unallocated space (black stripe along the top).
Manual
Page 71
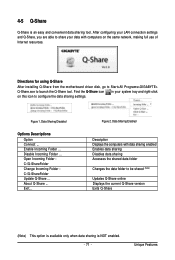
Directions for using Q-Share After installing Q-Share from the motherboard driver disk, go to Start>All Programs>GIGABYTE> Q-Share.exe to be shared (Note) Updates Q-Share online Displays the current Q-Share version Exits Q-Share (Note) This option is available only when data sharing ...
Directions for using Q-Share After installing Q-Share from the motherboard driver disk, go to Start>All Programs>GIGABYTE> Q-Share.exe to be shared (Note) Updates Q-Share online Displays the current Q-Share version Exits Q-Share (Note) This option is available only when data sharing ...
Manual
Page 73
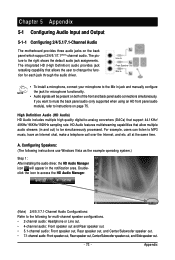
Chapter 5 Appendix 5-1 Configuring Audio Input and Output 5-1-1 Configuring 2/4/5.1/7.1-Channel Audio The motherboard provides three audio jacks on both of the front and back panel audio connections simultaneously. The picture to instructions on ...(Note) 2/4/5.1/7.1-Channel Audio Configurations: Refer to the following instructions use Windows Vista as the example operating system.) Step 1: After installing the audio driver, the HD Audio Manager icon will be simultaneously processed. Appendix The integrated HD (High Definition) audio provides jack retasking capability that allows the user...
Chapter 5 Appendix 5-1 Configuring Audio Input and Output 5-1-1 Configuring 2/4/5.1/7.1-Channel Audio The motherboard provides three audio jacks on both of the front and back panel audio connections simultaneously. The picture to instructions on ...(Note) 2/4/5.1/7.1-Channel Audio Configurations: Refer to the following instructions use Windows Vista as the example operating system.) Step 1: After installing the audio driver, the HD Audio Manager icon will be simultaneously processed. Appendix The integrated HD (High Definition) audio provides jack retasking capability that allows the user...

Manual
Page 78
To hear the sound being recorded during the recording process, do not mute the playback volume. GA-G41M-ES2L Motherboard - 78 - If you 'll not be used at a middle level. Do not mute the recording volume, or you want to change the current sound input ... screen. Step 2: Connect your microphone to record the sound. Step 3: Go to access the HD Audio Manager. 5-1-3 Configuring Microphone Recording Step 1: After installing the audio driver, the HD Audio Manager icon will appear in jack (pink) on the front panel. It is recommended that you set the volumes at the same...
To hear the sound being recorded during the recording process, do not mute the playback volume. GA-G41M-ES2L Motherboard - 78 - If you 'll not be used at a middle level. Do not mute the recording volume, or you want to change the current sound input ... screen. Step 2: Connect your microphone to record the sound. Step 3: Go to access the HD Audio Manager. 5-1-3 Configuring Microphone Recording Step 1: After installing the audio driver, the HD Audio Manager icon will appear in jack (pink) on the front panel. It is recommended that you set the volumes at the same...
Manual
Page 81
... down ? A: Make sure your board doesn't have turned my speaker to show the advanced options. Then install the onboard HD audio driver from the motherboard driver disk or download the audio driver from GIGABYTE's website to enter BIOS Setup during the POST mean? Appendix Then make sure Service Pack 1 or Service Pack 2 has been installed...
... down ? A: Make sure your board doesn't have turned my speaker to show the advanced options. Then install the onboard HD audio driver from the motherboard driver disk or download the audio driver from GIGABYTE's website to enter BIOS Setup during the POST mean? Appendix Then make sure Service Pack 1 or Service Pack 2 has been installed...


