
Manual
Page 3
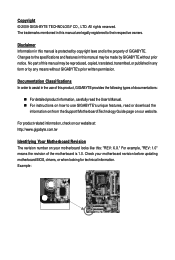
... product-related information, check on our website at: http://www.gigabyte.com.tw Identifying Your Motherboard Revision The revision number on your motherboard revision before updating motherboard BIOS, drivers, or when looking for technical information. Example: All rights reserved. Disclaimer Information in this manual may be made by copyright laws and is...
... product-related information, check on our website at: http://www.gigabyte.com.tw Identifying Your Motherboard Revision The revision number on your motherboard revision before updating motherboard BIOS, drivers, or when looking for technical information. Example: All rights reserved. Disclaimer Information in this manual may be made by copyright laws and is...
Manual
Page 5
... 57 3-1 Installing Chipset Drivers 57 3-2 Applications Software 58 3-3 Technical Manuals 58 3-4 Contact ...59 3-5 System ...59 3-6 Download Center 60 Chapter 4 Unique Features 61 4-1 Xpress Recovery2 61 4-2 BIOS Update Utilities 64 4-2-1 ...
... 57 3-1 Installing Chipset Drivers 57 3-2 Applications Software 58 3-3 Technical Manuals 58 3-4 Contact ...59 3-5 System ...59 3-6 Download Center 60 Chapter 4 Unique Features 61 4-1 Xpress Recovery2 61 4-2 BIOS Update Utilities 64 4-2-1 ...

Manual
Page 6
The box contents are for reference only. Optional Items 2-port USB 2.0 bracket (Part No. 12CR1-1UB030-5*R) 2-port SATA power cable (Part No. 12CF1-2SERPW-0*R) S/PDIF in and out cable (Part No. 12CR1-1SPINO-1*R) COM port cable (Part No. 12CF1-1CM001-3*R) - 6 - Box Contents GA-G41M-ES2L motherboard Motherboard driver disk User's Manual One IDE cable Two SATA 3Gb/s cables I/O Shield • The box contents above are subject to change without notice. • The motherboard image is for reference only and the actual items shall depend on the product package you obtain.
The box contents are for reference only. Optional Items 2-port USB 2.0 bracket (Part No. 12CR1-1UB030-5*R) 2-port SATA power cable (Part No. 12CF1-2SERPW-0*R) S/PDIF in and out cable (Part No. 12CR1-1SPINO-1*R) COM port cable (Part No. 12CF1-1CM001-3*R) - 6 - Box Contents GA-G41M-ES2L motherboard Motherboard driver disk User's Manual One IDE cable Two SATA 3Gb/s cables I/O Shield • The box contents above are subject to change without notice. • The motherboard image is for reference only and the actual items shall depend on the product package you obtain.
Manual
Page 12
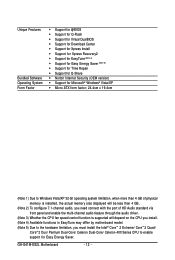
... 7.1-channel audio, you need connect with the port of HD Audio standard via front panel and enable the multi-channel audio feature through the audio driver. (Note 3) Whether the CPU fan speed control function is supported will depend on the CPU you install. (Note 4) Available functions in EasyTune may differ by... Intel® CoreTM 2 Extreme/ CoreTM 2 Quad/ CoreTM 2 Duo/ Pentium Dual-Core/ Celeron Dual-Core/ Celeron 400 Series CPU to enable support for Easy Energy Saver. GA-G41M-ES2L Motherboard - 12 -
... 7.1-channel audio, you need connect with the port of HD Audio standard via front panel and enable the multi-channel audio feature through the audio driver. (Note 3) Whether the CPU fan speed control function is supported will depend on the CPU you install. (Note 4) Available functions in EasyTune may differ by... Intel® CoreTM 2 Extreme/ CoreTM 2 Quad/ CoreTM 2 Duo/ Pentium Dual-Core/ Celeron Dual-Core/ Celeron 400 Series CPU to enable support for Easy Energy Saver. GA-G41M-ES2L Motherboard - 12 -
Manual
Page 18
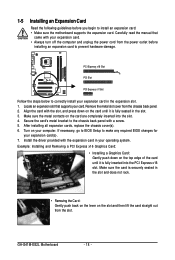
... the slot. 4. Remove the metal slot cover from the slot. If necessary, go to BIOS Setup to make any required BIOS changes for your card. GA-G41M-ES2L Motherboard - 18 - Locate an expansion slot that came with the slot, and press down on your operating system. 1-5 Installing an Expansion Card Read the following... expansion card to prevent hardware damage. Secure the card's metal bracket to the chassis back panel with the expansion card in the slot. 3. Install the driver provided with a screw. 5. Make sure the card is fully seated in your computer.
... the slot. 4. Remove the metal slot cover from the slot. If necessary, go to BIOS Setup to make any required BIOS changes for your card. GA-G41M-ES2L Motherboard - 18 - Locate an expansion slot that came with the slot, and press down on your operating system. 1-5 Installing an Expansion Card Read the following... expansion card to prevent hardware damage. Secure the card's metal bracket to the chassis back panel with the expansion card in the slot. 3. Install the driver provided with a screw. 5. Make sure the card is fully seated in your computer.
Manual
Page 20
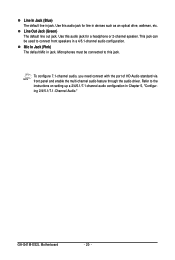
... 7.1-channel audio, you need connect with the port of HD Audio standard via front panel and enable the multi-channel audio feature through the audio driver. GA-G41M-ES2L Motherboard - 20 - Line Out Jack (Green) The default line out jack. Mic In Jack (Pink) The default Mic in jack. Refer to this audio jack...
... 7.1-channel audio, you need connect with the port of HD Audio standard via front panel and enable the multi-channel audio feature through the audio driver. GA-G41M-ES2L Motherboard - 20 - Line Out Jack (Green) The default line out jack. Mic In Jack (Pink) The default Mic in jack. Refer to this audio jack...
Manual
Page 32
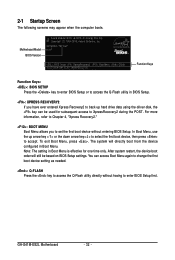
... up hard drive data using the driver disk, the key can access Boot Menu again to change the first boot device setting as needed. : Q-FLASH Press the key to access the Q-Flash utility directly without having to set the first boot device without entering BIOS Setup. GA-G41M-ES2L Motherboard - 32 - 2-1 Startup Screen The...
... up hard drive data using the driver disk, the key can access Boot Menu again to change the first boot device setting as needed. : Q-FLASH Press the key to access the Q-Flash utility directly without having to set the first boot device without entering BIOS Setup. GA-G41M-ES2L Motherboard - 32 - 2-1 Startup Screen The...
Manual
Page 57
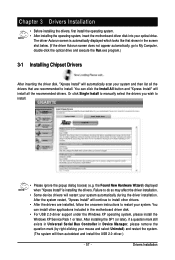
... All button and "Xpress Install" will then autodetect and install the USB 2.0 driver.) - 57 - Drivers Installation The driver Autorun screen is installing the drivers. You can install other drivers. • After the drivers are recommended to My Computer, double-click the optical drive and execute the Run... scan your mouse and select Uninstall) and restart the system. (The system will install all the drivers that shown in the motherboard driver disk. • For USB 2.0 driver support under the Windows XP operating system, please install the Windows XP Service Pack 1 or later....
... All button and "Xpress Install" will then autodetect and install the USB 2.0 driver.) - 57 - Drivers Installation The driver Autorun screen is installing the drivers. You can install other drivers. • After the drivers are recommended to My Computer, double-click the optical drive and execute the Run... scan your mouse and select Uninstall) and restart the system. (The system will install all the drivers that shown in the motherboard driver disk. • For USB 2.0 driver support under the Windows XP operating system, please install the Windows XP Service Pack 1 or later....

Manual
Page 58
3-2 Applications Software This page displays all the tools and applications that GIGABYTE develops and some free software. GA-G41M-ES2L Motherboard - 58 - You can click the Install button on the right of an item to install it. 3-3 Technical Manuals This page provides GIGABYTE's application guides, content descriptions for this driver disk, and the motherboard manuals.
3-2 Applications Software This page displays all the tools and applications that GIGABYTE develops and some free software. GA-G41M-ES2L Motherboard - 58 - You can click the Install button on the right of an item to install it. 3-3 Technical Manuals This page provides GIGABYTE's application guides, content descriptions for this driver disk, and the motherboard manuals.

Manual
Page 59
Drivers Installation 3-4 Contact For the detailed contact information of the GIGABYTE Taiwan headquarter or worldwide branch offices, click the URL on this page to link to the GIGABYTE Website. 3-5 System This page provides the basic system information. - 59 -
Drivers Installation 3-4 Contact For the detailed contact information of the GIGABYTE Taiwan headquarter or worldwide branch offices, click the URL on this page to link to the GIGABYTE Website. 3-5 System This page provides the basic system information. - 59 -
Manual
Page 60
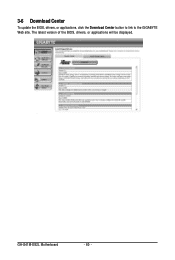
GA-G41M-ES2L Motherboard - 60 - The latest version of the BIOS, drivers, or applications will be displayed. 3-6 Download Center To update the BIOS, drivers, or applications, click the Download Center button to link to the GIGABYTE Web site.
GA-G41M-ES2L Motherboard - 60 - The latest version of the BIOS, drivers, or applications will be displayed. 3-6 Download Center To update the BIOS, drivers, or applications, click the Download Center button to link to the GIGABYTE Web site.

Manual
Page 61
... back up /restore the first physical hard drive that allows you to quickly compress and back up your system soon after the operating system and drivers are attached to boot from the Windows Vista setup disk.
... back up /restore the first physical hard drive that allows you to quickly compress and back up your system soon after the operating system and drivers are attached to boot from the Windows Vista setup disk.

Manual
Page 62
... the unallocated space (black stripe along the top). Boot from the motherboard driver disk to check disk allocation. After you see the following message: Press any key to startup Xpress Recovery2 , press any key to store the backup image file. GA-G41M-ES2L Motherboard - 62 - When you use the backup function in Xpress Recovery2...
... the unallocated space (black stripe along the top). Boot from the motherboard driver disk to check disk allocation. After you see the following message: Press any key to startup Xpress Recovery2 , press any key to store the backup image file. GA-G41M-ES2L Motherboard - 62 - When you use the backup function in Xpress Recovery2...
Manual
Page 71
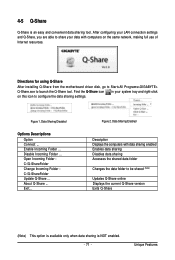
... Enabled Description Displays the computers with computers on this icon to launch the Q-Share tool. Directions for using Q-Share After installing Q-Share from the motherboard driver disk, go to Start>All Programs>GIGABYTE> Q-Share.exe to configure the data sharing settings. Figure 1.
... Enabled Description Displays the computers with computers on this icon to launch the Q-Share tool. Directions for using Q-Share After installing Q-Share from the motherboard driver disk, go to Start>All Programs>GIGABYTE> Q-Share.exe to configure the data sharing settings. Figure 1.
Manual
Page 73
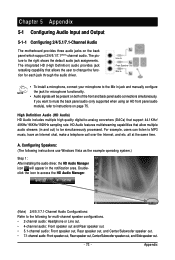
... and back panel audio connections simultaneously. all at the same time. A. Configuring Speakers: (The following for each jack through the audio driver. High Definition Audio (HD Audio) HD Audio includes multiple high quality digital-to MP3 music, have an Internet chat, make a telephone...Note)-channel audio. The picture to the following instructions use Windows Vista as the example operating system.) Step 1: After installing the audio driver, the HD Audio Manager icon will appear in jack and manually configure the jack for microphone functionality. • Audio signals will be...
... and back panel audio connections simultaneously. all at the same time. A. Configuring Speakers: (The following for each jack through the audio driver. High Definition Audio (HD Audio) HD Audio includes multiple high quality digital-to MP3 music, have an Internet chat, make a telephone...Note)-channel audio. The picture to the following instructions use Windows Vista as the example operating system.) Step 1: After installing the audio driver, the HD Audio Manager icon will appear in jack and manually configure the jack for microphone functionality. • Audio signals will be...

Manual
Page 78
... you 'll not be used at a middle level. GA-G41M-ES2L Motherboard - 78 - Step 2: Connect your microphone to microphone, right-click on Microphone and select Set Default Device. Step 3: Go to access the HD Audio Manager. 5-1-3 Configuring Microphone Recording Step 1: After installing the audio driver, the HD Audio Manager icon will appear in jack...
... you 'll not be used at a middle level. GA-G41M-ES2L Motherboard - 78 - Step 2: Connect your microphone to microphone, right-click on Microphone and select Set Default Device. Step 3: Go to access the HD Audio Manager. 5-1-3 Configuring Microphone Recording Step 1: After installing the audio driver, the HD Audio Manager icon will appear in jack...
Manual
Page 81
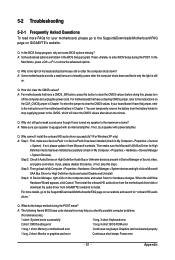
...please go back to the maximum volume? If not, try a speaker with an internal amplifier. If not, please update it from GIGABYTE's website to the instructions on High Definition Audio Bus or Unknown device is equipped with power/amplifier. If yes, please disable this ...do I have a clearing CMOS jumper, refer to install. For more FAQs for "onboard HD audio driver." A: Some motherboards provide a small amount of my keyboard/optical mouse still on GIGABYTE's website. Press to the instructions on the motherboard battery in the BIOS Setup program. For motherboards that...
...please go back to the maximum volume? If not, try a speaker with an internal amplifier. If not, please update it from GIGABYTE's website to the instructions on High Definition Audio Bus or Unknown device is equipped with power/amplifier. If yes, please disable this ...do I have a clearing CMOS jumper, refer to install. For more FAQs for "onboard HD audio driver." A: Some motherboards provide a small amount of my keyboard/optical mouse still on GIGABYTE's website. Press to the instructions on the motherboard battery in the BIOS Setup program. For motherboards that...


