
Manual
Page 5
... 57 3-1 Installing Chipset Drivers 57 3-2 Applications Software 58 3-3 Technical Manuals 58 3-4 Contact ...59 3-5 System ...59 3-6 Download Center 60 Chapter 4 Unique Features 61 4-1 Xpress Recovery2 ... Utility 67 4-3 EasyTune 6 ...68 4-4 Easy Energy Saver 69 4-5 Q-Share ...71 4-6 Time Repair ...72 Chapter 5 Appendix ...73 5-1 Configuring Audio Input and Output 73 5-1-1 Configuring 2/4/5.1/7.1-Channel Audio 73 5-1-2 Configuring S/PDIF In/Out 76 5-1-3 Configuring Microphone Recording 78 5-1-4 Using the Sound Recorder 80 5-2 Troubleshooting 81 5-2-1 Frequently Asked Questions 81 ...
... 57 3-1 Installing Chipset Drivers 57 3-2 Applications Software 58 3-3 Technical Manuals 58 3-4 Contact ...59 3-5 System ...59 3-6 Download Center 60 Chapter 4 Unique Features 61 4-1 Xpress Recovery2 ... Utility 67 4-3 EasyTune 6 ...68 4-4 Easy Energy Saver 69 4-5 Q-Share ...71 4-6 Time Repair ...72 Chapter 5 Appendix ...73 5-1 Configuring Audio Input and Output 73 5-1-1 Configuring 2/4/5.1/7.1-Channel Audio 73 5-1-2 Configuring S/PDIF In/Out 76 5-1-3 Configuring Microphone Recording 78 5-1-4 Using the Sound Recorder 80 5-2 Troubleshooting 81 5-2-1 Frequently Asked Questions 81 ...
Manual
Page 12
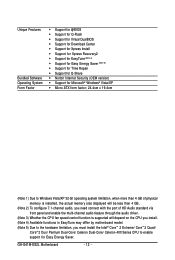
... installed, the actual memory size displayed will be less than 4 GB. (Note 2) To configure 7.1-channel audio, you need connect with the port of HD Audio standard via front panel and enable the multi-channel audio feature through the audio driver. (Note 3) Whether the CPU fan speed control function is supported will depend on the CPU... Intel® CoreTM 2 Extreme/ CoreTM 2 Quad/ CoreTM 2 Duo/ Pentium Dual-Core/ Celeron Dual-Core/ Celeron 400 Series CPU to enable support for Easy Energy Saver. GA-G41M-ES2L Motherboard - 12 -
... installed, the actual memory size displayed will be less than 4 GB. (Note 2) To configure 7.1-channel audio, you need connect with the port of HD Audio standard via front panel and enable the multi-channel audio feature through the audio driver. (Note 3) Whether the CPU fan speed control function is supported will depend on the CPU... Intel® CoreTM 2 Extreme/ CoreTM 2 Quad/ CoreTM 2 Duo/ Pentium Dual-Core/ Celeron Dual-Core/ Celeron 400 Series CPU to enable support for Easy Energy Saver. GA-G41M-ES2L Motherboard - 12 -
Manual
Page 20
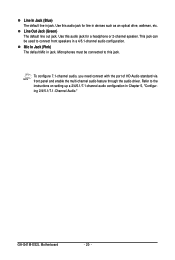
.... Refer to connect front speakers in a 4/5.1-channel audio configuration. Use this audio jack for a headphone or 2-channel speaker. To configure 7.1-channel audio, you need connect with the port of HD Audio standard via front panel and enable the multi-channel audio feature through the audio driver. GA-G41M-ES2L Motherboard - 20 - Use this audio jack for line in Chapter 5, "Configuring 2/4/5.1/7.1-Channel...
.... Refer to connect front speakers in a 4/5.1-channel audio configuration. Use this audio jack for a headphone or 2-channel speaker. To configure 7.1-channel audio, you need connect with the port of HD Audio standard via front panel and enable the multi-channel audio feature through the audio driver. GA-G41M-ES2L Motherboard - 20 - Use this audio jack for line in Chapter 5, "Configuring 2/4/5.1/7.1-Channel...
Manual
Page 73
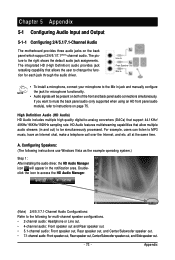
... jack and manually configure the jack for microphone functionality. • Audio signals will be simultaneously processed. Chapter 5 Appendix 5-1 Configuring Audio Input and Output 5-1-1 Configuring 2/4/5.1/7.1-Channel Audio The motherboard provides three audio jacks on page 75. Configuring Speakers: (The following for each jack through the audio driver. Line In Front Speaker Out Mic In • To install...
... jack and manually configure the jack for microphone functionality. • Audio signals will be simultaneously processed. Chapter 5 Appendix 5-1 Configuring Audio Input and Output 5-1-1 Configuring 2/4/5.1/7.1-Channel Audio The motherboard provides three audio jacks on page 75. Configuring Speakers: (The following for each jack through the audio driver. Line In Front Speaker Out Mic In • To install...

Manual
Page 78
5-1-3 Configuring Microphone Recording Step 1: After installing the audio driver, the HD Audio Manager icon will appear in jack (pink) on Microphone and select Set Default Device. Step 3: Go to access the HD Audio Manager. To hear the sound being recorded during the recording process, do not mute the playback ... on the back panel or the Mic in the notification area. It is recommended that you 'll not be used at a middle level. GA-G41M-ES2L Motherboard - 78 - Step 2: Connect your microphone to record the sound. Do not mute the recording volume, or you set the volumes at ...
5-1-3 Configuring Microphone Recording Step 1: After installing the audio driver, the HD Audio Manager icon will appear in jack (pink) on Microphone and select Set Default Device. Step 3: Go to access the HD Audio Manager. To hear the sound being recorded during the recording process, do not mute the playback ... on the back panel or the Mic in the notification area. It is recommended that you 'll not be used at a middle level. GA-G41M-ES2L Motherboard - 78 - Step 2: Connect your microphone to record the sound. Do not mute the recording volume, or you set the volumes at ...
Manual
Page 81
... in Chapter 1. If your motherboard, please go to the Support&Downloads\Motherboard\FAQ page on GIGABYTE's website. Then install the onboard HD audio driver from the motherboard driver disk or download the audio driver from Microsoft's website. Q: Why do I install the onboard HD audio driver successfully? (For Windows XP only) A: Step 1: First, make sure the Microsoft UAA Bus...
... in Chapter 1. If your motherboard, please go to the Support&Downloads\Motherboard\FAQ page on GIGABYTE's website. Then install the onboard HD audio driver from the motherboard driver disk or download the audio driver from Microsoft's website. Q: Why do I install the onboard HD audio driver successfully? (For Windows XP only) A: Step 1: First, make sure the Microsoft UAA Bus...


