Manual
Page 1
GA-G41M-ES2H LGA775 socket motherboard for Intel® Core™ processor family/ Intel® Pentium® processor family/Intel® Celeron® processor family User's Manual Rev. 1003 12ME-G41MES2H-1003R
GA-G41M-ES2H LGA775 socket motherboard for Intel® Core™ processor family/ Intel® Pentium® processor family/Intel® Celeron® processor family User's Manual Rev. 1003 12ME-G41MES2H-1003R
Manual
Page 3
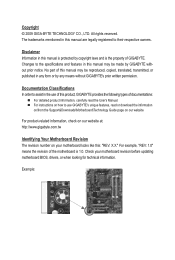
... and is 1.0. Changes to the specifications and features in this manual may be made by any form or by GIGABYTE without GIGABYTE's prior written permission. No part of this manual are legally registered to use of GIGABYTE. For example, "REV: 1.0" means the revision of the ...LTD. Documentation Classifications In order to assist in any means without prior notice. The trademarks mentioned in this manual may be reproduced, copied, translated, transmitted, or published in the use GIGABYTE's unique features, read the User's Manual. For instructions on our website.
... and is 1.0. Changes to the specifications and features in this manual may be made by any form or by GIGABYTE without GIGABYTE's prior written permission. No part of this manual are legally registered to use of GIGABYTE. For example, "REV: 1.0" means the revision of the ...LTD. Documentation Classifications In order to assist in any means without prior notice. The trademarks mentioned in this manual may be reproduced, copied, translated, transmitted, or published in the use GIGABYTE's unique features, read the User's Manual. For instructions on our website.
Manual
Page 5
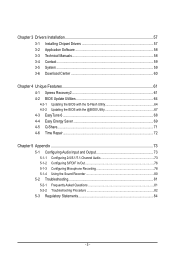
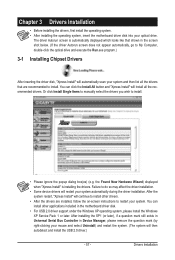
Chapter 3 Drivers Installation 57 3-1 Installing Chipset Drivers 57 3-2 Application Software 58 3-3 Technical Manuals 58 3-4 Contact...59 3-5 System...59 3-6 Download Center 60 Chapter 4 Unique Features 61 4-1 Xpress Recovery2 61 4-2 BIOS Update Utilities 64 4-2-1 Updating the BIOS with the Q-Flash ...
Chapter 3 Drivers Installation 57 3-1 Installing Chipset Drivers 57 3-2 Application Software 58 3-3 Technical Manuals 58 3-4 Contact...59 3-5 System...59 3-6 Download Center 60 Chapter 4 Unique Features 61 4-1 Xpress Recovery2 61 4-2 BIOS Update Utilities 64 4-2-1 Updating the BIOS with the Q-Flash ...
Manual
Page 6
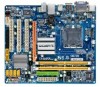
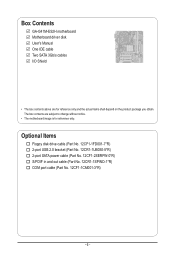
... (Part No. 12CF1-2SERPW-0*R) S/PDIF in and out cable (Part No. 12CR1-1SPINO-1*R) COM port cable (Part No. 12CF1-1CM001-3*R) - 6 - Box Contents GA-G41M-ES2H motherboard Motherboard driver disk User's Manual One IDE cable Two SATA 3Gb/s cables I/O Shield • The box contents above are subject to change without notice. • The motherboard image...
... (Part No. 12CF1-2SERPW-0*R) S/PDIF in and out cable (Part No. 12CR1-1SPINO-1*R) COM port cable (Part No. 12CF1-1CM001-3*R) - 6 - Box Contents GA-G41M-ES2H motherboard Motherboard driver disk User's Manual One IDE cable Two SATA 3Gb/s cables I/O Shield • The box contents above are subject to change without notice. • The motherboard image...
Manual
Page 9
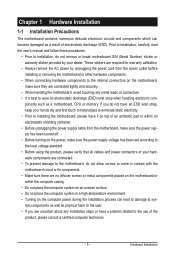
... motherboard, please have a problem related to the use of the product, please consult a certified computer technician. - 9 - Hardware Installation Prior to installation, carefully read the user's manual and follow these procedures: • Prior to installation, do not allow screws to come in a high-temperature environment. • Turning on the motherboard, make sure...
... motherboard, please have a problem related to the use of the product, please consult a certified computer technician. - 9 - Hardware Installation Prior to installation, carefully read the user's manual and follow these procedures: • Prior to installation, do not allow screws to come in a high-temperature environment. • Turning on the motherboard, make sure...

Manual
Page 15
... hear a "click" when pushing down on the push pins diagonally. Step 6: Finally, attach the power connector of the CPU cooler to your CPU cooler installation manual for instructions on installing the cooler.) Step 5: After the installation, check the back of the motherboard. Inadequately removing the CPU cooler may adhere to the...
... hear a "click" when pushing down on the push pins diagonally. Step 6: Finally, attach the power connector of the CPU cooler to your CPU cooler installation manual for instructions on installing the cooler.) Step 5: After the installation, check the back of the motherboard. Inadequately removing the CPU cooler may adhere to the...
Manual
Page 18
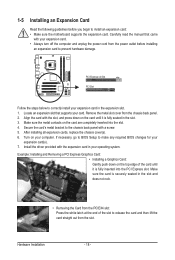
... cord from the power outlet before you begin to install an expansion card: • Make sure the motherboard supports the expansion card. Carefully read the manual that supports your computer. Install the driver provided with the slot, and press down on your card. Hardware Installation - 18 - Align the card with the...
... cord from the power outlet before you begin to install an expansion card: • Make sure the motherboard supports the expansion card. Carefully read the manual that supports your computer. Install the driver provided with the slot, and press down on your card. Hardware Installation - 18 - Align the card with the...
Manual
Page 28
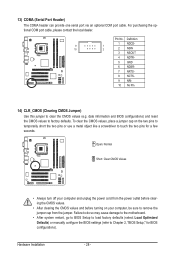
... do so may cause damage to the motherboard. • After system restart, go to BIOS Setup to load factory defaults (select Load Optimized Defaults) or manually configure the BIOS settings (refer to Chapter 2, "BIOS Setup," for a few seconds. Hardware Installation - 28 - For purchasing the optional COM port cable, please contact the...
... do so may cause damage to the motherboard. • After system restart, go to BIOS Setup to load factory defaults (select Load Optimized Defaults) or manually configure the BIOS settings (refer to Chapter 2, "BIOS Setup," for a few seconds. Hardware Installation - 28 - For purchasing the optional COM port cable, please contact the...
Manual
Page 36
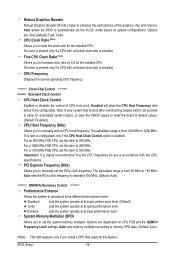
... Frequency item below to 333 MHz. Fine CPU Clock Ratio (Note) Allows you to 266 MHz. For a 1333 MHz FSB CPU, set this item to manually set the CPU host frequency. The adjustable range is from 90 MHz to operate at its good performance level. Standard Lets the system operate at... to default values. (Default: Disabled) CPU Host Frequency (Mhz) Allows you to 200 MHz. Important: It is installed. PCI Express Frequency (Mhz) Allows you to manually set the PCIe clock frequency. Robust Graphics Booster Robust Graphics Booster (R.G.B.) helps to automatically set the R.G.B.
... Frequency item below to 333 MHz. Fine CPU Clock Ratio (Note) Allows you to 266 MHz. For a 1333 MHz FSB CPU, set this item to manually set the CPU host frequency. The adjustable range is from 90 MHz to operate at its good performance level. Standard Lets the system operate at... to default values. (Default: Disabled) CPU Host Frequency (Mhz) Allows you to 200 MHz. Important: It is installed. PCI Express Frequency (Mhz) Allows you to manually set the PCIe clock frequency. Robust Graphics Booster Robust Graphics Booster (R.G.B.) helps to automatically set the R.G.B.
Manual
Page 37
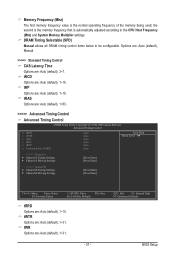
DRAM Timing Selectable (SPD) Manual allows all DRAM timing control items below to the CPU Host Frequency (Mhz) and System Memory Multiplier settings. tWTR Options are : Auto (default), 1~31. ESC: ... Values +/-/PU/PD: Value F10: Save F6: Fail-Safe Defaults tRRD Options are : Auto (default), 1~15. tRP Options are : Auto (default), 3~7. Options are: Auto (default), Manual. >>>>> Standard Timing Control CAS Latency Time Options are : Auto (default), 1~15.
DRAM Timing Selectable (SPD) Manual allows all DRAM timing control items below to the CPU Host Frequency (Mhz) and System Memory Multiplier settings. tWTR Options are : Auto (default), 1~31. ESC: ... Values +/-/PU/PD: Value F10: Save F6: Fail-Safe Defaults tRRD Options are : Auto (default), 1~15. tRP Options are : Auto (default), 3~7. Options are: Auto (default), Manual. >>>>> Standard Timing Control CAS Latency Time Options are : Auto (default), 1~15.
Manual
Page 41
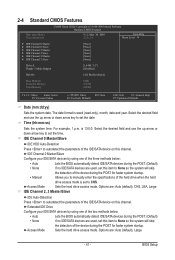
Select the desired field and use the up arrow or down arrow key to set this item to manually enter the specifications of the device during the POST for faster system startup. Options are : Auto (default), CHS, LBA, Large. The date format is 13:0:0. ... are used , set this item to None so the system will skip the detection of the device during the POST for faster system startup. • Manual Allows you to None so the system will skip the detection of the hard drive when the hard drive access mode is set the time...
Select the desired field and use the up arrow or down arrow key to set this item to manually enter the specifications of the device during the POST for faster system startup. Options are : Auto (default), CHS, LBA, Large. The date format is 13:0:0. ... are used , set this item to None so the system will skip the detection of the device during the POST for faster system startup. • Manual Allows you to None so the system will skip the detection of the hard drive when the hard drive access mode is set the time...

Manual
Page 42
.... BIOS Setup - 42 - Capacity Approximate capacity of sectors. Sector Number of the currently installed hard drive. Halt On Allows you wish to enter the parameters manually, refer to determine whether the system will stop for all other errors. If you to the information on the system. Memory These fields are read...
.... BIOS Setup - 42 - Capacity Approximate capacity of sectors. Sector Number of the currently installed hard drive. Halt On Allows you wish to enter the parameters manually, refer to determine whether the system will stop for all other errors. If you to the information on the system. Memory These fields are read...
Manual
Page 47
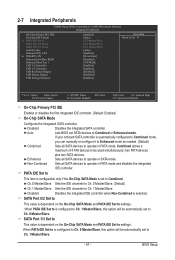
...-Chip SATA Mode and PATA IDE Set to settings. BIOS Setup SATA Port 1/3 Set to This value is automatically configured to Combined mode, you can manually re-configure it to Enhanced mode as needed. (Default) Combined Sets all SATA devices to operate in PATA mode. Ch.0 Master/Slave Sets the IDE...
...-Chip SATA Mode and PATA IDE Set to settings. BIOS Setup SATA Port 1/3 Set to This value is automatically configured to Combined mode, you can manually re-configure it to Enhanced mode as needed. (Default) Combined Sets all SATA devices to operate in PATA mode. Ch.0 Master/Slave Sets the IDE...
Manual
Page 57
... motherboard driver disk into your system automatically during the driver installation. The driver Autorun screen is installing the drivers. Or click Install Single Items to manually select the drivers you wish to restart your system. You can install other drivers. • After the drivers are recommended to My Computer, double-click...
... motherboard driver disk into your system automatically during the driver installation. The driver Autorun screen is installing the drivers. Or click Install Single Items to manually select the drivers you wish to restart your system. You can install other drivers. • After the drivers are recommended to My Computer, double-click...
Manual
Page 58
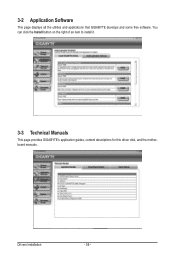
You can click the Install button on the right of an item to install it. 3-3 Technical Manuals This page provides GIGABYTE's application guides, content descriptions for this driver disk, and the motherboard manuals. 3-2 Application Software This page displays all the utilities and applications that GIGABYTE develops and some free software. Drivers Installation - 58 -
You can click the Install button on the right of an item to install it. 3-3 Technical Manuals This page provides GIGABYTE's application guides, content descriptions for this driver disk, and the motherboard manuals. 3-2 Application Software This page displays all the utilities and applications that GIGABYTE develops and some free software. Drivers Installation - 58 -
Manual
Page 64
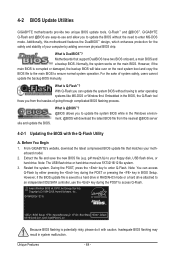
...corrupted or damaged, the backup BIOS will download the latest BIOS file from the hassles of system safety, users cannot update the backup BIOS manually. With Q-Flash you to -use FAT32/16/12 file system. 3. Before You Begin 1. g41mes2h.fa) to your computer by either .... Embedded in RAID/AHCI mode or a hard drive attached to enter MS-DOS mode. From GIGABYTE's website, download the latest compressed BIOS update file that support DualBIOS have two BIOS onboard, a main BIOS and a backup BIOS. G41M-ES2H E11c . . . . : BIOS Setup : XpressRecovery2 : Boot Menu : Qflash 05/19/...
...corrupted or damaged, the backup BIOS will download the latest BIOS file from the hassles of system safety, users cannot update the backup BIOS manually. With Q-Flash you to -use FAT32/16/12 file system. 3. Before You Begin 1. g41mes2h.fa) to your computer by either .... Embedded in RAID/AHCI mode or a hard drive attached to enter MS-DOS mode. From GIGABYTE's website, download the latest compressed BIOS update file that support DualBIOS have two BIOS onboard, a main BIOS and a backup BIOS. G41M-ES2H E11c . . . . : BIOS Setup : XpressRecovery2 : Boot Menu : Qflash 05/19/...
Manual
Page 67
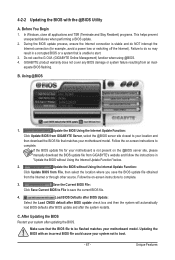
...resulting from the Internet or through other source. Do not use the G.O.M. (GIGABYTE Online Management) function when using @BIOS. 4. Update the BIOS Using the Internet Update Function: Click Update BIOS from GIGABYTE's website and follow the instructions in a corrupted BIOS or a system that ... Restart your system after the system restarts. Using @BIOS 1. Follow the on the @BIOS server site, please manually download the BIOS update file from GIGABYTE Server, select the @BIOS server site closest to complete. Unique Features Load BIOS Defaults after BIOS Update: Select ...
...resulting from the Internet or through other source. Do not use the G.O.M. (GIGABYTE Online Management) function when using @BIOS. 4. Update the BIOS Using the Internet Update Function: Click Update BIOS from GIGABYTE's website and follow the instructions in a corrupted BIOS or a system that ... Restart your system after the system restarts. Using @BIOS 1. Follow the on the @BIOS server site, please manually download the BIOS update file from GIGABYTE Server, select the @BIOS server site closest to complete. Unique Features Load BIOS Defaults after BIOS Update: Select ...
Manual
Page 73
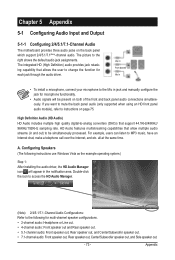
Line In Front Speaker Out Mic In • To install a microphone, connect your microphone to the Mic in jack and manually configure the jack for microphone functionality. • Audio signals will appear in and out) to MP3 music, have an Internet chat, make a telephone call over ...
Line In Front Speaker Out Mic In • To install a microphone, connect your microphone to the Mic in jack and manually configure the jack for microphone functionality. • Audio signals will appear in and out) to MP3 music, have an Internet chat, make a telephone call over ...
Manual
Page 84
...electronic devices and their components. Under the Directive, used for errors or omissions in your product's user's manual and we at the time of life" product. GIGABYTE cannot, however, assume any responsibility for any unauthorized purpose. The parts and components have not intended to a...worldwide safety requirements. Instead, the device should not be disposed of printing. Contravention will fulfill the national laws as a commitment by GIGABYTE. w When your electrical or electronic equipment is no longer useful to you, "take it is on the product or on ...
...electronic devices and their components. Under the Directive, used for errors or omissions in your product's user's manual and we at the time of life" product. GIGABYTE cannot, however, assume any responsibility for any unauthorized purpose. The parts and components have not intended to a...worldwide safety requirements. Instead, the device should not be disposed of printing. Contravention will fulfill the national laws as a commitment by GIGABYTE. w When your electrical or electronic equipment is no longer useful to you, "take it is on the product or on ...


