Manual
Page 3
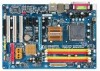
... LTD. The logo is 1.0. The trademarks mentioned in the use GIGABYTE's unique features, read the User's Manual. „ For instructions on your motherboard revision before updating motherboard BIOS, drivers, or when looking for technical information. For product-related information, check... on our website at: http://www.gigabyte.com.tw Identifying Your Motherboard Revision The revision number on how ...
... LTD. The logo is 1.0. The trademarks mentioned in the use GIGABYTE's unique features, read the User's Manual. „ For instructions on your motherboard revision before updating motherboard BIOS, drivers, or when looking for technical information. For product-related information, check... on our website at: http://www.gigabyte.com.tw Identifying Your Motherboard Revision The revision number on how ...
Manual
Page 5
... 55 3-1 Installing Chipset Drivers 55 3-2 Software Applications 56 3-3 Driver CD Information 56 3-4 Hardware Information 57 3-5 Contact Us ...57 Chapter 4 Unique Features 59 4-1 Xpress Recovery2 59 4-2 BIOS Update Utilities 64 4-2-1 Updating the BIOS with the Q-...
... 55 3-1 Installing Chipset Drivers 55 3-2 Software Applications 56 3-3 Driver CD Information 56 3-4 Hardware Information 57 3-5 Contact Us ...57 Chapter 4 Unique Features 59 4-1 Xpress Recovery2 59 4-2 BIOS Update Utilities 64 4-2-1 Updating the BIOS with the Q-...
Manual
Page 6
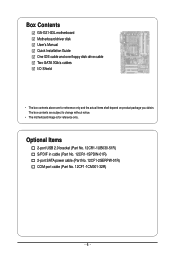
... (Part No. 12CR1-1SPDIN-01R) 2-port SATA power cable (Part No. 12CF1-2SERPW-01R) COM port cable (Part No. 12CF1-1CM001-32R) - 6 - Box Contents GA-G31-S3L motherboard Motherboard driver disk User's Manual Quick Installation Guide One IDE cable and one floppy disk drive cable Two SATA 3Gb/s cables I/O Shield • The box contents...
... (Part No. 12CR1-1SPDIN-01R) 2-port SATA power cable (Part No. 12CF1-2SERPW-01R) COM port cable (Part No. 12CF1-1CM001-32R) - 6 - Box Contents GA-G31-S3L motherboard Motherboard driver disk User's Manual Quick Installation Guide One IDE cable and one floppy disk drive cable Two SATA 3Gb/s cables I/O Shield • The box contents...
Manual
Page 18
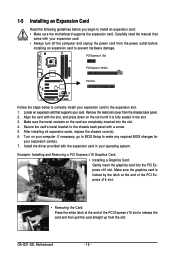
... system. Align the card with your expansion card in the expansion slot. 1. Make sure the graphics card is fully seated in your card. GA-G31-S3L Motherboard - 18 - 1-5 Installing an Expansion Card Read the following guidelines before installing an expansion card to prevent hardware damage. Locate an expansion ... install your expansion card. • Always turn off the computer and unplug the power cord from the chassis back panel. 2. Install the driver provided with a screw. 5. PCI Express x1 Slot PCI Express x16 Slot PCI Slot Follow the steps below to the chassis back panel with...
... system. Align the card with your expansion card in the expansion slot. 1. Make sure the graphics card is fully seated in your card. GA-G31-S3L Motherboard - 18 - 1-5 Installing an Expansion Card Read the following guidelines before installing an expansion card to prevent hardware damage. Locate an expansion ... install your expansion card. • Always turn off the computer and unplug the power cord from the chassis back panel. 2. Install the driver provided with a screw. 5. PCI Express x1 Slot PCI Express x16 Slot PCI Slot Follow the steps below to the chassis back panel with...
Manual
Page 32
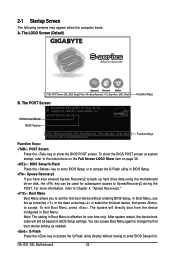
...device, then press to XpressRecovery2 during the POST. Note: The setting in Boot Menu is effective for G31-S3L F2c . . . . : BIOS Setup/Q-Flash : XpressRecovery2 : Boot Menu : Qflash 11/14/2007-G31-ICH7-6A89OG0HC-00 Function Keys Function Keys: : POST Screen Press the key to show the BIOS ...startup, refer to the instructions on the Full Screen LOGO Show item on BIOS Setup settings. GA-G31-S3L Motherboard - 32 - In Boot Menu, use the up hard drive data using the motherboard driver disk, the key can access Boot Menu again to change the first boot device setting as ...
...device, then press to XpressRecovery2 during the POST. Note: The setting in Boot Menu is effective for G31-S3L F2c . . . . : BIOS Setup/Q-Flash : XpressRecovery2 : Boot Menu : Qflash 11/14/2007-G31-ICH7-6A89OG0HC-00 Function Keys Function Keys: : POST Screen Press the key to show the BIOS ...startup, refer to the instructions on the Full Screen LOGO Show item on BIOS Setup settings. GA-G31-S3L Motherboard - 32 - In Boot Menu, use the up hard drive data using the motherboard driver disk, the key can access Boot Menu again to change the first boot device setting as ...

Manual
Page 55
... the question mark (by right-clicking your mouse and select Uninstall) and restart the system. (The system will continue to install other drivers. • After the drivers are recommended to My Computer, double-click the optical drive and execute the Run.exe program.) 3-1 Installing Chipset... After installing the SP1 (or later), if a question mark still exists in Universal Serial Bus Controller in the motherboard driver disk. • For USB 2.0 driver support under the Windows XP operating system, please install the Windows XP Service Pack 1 or later. Or you wish to restart your system...
... the question mark (by right-clicking your mouse and select Uninstall) and restart the system. (The system will continue to install other drivers. • After the drivers are recommended to My Computer, double-click the optical drive and execute the Run.exe program.) 3-1 Installing Chipset... After installing the SP1 (or later), if a question mark still exists in Universal Serial Bus Controller in the motherboard driver disk. • For USB 2.0 driver support under the Windows XP operating system, please install the Windows XP Service Pack 1 or later. Or you wish to restart your system...

Manual
Page 56
3-2 Software Applications This page displays all the tools and applications that GIGABYTE develops and some free software. You may press the Install button following an item to install it. 3-3 Driver CD Information This page provides information about the drivers, applications and tools in this driver disk. GA-G31-S3L Motherboard - 56 -
3-2 Software Applications This page displays all the tools and applications that GIGABYTE develops and some free software. You may press the Install button following an item to install it. 3-3 Driver CD Information This page provides information about the drivers, applications and tools in this driver disk. GA-G31-S3L Motherboard - 56 -

Manual
Page 57
Drivers Installation 3-4 Hardware Information This page provides information about the hardware devices on this motherboard. 3-5 Contact Us Check the contacts information of the GIGABYTE headquarter in Taiwan and the overseas branch offices on the last page of this manual. - 57 -
Drivers Installation 3-4 Hardware Information This page provides information about the hardware devices on this motherboard. 3-5 Contact Us Check the contacts information of the GIGABYTE headquarter in Taiwan and the overseas branch offices on the last page of this manual. - 57 -

Manual
Page 59
... drive on the first IDE connector is the first physical drive. - 59 - Xpress Recovery2 can back up your system soon after the operating system and drivers are not supported. For example, when hard drives are attached to restore it . Supporting NTFS, FAT32, and FAT16 file systems, Xpress Recovery2 can only back...
... drive on the first IDE connector is the first physical drive. - 59 - Xpress Recovery2 can back up your system soon after the operating system and drivers are not supported. For example, when hard drives are attached to restore it . Supporting NTFS, FAT32, and FAT16 file systems, Xpress Recovery2 can only back...

Manual
Page 62
Boot from the motherboard driver disk to search the first physical hard drive as the target drive and detect whether this hard drive contains the Windows operating system. If you ... Disk Management to start backing up your hard drive. Figure 12 GA-G31-S3L Motherboard Xpress Recovery2 will begin to access Xpress Recovery2 for G31-S3L F2c . . . . : BIOS Setup/Q-Flash : XpressRecovery2 : Boot Menu : Qflash 11/14/2007-G31-ICH7-6A89OG0HC-00 Figure 9 C. Accessing Xpress Recovery2 1. Intel G31 BIOS for the first time. B. After you wish to startup...
Boot from the motherboard driver disk to search the first physical hard drive as the target drive and detect whether this hard drive contains the Windows operating system. If you ... Disk Management to start backing up your hard drive. Figure 12 GA-G31-S3L Motherboard Xpress Recovery2 will begin to access Xpress Recovery2 for G31-S3L F2c . . . . : BIOS Setup/Q-Flash : XpressRecovery2 : Boot Menu : Qflash 11/14/2007-G31-ICH7-6A89OG0HC-00 Figure 9 C. Accessing Xpress Recovery2 1. Intel G31 BIOS for the first time. B. After you wish to startup...

Manual
Page 67
... the Internet Update Function Select this option Click Update New BIOS Step 1: Select the Find BIOS From Gigabyte check box and click Update New BIOS. Before You Begin: 1. Installing and Using @BIOS: Use the motherboard driver disk included with the @BIOS Utility A. Unique Features During the BIOS update process, ensure the Internet...
... the Internet Update Function Select this option Click Update New BIOS Step 1: Select the Find BIOS From Gigabyte check box and click Update New BIOS. Before You Begin: 1. Installing and Using @BIOS: Use the motherboard driver disk included with the @BIOS Utility A. Unique Features During the BIOS update process, ensure the Internet...

Manual
Page 71
...) audio provides jack retasking capability that support 44.1KHz/ 48KHz/ 96KHz/192KHz sampling rate. all at the same time. Before installing the audio driver, make a telephone call over the Internet, and etc. If you can listen to change the function for multi-channel speaker configurations. •...streams (in and out) to the following instructions use Windows XP as the example operating system.) Step 1: After installing the audio driver, the Audio Manager icon will be simultaneously processed. Appendix For example, users can retask the Center/Subwoofer speaker out jack to be...
...) audio provides jack retasking capability that support 44.1KHz/ 48KHz/ 96KHz/192KHz sampling rate. all at the same time. Before installing the audio driver, make a telephone call over the Internet, and etc. If you can listen to change the function for multi-channel speaker configurations. •...streams (in and out) to the following instructions use Windows XP as the example operating system.) Step 1: After installing the audio driver, the Audio Manager icon will be simultaneously processed. Appendix For example, users can retask the Center/Subwoofer speaker out jack to be...

Manual
Page 75
Step 3: Locate the Volume icon in jack on the front panel. Note: The microphone functions on the front panel and back panel cannot be used at the same time. Then configure the jack for microphone functionality. Double-click the icon to open the volume control panel. - 75 - 5-1-3 Configuring Microphone Recording Step 1: After installing the audio driver, the Audio Manager icon will appear in your microphone to the Mic in jack (pink) on the back panel or the Line in your system tray and click it to access the Audio Control Panel. Step 2: Connect your system tray. Appendix
Step 3: Locate the Volume icon in jack on the front panel. Note: The microphone functions on the front panel and back panel cannot be used at the same time. Then configure the jack for microphone functionality. Double-click the icon to open the volume control panel. - 75 - 5-1-3 Configuring Microphone Recording Step 1: After installing the audio driver, the Audio Manager icon will appear in your microphone to the Mic in jack (pink) on the back panel or the Line in your system tray and click it to access the Audio Control Panel. Step 2: Connect your system tray. Appendix


