
Manual
Page 38
... made in BIOS Setup. „ Set User Password Change, set , or disable password. Pressing to 8 profiles (Profile 1-8) and name each profile. First enter the profile name (to erase the default profile name, use this task.) GA-EX38-DS4 Motherboard - 38 - A supervisor password allows you can also carry out this function to load the BIOS settings from a profile...
... made in BIOS Setup. „ Set User Password Change, set , or disable password. Pressing to 8 profiles (Profile 1-8) and name each profile. First enter the profile name (to erase the default profile name, use this task.) GA-EX38-DS4 Motherboard - 38 - A supervisor password allows you can also carry out this function to load the BIOS settings from a profile...
Manual
Page 72
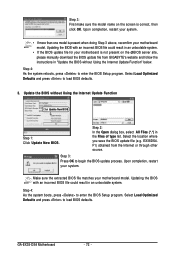
...GIGABYTE's website and follow the instructions in an unbootable system. • If the BIOS update file for your motherboard model. Upon completion, restart your motherboard model. Make sure the extracted BIOS file matches your system. Step 4: As the system boots, press to enter the BIOS Setup program. GA-EX38-DS4 Motherboard... - 72 - Step 3: First make sure the model name on the screen is not present on the @BIOS server site, please manually download the BIOS update ...
...GIGABYTE's website and follow the instructions in an unbootable system. • If the BIOS update file for your motherboard model. Upon completion, restart your motherboard model. Make sure the extracted BIOS file matches your system. Step 4: As the system boots, press to enter the BIOS Setup program. GA-EX38-DS4 Motherboard... - 72 - Step 3: First make sure the model name on the screen is not present on the @BIOS server site, please manually download the BIOS update ...

Manual
Page 80
... [ HELP ] The following are typical values: RAID0 - 128KB RAID10 - 64KB RAID5 - 64KB [K L ]-Change [TAB]-Next [ESC]-Previous Menu Figure 5 [ENTER]-Select GA-EX38-DS4 Motherboard - 80 - All Rights Reversed. [ CREATE VOLUME MENU ] Name : RAID Level : Disks : Strip Size : Capacity : Volume0 RAID0(Stripe) Select Disks 128KB 223.6 GB Create Volume [ HELP ] Choose the RAID level: RAID0...
... [ HELP ] The following are typical values: RAID0 - 128KB RAID10 - 64KB RAID5 - 64KB [K L ]-Change [TAB]-Next [ESC]-Previous Menu Figure 5 [ENTER]-Select GA-EX38-DS4 Motherboard - 80 - All Rights Reversed. [ CREATE VOLUME MENU ] Name : RAID Level : Disks : Strip Size : Capacity : Volume0 RAID0(Stripe) Select Disks 128KB 223.6 GB Create Volume [ HELP ] Choose the RAID level: RAID0...
Manual
Page 82
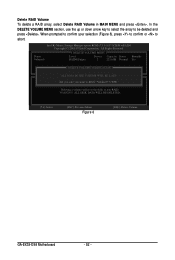
... wRAID5 Copyright(C) 2003-07 Intel Corporation. WARNING: ALL DISK DATA WILL BE DELETED. [K L ]-Select [ESC]-Previous Menu Figure 8 [DEL]-Delete Volume GA-EX38-DS4 Motherboard - 82 - All Rights Reversed. [ DELETE VOLUME MENU ] Name Volume0 Level RAID0(Stripe) Drives Capacity Status Bootable 2 223.6GB Normal Yes [ DELETE VOLUME VERIFICATION ] ALL DATA IN THE[VHOELLUPM] E WILL BE...
... wRAID5 Copyright(C) 2003-07 Intel Corporation. WARNING: ALL DISK DATA WILL BE DELETED. [K L ]-Select [ESC]-Previous Menu Figure 8 [DEL]-Delete Volume GA-EX38-DS4 Motherboard - 82 - All Rights Reversed. [ DELETE VOLUME MENU ] Name Volume0 Level RAID0(Stripe) Drives Capacity Status Bootable 2 223.6GB Normal Yes [ DELETE VOLUME VERIFICATION ] ALL DATA IN THE[VHOELLUPM] E WILL BE...

Manual
Page 97
... will see the connection speed is subject to the actual network environment or status even with Teaming enabled. Step 1: Insert the motherboard driver disk and select Software Applications. Select the check boxes for the Team, e.g. Fault tolerance on your system when completed. ...: Step 5: After you complete the setup, you created, and then click the Remove button. - 97 - Appendix Step 4: Give a name for the two available adapters and click OK. Go to access the utility. Click Install under Realtek Ethernet Teaming Utility for installation. Restart your...
... will see the connection speed is subject to the actual network environment or status even with Teaming enabled. Step 1: Insert the motherboard driver disk and select Software Applications. Select the check boxes for the Team, e.g. Fault tolerance on your system when completed. ...: Step 5: After you complete the setup, you created, and then click the Remove button. - 97 - Appendix Step 4: Give a name for the two available adapters and click OK. Go to access the utility. Click Install under Realtek Ethernet Teaming Utility for installation. Restart your...


