
Manual
Page 5
... 4-5 Windows Vista ReadyBoost 76 Chapter 5 Appendix ...77 5-1 Configuring SATA Hard Drive(s 77 5-1-1 Configuring Intel® ICH9R SATA Controllers 77 5-1-2 Making a SATA RAID/AHCI Driver Diskette 83 5-1-3 Installing the SATA RAID/AHCI Driver and Operating System 84 5-2 ConfiguringAudio Input and Output 89 5-2-1 Configuring 2/4/5.1/7.1-Channel Audio 89 5-2-2 Installing the S/PDIF In Cable (Optional 91...
... 4-5 Windows Vista ReadyBoost 76 Chapter 5 Appendix ...77 5-1 Configuring SATA Hard Drive(s 77 5-1-1 Configuring Intel® ICH9R SATA Controllers 77 5-1-2 Making a SATA RAID/AHCI Driver Diskette 83 5-1-3 Installing the SATA RAID/AHCI Driver and Operating System 84 5-2 ConfiguringAudio Input and Output 89 5-2-1 Configuring 2/4/5.1/7.1-Channel Audio 89 5-2-2 Installing the S/PDIF In Cable (Optional 91...
Manual
Page 10
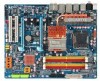
... Š Up to 3 IEEE 1394a ports (2 on the back panel, 1 via the IEEE 1394a bracket connected to the internal IEEE 1394a header) GA-EX38-DS4 Motherboard - 10 - 1-2 Product Specifications CPU Front Side Bus Chipset Memory Audio LAN Expansion Slots Storage Interface IEEE 1394 Š Support for an Intel&#...Support for S/PDIF In/Out Š Support for CD In Š 2 x Realtek 8111B chips (10/100/1000 Mbit) Š Support for SATA RAID 0, RAID 1, RAID 5 and RAID 10 Š GIGABYTE SATA2 chip: - 1 x IDE connector supporting ATA-133/100/66/33 and up to 2 IDE devices Š iTE IT8718 chip: - 1 x ...
... Š Up to 3 IEEE 1394a ports (2 on the back panel, 1 via the IEEE 1394a bracket connected to the internal IEEE 1394a header) GA-EX38-DS4 Motherboard - 10 - 1-2 Product Specifications CPU Front Side Bus Chipset Memory Audio LAN Expansion Slots Storage Interface IEEE 1394 Š Support for an Intel&#...Support for S/PDIF In/Out Š Support for CD In Š 2 x Realtek 8111B chips (10/100/1000 Mbit) Š Support for SATA RAID 0, RAID 1, RAID 5 and RAID 10 Š GIGABYTE SATA2 chip: - 1 x IDE connector supporting ATA-133/100/66/33 and up to 2 IDE devices Š iTE IT8718 chip: - 1 x ...
Manual
Page 12
... the CPU being used. (Note 5) Due to chipset limitation, Intel ICH9R RAID driver does not support Windows 2000 operating system. Increase FSB voltage by 0.05V to : - Adjust DDR2 frequency - Increase PCIe voltage by 0.05V to 1.55V with 0.05V increment - GA-EX38-DS4 Motherboard - 12 - Adjust CPU host frequency from 90 MHz to 150 MHz...
... the CPU being used. (Note 5) Due to chipset limitation, Intel ICH9R RAID driver does not support Windows 2000 operating system. Increase FSB voltage by 0.05V to : - Adjust DDR2 frequency - Increase PCIe voltage by 0.05V to 1.55V with 0.05V increment - GA-EX38-DS4 Motherboard - 12 - Adjust CPU host frequency from 90 MHz to 150 MHz...

Manual
Page 26
... two hard drives. The ICH9R controller supports RAID 0, RAID 1, RAID 5 and RAID 10. The LED keeps blinking when the system is in S3/S4 sleep state or powered off when the system is in S1 sleep state. System Status LED S0 On S1 Blinking S3/S4/S5 Off GA-EX38-DS4 Motherboard - 26 - Pin No. Each SATA...
... two hard drives. The ICH9R controller supports RAID 0, RAID 1, RAID 5 and RAID 10. The LED keeps blinking when the system is in S3/S4 sleep state or powered off when the system is in S1 sleep state. System Status LED S0 On S1 Blinking S3/S4/S5 Off GA-EX38-DS4 Motherboard - 26 - Pin No. Each SATA...

Manual
Page 43
...-Safe Defaults ESC: Exit F1: General Help F7: Optimized Defaults SATA RAID/AHCI Mode (Intel ICH9R Southbridge) Enables or disables RAID for the SATA controllers integrated in Native IDE mode. Disabled Disables RAID for the SATA controllers. Windows 9X/ME. (Default) Enabled Allows the... Enables or disables the integrated USB controller. (Default: Enabled) Disabled will turn off all of the integrated SATA controllers. RAID Enables RAID for the SATA controllers and configures the SATA controllers to PATA mode. (Default) AHCI Configures the SATA controllers to enable ...
...-Safe Defaults ESC: Exit F1: General Help F7: Optimized Defaults SATA RAID/AHCI Mode (Intel ICH9R Southbridge) Enables or disables RAID for the SATA controllers integrated in Native IDE mode. Disabled Disables RAID for the SATA controllers. Windows 9X/ME. (Default) Enabled Allows the... Enables or disables the integrated USB controller. (Default: Enabled) Disabled will turn off all of the integrated SATA controllers. RAID Enables RAID for the SATA controllers and configures the SATA controllers to PATA mode. (Default) AHCI Configures the SATA controllers to enable ...

Manual
Page 63
Windows® XP with Xpress Recovery cannot be restored using Xpress Recovery2. • USB hard drives are not supported. • Hard drives in RAID/AHCI mode are not supported. Unique Features Xpress Recovery2 can back up your system soon after the operating system and drivers are attached to the ...
Windows® XP with Xpress Recovery cannot be restored using Xpress Recovery2. • USB hard drives are not supported. • Hard drives in RAID/AHCI mode are not supported. Unique Features Xpress Recovery2 can back up your system soon after the operating system and drivers are attached to the ...
Manual
Page 68
... file (e.g. Note: The USB flash drive or hard drive must use FAT32/16/12 file system. 3. Inadequate BIOS flashing may result in RAID/AHCI mode or a hard drive attached to an independent IDE/SATA controller, use the key during the POST or pressing the key in BIOS...BIOS chip. During the POST, press the key to your motherboard model. 2. GA-EX38-DS4 Motherboard - 68 - EX38DS4.F1) to enter Q-Flash. 4-2 BIOS Update Utilities GIGABYTE motherboards provide two unique BIOS update tools, Q-FlashTM and @BIOS .TM GIGABYTE Q-Flash and @BIOS are easy-to-use and allow you to update the BIOS...
... file (e.g. Note: The USB flash drive or hard drive must use FAT32/16/12 file system. 3. Inadequate BIOS flashing may result in RAID/AHCI mode or a hard drive attached to an independent IDE/SATA controller, use the key during the POST or pressing the key in BIOS...BIOS chip. During the POST, press the key to your motherboard model. 2. GA-EX38-DS4 Motherboard - 68 - EX38DS4.F1) to enter Q-Flash. 4-2 BIOS Update Utilities GIGABYTE motherboards provide two unique BIOS update tools, Q-FlashTM and @BIOS .TM GIGABYTE Q-Flash and @BIOS are easy-to-use and allow you to update the BIOS...

Manual
Page 69
... Flash Type/Size SST 25VF080B 1M EnteFr l:oRppuyn A HDD 0-0 Keep DMI Data Enable Update BIOS from the floppy disk is saved to a hard drive in RAID/AHCI mode or a hard drive attached to an independent IDE/SATA controller, use the up or down arrow key to select Update BIOS from Drive...
... Flash Type/Size SST 25VF080B 1M EnteFr l:oRppuyn A HDD 0-0 Keep DMI Data Enable Update BIOS from the floppy disk is saved to a hard drive in RAID/AHCI mode or a hard drive attached to an independent IDE/SATA controller, use the up or down arrow key to select Update BIOS from Drive...

Manual
Page 77
... only one end of the SATA signal cable to the rear of the SATA hard drive and the other end to chipset limitation, Intel ICH9R RAID driver does not support Windows 2000 operating system. - 77 - Then connect the power connector from your computer Attach one hard drive. • An empty ... your computer. Install SATA hard drive(s) in your power supply to the hard drive. (Note 1) Skip this step if you do not want to create RAID array on the SATA controller. (Note 2) Required when the SATA controller is recommended that you do not want to ensure optimal performance, it is set...
... only one end of the SATA signal cable to the rear of the SATA hard drive and the other end to chipset limitation, Intel ICH9R RAID driver does not support Windows 2000 operating system. - 77 - Then connect the power connector from your computer Attach one hard drive. • An empty ... your computer. Install SATA hard drive(s) in your power supply to the hard drive. (Note 1) Skip this step if you do not want to create RAID array on the SATA controller. (Note 2) Required when the SATA controller is recommended that you do not want to ensure optimal performance, it is set...

Manual
Page 78
... H/W LAN2 ` SMART LAN1 ` SMART LAN2 Onboard LAN1 Boot ROM Onboard LAN2 Boot ROM Onboard IDE Controller Onboard Serial Port 1 Onboard Parallel Port Parallel Port Mode [RAID] [Disabled] [Enabled] [Enabled] [Disabled] [Disabled] [Enabled] [Auto] [Enabled] [Enabled] [Enabled] [Press Enter] [Press Enter] [Disabled] [Disabled]...controller mode correctly in system BIOS Setup . The BIOS Setup menus described in BIOS Setup Make sure to RAID (Figure 1)(Disabled by default). GA-EX38-DS4 Motherboard - 78 - Configuring SATA controller mode in this item to enter BIOS Setup during the POST ...
... H/W LAN2 ` SMART LAN1 ` SMART LAN2 Onboard LAN1 Boot ROM Onboard LAN2 Boot ROM Onboard IDE Controller Onboard Serial Port 1 Onboard Parallel Port Parallel Port Mode [RAID] [Disabled] [Enabled] [Enabled] [Disabled] [Disabled] [Enabled] [Auto] [Enabled] [Enabled] [Enabled] [Press Enter] [Press Enter] [Disabled] [Disabled]...controller mode correctly in system BIOS Setup . The BIOS Setup menus described in BIOS Setup Make sure to RAID (Figure 1)(Disabled by default). GA-EX38-DS4 Motherboard - 78 - Configuring SATA controller mode in this item to enter BIOS Setup during the POST ...

Manual
Page 79
...installation of Windows operating system for a message which says "Press to create a RAID array, select Create RAID Volume in RAID BIOS Enter the RAID BIOS setup utility to enter the RAID Configuration Utility. Physical Disks : Port Drive Model 0 ST3120026AS 1 ST3120026AS Serial # ...3JT354CP 3JT329JX Size Type/Status(Vol ID) 111.7GB Non-RAID Disk 111.7GB Non-RAID Disk Press to Non-RAID 4. Create RAID Volume 2. Physical Disks : Port Drive Model 0 ST3120026AS 1 ST3120026AS [ DISK/VOLUME INFORMATION ] Serial # ...
...installation of Windows operating system for a message which says "Press to create a RAID array, select Create RAID Volume in RAID BIOS Enter the RAID BIOS setup utility to enter the RAID Configuration Utility. Physical Disks : Port Drive Model 0 ST3120026AS 1 ST3120026AS Serial # ...3JT354CP 3JT329JX Size Type/Status(Vol ID) 111.7GB Non-RAID Disk 111.7GB Non-RAID Disk Press to Non-RAID 4. Create RAID Volume 2. Physical Disks : Port Drive Model 0 ST3120026AS 1 ST3120026AS [ DISK/VOLUME INFORMATION ] Serial # ...

Manual
Page 80
... the Name item and press . Step 3: After entering the CREATE VOLUME MENU screen, enter a volume name with 1~16 letters (letters cannot be included in the RAID array. Once you have selected the stripe block size, press . Intel(R) Matrix Storage Manager option ROM v7.5.0.1017 ICH9R wRAID5 Copyright(C) 2003-07 Intel Corporation... the hard drives to 128 KB. There are typical values: RAID0 - 128KB RAID10 - 64KB RAID5 - 64KB [K L ]-Change [TAB]-Next [ESC]-Previous Menu Figure 5 [ENTER]-Select GA-EX38-DS4 Motherboard - 80 -
... the Name item and press . Step 3: After entering the CREATE VOLUME MENU screen, enter a volume name with 1~16 letters (letters cannot be included in the RAID array. Once you have selected the stripe block size, press . Intel(R) Matrix Storage Manager option ROM v7.5.0.1017 ICH9R wRAID5 Copyright(C) 2003-07 Intel Corporation... the hard drives to 128 KB. There are typical values: RAID0 - 128KB RAID10 - 64KB RAID5 - 64KB [K L ]-Change [TAB]-Next [ESC]-Previous Menu Figure 5 [ENTER]-Select GA-EX38-DS4 Motherboard - 80 -

Manual
Page 81
...[ESC]-Previous Menu Figure 6 [ENTER]-Select When completed, you may proceed to cancel (Figure 6). Reset Disks to begin creating the RAID array. Exit RAID Volumes : ID Name 0 Volume0 Physical Disks : Port Drive Model 0 ST3120026AS 1 ST3120026AS [ DISK/VOLUME INFORMATION ] Level Strip RAID0... Storage Manager option ROM v7.5.0.1017 ICH9R wRAID5 Copyright(C) 2003-07 Intel Corporation. All Rights Reversed. [ CREATE VOLUME MENU ] Name : RAID Level : Disks : Strip Size : Capacity : RAID_Volume0 RAID0(Stripe) Select Disks 128KB 223.6 GB Create Volume WARNING : ALL DATA ON...
...[ESC]-Previous Menu Figure 6 [ENTER]-Select When completed, you may proceed to cancel (Figure 6). Reset Disks to begin creating the RAID array. Exit RAID Volumes : ID Name 0 Volume0 Physical Disks : Port Drive Model 0 ST3120026AS 1 ST3120026AS [ DISK/VOLUME INFORMATION ] Level Strip RAID0... Storage Manager option ROM v7.5.0.1017 ICH9R wRAID5 Copyright(C) 2003-07 Intel Corporation. All Rights Reversed. [ CREATE VOLUME MENU ] Name : RAID Level : Disks : Strip Size : Capacity : RAID_Volume0 RAID0(Stripe) Select Disks 128KB 223.6 GB Create Volume WARNING : ALL DATA ON...
Manual
Page 82
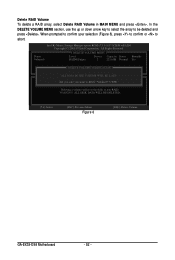
... WILL BE DELETED. [K L ]-Select [ESC]-Previous Menu Figure 8 [DEL]-Delete Volume GA-EX38-DS4 Motherboard - 82 - In the DELETE VOLUME MENU section, use the up or down arrow key to select the array to non-RAID. Delete RAID Volume To delete a RAID array, select Delete RAID Volume in MAIN MENU and press . When prompted to confirm your...
... WILL BE DELETED. [K L ]-Select [ESC]-Previous Menu Figure 8 [DEL]-Delete Volume GA-EX38-DS4 Motherboard - 82 - In the DELETE VOLUME MENU section, use the up or down arrow key to select the array to non-RAID. Delete RAID Volume To delete a RAID array, select Delete RAID Volume in MAIN MENU and press . When prompted to confirm your...
Manual
Page 83
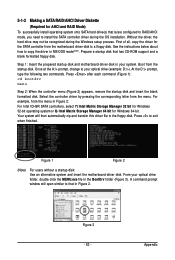
... a startup disk: Use an alternative system and insert the motherboard driver disk. 5-1-2 Making a SATA RAID/AHCI Driver Diskette (Required for AHCI and RAID Mode) To successfully install operating system onto SATA hard drive(s) that is/are configured to RAID/AHCI mode, you need to exit when finished. Without the driver, the hard drive...
... a startup disk: Use an alternative system and insert the motherboard driver disk. 5-1-2 Making a SATA RAID/AHCI Driver Diskette (Required for AHCI and RAID Mode) To successfully install operating system onto SATA hard drive(s) that is/are configured to RAID/AHCI mode, you need to exit when finished. Without the driver, the hard drive...
Manual
Page 84
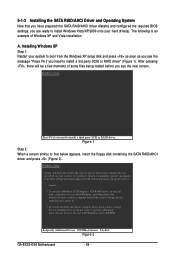
... driver diskette and configured the required BIOS settings, you need to install a third party SCSI or RAID driver. S=Specify Additional Device ENTER=Continue F3=Exit Figure 2 GA-EX38-DS4 Motherboard - 84 - Installing Windows XP Step 1: Restart your hard drive(s). The following mass storage devices(s) * To specify ... device manufacturer, press S. * If you see the message "Press F6 if you are ready to install a 3rd party SCSI or RAID driver" (Figure 1). Windows Setup Setup could not determine the type of some files being loaded before you do not want to manually ...
... driver diskette and configured the required BIOS settings, you need to install a third party SCSI or RAID driver. S=Specify Additional Device ENTER=Continue F3=Exit Figure 2 GA-EX38-DS4 Motherboard - 84 - Installing Windows XP Step 1: Restart your hard drive(s). The following mass storage devices(s) * To specify ... device manufacturer, press S. * If you see the message "Press F6 if you are ready to install a 3rd party SCSI or RAID driver" (Figure 1). Windows Setup Setup could not determine the type of some files being loaded before you do not want to manually ...

Manual
Page 85
... displayed and press . Intel(R) ICH9 SATA AHCI Controller (Desktop ICH9R) Intel(R) 82801HEM SATA RAID Controller (Mobile ICH8M-E) Intel(R) 82801HEM/HBM SATA AHCI Controller (Mobile ICH8M-E/M) Intel(R) ICH8R/ICH9R SATA RAID Controller ENTER=Select F3=Exit Figure 3 If a message appears saying one minute. When the...as shown below will be found, please check the floppy disk or copy the correct SATA RAID/AHCI driver again from the following mass storage device(s): Intel(R) ICH8R/ICH9R SATA RAID Controller * To specify additional SCSI adapters, CD-ROM drives, or special disk controllers for ...
... displayed and press . Intel(R) ICH9 SATA AHCI Controller (Desktop ICH9R) Intel(R) 82801HEM SATA RAID Controller (Mobile ICH8M-E) Intel(R) 82801HEM/HBM SATA AHCI Controller (Mobile ICH8M-E/M) Intel(R) ICH8R/ICH9R SATA RAID Controller ENTER=Select F3=Exit Figure 3 If a message appears saying one minute. When the...as shown below will be found, please check the floppy disk or copy the correct SATA RAID/AHCI driver again from the following mass storage device(s): Intel(R) ICH8R/ICH9R SATA RAID Controller * To specify additional SCSI adapters, CD-ROM drives, or special disk controllers for ...
Manual
Page 86
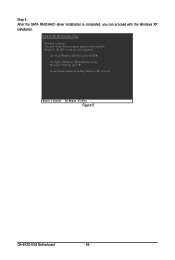
This port of the Setup program prepares Microsoft(R) Windows (R) XP to Setup. To repair a Windows XP installation using Recovery Console, press R. Enter= Continue R=Repair F3=Exit Figure 5 GA-EX38-DS4 Motherboard - 86 - WindowsXP Professional Setup Welcome to run on your computer. To quit Setup without installing Windows XP, press F3. To set up Windows XP now, press ENTER. Step 4: After the SATA RAID/AHCI driver installation is completed, you can proceed with the Windows XP installation.
This port of the Setup program prepares Microsoft(R) Windows (R) XP to Setup. To repair a Windows XP installation using Recovery Console, press R. Enter= Continue R=Repair F3=Exit Figure 5 GA-EX38-DS4 Motherboard - 86 - WindowsXP Professional Setup Welcome to run on your computer. To quit Setup without installing Windows XP, press F3. To set up Windows XP now, press ENTER. Step 4: After the SATA RAID/AHCI driver installation is completed, you can proceed with the Windows XP installation.

Manual
Page 87
When a screen similar to boot from the Windows Vista setup disk and perform standard OS installation steps. Figure 7 - 87 - Appendix B. Figure 6 Step 2: Specify the location where the driver is saved, such as your system to that below assumes that only one RAID array exists in your system.) Step 1: Restart your floppy disk (Figure 7). Installing Windows Vista (The procedure below appears, select Load Driver. (Figure 6).
When a screen similar to boot from the Windows Vista setup disk and perform standard OS installation steps. Figure 7 - 87 - Appendix B. Figure 6 Step 2: Specify the location where the driver is saved, such as your system to that below assumes that only one RAID array exists in your system.) Step 1: Restart your floppy disk (Figure 7). Installing Windows Vista (The procedure below appears, select Load Driver. (Figure 6).

Manual
Page 88
Step 3: When a screen as Intel(R) ICH9 SATA AHCI Controller when the SATA controllers are set to continue the OS installation (Figure 9). Figure 8 Step 4: After the driver is loaded, select the RAID/AHCI drive(s) where you want to install the operating system and then press Next to AHCI mode. Figure 9 (Note) The item displayed in Figure 8 will be shown as shown in Figure 8 appears, select Intel(R) ICH8R/ICH9R SATA RAID Controller (Note) and press Next. GA-EX38-DS4 Motherboard - 88 -
Step 3: When a screen as Intel(R) ICH9 SATA AHCI Controller when the SATA controllers are set to continue the OS installation (Figure 9). Figure 8 Step 4: After the driver is loaded, select the RAID/AHCI drive(s) where you want to install the operating system and then press Next to AHCI mode. Figure 9 (Note) The item displayed in Figure 8 will be shown as shown in Figure 8 appears, select Intel(R) ICH8R/ICH9R SATA RAID Controller (Note) and press Next. GA-EX38-DS4 Motherboard - 88 -


