Manual
Page 3
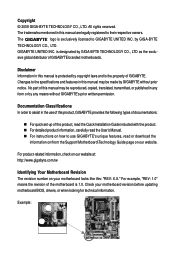
...Technology Guide page on your motherboard revision before updating motherboard BIOS, drivers, or when looking for technical information. Check your motherboard looks like this manual are legally registered to GIGABYTE UNITED INC. Example: is 1.0. Documentation Classifications In order to ...is protected by copyright laws and is exclusively licensed to their respective owners. No part of GIGABYTE. Disclaimer Information in any form or by GIGABYTE without GIGABYTE's prior written permission. Copyright © 2008 GIGA-BYTE TECHNOLOGY CO., LTD. The logo ...
...Technology Guide page on your motherboard revision before updating motherboard BIOS, drivers, or when looking for technical information. Check your motherboard looks like this manual are legally registered to GIGABYTE UNITED INC. Example: is 1.0. Documentation Classifications In order to ...is protected by copyright laws and is exclusively licensed to their respective owners. No part of GIGABYTE. Disclaimer Information in any form or by GIGABYTE without GIGABYTE's prior written permission. Copyright © 2008 GIGA-BYTE TECHNOLOGY CO., LTD. The logo ...

Manual
Page 5
... 59 3-1 Installing Chipset Drivers 59 3-2 SoftwareApplications 60 3-3 Driver CD Information 60 3-4 Hardware Information 61 3-5 Contact Us ...61 Chapter 4 Unique Features 63 4-1 Xpress Recovery2 63 4-2 BIOS Update Utilities ... Appendix ...77 5-1 Configuring SATA Hard Drive(s 77 5-1-1 Configuring Intel® ICH9R SATA Controllers 77 5-1-2 Making a SATA RAID/AHCI Driver Diskette 83 5-1-3 Installing the SATA RAID/AHCI Driver and Operating System 84 5-2 ConfiguringAudio Input and Output 89 5-2-1 Configuring 2/4/5.1/7.1-Channel Audio 89 5-2-2 Installing the S/PDIF In Cable (Optional 91...
... 59 3-1 Installing Chipset Drivers 59 3-2 SoftwareApplications 60 3-3 Driver CD Information 60 3-4 Hardware Information 61 3-5 Contact Us ...61 Chapter 4 Unique Features 63 4-1 Xpress Recovery2 63 4-2 BIOS Update Utilities ... Appendix ...77 5-1 Configuring SATA Hard Drive(s 77 5-1-1 Configuring Intel® ICH9R SATA Controllers 77 5-1-2 Making a SATA RAID/AHCI Driver Diskette 83 5-1-3 Installing the SATA RAID/AHCI Driver and Operating System 84 5-2 ConfiguringAudio Input and Output 89 5-2-1 Configuring 2/4/5.1/7.1-Channel Audio 89 5-2-2 Installing the S/PDIF In Cable (Optional 91...
Manual
Page 6
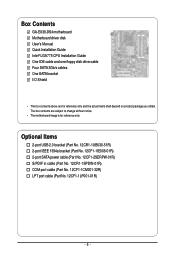
... cable (Part No. 12CR1-1SPDIN-01R) COM port cable (Part No. 12CF1-1CM001-32R) LPT port cable (Part No. 12CF1-1LP001-01R) - 6 - Box Contents GA-EX38-DS4 motherboard Motherboard driver disk User's Manual Quick Installation Guide Intel® LGA775 CPU Installation Guide One IDE cable and one floppy disk drive cable Four SATA 3Gb...
... cable (Part No. 12CR1-1SPDIN-01R) COM port cable (Part No. 12CF1-1CM001-32R) LPT port cable (Part No. 12CF1-1LP001-01R) - 6 - Box Contents GA-EX38-DS4 motherboard Motherboard driver disk User's Manual Quick Installation Guide Intel® LGA775 CPU Installation Guide One IDE cable and one floppy disk drive cable Four SATA 3Gb...
Manual
Page 12
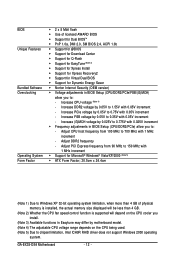
Increase CPU voltage (Note 4) - Increase FSB voltage by 0.05V to 0.35V with 0.05V increment - GA-EX38-DS4 Motherboard - 12 - Increase DDR2 voltage by 0.025V to 0.775V with 1 MHz increment - Increase (G)MCH voltage by 0.05V to 1.55V with 0.05V increment - Adjust ... Whether the CPU fan speed control function is supported will depend on the CPU being used. (Note 5) Due to chipset limitation, Intel ICH9R RAID driver does not support Windows 2000 operating system. Increase PCIe voltage by motherboard model. (Note 4) The adjustable CPU voltage range depends on the CPU cooler ...
Increase CPU voltage (Note 4) - Increase FSB voltage by 0.05V to 0.35V with 0.05V increment - GA-EX38-DS4 Motherboard - 12 - Increase DDR2 voltage by 0.025V to 0.775V with 1 MHz increment - Increase (G)MCH voltage by 0.05V to 1.55V with 0.05V increment - Adjust ... Whether the CPU fan speed control function is supported will depend on the CPU being used. (Note 5) Due to chipset limitation, Intel ICH9R RAID driver does not support Windows 2000 operating system. Increase PCIe voltage by motherboard model. (Note 4) The adjustable CPU voltage range depends on the CPU cooler ...
Manual
Page 18
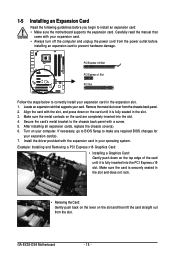
...unplug the power cord from the power outlet before you begin to install an expansion card: • Make sure the motherboard supports the expansion card. GA-EX38-DS4 Motherboard - 18 - Make sure the metal contacts on the top edge of the card until it is fully seated in the expansion slot. 1. ...before installing an expansion card to the chassis back panel with a screw. 5. Make sure the card is securely seated in your computer. Install the driver provided with the expansion card in the slot and does not rock. • Removing the Card: Gently push back on the lever on your ...
...unplug the power cord from the power outlet before you begin to install an expansion card: • Make sure the motherboard supports the expansion card. GA-EX38-DS4 Motherboard - 18 - Make sure the metal contacts on the top edge of the card until it is fully seated in the expansion slot. 1. ...before installing an expansion card to the chassis back panel with a screw. 5. Make sure the card is securely seated in your computer. Install the driver provided with the expansion card in the slot and does not rock. • Removing the Card: Gently push back on the lever on your ...

Manual
Page 36
... Menu, use the up hard drive data using the motherboard driver disk, the key can access Boot Menu again to change the first boot device setting as needed. : Q-Flash Press the key to access the Q-Flash utility directly without entering BIOS Setup. GA-EX38-DS4 Motherboard - 36 - To exit Boot Menu, press . Note: The...
... Menu, use the up hard drive data using the motherboard driver disk, the key can access Boot Menu again to change the first boot device setting as needed. : Q-Flash Press the key to access the Q-Flash utility directly without entering BIOS Setup. GA-EX38-DS4 Motherboard - 36 - To exit Boot Menu, press . Note: The...

Manual
Page 43
...) is an interface specification that cannot be used in Native IDE mode. In Legacy mode the SATA controllers use dedicated IRQs that allows the storage driver to enable advanced Serial ATA features such as Native Command Queuing and hot plug. USB 2.0 Controller Enables or disables the integrated USB 2.0 controller. (Default: Enabled...
...) is an interface specification that cannot be used in Native IDE mode. In Legacy mode the SATA controllers use dedicated IRQs that allows the storage driver to enable advanced Serial ATA features such as Native Command Queuing and hot plug. USB 2.0 Controller Enables or disables the integrated USB 2.0 controller. (Default: Enabled...
Manual
Page 59
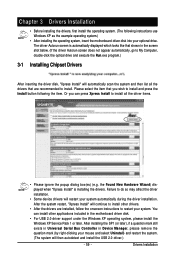
... XP as the example operating system.) • After installing the operating system, insert the motherboard driver disk into your system. Failure to install. The driver Autorun screen is installing the drivers. After installing the SP1 (or later), if a question mark still exists in Universal Serial Bus...Wizard) displayed when "Xpress Install" is automatically displayed which looks like that shown in the screen shot below. (If the driver Autorun screen does not appear automatically, go to My Computer, double-click the optical drive and execute the Run.exe program.) 3-1 Installing ...
... XP as the example operating system.) • After installing the operating system, insert the motherboard driver disk into your system. Failure to install. The driver Autorun screen is installing the drivers. After installing the SP1 (or later), if a question mark still exists in Universal Serial Bus...Wizard) displayed when "Xpress Install" is automatically displayed which looks like that shown in the screen shot below. (If the driver Autorun screen does not appear automatically, go to My Computer, double-click the optical drive and execute the Run.exe program.) 3-1 Installing ...
Manual
Page 60
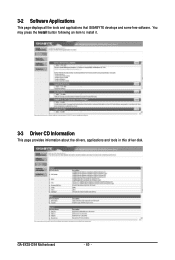
3-2 Software Applications This page displays all the tools and applications that GIGABYTE develops and some free software. GA-EX38-DS4 Motherboard - 60 - You may press the Install button following an item to install it. 3-3 Driver CD Information This page provides information about the drivers, applications and tools in this driver disk.
3-2 Software Applications This page displays all the tools and applications that GIGABYTE develops and some free software. GA-EX38-DS4 Motherboard - 60 - You may press the Install button following an item to install it. 3-3 Driver CD Information This page provides information about the drivers, applications and tools in this driver disk.
Manual
Page 61
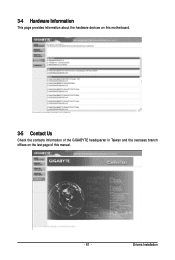
3-4 Hardware Information This page provides information about the hardware devices on this motherboard. 3-5 Contact Us Check the contacts information of the GIGABYTE headquarter in Taiwan and the overseas branch offices on the last page of this manual. - 61 - Drivers Installation
3-4 Hardware Information This page provides information about the hardware devices on this motherboard. 3-5 Contact Us Check the contacts information of the GIGABYTE headquarter in Taiwan and the overseas branch offices on the last page of this manual. - 61 - Drivers Installation

Manual
Page 63
... Recovery2 are not supported. For example, when hard drives are attached to quickly compress and back up your system soon after the operating system and drivers are attached to the first and second SATA connectors, the hard drive on PATA and SATA hard drives and restore it . Unique Features Before You...
... Recovery2 are not supported. For example, when hard drives are attached to quickly compress and back up your system soon after the operating system and drivers are attached to the first and second SATA connectors, the hard drive on PATA and SATA hard drives and restore it . Unique Features Before You...

Manual
Page 66
...Software, Inc. EX38-DS4 F1a . . . . : BIOS Setup : XpressRecovery2 : Boot Menu : Qflash 01/02/2008-X38-ICH9-6A89OG0WC-00 Figure 9 C. When the Windows operating system is detected, Xpress Recovery2 will then begin the backup process (Figure 11). Boot from the motherboard driver disk to search...partition to enter Xpress Recovery2. . . When finished, go to Disk Management to start backing up your hard drive. Figure 12 GA-EX38-DS4 Motherboard Xpress Recovery2 will stay permanent in your hard drive data (Figure 10). 2. When you wish to startup XpressRecovery2..... After ...
...Software, Inc. EX38-DS4 F1a . . . . : BIOS Setup : XpressRecovery2 : Boot Menu : Qflash 01/02/2008-X38-ICH9-6A89OG0WC-00 Figure 9 C. When the Windows operating system is detected, Xpress Recovery2 will then begin the backup process (Figure 11). Boot from the motherboard driver disk to search...partition to enter Xpress Recovery2. . . When finished, go to Disk Management to start backing up your hard drive. Figure 12 GA-EX38-DS4 Motherboard Xpress Recovery2 will stay permanent in your hard drive data (Figure 10). 2. When you wish to startup XpressRecovery2..... After ...

Manual
Page 71
GIGABYTE product warranty does not cover any BIOS damage or system failure resulting from an inadequate BIOS flashing. Installing and Using @BIOS: Use the motherboard driver disk included with the @BIOS Utility A. Failure to do NOT interrupt the Internet connection (for example, avoid a power loss ... click Install. Update the BIOS Using the Internet Update Function Select this option Click Update New BIOS Step 1: Select the Find BIOS From Gigabyte check box and click Update New BIOS. Step 2: Select the @BIOS server site closest to save the current BIOS file. 2. 4-2-2 ...
GIGABYTE product warranty does not cover any BIOS damage or system failure resulting from an inadequate BIOS flashing. Installing and Using @BIOS: Use the motherboard driver disk included with the @BIOS Utility A. Failure to do NOT interrupt the Internet connection (for example, avoid a power loss ... click Install. Update the BIOS Using the Internet Update Function Select this option Click Update New BIOS Step 1: Select the Find BIOS From Gigabyte check box and click Update New BIOS. Step 2: Select the @BIOS server site closest to save the current BIOS file. 2. 4-2-2 ...

Manual
Page 77
...SATA hard drives (to ensure optimal performance, it is set to AHCI or RAID mode. (Note 3) Due to chipset limitation, Intel ICH9R RAID driver does not support Windows 2000 operating system. - 77 - Installing SATA hard drive(s) in your computer. Configure a RAID array in BIOS Setup. ...your computer Attach one hard drive. • An empty formatted floppy disk. • Windows Vista/XP/2000 (Note 3) setup disk. • Motherboard driver disk. 5-1-1 Configuring Intel® ICH9R SATA Controllers A. Install SATA hard drive(s) in your power supply to the hard drive. (Note 1) Skip this ...
...SATA hard drives (to ensure optimal performance, it is set to AHCI or RAID mode. (Note 3) Due to chipset limitation, Intel ICH9R RAID driver does not support Windows 2000 operating system. - 77 - Installing SATA hard drive(s) in your computer. Configure a RAID array in BIOS Setup. ...your computer Attach one hard drive. • An empty formatted floppy disk. • Windows Vista/XP/2000 (Note 3) setup disk. • Motherboard driver disk. 5-1-1 Configuring Intel® ICH9R SATA Controllers A. Install SATA hard drive(s) in your power supply to the hard drive. (Note 1) Skip this ...

Manual
Page 81
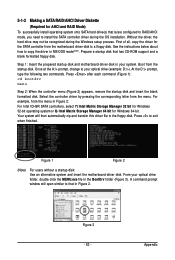
... volume, press to confirm or to Non-RAID 4. Finally press on the Create Volume item to create the SATA RAID/AHCI driver diskette and the installation of the SATA RAID/ACHI driver and operating system. - 81 - All Rights Reversed. [ CREATE VOLUME MENU ] Name : RAID Level : Disks : Strip Size : Capacity : RAID_Volume0 RAID0(Stripe...
... volume, press to confirm or to Non-RAID 4. Finally press on the Create Volume item to create the SATA RAID/AHCI driver diskette and the installation of the SATA RAID/ACHI driver and operating system. - 81 - All Rights Reversed. [ CREATE VOLUME MENU ] Name : RAID Level : Disks : Strip Size : Capacity : RAID_Volume0 RAID0(Stripe...
Manual
Page 83
...disk. Figure 1 Figure 2 (Note) For users without a startup disk: Use an alternative system and insert the motherboard driver disk. Appendix First of all, copy the driver for Windows 64-bit. At the D:\> prompt, type the following two commands. Your system will open similar to that is... for Windows 32-bit operating system or 8) Intel Matrix Storage Manager 64 bit for the SATA controller from the motherboard driver disk to install the SATA controller driver during the Windows setup process. Once at the A:\> prompt, change to exit when finished. Press after each command (...
...disk. Figure 1 Figure 2 (Note) For users without a startup disk: Use an alternative system and insert the motherboard driver disk. Appendix First of all, copy the driver for Windows 64-bit. At the D:\> prompt, type the following two commands. Your system will open similar to that is... for Windows 32-bit operating system or 8) Intel Matrix Storage Manager 64 bit for the SATA controller from the motherboard driver disk to install the SATA controller driver during the Windows setup process. Once at the A:\> prompt, change to exit when finished. Press after each command (...
Manual
Page 84
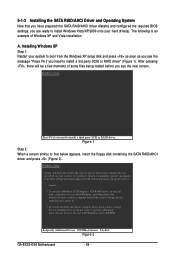
.../XP/2000 onto your system to boot from a mass storage device manufacturer, or do not have prepared the SATA RAID/AHCI driver diskette and configured the required BIOS settings, you need to that you have any device support disks from the Windows XP setup ... Step 1: Restart your hard drive(s). Figure 1 Step 2: When a screen similar to install a third party SCSI or RAID driver. A. S=Specify Additional Device ENTER=Continue F3=Exit Figure 2 GA-EX38-DS4 Motherboard - 84 - After pressing , there will load support for which you need to manually specify an adapter. The following ...
.../XP/2000 onto your system to boot from a mass storage device manufacturer, or do not have prepared the SATA RAID/AHCI driver diskette and configured the required BIOS settings, you need to that you have any device support disks from the Windows XP setup ... Step 1: Restart your hard drive(s). Figure 1 Step 2: When a screen similar to install a third party SCSI or RAID driver. A. S=Specify Additional Device ENTER=Continue F3=Exit Figure 2 GA-EX38-DS4 Motherboard - 84 - After pressing , there will load support for which you need to manually specify an adapter. The following ...

Manual
Page 85
...cannot be finished in about one of the items displayed and press . Step 3: When Setup correctly recognizes the Intel ICH9R SATA RAID/AHCI driver in BIOS Setup to RAID mode, select Intel(R) ICH8R/ICH9R SATA RAID Controller. (Select ICH9 SATA AHCI Controller (Desktop ICH9R) for ... menu similar to Figure 3 below appears, press to continue the driver installation from the motherboard driver disk. The driver installation will be found, please check the floppy disk or copy the correct SATA RAID/AHCI driver again from the floppy disk. When the screen as shown below will...
...cannot be finished in about one of the items displayed and press . Step 3: When Setup correctly recognizes the Intel ICH9R SATA RAID/AHCI driver in BIOS Setup to RAID mode, select Intel(R) ICH8R/ICH9R SATA RAID Controller. (Select ICH9 SATA AHCI Controller (Desktop ICH9R) for ... menu similar to Figure 3 below appears, press to continue the driver installation from the motherboard driver disk. The driver installation will be found, please check the floppy disk or copy the correct SATA RAID/AHCI driver again from the floppy disk. When the screen as shown below will...
Manual
Page 86
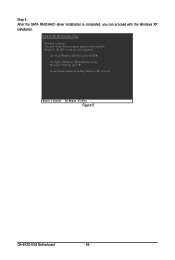
Enter= Continue R=Repair F3=Exit Figure 5 GA-EX38-DS4 Motherboard - 86 - To set up Windows XP now, press ENTER. This port of the Setup program prepares Microsoft(R) Windows (R) XP to Setup. Step 4: After the SATA RAID/AHCI driver installation is completed, you can proceed with the Windows XP installation. WindowsXP Professional Setup Welcome to run on your computer. To repair a Windows XP installation using Recovery Console, press R. To quit Setup without installing Windows XP, press F3.
Enter= Continue R=Repair F3=Exit Figure 5 GA-EX38-DS4 Motherboard - 86 - To set up Windows XP now, press ENTER. This port of the Setup program prepares Microsoft(R) Windows (R) XP to Setup. Step 4: After the SATA RAID/AHCI driver installation is completed, you can proceed with the Windows XP installation. WindowsXP Professional Setup Welcome to run on your computer. To repair a Windows XP installation using Recovery Console, press R. To quit Setup without installing Windows XP, press F3.

Manual
Page 87
Figure 6 Step 2: Specify the location where the driver is saved, such as your system to that only one RAID array exists in your system.) Step 1: Restart your floppy disk (Figure 7). B. When a screen similar to boot from the Windows Vista setup disk and perform standard OS installation steps. Figure 7 - 87 - Installing Windows Vista (The procedure below assumes that below appears, select Load Driver. (Figure 6). Appendix
Figure 6 Step 2: Specify the location where the driver is saved, such as your system to that only one RAID array exists in your system.) Step 1: Restart your floppy disk (Figure 7). B. When a screen similar to boot from the Windows Vista setup disk and perform standard OS installation steps. Figure 7 - 87 - Installing Windows Vista (The procedure below assumes that below appears, select Load Driver. (Figure 6). Appendix


