Manual
Page 5
... 74 4-2-2 Updating the BIOS with the @BIOS Utility 77 4-3 EasyTune 6 ...78 4-4 Dynamic Energy Saver Advanced 79 4-5 Ultra TPM (Note 81 4-6 Q-Share ...82 4-7 Time Repair ...83 4-8 Teaming ...84 Chapter 5 Appendix ...87 5-1 Configuring SATA Hard Drive(s 87 5-1-1 Configuring the Onboard SATA Controller 87 5-1-2 Making a SATA RAID/AHCI Driver Diskette 93 5-1-3 Installing the SATA...
... 74 4-2-2 Updating the BIOS with the @BIOS Utility 77 4-3 EasyTune 6 ...78 4-4 Dynamic Energy Saver Advanced 79 4-5 Ultra TPM (Note 81 4-6 Q-Share ...82 4-7 Time Repair ...83 4-8 Teaming ...84 Chapter 5 Appendix ...87 5-1 Configuring SATA Hard Drive(s 87 5-1-1 Configuring the Onboard SATA Controller 87 5-1-2 Making a SATA RAID/AHCI Driver Diskette 93 5-1-3 Installing the SATA...

Manual
Page 10
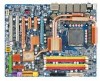
...Note 2) Š Support for S/PDIF In/Out Š Support for CD In Š 4 x Realtek 8111C chips (10/100/1000 Mbit) Š Support for Teaming Š 1 x PCI Express x16 slot, running at x16 (PCIEX16) (Note 3) Š 1 x PCI Express x16 slot, running at x8 (PCIEX8) (The ...: - 6 x SATA 3Gb/s connectors (SATA2_0, SATA2_1, SATA2_2, SATA2_3, SATA2_4, SATA2_5) supporting up to 1 floppy disk drive GA-EP45-DQ6 Motherboard - 10 - Support for SATA RAID 0, RAID 1, RAID 5 and RAID 10 Š GIGABYTE SATA2 chip: - 1 x IDE connector supporting ATA-133/100/66/33 and up to 2 IDE devices Š 2 x ...
...Note 2) Š Support for S/PDIF In/Out Š Support for CD In Š 4 x Realtek 8111C chips (10/100/1000 Mbit) Š Support for Teaming Š 1 x PCI Express x16 slot, running at x16 (PCIEX16) (Note 3) Š 1 x PCI Express x16 slot, running at x8 (PCIEX8) (The ...: - 6 x SATA 3Gb/s connectors (SATA2_0, SATA2_1, SATA2_2, SATA2_3, SATA2_4, SATA2_5) supporting up to 1 floppy disk drive GA-EP45-DQ6 Motherboard - 10 - Support for SATA RAID 0, RAID 1, RAID 5 and RAID 10 Š GIGABYTE SATA2 chip: - 1 x IDE connector supporting ATA-133/100/66/33 and up to 2 IDE devices Š 2 x ...

Manual
Page 84
...Local Area Connection Status and you created, and then click the Remove button. GA-EP45-DQ6 Motherboard - 84 - Select the check boxes for installation. 4-8 Teaming Dual LAN with Teaming enabled. • To enable Teaming or Bonding (IEEE 802.3ad Link Aggregation) feature, it is required the ...• The speed of distant image(s). Step 2: The Realtek Ethernet Diagnostic Utility icon appears in Windows XP: Select Realtek Ethernet Teaming Utility and click Install. Fault tolerance on the dual LAN network prevents network downtime by transferring the workload from a failed port ...
...Local Area Connection Status and you created, and then click the Remove button. GA-EP45-DQ6 Motherboard - 84 - Select the check boxes for installation. 4-8 Teaming Dual LAN with Teaming enabled. • To enable Teaming or Bonding (IEEE 802.3ad Link Aggregation) feature, it is required the ...• The speed of distant image(s). Step 2: The Realtek Ethernet Diagnostic Utility icon appears in Windows XP: Select Realtek Ethernet Teaming Utility and click Install. Fault tolerance on the dual LAN network prevents network downtime by transferring the workload from a failed port ...

Manual
Page 85
...you will appear during the setup process, click OK to access the utility. Unique Features Step 4: After the Teaming is 4.0 Gbps. Step 1: Insert the motherboard driver disk and select Application Software, Install Application Software. Point to All Programs, Realtek... Teaming and VLAN, Realtek Teaming and VLAN Utility to continue). Step 2: Click the Start icon . Enabling Teaming Functionality in Network and Sharing Center. Then click the Teaming button. (Two dialog boxes will see only one connection in...
...you will appear during the setup process, click OK to access the utility. Unique Features Step 4: After the Teaming is 4.0 Gbps. Step 1: Insert the motherboard driver disk and select Application Software, Install Application Software. Point to All Programs, Realtek... Teaming and VLAN, Realtek Teaming and VLAN Utility to continue). Step 2: Click the Start icon . Enabling Teaming Functionality in Network and Sharing Center. Then click the Teaming button. (Two dialog boxes will see only one connection in...