User Manual
Page 3
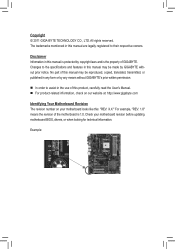
... this product, carefully read the User's Manual. For product-related information, check on our website at: http://www.gigabyte.com Identifying Your Motherboard Revision The revision number on your motherboard revision before updating motherboard BIOS, drivers, or when looking for technical information. Copyright © 2011 GIGA-BYTE TECHNOLOGY CO., LTD. All rights reserved. For...
... this product, carefully read the User's Manual. For product-related information, check on our website at: http://www.gigabyte.com Identifying Your Motherboard Revision The revision number on your motherboard revision before updating motherboard BIOS, drivers, or when looking for technical information. Copyright © 2011 GIGA-BYTE TECHNOLOGY CO., LTD. All rights reserved. For...
User Manual
Page 4
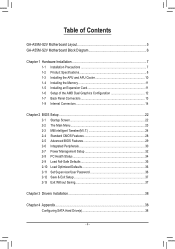
Table of Contents GA-A55M-S2V Motherboard Layout 5 GA-A55M-S2V Motherboard Block Diagram 6 Chapter 1 Hardware Installation 7 1-1 Installation Precautions 7 1-2 Product Specifications 8 1-3 Installing the APU and APU Cooler 10 1-4 Installing the Memory 11 1-5 Installing an Expansion Card 11 1-6 ...-Safe Defaults 35 2-10 Load Optimized Defaults 36 2-11 Set Supervisor/User Password 36 2-12 Save & Exit Setup 37 2-13 Exit Without Saving 37 Chapter 3 Drivers Installation 38 Chapter 4 Appendix...38 Configuring SATA Hard Drive(s 38 - 4 -
Table of Contents GA-A55M-S2V Motherboard Layout 5 GA-A55M-S2V Motherboard Block Diagram 6 Chapter 1 Hardware Installation 7 1-1 Installation Precautions 7 1-2 Product Specifications 8 1-3 Installing the APU and APU Cooler 10 1-4 Installing the Memory 11 1-5 Installing an Expansion Card 11 1-6 ...-Safe Defaults 35 2-10 Load Optimized Defaults 36 2-11 Set Supervisor/User Password 36 2-12 Save & Exit Setup 37 2-13 Exit Without Saving 37 Chapter 3 Drivers Installation 38 Chapter 4 Appendix...38 Configuring SATA Hard Drive(s 38 - 4 -
User Manual
Page 5
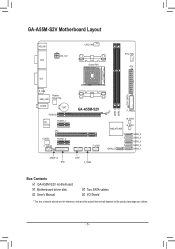
GA-A55M-S2V Motherboard Layout KB_MS VGA ATX_12V CPU_FAN Socket FM1 SYS_FAN ATX DVI R_USB USB_LAN Realtek RTL8111E AUDIO BAT PCIEX16 iTE IT8720 PCIEX1_1 PCI CODEC PCIEX1_2 F_AUDIO SPDIF_O TPM GA-A55M-S2V F_USB1 COM F_USB2 F_PANEL M_BIOS AMD A75/A55 SATA2_0 B_BIOS SATA2_5 SATA2_4 SATA2_3 SATA2_2 SATA2_1 DDR3_2 DDR3_1 CLR_CMOS Box Contents GA-A55M-S2V motherboard Motherboard driver disk User's Manual Two SATA cables I/O Shield * The box contents above are for reference only and the actual items shall depend on the product package you obtain. - 5 -
GA-A55M-S2V Motherboard Layout KB_MS VGA ATX_12V CPU_FAN Socket FM1 SYS_FAN ATX DVI R_USB USB_LAN Realtek RTL8111E AUDIO BAT PCIEX16 iTE IT8720 PCIEX1_1 PCI CODEC PCIEX1_2 F_AUDIO SPDIF_O TPM GA-A55M-S2V F_USB1 COM F_USB2 F_PANEL M_BIOS AMD A75/A55 SATA2_0 B_BIOS SATA2_5 SATA2_4 SATA2_3 SATA2_2 SATA2_1 DDR3_2 DDR3_1 CLR_CMOS Box Contents GA-A55M-S2V motherboard Motherboard driver disk User's Manual Two SATA cables I/O Shield * The box contents above are for reference only and the actual items shall depend on the product package you obtain. - 5 -

User Manual
Page 12
...the graphics card and plug it into the graphics card and start up your computer. A. An AMD Dual Graphics technology-supported motherboard and correct driver - Installing the Graphics Cards and Configuring BIOS Setup Step 1: Observe the steps in the operating system, go to Performance\ ...AMD CrossFire™ and ensure the Enable CrossFire™ check box is selected. (Note) Make sure the drivers for the Chipset, onboard graphics, and external graphics card are properly installed. - 12 - Browse to the AMD VISION Engine Control Center. AMD...
...the graphics card and plug it into the graphics card and start up your computer. A. An AMD Dual Graphics technology-supported motherboard and correct driver - Installing the Graphics Cards and Configuring BIOS Setup Step 1: Observe the steps in the operating system, go to Performance\ ...AMD CrossFire™ and ensure the Enable CrossFire™ check box is selected. (Note) Make sure the drivers for the Chipset, onboard graphics, and external graphics card are properly installed. - 12 - Browse to the AMD VISION Engine Control Center. AMD...

User Manual
Page 13
... connect a PS/2 mouse and the lower port (purple) to a back panel connector, first remove the cable from your device and then remove it from the motherboard. •• When removing the cable, pull it side to side to turn off the computer first. (Note 2) The DVI-D port does not support D-Sub... out from the connector. If you have to use an HD front panel audio module and enable the multi-channel audio feature through the audio driver. •• When removing the cable connected to connect a PS/2 keyboard. Use this port. Use this audio jack for USB devices such as an optical...
... connect a PS/2 mouse and the lower port (purple) to a back panel connector, first remove the cable from your device and then remove it from the motherboard. •• When removing the cable, pull it side to side to turn off the computer first. (Note 2) The DVI-D port does not support D-Sub... out from the connector. If you have to use an HD front panel audio module and enable the multi-channel audio feature through the audio driver. •• When removing the cable connected to connect a PS/2 keyboard. Use this port. Use this audio jack for USB devices such as an optical...
User Manual
Page 38
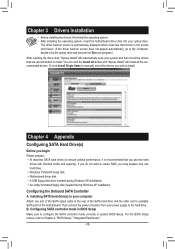
... can click the Install All button and "Xpress Install" will automatically scan your computer Attach one hard drive. • Windows 7/Vista/XP setup disk. • Motherboard driver disk. • A USB floppy disk drive (needed during Windows XP installation) • An empty formatted floppy disk (needed during Windows XP installation) Configuring the Onboard...
... can click the Install All button and "Xpress Install" will automatically scan your computer Attach one hard drive. • Windows 7/Vista/XP setup disk. • Motherboard driver disk. • A USB floppy disk drive (needed during Windows XP installation) • An empty formatted floppy disk (needed during Windows XP installation) Configuring the Onboard...


