Manual
Page 12
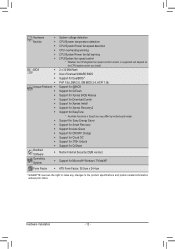
... ŠŠ Use of licensed AWARD BIOS ŠŠ Support for DualBIOS™ ŠŠ PnP 1.0a, DMI 2.0, SM BIOS 2.4, ACPI 1.0b Unique Features ŠŠ Support for @BIOS ŠŠ Support for Q-Flash ŠŠ Support for Xpress BIOS Rescue ŠŠ Support for Download Center...for Cloud OC ŠŠ Support for 3TB+ Unlock ŠŠ Support for Q-Share Bundled Software ŠŠ Norton Internet Security (OEM version) Operating System ŠŠ Support for Microsoft® Windows 7/Vista/XP Form Factor ŠŠ ATX Form Factor; 30.5cm x 24....
... ŠŠ Use of licensed AWARD BIOS ŠŠ Support for DualBIOS™ ŠŠ PnP 1.0a, DMI 2.0, SM BIOS 2.4, ACPI 1.0b Unique Features ŠŠ Support for @BIOS ŠŠ Support for Q-Flash ŠŠ Support for Xpress BIOS Rescue ŠŠ Support for Download Center...for Cloud OC ŠŠ Support for 3TB+ Unlock ŠŠ Support for Q-Share Bundled Software ŠŠ Norton Internet Security (OEM version) Operating System ŠŠ Support for Microsoft® Windows 7/Vista/XP Form Factor ŠŠ ATX Form Factor; 30.5cm x 24....

Manual
Page 31
...for the beep codes description. • It is recommended that searches and downloads the latest version of the BIOS Setup program. When the power is turned off, the battery on . To access the BIOS Setup program, press the key during the POST when the power is potentially risky, if you... values in the CMOS. Its major functions include conducting the Power-On Self-Test (POST) during the POST. To upgrade the BIOS, use either the GIGABYTE Q-Flash or @BIOS utility. • Q-Flash allows the user to prevent system instability or other unexpected results. Refer to boot. Inadequate...
...for the beep codes description. • It is recommended that searches and downloads the latest version of the BIOS Setup program. When the power is turned off, the battery on . To access the BIOS Setup program, press the key during the POST when the power is potentially risky, if you... values in the CMOS. Its major functions include conducting the Power-On Self-Test (POST) during the POST. To upgrade the BIOS, use either the GIGABYTE Q-Flash or @BIOS utility. • Q-Flash allows the user to prevent system instability or other unexpected results. Refer to boot. Inadequate...

Manual
Page 32
GA-990FXA-UD5 F1a . . . . : BIOS Setup : XpressRecovery2 : Boot Menu : Qflash 04/26/2011-RD990-SB950-7A66FG04C-00 Function Keys Function Keys: : POST SCREEN Press the key to accept. After system ..., the device boot order will directly boot from the device configured in Boot Menu. To exit Boot Menu, press . The POST Screen Motherboard Model BIOS Version Award Modular BIOS v6.00PG Copyright (C) 1984-2011, Award Software, Inc. For more information, refer to Chapter 4, "Xpress Recovery2." : BOOT MENU Boot Menu allows you have ever...
GA-990FXA-UD5 F1a . . . . : BIOS Setup : XpressRecovery2 : Boot Menu : Qflash 04/26/2011-RD990-SB950-7A66FG04C-00 Function Keys Function Keys: : POST SCREEN Press the key to accept. After system ..., the device boot order will directly boot from the device configured in Boot Menu. To exit Boot Menu, press . The POST Screen Motherboard Model BIOS Version Award Modular BIOS v6.00PG Copyright (C) 1984-2011, Award Software, Inc. For more information, refer to Chapter 4, "Xpress Recovery2." : BOOT MENU Boot Menu allows you have ever...
Manual
Page 33
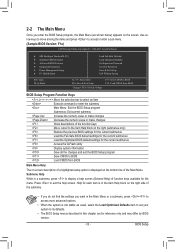
... for the menu. Use arrow keys to move among the items and press to accept or enter a sub-menu. (Sample BIOS Version: F1a) CMOS Setup Utility-Copyright (C) 1984-2011 Award Software MB Intelligent Tweaker(M.I.T.) Standard CMOS Features Advanced... on the right (submenus only) Restore the previous BIOS settings for the current submenus Load the Fail-Safe BIOS default settings for the current submenus Load the Optimized BIOS default settings for reference only and may differ by BIOS version. - 33 - BIOS Setup Help for each item is in the Item...
... for the menu. Use arrow keys to move among the items and press to accept or enter a sub-menu. (Sample BIOS Version: F1a) CMOS Setup Utility-Copyright (C) 1984-2011 Award Software MB Intelligent Tweaker(M.I.T.) Standard CMOS Features Advanced... on the right (submenus only) Restore the previous BIOS settings for the current submenus Load the Fail-Safe BIOS default settings for the current submenus Load the Optimized BIOS default settings for reference only and may differ by BIOS version. - 33 - BIOS Setup Help for each item is in the Item...

Manual
Page 60
You can click the Install button on the right of the BIOS, drivers, or applications will be displayed. 3-7 New Utilities This page provides a quick link to GIGABYTE's lately developed utilities for users to install it. The latest version of an item to install. Drivers Installation - 60 - 3-6 Download Center To update the BIOS, drivers, or applications, click the Download Center button to link to the GIGABYTE website.
You can click the Install button on the right of the BIOS, drivers, or applications will be displayed. 3-7 New Utilities This page provides a quick link to GIGABYTE's lately developed utilities for users to install it. The latest version of an item to install. Drivers Installation - 60 - 3-6 Download Center To update the BIOS, drivers, or applications, click the Download Center button to link to the GIGABYTE website.

Manual
Page 66
.... As the system boots, you should see the new BIOS version is complete after a BIOS update, so we recommend that you reload BIOS defaults. The procedure is present on the POST screen. Step 5: During the POST, press to exit Q-Flash and ...(C) 1984-2011 Award Software MB Intelligent Tweaker(M.I.T.) Load Fail-Safe Defaults Standard CMOS Features Load Optimized Defaults Advanced BIOS Features Set Supervisor Password Integrated Peripherals Set User Password Power Management Setup PC Health Status Load Optimized DefaultsS(aYve/N&)?...
.... As the system boots, you should see the new BIOS version is complete after a BIOS update, so we recommend that you reload BIOS defaults. The procedure is present on the POST screen. Step 5: During the POST, press to exit Q-Flash and ...(C) 1984-2011 Award Software MB Intelligent Tweaker(M.I.T.) Load Fail-Safe Defaults Standard CMOS Features Load Optimized Defaults Advanced BIOS Features Set Supervisor Password Integrated Peripherals Set User Password Power Management Setup PC Health Status Load Optimized DefaultsS(aYve/N&)?...

Manual
Page 76
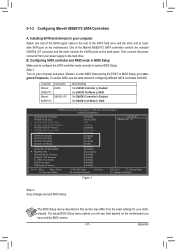
... To enable RAID for the SATA3_4/5 connectors, set OnChip SATA Type to RAID and set OnChip SATA Port4/5 Type to RAID. The BIOS Setup menus described in this section may differ from the exact settings for RAID 5, set OnChip SATA Type to As SATA Type (Figure... menu options you will see shall depend on your motherboard. Configuring SATA controller mode in system BIOS Setup. Step 1: Turn on the motherboard you have and the BIOS version. B. Appendix - 76 - CMOS Setup Utility-Copyright (C) 1984-2011 Award Software Integrated Peripherals OnChip SATA Controller OnChip SATA Type...
... To enable RAID for the SATA3_4/5 connectors, set OnChip SATA Type to RAID and set OnChip SATA Port4/5 Type to RAID. The BIOS Setup menus described in this section may differ from the exact settings for RAID 5, set OnChip SATA Type to As SATA Type (Figure... menu options you will see shall depend on your motherboard. Configuring SATA controller mode in system BIOS Setup. Step 1: Turn on the motherboard you have and the BIOS version. B. Appendix - 76 - CMOS Setup Utility-Copyright (C) 1984-2011 Award Software Integrated Peripherals OnChip SATA Controller OnChip SATA Type...

Manual
Page 77
...Version 3.3.1540.11 (c) 2011 Advanced Micro Devices, Inc. Press to enter the Delete LD Menu window. Figure 2 Step 2: Main Menu This is defined.. C. To delete an array, press to enter RAID Option ROM Utility... No Array is the first option screen when you enter the BIOS... 1 ] LD View/ LD Define Menu 2 ] Delete LD Menu 3 ] Controller Configuration 4 ] [ Keys Available ] Press 1..4 to enter the RAID BIOS setup utility. Press + to Select Option Figure 3 [ESC] Exit - 77 - Skip this step and proceed with the installation of Windows operating system for ...
...Version 3.3.1540.11 (c) 2011 Advanced Micro Devices, Inc. Press to enter the Delete LD Menu window. Figure 2 Step 2: Main Menu This is defined.. C. To delete an array, press to enter RAID Option ROM Utility... No Array is the first option screen when you enter the BIOS... 1 ] LD View/ LD Define Menu 2 ] Delete LD Menu 3 ] Controller Configuration 4 ] [ Keys Available ] Press 1..4 to enter the RAID BIOS setup utility. Press + to Select Option Figure 3 [ESC] Exit - 77 - Skip this step and proceed with the installation of Windows operating system for ...
Manual
Page 81
...from your computer and press to available SATA port on the back panel. Controller Connectors Marvell eSATA 88SE9172 Marvell GSATA3_6/7 88SE9172 BIOS Settings Set eSATA3 Controller to Enabled Set eSATA3 Ctrl Mode to RAID Set GSATA3 Controller to Enabled Set GSATA3 Ctrl Mode to ...controls the onboard GSATA3_6/7 connector and the other end to enter BIOS Setup during the POST. The BIOS Setup menus described in your motherboard. The actual BIOS Setup menu options you have and the BIOS version. - 81 - In BIOS Setup, go to RAID CMOS Setup Utility-Copyright (C) 1984-2011...
...from your computer and press to available SATA port on the back panel. Controller Connectors Marvell eSATA 88SE9172 Marvell GSATA3_6/7 88SE9172 BIOS Settings Set eSATA3 Controller to Enabled Set eSATA3 Ctrl Mode to RAID Set GSATA3 Controller to Enabled Set GSATA3 Ctrl Mode to ...controls the onboard GSATA3_6/7 connector and the other end to enter BIOS Setup during the POST. The BIOS Setup menus described in your motherboard. The actual BIOS Setup menu options you have and the BIOS version. - 81 - In BIOS Setup, go to RAID CMOS Setup Utility-Copyright (C) 1984-2011...

Manual
Page 82
...Raid Mode: 1B4B:9192 1.0.0.0017 00 0A RAID0 RAID1 ENTER/SPACE: Select, ESC: Back/Exit Figure 3 Appendix - 82 - Marvell 88SE91xx Adapter - C. BIOS Version 1.0.0.0017 PCIe x1 5.0Gbps Mode: RAID [Virtual Disks] No Virtual Disk! [Physical Disks] Adapter 0 Port Disk Name S0 SATA: WDC WD800JD-22LSA0 S1...3), use the left or right arrow key to the installation of Windows operating system for a message which says "Press + to enter BIOS Setup or to enter the RAID setup utility. After the POST memory test begins and before the operating system boot begins, look for ...
...Raid Mode: 1B4B:9192 1.0.0.0017 00 0A RAID0 RAID1 ENTER/SPACE: Select, ESC: Back/Exit Figure 3 Appendix - 82 - Marvell 88SE91xx Adapter - C. BIOS Version 1.0.0.0017 PCIe x1 5.0Gbps Mode: RAID [Virtual Disks] No Virtual Disk! [Physical Disks] Adapter 0 Port Disk Name S0 SATA: WDC WD800JD-22LSA0 S1...3), use the left or right arrow key to the installation of Windows operating system for a message which says "Press + to enter BIOS Setup or to enter the RAID setup utility. After the POST memory test begins and before the operating system boot begins, look for ...


