
Manual
Page 5
... 57 3-1 Installing Chipset Drivers 57 3-2 Application Software 58 3-3 Technical Manuals 58 3-4 Contact...59 3-5 System...59 3-6 Download Center 60 3-7 New Utilities...60 Chapter 4 Unique Features 61 4-1 ...5 Appendix...75 5-1 Configuring SATA Hard Drive(s 75 5-1-1 Configuring AMD SB950 SATA Controllers 75 5-1-2 Configuring Marvell 88SE9172 SATA Controller 81 5-1-3 Installing the SATA RAID/AHCI Driver and Operating System 87 5-2 Configuring Audio Input and Output 95 5-2-1 Configuring 2/4/5.1/7.1-Channel Audio 95 5-2-2 Configuring S/PDIF Out 97 5-2-3 Enabling the Dolby Home Theater...
... 57 3-1 Installing Chipset Drivers 57 3-2 Application Software 58 3-3 Technical Manuals 58 3-4 Contact...59 3-5 System...59 3-6 Download Center 60 3-7 New Utilities...60 Chapter 4 Unique Features 61 4-1 ...5 Appendix...75 5-1 Configuring SATA Hard Drive(s 75 5-1-1 Configuring AMD SB950 SATA Controllers 75 5-1-2 Configuring Marvell 88SE9172 SATA Controller 81 5-1-3 Installing the SATA RAID/AHCI Driver and Operating System 87 5-2 Configuring Audio Input and Output 95 5-2-1 Configuring 2/4/5.1/7.1-Channel Audio 95 5-2-2 Configuring S/PDIF Out 97 5-2-3 Enabling the Dolby Home Theater...
Manual
Page 46
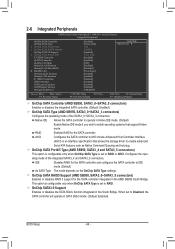
... the SATA controller and configures the SATA controller to RAID. Advanced Host Controller Interface (AHCI) is an interface specification that support Native mode. OnChip ... BIOS Setup - 46 - Native IDE Allows the SATA controller to RAID or AHCI. IDE Disables RAID for the SATA controller. OnChip SATA RAID5 Support (AMD SB950, SATA3_0~SATA3_5 connectors) Enables or disables RAID 5 support for the SATA controller integrated in the South Bridge. 2-6...Enable Native IDE mode if you wish to install operating systems that allows the storage driver to AHCI mode.
... the SATA controller and configures the SATA controller to RAID. Advanced Host Controller Interface (AHCI) is an interface specification that support Native mode. OnChip ... BIOS Setup - 46 - Native IDE Allows the SATA controller to RAID or AHCI. IDE Disables RAID for the SATA controller. OnChip SATA RAID5 Support (AMD SB950, SATA3_0~SATA3_5 connectors) Enables or disables RAID 5 support for the SATA controller integrated in the South Bridge. 2-6...Enable Native IDE mode if you wish to install operating systems that allows the storage driver to AHCI mode.
Manual
Page 47
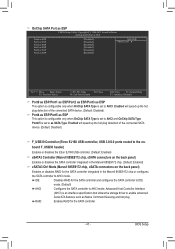
... the SATA controller and configures the SATA controller to IDE mode. (Default) AHCI Configures the SATA controller to AHCI mode. IDE Disables RAID for the SATA controller. - 47 - Enabled will speed up the hot plug detection of the connected SATA device. (Default: Disabled) Port4 as ESP/Port5 as ... option is configurable only when OnChip SATA Type is set to AHCI and OnChip SATA Type Port4/5 is an interface specification that allows the storage driver to AHCI.
... the SATA controller and configures the SATA controller to IDE mode. (Default) AHCI Configures the SATA controller to AHCI mode. IDE Disables RAID for the SATA controller. - 47 - Enabled will speed up the hot plug detection of the connected SATA device. (Default: Disabled) Port4 as ESP/Port5 as ... option is configurable only when OnChip SATA Type is set to AHCI and OnChip SATA Type Port4/5 is an interface specification that allows the storage driver to AHCI.

Manual
Page 61
... graphics card • Windows XP with Xpress Recovery cannot be restored using Xpress Recovery2. • USB hard drives are not supported. • RAID drives are not supported. • GPT partitions are not supported. • Hard drives larger than to the first and third SATA connectors, the...requirements vary, depending on the amount of data). • It is recommended to back up your system soon after the operating system and drivers are different utilities. For example, When hard drives are not supported. Unique Features Xpress Recovery2 can back up your system to boot from ...
... graphics card • Windows XP with Xpress Recovery cannot be restored using Xpress Recovery2. • USB hard drives are not supported. • RAID drives are not supported. • GPT partitions are not supported. • Hard drives larger than to the first and third SATA connectors, the...requirements vary, depending on the amount of data). • It is recommended to back up your system soon after the operating system and drivers are different utilities. For example, When hard drives are not supported. Unique Features Xpress Recovery2 can back up your system to boot from ...
Manual
Page 75
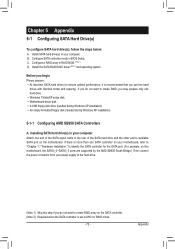
.... (Note 1) D. B. Configure a RAID array in your motherboard, refer to "Chapter 1," "Hardware Installation," to ensure optimal performance, it is more than one hard drive. • Windows 7/Vista/XP setup disk. • Motherboard driver disk. • A USB floppy disk drive (needed during Windows XP installation)...AMD SB950 SATA Controllers A. If there is recommended that you use two hard drives with identical model and capacity). Install the SATA RAID/AHCI driver (Note 2) and operating system. Before you begin Please prepare: • At least two SATA hard drives (to identify the...
.... (Note 1) D. B. Configure a RAID array in your motherboard, refer to "Chapter 1," "Hardware Installation," to ensure optimal performance, it is more than one hard drive. • Windows 7/Vista/XP setup disk. • Motherboard driver disk. • A USB floppy disk drive (needed during Windows XP installation)...AMD SB950 SATA Controllers A. If there is recommended that you use two hard drives with identical model and capacity). Install the SATA RAID/AHCI driver (Note 2) and operating system. Before you begin Please prepare: • At least two SATA hard drives (to identify the...
Manual
Page 87
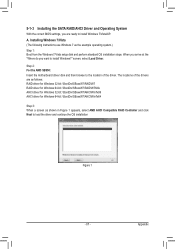
...appears, select AMD AHCI Compatible RAID Controller and click Next to install Windows?" When you arrive at the "Where do you are as follows: RAID driver for Windows 32-bit: \BootDrv\SBxxxW7\RAID\W7 RAID driver for Windows 64-bit: \BootDrv\SBxxxW7\RAID\W764A AHCI driver for Windows 32-bit: \BootDrv...\SBxxxW7\AHCI\Win7x86 AHCI driver for Windows 64-bit: \BootDrv\SBxxxW7\AHCI\Win7x64 Step 3: ...
...appears, select AMD AHCI Compatible RAID Controller and click Next to install Windows?" When you arrive at the "Where do you are as follows: RAID driver for Windows 32-bit: \BootDrv\SBxxxW7\RAID\W7 RAID driver for Windows 64-bit: \BootDrv\SBxxxW7\RAID\W764A AHCI driver for Windows 32-bit: \BootDrv...\SBxxxW7\AHCI\Win7x86 AHCI driver for Windows 64-bit: \BootDrv\SBxxxW7\AHCI\Win7x64 Step 3: ...

Manual
Page 88
The locations of the drivers are as follows: RAID driver for Windows 32-bit: \BootDrv\Marvell\RAID\i386 RAID driver for Windows 64-bit: \BootDrv\Marvell\RAID\amd64 AHCI driver for Windows 32-bit: \BootDrv\Marvell\AHCI\Floppy32 AHCI driver for Windows 64-bit: \BootDrv\Marvell\AHCI\Floppy64 Step 3: When a screen as shown in Figure 2 appears, select Marvell 91xx SATA 6G RAID Controller and click Next to the location of the driver. Step 2: For the Marvell 88SE9172: Insert the motherboard driver disk and then browse to load the driver and continue the OS installation Figure 2 Appendix - 88 -
The locations of the drivers are as follows: RAID driver for Windows 32-bit: \BootDrv\Marvell\RAID\i386 RAID driver for Windows 64-bit: \BootDrv\Marvell\RAID\amd64 AHCI driver for Windows 32-bit: \BootDrv\Marvell\AHCI\Floppy32 AHCI driver for Windows 64-bit: \BootDrv\Marvell\AHCI\Floppy64 Step 3: When a screen as shown in Figure 2 appears, select Marvell 91xx SATA 6G RAID Controller and click Next to the location of the driver. Step 2: For the Marvell 88SE9172: Insert the motherboard driver disk and then browse to load the driver and continue the OS installation Figure 2 Appendix - 88 -
Manual
Page 89
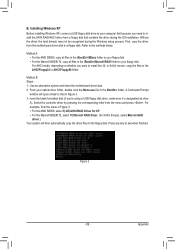
... in Figure 3, • For the AMD SB950, select 3) ATi AHCI/RAID Driver for XP. • For the Marvell 88SE9172, select 10) Marvell RAID driver. (For AHCI drive(s), select Marvell AHCI driver.) Your system will open similar to install the SATA RAID/AHCI driver from the motherboard driver disk to the methods below. A Command Prompt window will then automatically...
... in Figure 3, • For the AMD SB950, select 3) ATi AHCI/RAID Driver for XP. • For the Marvell 88SE9172, select 10) Marvell RAID driver. (For AHCI drive(s), select Marvell AHCI driver.) Your system will open similar to install the SATA RAID/AHCI driver from the motherboard driver disk to the methods below. A Command Prompt window will then automatically...

Manual
Page 90
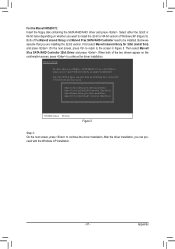
...- 90 - Step 2: For the AMD SB950: Insert the floppy disk containing the SATA RAID/AHCI driver and press . Refer to the following list, or press ESC to return to the previous screen. Select AMD AHCI Compatible RAID Controller-x86 platform and press . A screen will then appear asking you need to configure ... process. Then a controller menu similar to specify an additional SCSI adapter. Windows Setup You have chosen to install a 3rd party SCSI or RAID driver." Select the SCSI Adapter you want from the Windows XP setup disk and press as soon as you see the message "Press F6 if...
...- 90 - Step 2: For the AMD SB950: Insert the floppy disk containing the SATA RAID/AHCI driver and press . Refer to the following list, or press ESC to return to the previous screen. Select AMD AHCI Compatible RAID Controller-x86 platform and press . A screen will then appear asking you need to configure ... process. Then a controller menu similar to specify an additional SCSI adapter. Windows Setup You have chosen to install a 3rd party SCSI or RAID driver." Select the SCSI Adapter you want from the Windows XP setup disk and press as soon as you see the message "Press F6 if...
Manual
Page 91
... press . For the Marvell 88SE9172: Insert the floppy disk containing the SATA RAID/AHCI driver and press . Marvell shared library for 32bit (install first) Marvell 91xx SATA RAID Controller 32bit Driver Marvell shared library for 64bit (install first) Marvell 91xx SATA RAID Controller 64bit Driver ENTER=Select F3=Exit Figure 5 Step 3: On the next screen, press...
... press . For the Marvell 88SE9172: Insert the floppy disk containing the SATA RAID/AHCI driver and press . Marvell shared library for 32bit (install first) Marvell 91xx SATA RAID Controller 32bit Driver Marvell shared library for 64bit (install first) Marvell 91xx SATA RAID Controller 64bit Driver ENTER=Select F3=Exit Figure 5 Step 3: On the next screen, press...

Manual
Page 92
... the Rebuild tab in the array. Step 4: The rebuilding progress is displayed on the Information page in the Start Menu. Step 2: Select the RAID array to fault-tolerant arrays such as Functional. - 92 - Rebuilding an Array: Rebuilding is the process of equal or greater capacity. Step 1:... Enter the login ID and password (default: "admin"), and then click Sign in to a hard drive from the motherboard driver disk. Appendix Step 5: When done, the array's status on the screen and you can select Pause/Resume/Abort during the rebuilding process. To ...
... the Rebuild tab in the array. Step 4: The rebuilding progress is displayed on the Information page in the Start Menu. Step 2: Select the RAID array to fault-tolerant arrays such as Functional. - 92 - Rebuilding an Array: Rebuilding is the process of equal or greater capacity. Step 1:... Enter the login ID and password (default: "admin"), and then click Sign in to a hard drive from the motherboard driver disk. Appendix Step 5: When done, the array's status on the screen and you can select Pause/Resume/Abort during the rebuilding process. To ...
Manual
Page 94
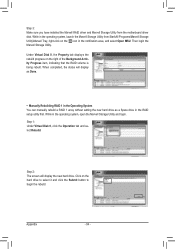
While in the operating system, launch the Marvell Storage Utility from the motherboard driver disk. While in the notification area, and select Open MSU. Appendix - 94 - Under Virtual Disk 0, the Property tab displays the rebuild progress on the hard... utility first. Click on the right of the Background Activity Progress item, indicating that the RAID volume is being rebuilt. Step 3: Make sure you have installed the Marvell RAID driver and Marvell Storage Utility from Start\All Programs\Marvell Storage Utility\Marvell Tray, right-click on the icon in the operating system, ...
While in the operating system, launch the Marvell Storage Utility from the motherboard driver disk. While in the notification area, and select Open MSU. Appendix - 94 - Under Virtual Disk 0, the Property tab displays the rebuild progress on the hard... utility first. Click on the right of the Background Activity Progress item, indicating that the RAID volume is being rebuilt. Step 3: Make sure you have installed the Marvell RAID driver and Marvell Storage Utility from Start\All Programs\Marvell Storage Utility\Marvell Tray, right-click on the icon in the operating system, ...


