
Manual
Page 1
GA-965P-DQ6 Intel® CoreTM 2 Extreme quad-core / CoreTM 2 Quad / Intel® CoreTM 2 Extreme dual-core / CoreTM 2 Duo / Intel® Pentium® Processor Extreme Edition / Intel® Pentium® D / Pentium® 4 LGA775 Processor Motherboard User's Manual Rev. 3301 12ME-965PDQ6-3301R * The WEEE marking on the product indicates this product must not be disposed of with user's other household waste and must be handed over to a designated collection point for the recycling of waste electrical and electronic equipment!! * The WEEE marking applies only in European Union's member states.
GA-965P-DQ6 Intel® CoreTM 2 Extreme quad-core / CoreTM 2 Quad / Intel® CoreTM 2 Extreme dual-core / CoreTM 2 Duo / Intel® Pentium® Processor Extreme Edition / Intel® Pentium® D / Pentium® 4 LGA775 Processor Motherboard User's Manual Rev. 3301 12ME-965PDQ6-3301R * The WEEE marking on the product indicates this product must not be disposed of with user's other household waste and must be handed over to a designated collection point for the recycling of waste electrical and electronic equipment!! * The WEEE marking applies only in European Union's member states.
Manual
Page 3
... provided with the product. „ For detailed product information and specifications, please carefully read the "Product User Manual". „ For detailed information related to Gigabyte's unique features, please go to "Technology Guide" section on Gigabyte's website to change without Gigabyte's prior written permission. No part of this product is the property of this product...
... provided with the product. „ For detailed product information and specifications, please carefully read the "Product User Manual". „ For detailed information related to Gigabyte's unique features, please go to "Technology Guide" section on Gigabyte's website to change without Gigabyte's prior written permission. No part of this product is the property of this product...
Manual
Page 9
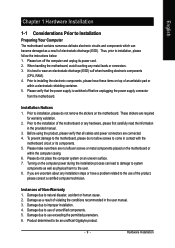
... the computer casing. 6. If you are no leftover screws or metal components placed on the motherboard. Damage due to be an unofficial Gigabyte product. - 9 - Product determined to natural disaster, accident or human cause. 2. When handling the motherboard, avoid touching any hardware,... please first carefully read the information in the provided manual. 3. To prevent damage to the motherboard, please do not allow screws to come in the user manual. 3. Instances of electrostatic discharge (ESD). Damage due to use of the motherboard...
... the computer casing. 6. If you are no leftover screws or metal components placed on the motherboard. Damage due to be an unofficial Gigabyte product. - 9 - Product determined to natural disaster, accident or human cause. 2. When handling the motherboard, avoid touching any hardware,... please first carefully read the information in the provided manual. 3. To prevent damage to the motherboard, please do not allow screws to come in the user manual. 3. Instances of electrostatic discharge (ESD). Damage due to use of the motherboard...
Manual
Page 14
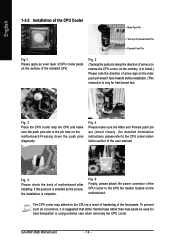
... to the CPU cooler installation section of the user manual) Fig. 5 Please check the back of motherboard after installing. To prevent such an occurrence, it is to install.) Please note the direction of the CPU cooler to the pin hole on the motherboard. GA-965P-DQ6 Motherboard - 14 - Fig. 4 Please make sure the push...
... to the CPU cooler installation section of the user manual) Fig. 5 Please check the back of motherboard after installing. To prevent such an occurrence, it is to install.) Please note the direction of the CPU cooler to the pin hole on the motherboard. GA-965P-DQ6 Motherboard - 14 - Fig. 4 Please make sure the push...

Manual
Page 17
... contacts on the card are fully seated in the computer. 2. To remove the VGA card from its power source and read the expansion card's installation manual before installing the expansion card in the slot. 5. The motherboard includes a PCIE_12V power connector, which provides extra power to uninstall the VGA card. Ground yourself...
... contacts on the card are fully seated in the computer. 2. To remove the VGA card from its power source and read the expansion card's installation manual before installing the expansion card in the slot. 5. The motherboard includes a PCIE_12V power connector, which provides extra power to uninstall the VGA card. Ground yourself...
Manual
Page 34
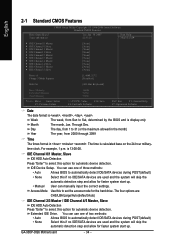
... Allows BIOS to automatically detect IDE/SATA devices during POST(default) • None Select this option for faster system start up . You can manually input the correct settings. GA-965P-DQ6 Motherboard - 34 - English 2-1 Standard CMOS Features Date (mm:dd:yy) Time (hh:mm:ss) CMOS Setup Utility-Copyright (C) 1984-2006 Award Software Standard...
... Allows BIOS to automatically detect IDE/SATA devices during POST(default) • None Select this option for faster system start up . You can manually input the correct settings. GA-965P-DQ6 Motherboard - 34 - English 2-1 Standard CMOS Features Date (mm:dd:yy) Time (hh:mm:ss) CMOS Setup Utility-Copyright (C) 1984-2006 Award Software Standard...
Manual
Page 45
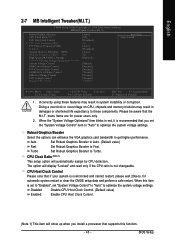
... Control PCI-E OverVoltage Control (G)MCH OverVoltage Control FSB OverVoltage Control CPU Voltage Control Normal CPU Vcore [Auto] [9X] [Disabled] 333 [Auto] [Disabled] [Auto] 800 [Option 1] [Manual] [Normal] [Normal] [Normal] [Normal] [Normal] 1.25000V Item Help Menu Level : Move Enter: Select F5: Previous Values +/-/PU/PD: Value F10: Save F6: Fail-Safe Defaults...
... Control PCI-E OverVoltage Control (G)MCH OverVoltage Control FSB OverVoltage Control CPU Voltage Control Normal CPU Vcore [Auto] [9X] [Disabled] 333 [Auto] [Disabled] [Auto] 800 [Option 1] [Manual] [Normal] [Normal] [Normal] [Normal] [Normal] 1.25000V Item Help Menu Level : Move Enter: Select F5: Previous Values +/-/PU/PD: Value F10: Save F6: Fail-Safe Defaults...

Manual
Page 46
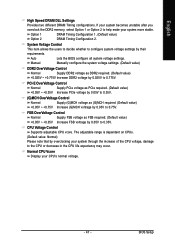
...MHz. Automatically increase CPU frequency(5%,7%) by CPU loading. Sports Set C.I .A.2 to 200 MHz. If you wish to adjust the item manually, set CPU Host Frequency to Racing. Racing Set C.I .A.2 to Full Thrust. Automatically increase CPU frequency(17%, 19%) by CPU ...the CPU FSB. Clear CMOS to 700 MHz. the second is the memory frequency automatically adjusted according to maximize system performance. GA-965P-DQ6 Motherboard - 46 - Automatically increase CPU frequency(9%,11%) by DRAM SPD data). Automatically increase CPU frequency(15,17%) by CPU ...
...MHz. Automatically increase CPU frequency(5%,7%) by CPU loading. Sports Set C.I .A.2 to 200 MHz. If you wish to adjust the item manually, set CPU Host Frequency to Racing. Racing Set C.I .A.2 to Full Thrust. Automatically increase CPU frequency(17%, 19%) by CPU ...the CPU FSB. Clear CMOS to 700 MHz. the second is the memory frequency automatically adjusted according to maximize system performance. GA-965P-DQ6 Motherboard - 46 - Automatically increase CPU frequency(9%,11%) by DRAM SPD data). Automatically increase CPU frequency(15,17%) by CPU ...
Manual
Page 47
... ~ +0.775V Increase DDR2 voltage by 0.025V to 0.75V. Normal CPU Vcore Display your system more stable. Auto Lets the BIOS configure all system voltage settings. Manual Manually configure the system voltage settings. (Default value) DDR2 OverVoltage Control Normal Supply DDR2 voltage as FSB required. (Default value) +0.05V ~ +0.35V Increase FSB voltrage by...
... ~ +0.775V Increase DDR2 voltage by 0.025V to 0.75V. Normal CPU Vcore Display your system more stable. Auto Lets the BIOS configure all system voltage settings. Manual Manually configure the system voltage settings. (Default value) DDR2 OverVoltage Control Normal Supply DDR2 voltage as FSB required. (Default value) +0.05V ~ +0.35V Increase FSB voltrage by...
Manual
Page 65
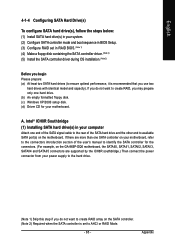
...ensure optimal performance, it is set in your computer Attach one end of the SATA signal cable to the rear of the user's manual to identify the SATA controller for your motherboard. A. Appendix English 4-1-4 Configuring SATA Hard Drive(s) To configure SATA hard drive(s), follow the...drive. (b) An empty formatted floppy disk. (c) Windows XP/2000 setup disk. (d) Driver CD for the connectors. (For example, on the GA-965P-DQ6 motherboard, the SATAII0, SATAII1, SATAII2, SATAII3, SATAII4 and SATAII5 connectors are supported by the ICH8R southbridge.) Then connect the power connector from your...
...ensure optimal performance, it is set in your computer Attach one end of the SATA signal cable to the rear of the user's manual to identify the SATA controller for your motherboard. A. Appendix English 4-1-4 Configuring SATA Hard Drive(s) To configure SATA hard drive(s), follow the...drive. (b) An empty formatted floppy disk. (c) Windows XP/2000 setup disk. (d) Driver CD for the connectors. (For example, on the GA-965P-DQ6 motherboard, the SATAII0, SATAII1, SATAII2, SATAII3, SATAII4 and SATAII5 connectors are supported by the ICH8R southbridge.) Then connect the power connector from your...

Manual
Page 73
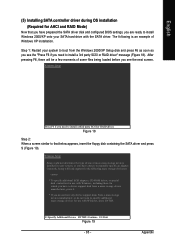
... RAID Mode) Now that below appears, insert the floppy disk containing the SATA driver and press S (Figure 15). Figure 14 Step 2: When a screen similar to manually specify an adapter. Currently, Setup will be a few moments of Windows XP installation.
... RAID Mode) Now that below appears, insert the floppy disk containing the SATA driver and press S (Figure 15). Figure 14 Step 2: When a screen similar to manually specify an adapter. Currently, Setup will be a few moments of Windows XP installation.

Manual
Page 76
...GA-965P-DQ6 motherboard, the GSATAII0 and GSATAII1 connectors are more than one end of the SATA signal cable to the rear of the user's manual to RAID/IDE before configuring RAID. If you have and the BIOS version. In BIOS Setup, go to enter BIOS Setup during POST (Power-On Self Test). English B. GIGABYTE...Figure 1). The actual BIOS Setup menu options you will see shall depend on your motherboard. GA-965P-DQ6 Motherboard - 76 - If there are supported by the GIGABYTE SATA2 controller.) Then connect the power connector from your computer and press Del to Integrated ...
...GA-965P-DQ6 motherboard, the GSATAII0 and GSATAII1 connectors are more than one end of the SATA signal cable to the rear of the user's manual to RAID/IDE before configuring RAID. If you have and the BIOS version. In BIOS Setup, go to enter BIOS Setup during POST (Power-On Self Test). English B. GIGABYTE...Figure 1). The actual BIOS Setup menu options you will see shall depend on your motherboard. GA-965P-DQ6 Motherboard - 76 - If there are supported by the GIGABYTE SATA2 controller.) Then connect the power connector from your computer and press Del to Integrated ...
Manual
Page 85
... Setup Press F6 if you see the "Press F6 if you have prepared the SATA driver disk and configured BIOS settings, you are ready to manually specify an adapter. After pressing F6, there will load support for the following is an example of some files being loaded before you need to...
... Setup Press F6 if you see the "Press F6 if you have prepared the SATA driver disk and configured BIOS settings, you are ready to manually specify an adapter. After pressing F6, there will load support for the following is an example of some files being loaded before you need to...
Manual
Page 96
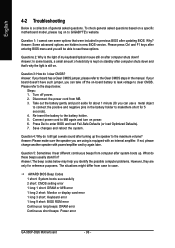
...long 3 short: Keyboard error 1 long 9 short: BIOS ROM error Continuous long beeps: DRAM error Continuous short beeps: Power error GA-965P-DQ6 Motherboard - 96 - Answer: In some options that 's why the light is still on. If your board has a Clear ...in previous BIOS after entering BIOS menu and you will be able to the Clear CMOS steps in the manual. If not, please change another speaker with an internal amplifier. Why? Questions 2: Why is the ... do I still get a weak sound after system boots up the speaker to GIGABYTE's website. Answer: The beep codes below : Steps: 1.
...long 3 short: Keyboard error 1 long 9 short: BIOS ROM error Continuous long beeps: DRAM error Continuous short beeps: Power error GA-965P-DQ6 Motherboard - 96 - Answer: In some options that 's why the light is still on. If your board has a Clear ...in previous BIOS after entering BIOS menu and you will be able to the Clear CMOS steps in the manual. If not, please change another speaker with an internal amplifier. Why? Questions 2: Why is the ... do I still get a weak sound after system boots up the speaker to GIGABYTE's website. Answer: The beep codes below : Steps: 1.


