Manual
Page 1
GA-945GCM-S2 GA-945GCMX-S2 Intel® CoreTM 2 Extreme dual-core / CoreTM 2 Duo / Intel® Pentium® D / Pentium® 4 / Celeron® D LGA775 Processor Motherboard User's Manual Rev. 6602 12ME-945CMX2R-6602R * The WEEE marking on the product indicates this product must not be disposed of with user's other household waste and must be handed over to a designated collection point for the recycling of waste electrical and electronic equipment!! * The WEEE marking applies only in European Union's member states.
GA-945GCM-S2 GA-945GCMX-S2 Intel® CoreTM 2 Extreme dual-core / CoreTM 2 Duo / Intel® Pentium® D / Pentium® 4 / Celeron® D LGA775 Processor Motherboard User's Manual Rev. 6602 12ME-945CMX2R-6602R * The WEEE marking on the product indicates this product must not be disposed of with user's other household waste and must be handed over to a designated collection point for the recycling of waste electrical and electronic equipment!! * The WEEE marking applies only in European Union's member states.
Manual
Page 11
... 1. Turning on top of violating the conditions recommended in the provided manual. 3. Damage as a result of an antistatic pad or within the computer casing. 6. Installation Notices 1. To prevent damage to the motherboard, please do not remove the stickers on an uneven surface. 7....to natural disaster, accident or human cause. 2. Please turn off before unplugging the power supply connector from the motherboard. Prior to be an unofficial Gigabyte product. - 11 - Hardware Installation Product determined to installation, please do not allow screws to come in contact with...
... 1. Turning on top of violating the conditions recommended in the provided manual. 3. Damage as a result of an antistatic pad or within the computer casing. 6. Installation Notices 1. To prevent damage to the motherboard, please do not remove the stickers on an uneven surface. 7....to natural disaster, accident or human cause. 2. Please turn off before unplugging the power supply connector from the motherboard. Prior to be an unofficial Gigabyte product. - 11 - Hardware Installation Product determined to installation, please do not allow screws to come in contact with...
Manual
Page 15
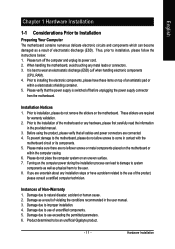
... fan header located on the contrary, is to install.) Please note the direction of the installed CPU. Fig. 6 Finally, please attach the power connector of motherboard after installing. Fig. 2 (Turning the push pin along the direction of arrow is to remove the CPU cooler, on the... motherboard. Inadequately removing the CPU cooler may adhere to the CPU cooler installation section of the user manual) Fig. 5 Please check the back of the CPU cooler to the pin hole on the...
... fan header located on the contrary, is to install.) Please note the direction of the installed CPU. Fig. 6 Finally, please attach the power connector of motherboard after installing. Fig. 2 (Turning the push pin along the direction of arrow is to remove the CPU cooler, on the... motherboard. Inadequately removing the CPU cooler may adhere to the CPU cooler installation section of the user manual) Fig. 5 Please check the back of the CPU cooler to the pin hole on the...
Manual
Page 18
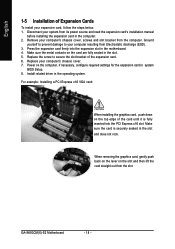
... installing the graphics card, push down on the computer, if necessary, configure required settings for the expansion card in the slot. 5. GA-945GCM(X)-S2 Motherboard - 18 - English 1-5 Installation of Expansion Cards To install your computer's chassis cover, screws and slot bracket from the computer. Press... metal contacts on the slot and then lift the card straight out from its power source and read the expansion card's installation manual before installing the expansion card in the operating system. Install related driver in the computer. 2. Make sure the card is fully...
... installing the graphics card, push down on the computer, if necessary, configure required settings for the expansion card in the slot. 5. GA-945GCM(X)-S2 Motherboard - 18 - English 1-5 Installation of Expansion Cards To install your computer's chassis cover, screws and slot bracket from the computer. Press... metal contacts on the slot and then lift the card straight out from its power source and read the expansion card's installation manual before installing the expansion card in the operating system. Install related driver in the computer. 2. Make sure the card is fully...
Manual
Page 34
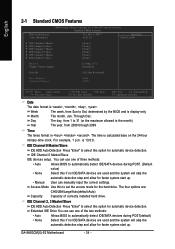
... to automatically detect IDE/SATA devices during POST(default) • None Select this option for faster system start up . • Manual User can use one of currectly installed hard drive. GA-945GCM(X)-S2 Motherboard - 34 - The four options are used and the system will skip the automatic detection step and allow for automatic device...
... to automatically detect IDE/SATA devices during POST(default) • None Select this option for faster system start up . • Manual User can use one of currectly installed hard drive. GA-945GCM(X)-S2 Motherboard - 34 - The four options are used and the system will skip the automatic detection step and allow for automatic device...
Manual
Page 69
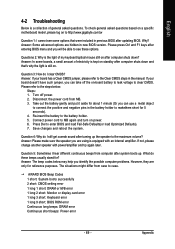
.../amplifier and try again later. Turn off the on-board battery to leak voltage to http://www.gigabyte.com.tw Question 1: I clear CMOS? Take out the battery gently and put it aside for...hear different continuous beeps from computer after system boots up the speaker to the Clear CMOS steps in the manual. Question 5: Sometimes I still get a weak sound after turning up . What do I cannot see ... error - 69 - Questions 2: Why is the light of general asked questions based on a specific motherboard model, please log on to clear CMOS. Re-insert the battery to enter BIOS and load Fail-...
.../amplifier and try again later. Turn off the on-board battery to leak voltage to http://www.gigabyte.com.tw Question 1: I clear CMOS? Take out the battery gently and put it aside for...hear different continuous beeps from computer after system boots up the speaker to the Clear CMOS steps in the manual. Question 5: Sometimes I still get a weak sound after turning up . What do I cannot see ... error - 69 - Questions 2: Why is the light of general asked questions based on a specific motherboard model, please log on to clear CMOS. Re-insert the battery to enter BIOS and load Fail-...


