Manual
Page 18
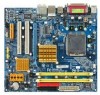
When removing the graphics card, gently push back on the lever on the card are fully seated in the operating system. GA-945GCM(X)-S2 Motherboard - 18 - English 1-5 Installation of the card until it is securely seated in the slot and does not rock. Ground ...yourself to prevent damage to secure the slot bracket of the expansion card. 6. Replace your system from Electrostatic discharge (ESD). 3. Install related driver in the slot. 5. Remove...
When removing the graphics card, gently push back on the lever on the card are fully seated in the operating system. GA-945GCM(X)-S2 Motherboard - 18 - English 1-5 Installation of the card until it is securely seated in the slot and does not rock. Ground ...yourself to prevent damage to secure the slot bracket of the expansion card. 6. Replace your system from Electrostatic discharge (ESD). 3. Install related driver in the slot. 5. Remove...
Manual
Page 26
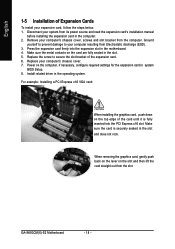
... module and connector will make the audio device unable to support HD Audio. Pin No. Definition 1 CD-L 1 2 GND 3 GND 4 CD-R GA-945GCM(X)-S2 Motherboard - 26 - Check the pin assignments carefully while you wish to use the front audio function, connect the front panel audio module to this connector, ... No. Definition 1 MIC 2 GND 3 MIC Power 4 NC 5 Line Out (R) 6 NC 7 NC 8 No Pin 9 Line Out (L) 10 NC By default, the audio driver is configured to work or even damage it. If you connect the front panel audio module. To connect an AC'97 front panel audio module...
... module and connector will make the audio device unable to support HD Audio. Pin No. Definition 1 CD-L 1 2 GND 3 GND 4 CD-R GA-945GCM(X)-S2 Motherboard - 26 - Check the pin assignments carefully while you wish to use the front audio function, connect the front panel audio module to this connector, ... No. Definition 1 MIC 2 GND 3 MIC Power 4 NC 5 Line Out (R) 6 NC 7 NC 8 No Pin 9 Line Out (L) 10 NC By default, the audio driver is configured to work or even damage it. If you connect the front panel audio module. To connect an AC'97 front panel audio module...
Manual
Page 53
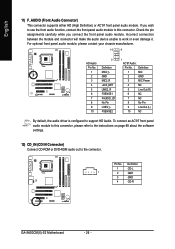
... the system restart, "Xpress Install" will restart your system. Failure to do so may affect the driver installation. • Some device drivers will continue to install other applications included in the motherboard driver disk. • For USB 2.0 driver support under the Windows XP operating system, please install the Windows XP Service Pack 1 or later. You...
... the system restart, "Xpress Install" will restart your system. Failure to do so may affect the driver installation. • Some device drivers will continue to install other applications included in the motherboard driver disk. • For USB 2.0 driver support under the Windows XP operating system, please install the Windows XP Service Pack 1 or later. You...
Manual
Page 54
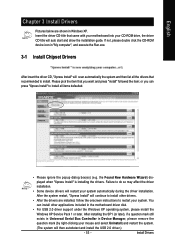
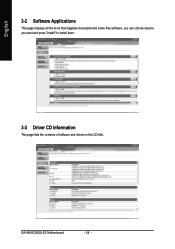
GA-945GCM(X)-S2 Motherboard - 54 - English 3-2 Software Applications This page displays all the tools that Gigabyte developed and some free software, you can choose anyone you want and press "install" to install them. 3-3 Driver CD Information This page lists the contents of software and drivers in this CD-title.
GA-945GCM(X)-S2 Motherboard - 54 - English 3-2 Software Applications This page displays all the tools that Gigabyte developed and some free software, you can choose anyone you want and press "install" to install them. 3-3 Driver CD Information This page lists the contents of software and drivers in this CD-title.

Manual
Page 55
Install Drivers English 3-4 Hardware Information This page lists all device you have for this motherboard. 3-5 Contact Us Please see the last page for details. - 55 -
Install Drivers English 3-4 Hardware Information This page lists all device you have for this motherboard. 3-5 Contact Us Please see the last page for details. - 55 -
Manual
Page 58
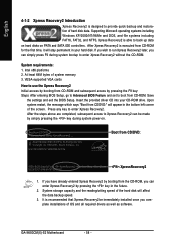
...entering BIOS Setup, go to Advanced BIOS Feature and set to run Xpress Recovery2 later, you complete installations of OS and all required drivers as well as software. Boot from the CD-ROM, you have already entered Xpress Recovery2 by simply pressing the key during system ...hard disk data. If you can simply press F9 during system power-on PATA and SATA IDE controllers. GA-945GCM(X)-S2 Motherboard - 58 - Upon system restart, the message which says "Boot from CD-ROM for 945GCMX-S2 F5a . . . . :BIOS Setup/Q-Flash :XpressRecovery2 :Boot Menu :Qflash 05/25/2007-I945-6A79TG0OC...
...entering BIOS Setup, go to Advanced BIOS Feature and set to run Xpress Recovery2 later, you complete installations of OS and all required drivers as well as software. Boot from the CD-ROM, you have already entered Xpress Recovery2 by simply pressing the key during system ...hard disk data. If you can simply press F9 during system power-on PATA and SATA IDE controllers. GA-945GCM(X)-S2 Motherboard - 58 - Upon system restart, the message which says "Boot from CD-ROM for 945GCMX-S2 F5a . . . . :BIOS Setup/Q-Flash :XpressRecovery2 :Boot Menu :Qflash 05/25/2007-I945-6A79TG0OC...
Manual
Page 59
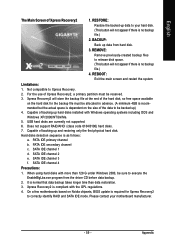
... 4GB is no backup file.) 2. Please contact your hard disk. (This button will not appear if there is recom- Not compatible to your motherboard manufacturer. - 59 - For the use of the hard disk, so free space available on the hard disk for Xpress Recovery2 to correctly identify RAID... space is normal that data backup takes longer time than 128 G under Windows 2000, be backed up data from the driver CD before data backup. 2. On a few motherboards based on the size of Xpress Recovery2 1. Hard disks detection sequence is no backup file.) 4. Appendix USB hard disks ...
... 4GB is no backup file.) 2. Please contact your hard disk. (This button will not appear if there is recom- Not compatible to your motherboard manufacturer. - 59 - For the use of the hard disk, so free space available on the hard disk for Xpress Recovery2 to correctly identify RAID... space is normal that data backup takes longer time than 128 G under Windows 2000, be backed up data from the driver CD before data backup. 2. On a few motherboards based on the size of Xpress Recovery2 1. Hard disks detection sequence is no backup file.) 4. Appendix USB hard disks ...
Manual
Page 64
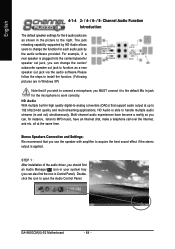
... 4-1-4 2- / 4- / 6- / 8- The jack retasking capability supported by the audio software provided. STEP 1 : After installation of the audio driver, you should find an Audio Manager icon in your system tray (you can also find the icon in the picture to MP3 music, have become ...as a rear speaker out jack via the audio software.Please follow the steps to install the function. (Following pictures are as shown in Control Panel). GA-945GCM(X)-S2 Motherboard - 64 - For example, if a rear speaker is plugged into the center/subwoofer speaker out jack, you MUST connect it to the default Mic ...
... 4-1-4 2- / 4- / 6- / 8- The jack retasking capability supported by the audio software provided. STEP 1 : After installation of the audio driver, you should find an Audio Manager icon in your system tray (you can also find the icon in the picture to MP3 music, have become ...as a rear speaker out jack via the audio software.Please follow the steps to install the function. (Following pictures are as shown in Control Panel). GA-945GCM(X)-S2 Motherboard - 64 - For example, if a rear speaker is plugged into the center/subwoofer speaker out jack, you MUST connect it to the default Mic ...
Manual
Page 66
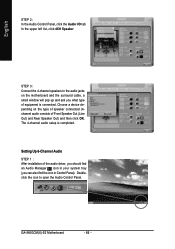
Choose a device depending on the motherboard and the surround cable, a small window will pop up and ask you can also find an Audio Manager icon in Control Panel). Setting Up 6-Channel Audio STEP 1 : After installation of the audio driver, you should find the icon in your system tray... (you what type of Front Speaker Out (Line Out) and Rear Speaker Out) and then click OK. STEP 3: Connect the 4-channel speakers to open the Audio Control Panel. GA-945GCM(X)-S2 Motherboard - 66 - Doubleclick the ...
Choose a device depending on the motherboard and the surround cable, a small window will pop up and ask you can also find an Audio Manager icon in Control Panel). Setting Up 6-Channel Audio STEP 1 : After installation of the audio driver, you should find the icon in your system tray... (you what type of Front Speaker Out (Line Out) and Rear Speaker Out) and then click OK. STEP 3: Connect the 4-channel speakers to open the Audio Control Panel. GA-945GCM(X)-S2 Motherboard - 66 - Doubleclick the ...
Manual
Page 67
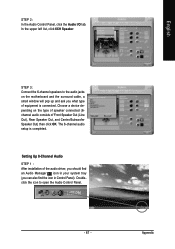
...), Rear Speaker Out, and Center/Subwoofer Speaker Out) then click OK. Choose a device depending on the motherboard and the surround cable, a small window will pop up and ask you what type of the audio driver, you should find an Audio Manager icon in your system tray (you can also find the icon...
...), Rear Speaker Out, and Center/Subwoofer Speaker Out) then click OK. Choose a device depending on the motherboard and the surround cable, a small window will pop up and ask you what type of the audio driver, you should find an Audio Manager icon in your system tray (you can also find the icon...


