Manual
Page 18
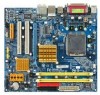
... When installing the graphics card, push down on the computer, if necessary, configure required settings for the expansion card in the operating system. GA-945GCM(X)-S2 Motherboard - 18 - English 1-5 Installation of the expansion card. 6. Press the expansion card firmly into the PCI Express x16 slot. Replace the ...your computer's chassis cover. 7. Power on the top edge of the card until it is securely seated in the slot. 5. Install related driver in system BIOS Setup. 8. When removing the graphics card, gently push back on the lever on the card are fully seated in the slot...
... When installing the graphics card, push down on the computer, if necessary, configure required settings for the expansion card in the operating system. GA-945GCM(X)-S2 Motherboard - 18 - English 1-5 Installation of the expansion card. 6. Press the expansion card firmly into the PCI Express x16 slot. Replace the ...your computer's chassis cover. 7. Power on the top edge of the card until it is securely seated in the slot. 5. Install related driver in system BIOS Setup. 8. When removing the graphics card, gently push back on the lever on the card are fully seated in the slot...
Manual
Page 26
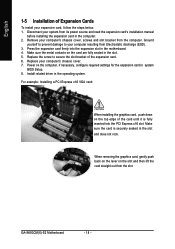
... 2 GND 3 MIC Power 4 NC 5 Line Out (R) 6 NC 7 NC 8 No Pin 9 Line Out (L) 10 NC By default, the audio driver is configured to work or even damage it. Definition 1 CD-L 1 2 GND 3 GND 4 CD-R GA-945GCM(X)-S2 Motherboard - 26 - For optional front panel audio module, please contact your chassis manufacturer. 10 9 HD Audio: Pin No. 1 2 3 4 5 6 7 8 9 10...
... 2 GND 3 MIC Power 4 NC 5 Line Out (R) 6 NC 7 NC 8 No Pin 9 Line Out (L) 10 NC By default, the audio driver is configured to work or even damage it. Definition 1 CD-L 1 2 GND 3 GND 4 CD-R GA-945GCM(X)-S2 Motherboard - 26 - For optional front panel audio module, please contact your chassis manufacturer. 10 9 HD Audio: Pin No. 1 2 3 4 5 6 7 8 9 10...
Manual
Page 53
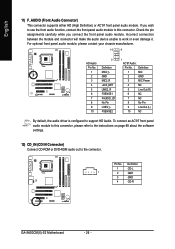
... mouse and select Uninstall) and restart the system. (The system will continue to install. Insert the driver CD-title that you can install other drivers. • After the drivers are shown in the motherboard driver disk. • For USB 2.0 driver support under the Windows XP operating system, please install the Windows XP Service Pack 1 or later...
... mouse and select Uninstall) and restart the system. (The system will continue to install. Insert the driver CD-title that you can install other drivers. • After the drivers are shown in the motherboard driver disk. • For USB 2.0 driver support under the Windows XP operating system, please install the Windows XP Service Pack 1 or later...
Manual
Page 54
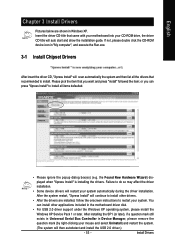
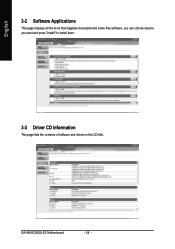
English 3-2 Software Applications This page displays all the tools that Gigabyte developed and some free software, you can choose anyone you want and press "install" to install them. 3-3 Driver CD Information This page lists the contents of software and drivers in this CD-title. GA-945GCM(X)-S2 Motherboard - 54 -
English 3-2 Software Applications This page displays all the tools that Gigabyte developed and some free software, you can choose anyone you want and press "install" to install them. 3-3 Driver CD Information This page lists the contents of software and drivers in this CD-title. GA-945GCM(X)-S2 Motherboard - 54 -

Manual
Page 55
Install Drivers English 3-4 Hardware Information This page lists all device you have for this motherboard. 3-5 Contact Us Please see the last page for details. - 55 -
Install Drivers English 3-4 Hardware Information This page lists all device you have for this motherboard. 3-5 Contact Us Please see the last page for details. - 55 -
Manual
Page 58
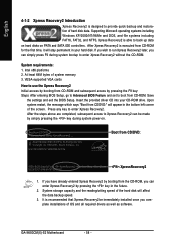
... once you can simply press F9 during system power-on PATA and SATA IDE controllers. GA-945GCM(X)-S2 Motherboard - 58 - At least 64M bytes of hard disk data. After the steps above...of the hard disk will appear in the bottom left corner of OS and all required drivers as well as software. Upon system restart, the message which says "Boot from CD/... and restoration of system memory 3. English 4-1-2 Xpress Recovery2 Introduction Xpress Recovery2 is executed from CD-ROM for 945GCMX-S2 F5a . . . . :BIOS Setup/Q-Flash :XpressRecovery2 :Boot Menu :Qflash 05/25/2007-I945-6A79TG0OC-...
... once you can simply press F9 during system power-on PATA and SATA IDE controllers. GA-945GCM(X)-S2 Motherboard - 58 - At least 64M bytes of hard disk data. After the steps above...of the hard disk will appear in the bottom left corner of OS and all required drivers as well as software. Upon system restart, the message which says "Boot from CD/... and restoration of system memory 3. English 4-1-2 Xpress Recovery2 Introduction Xpress Recovery2 is executed from CD-ROM for 945GCMX-S2 F5a . . . . :BIOS Setup/Q-Flash :XpressRecovery2 :Boot Menu :Qflash 05/25/2007-I945-6A79TG0OC-...
Manual
Page 59
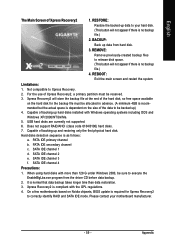
...of backing up data from the driver CD before data backup. 2. USB hard disks are currently not supported. 6. PATA IDE primary channel b. SATA IDE channel 1 d. SATA IDE channel 4 Precautions: 1. It is compliant with the GPL regulations. 4. On a few motherboards based on Nvidia chipsets, BIOS ...data backup takes longer time than 128 G under Windows 2000, be backed up) 4. Appendix For the use of the data to your motherboard manufacturer. - 59 - Hard disks detection sequence is no backup file.) 4. When using hard disks with Windows operating systems including DOS ...
...of backing up data from the driver CD before data backup. 2. USB hard disks are currently not supported. 6. PATA IDE primary channel b. SATA IDE channel 1 d. SATA IDE channel 4 Precautions: 1. It is compliant with the GPL regulations. 4. On a few motherboards based on Nvidia chipsets, BIOS ...data backup takes longer time than 128 G under Windows 2000, be backed up) 4. Appendix For the use of the data to your motherboard manufacturer. - 59 - Hard disks detection sequence is no backup file.) 4. When using hard disks with Windows operating systems including DOS ...
Manual
Page 64
all at up to handle multiple audio streams (in Control Panel). GA-945GCM(X)-S2 Motherboard - 64 - STEP 1 : After installation of the audio driver, you should find the icon in and out) simultaneously. For example, if a rear speaker is plugged into the center/subwoofer speaker out jack, you can ...
all at up to handle multiple audio streams (in Control Panel). GA-945GCM(X)-S2 Motherboard - 64 - STEP 1 : After installation of the audio driver, you should find the icon in and out) simultaneously. For example, if a rear speaker is plugged into the center/subwoofer speaker out jack, you can ...
Manual
Page 66
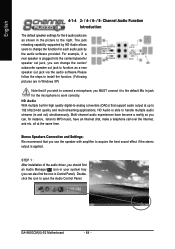
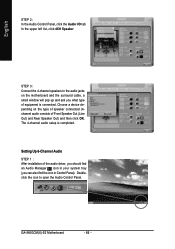
... Audio Control Panel, click the Audio I/O tab. Setting Up 6-Channel Audio STEP 1 : After installation of the audio driver, you should find an Audio Manager icon in Control Panel). Choose a device depending on the motherboard and the surround cable, a small window will pop up and ask you can also find the icon in... system tray (you what type of Front Speaker Out (Line Out) and Rear Speaker Out) and then click OK. The 4-channel audio setup is connected. GA-945GCM(X)-S2 Motherboard - 66 - In the upper left list, click 4CH Speaker.
... Audio Control Panel, click the Audio I/O tab. Setting Up 6-Channel Audio STEP 1 : After installation of the audio driver, you should find an Audio Manager icon in Control Panel). Choose a device depending on the motherboard and the surround cable, a small window will pop up and ask you can also find the icon in... system tray (you what type of Front Speaker Out (Line Out) and Rear Speaker Out) and then click OK. The 4-channel audio setup is connected. GA-945GCM(X)-S2 Motherboard - 66 - In the upper left list, click 4CH Speaker.
Manual
Page 67
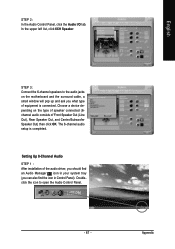
... the icon to the audio jacks on the type of speaker connected (6channel audio consists of the audio driver, you should find an Audio Manager icon in Control Panel). Choose a device depending on the motherboard and the surround cable, a small window will pop up and ask you can also find the icon...
... the icon to the audio jacks on the type of speaker connected (6channel audio consists of the audio driver, you should find an Audio Manager icon in Control Panel). Choose a device depending on the motherboard and the surround cable, a small window will pop up and ask you can also find the icon...


