Manual
Page 4
Table of Contents GA-8VM800M-775 Motherboard Layout 6 Block Diagram ...7 Chapter 1 Hardware Installation 9 1-1 Considerations Prior to Installation 9 1-2 Feature Summary 10 1-3 Installation of the CPU and Heatsink 12 1-3-1 Installation of the CPU 12 1-3-2 Installation of the Heatsink 13 1-4 Installation of Memory 14 1-5 Installation of Expansion Cards 15 1-6 I/O Back Panel Introduction 16 1-7 Connectors Introduction 17 Chapter 2 BIOS...
Table of Contents GA-8VM800M-775 Motherboard Layout 6 Block Diagram ...7 Chapter 1 Hardware Installation 9 1-1 Considerations Prior to Installation 9 1-2 Feature Summary 10 1-3 Installation of the CPU and Heatsink 12 1-3-1 Installation of the CPU 12 1-3-2 Installation of the Heatsink 13 1-4 Installation of Memory 14 1-5 Installation of Expansion Cards 15 1-6 I/O Back Panel Introduction 16 1-7 Connectors Introduction 17 Chapter 2 BIOS...
Manual
Page 10
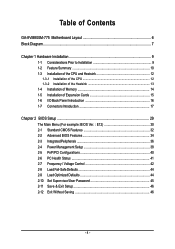
... VIA P4M800 Chipset Š Onboard RTL8100C chip (10/100 Mbit) Š 1 RJ45 port Š Realtek ALC655 CODEC Š Supports Line In ; GA-8VM800M-775 Motherboard - 10 - English 1-2 Feature Summary CPU Chipset Memory Slots IDE Connections Onboard SATA FDD Connections Peripherals Onboard VGA Onboard LAN Onboard Audio I/O Control Hardware Monitor Š Supports the latest Intel...
... VIA P4M800 Chipset Š Onboard RTL8100C chip (10/100 Mbit) Š 1 RJ45 port Š Realtek ALC655 CODEC Š Supports Line In ; GA-8VM800M-775 Motherboard - 10 - English 1-2 Feature Summary CPU Chipset Memory Slots IDE Connections Onboard SATA FDD Connections Peripherals Onboard VGA Onboard LAN Onboard Audio I/O Control Hardware Monitor Š Supports the latest Intel...
Manual
Page 12
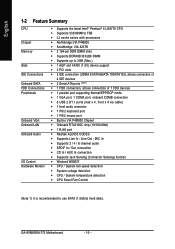
...Technology 1-3-1 Installation of the CPU Metal Lever Fig. 1 Gently lift the metal lever located on the CPU prior to the CPU during installation.) GA-8VM800M-775 Motherboard - 12 - If you install the CPU in the wrong direction, the CPU will not insert properly. Chipset: An VIA Chipset that ...on the CPU socket. Please make sure the heatsink is installed on the CPU socket to your hardware specifications including the CPU, graphics card, memory, hard drive, etc. If this occurs, please change the insert direction of the CPU. Fig. 2 Remove the plastic covering on the ...
...Technology 1-3-1 Installation of the CPU Metal Lever Fig. 1 Gently lift the metal lever located on the CPU prior to the CPU during installation.) GA-8VM800M-775 Motherboard - 12 - If you install the CPU in the wrong direction, the CPU will not insert properly. Chipset: An VIA Chipset that ...on the CPU socket. Please make sure the heatsink is installed on the CPU socket to your hardware specifications including the CPU, graphics card, memory, hard drive, etc. If this occurs, please change the insert direction of the CPU. Fig. 2 Remove the plastic covering on the ...
Manual
Page 14
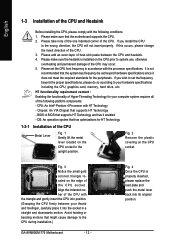
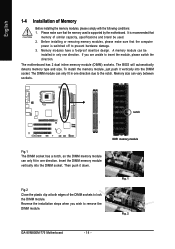
... direction. The DIMM module can vary between sockets. Insert the DIMM memory module vertically into the DIMM socket. notch Fig.1 The DIMM socket has a notch, so the DIMM memory module can be used is recommended that the computer power is switched ... edges of Memory Before installing the memory modules, please comply with the following conditions: 1. Before installing or removing memory modules, please make sure that the memory used . 2. To install the memory module, just push it down. It is supported by the motherboard. Fig. 1 Fig. 2 GA-8VM800M-775 Motherboard - ...
... direction. The DIMM module can vary between sockets. Insert the DIMM memory module vertically into the DIMM socket. notch Fig.1 The DIMM socket has a notch, so the DIMM memory module can be used is recommended that the computer power is switched ... edges of Memory Before installing the memory modules, please comply with the following conditions: 1. Before installing or removing memory modules, please make sure that the memory used . 2. To install the memory module, just push it down. It is supported by the motherboard. Fig. 1 Fig. 2 GA-8VM800M-775 Motherboard - ...
Manual
Page 32
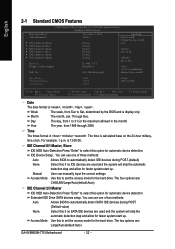
... Auto Allows BIOS to set the access mode for the hard drive. For example, 1 p.m. The four options are : Large/Auto(default:Auto) GA-8VM800M-775 Motherboard - 32 - is display only The month, Jan. You can manually input the correct settings Access Mode Use this to automatically detect SATA IDE...option for faster system start up . Week Month The week, from 1999 through 2098 Time The times format in the month) Base Memory Extended Memory Total Memory 640K 127M 128M 1999 to set the access mode for the hard drive. The two options are : CHS/LBA/Large/Auto(default...
... Auto Allows BIOS to set the access mode for the hard drive. For example, 1 p.m. The four options are : Large/Auto(default:Auto) GA-8VM800M-775 Motherboard - 32 - is display only The month, Jan. You can manually input the correct settings Access Mode Use this to automatically detect SATA IDE...option for faster system start up . Week Month The week, from 1999 through 2098 Time The times format in the month) Base Memory Extended Memory Total Memory 640K 127M 128M 1999 to set the access mode for the hard drive. The two options are : CHS/LBA/Large/Auto(default...

Manual
Page 33
... for Japan Area) Disabled Normal Floppy Drive. (Default value) Drive A Drive A is typically 512K for systems with 640K or more memory installed on the outside drive casing. Floppy 3 Mode Support (for a disk error; it will stop for all other errors. (Default...25 inch AT-type high-density drive; 1.2M byte capacity 720K, 3.5" (3.5 inch when 3 Mode is present during power up. Extended Memory The BIOS determines how much extended memory is Enabled). 3.5 inch double-sided drive; 720K byte capacity 1.44M, 3.5" 3.5 inch double-sided drive; 1.44M byte capacity. (Default...
... for Japan Area) Disabled Normal Floppy Drive. (Default value) Drive A Drive A is typically 512K for systems with 640K or more memory installed on the outside drive casing. Floppy 3 Mode Support (for a disk error; it will stop for all other errors. (Default...25 inch AT-type high-density drive; 1.2M byte capacity 720K, 3.5" (3.5 inch when 3 Mode is present during power up. Extended Memory The BIOS determines how much extended memory is Enabled). 3.5 inch double-sided drive; 720K byte capacity 1.44M, 3.5" 3.5 inch double-sided drive; 1.44M byte capacity. (Default...
Manual
Page 34
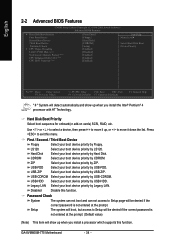
...Hard Disk. Password Check System The system can not boot and can not access to exit this function. Disabled Disable this menu. GA-8VM800M-775 Motherboard - 34 - English 2-2 Advanced BIOS Features CMOS Setup Utility-Copyright (C) 1984-2005 Award Software Advanced BIOS Features ` Hard ... your boot device priority by Floppy. Setup The system will boot, but access to Setup will detect automatically and show up , or to 3 No-Execute Memory Protect (Note) CPU Enhanced Halt (C1E) (Note) CPU EIST Function (Note) [Press Enter] [Floppy] [Hard Disk] [CDROM] [Setup] [Enabled]...
...Hard Disk. Password Check System The system can not boot and can not access to exit this function. Disabled Disable this menu. GA-8VM800M-775 Motherboard - 34 - English 2-2 Advanced BIOS Features CMOS Setup Utility-Copyright (C) 1984-2005 Award Software Advanced BIOS Features ` Hard ... your boot device priority by Floppy. Setup The system will boot, but access to Setup will detect automatically and show up , or to 3 No-Execute Memory Protect (Note) CPU Enhanced Halt (C1E) (Note) CPU EIST Function (Note) [Press Enter] [Floppy] [Hard Disk] [CDROM] [Setup] [Enabled]...
Manual
Page 35
... will show up when you install a processor which supports this feature is only working for windows XP. (Default value) No-Execute Memory Protect (Note) Enabled Enables No-Execute Memory Protect function. (Default value) Disabled Disables No-Execute Memory Protect function. BIOS Setup English CPU Hyper-Threading Enabled Disabled Enables CPU Hyper Threading Feature.
... will show up when you install a processor which supports this feature is only working for windows XP. (Default value) No-Execute Memory Protect (Note) Enabled Enables No-Execute Memory Protect function. (Default value) Disabled Disables No-Execute Memory Protect function. BIOS Setup English CPU Hyper-Threading Enabled Disabled Enables CPU Hyper Threading Feature.
Manual
Page 38
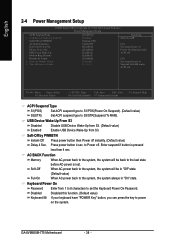
... value) Full-On When AC-power back to the last state Soft-Off before AC-power is pressed less than 4 sec. Press power button 4 sec. GA-8VM800M-775 Motherboard - 38 - English 2-4 Power Management Setup CMOS Setup Utility-Copyright (C) 1984-2005 Award Software Power Management Setup ACPI Suspend Type x USB Device Wake-Up ... On Mouse Power On PME Event Wake Up Modem Ring Resume Resume by PWRBTN Instant-Off Press power button then Power off . AC BACK Function Memory When AC-power back to the system, the system will be back to the system, the system always in "On" state. to S3/STR(...
... value) Full-On When AC-power back to the last state Soft-Off before AC-power is pressed less than 4 sec. Press power button 4 sec. GA-8VM800M-775 Motherboard - 38 - English 2-4 Power Management Setup CMOS Setup Utility-Copyright (C) 1984-2005 Award Software Power Management Setup ACPI Suspend Type x USB Device Wake-Up ... On Mouse Power On PME Event Wake Up Modem Ring Resume Resume by PWRBTN Instant-Off Press power button then Power off . AC BACK Function Memory When AC-power back to the system, the system will be back to the system, the system always in "On" state. to S3/STR(...

Manual
Page 43
English CPU Host Clock Control Note: Please note that by overclocking your system through the increase of the DDR voltage, damage to the memory may occur. CPU Clock 200MHz ~255MHz Set CPU Clock from 200MHz to "133". If you use DDR266 DRAM module, please set "DRAM Clock" to +0.2V. ...
English CPU Host Clock Control Note: Please note that by overclocking your system through the increase of the DDR voltage, damage to the memory may occur. CPU Clock 200MHz ~255MHz Set CPU Clock from 200MHz to "133". If you use DDR266 DRAM module, please set "DRAM Clock" to +0.2V. ...

Manual
Page 53
... PC chassis and short-circuit the "Clear CMOS" pins or the battery on the original M.I.B., the new Memory Intelligent Booster 2 (M.I .B. 2 features. Appendix Through GIGABYTE M.I .T.'s integration of all platform performance settings into different modes within BIOS setup in order to the desired... level. C.I.A.2 (CPU Intelligent Accelerator 2) GIGABYTE CPU Intelligent Accelerator 2(C.I .B.2 (Memory Intelligent Booster 2) Built on the motherboard to reset the system back to 10%. automatically resets the overclocked ...
... PC chassis and short-circuit the "Clear CMOS" pins or the battery on the original M.I.B., the new Memory Intelligent Booster 2 (M.I .B. 2 features. Appendix Through GIGABYTE M.I .T.'s integration of all platform performance settings into different modes within BIOS setup in order to the desired... level. C.I.A.2 (CPU Intelligent Accelerator 2) GIGABYTE CPU Intelligent Accelerator 2(C.I .B.2 (Memory Intelligent Booster 2) Built on the motherboard to reset the system back to 10%. automatically resets the overclocked ...
Manual
Page 54
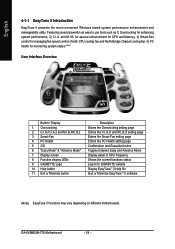
... for CPU and Memory, 3) Smart-Fan control for managing fan speed control of CPU frequency Shows the current functions status Log on different motherboards. Overclocking 2. GO 6. GIGABYTE Logo 10. GA-8VM800M-775 Motherboard - 54 - Smart-Fan 4. PC Health 5. C.I.A./C.I.A.2 and M.I.B./M.I .B. Help button 11. "Easy Mode" & "Advance Mode" 7. Featuring several powerful yet easy to GIGABYTE website Display EasyTuneTM...
... for CPU and Memory, 3) Smart-Fan control for managing fan speed control of CPU frequency Shows the current functions status Log on different motherboards. Overclocking 2. GO 6. GIGABYTE Logo 10. GA-8VM800M-775 Motherboard - 54 - Smart-Fan 4. PC Health 5. C.I.A./C.I.A.2 and M.I.B./M.I .B. Help button 11. "Easy Mode" & "Advance Mode" 7. Featuring several powerful yet easy to GIGABYTE website Display EasyTuneTM...
Manual
Page 55
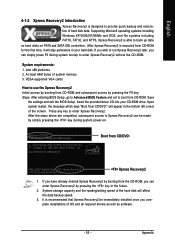
.../NT/98/Me and DOS, and file systems including FAT16, FAT32, and NTFS, Xpress Recovery2 is designed to provide quick backup and restoration of system memory 3. English 4-1-2 Xpress Recovery2 Introduction Xpress Recovery2 is able to back up data on hard disks on . . . After the steps above are completed, subsequent access to...
.../NT/98/Me and DOS, and file systems including FAT16, FAT32, and NTFS, Xpress Recovery2 is designed to provide quick backup and restoration of system memory 3. English 4-1-2 Xpress Recovery2 Introduction Xpress Recovery2 is able to back up data on hard disks on . . . After the steps above are completed, subsequent access to...

Manual
Page 57
... None Press DEL to avoid any complicated instructions and operating system since it with Q-FlashTM Utility on Dual BIOS Motherboards. Please note that Gigabyte Technology Co., Ltd is not responsible for damages of system because of incorrect manipulation of the motherboards supporting Q-Flash and Dual BIOS, the... OK Memory Frequency 266 MHz in the BIOS menu. Part One: Updating BIOS with caution!! In the BIOS menu of updating BIOS to enter SETUP / Dual BIOS / Q-Flash / F9 For Xpress Recovery 08/07/2003-i875P-6A79BG03C-00 - 57 - In the following sections, we take GA-8KNXP ...
... None Press DEL to avoid any complicated instructions and operating system since it with Q-FlashTM Utility on Dual BIOS Motherboards. Please note that Gigabyte Technology Co., Ltd is not responsible for damages of system because of incorrect manipulation of the motherboards supporting Q-Flash and Dual BIOS, the... OK Memory Frequency 266 MHz in the BIOS menu. Part One: Updating BIOS with caution!! In the BIOS menu of updating BIOS to enter SETUP / Dual BIOS / Q-Flash / F9 For Xpress Recovery 08/07/2003-i875P-6A79BG03C-00 - 57 - In the following sections, we take GA-8KNXP ...

Manual
Page 60
... BIOS / Q-Flash / F9 For Xpress Recovery 09/23/2003-i875P-6A79BG03C-00 GA-8VM800M-775 Motherboard - 60 - Intel i875P AGPset BIOS for 8KNXP Ultra Fba Check System Health OK , VCore = 1.5250 Main Processor : Intel Pentium(R) 4 1.6GHz (133x12) Memory Testing : 131072K OK Memory Frequency 266 MHz in Single Channel Primary Master : FUJITSU MPE3170AT ED-03-08...
... BIOS / Q-Flash / F9 For Xpress Recovery 09/23/2003-i875P-6A79BG03C-00 GA-8VM800M-775 Motherboard - 60 - Intel i875P AGPset BIOS for 8KNXP Ultra Fba Check System Health OK , VCore = 1.5250 Main Processor : Intel Pentium(R) 4 1.6GHz (133x12) Memory Testing : 131072K OK Memory Frequency 266 MHz in Single Channel Primary Master : FUJITSU MPE3170AT ED-03-08...

Manual
Page 63
... Y button to 7 in Part One. Intel 845GE AGPSet BIOS for 8GE800 F4 Check System Health OK Main Processor : Intel Pentium(R) 4 1.7GHz (100x17.0) Memory Testing : 122880K OK + 8192K Shared Memory Primary Master : FUJITSU MPE3170AT ED-03-08 Primary Slave : None Secondary Master : CREATIVEDVD-RM DVD1242E BC101 Secondary Slave : None Press DEL to enter...
... Y button to 7 in Part One. Intel 845GE AGPSet BIOS for 8GE800 F4 Check System Health OK Main Processor : Intel Pentium(R) 4 1.7GHz (100x17.0) Memory Testing : 122880K OK + 8192K Shared Memory Primary Master : FUJITSU MPE3170AT ED-03-08 Primary Slave : None Secondary Master : CREATIVEDVD-RM DVD1242E BC101 Secondary Slave : None Press DEL to enter...

Manual
Page 79
... *Computer gives 1 short beep when system boots successfully. *Except for ? If your board has a Clear CMOS jumper, please refer to http://www.gigabyte.com.tw Question 1: I still get a weak sound after system boots up the speaker to the battery holder. 5. Question 4: Why do I hear... after turning up . Answer: Some advanced options are always fatal. 1 beep Refresh failure 2 beeps Parity error 3 beeps Base 64K memory failure 4 beeps Timer not operational 5 beeps Processor error 6 beeps 8042 - gate A20 failure 7 beeps Processor exception interrupt error 8 beeps Display...
... *Computer gives 1 short beep when system boots successfully. *Except for ? If your board has a Clear CMOS jumper, please refer to http://www.gigabyte.com.tw Question 1: I still get a weak sound after system boots up the speaker to the battery holder. 5. Question 4: Why do I hear... after turning up . Answer: Some advanced options are always fatal. 1 beep Refresh failure 2 beeps Parity error 3 beeps Base 64K memory failure 4 beeps Timer not operational 5 beeps Processor error 6 beeps 8042 - gate A20 failure 7 beeps Processor exception interrupt error 8 beeps Display...


