Manual
Page 5
Chapter 3 Drivers Installation 49 3-1 Install Chipset Drivers 49 3-2 SoftwareApplication 50 3-3 Software Information 50 3-4 Hardware Information 51 3-5 Contact Us ...51 Chapter 4 Appendix 53 4-1 Unique Software Utilities 53 4-1-1 EasyTune 5 Introduction 54 4-1-2 Xpress Recovery2 Introduction 55 4-1-3 Flash BIOS Method Introduction 57 4-1-4 Serial ATA BIOS Setting Utility Introduction 66 4-1-5 2 / 4 / 6 Channel Audio Function Introduction 73 4-2 Troubleshooting 79 - 5 -
Chapter 3 Drivers Installation 49 3-1 Install Chipset Drivers 49 3-2 SoftwareApplication 50 3-3 Software Information 50 3-4 Hardware Information 51 3-5 Contact Us ...51 Chapter 4 Appendix 53 4-1 Unique Software Utilities 53 4-1-1 EasyTune 5 Introduction 54 4-1-2 Xpress Recovery2 Introduction 55 4-1-3 Flash BIOS Method Introduction 57 4-1-4 Serial ATA BIOS Setting Utility Introduction 66 4-1-5 2 / 4 / 6 Channel Audio Function Introduction 73 4-2 Troubleshooting 79 - 5 -

Manual
Page 15
... following the steps outlined below: 1. Read the related expansion card's instruction document before installing the expansion card into expansion slot in the slot. 5. Install related driver from the computer. 3. Installing a AGP expansion card: Please carefully pull out the small whitedrawable bar at the end of the expansion card. 6.
... following the steps outlined below: 1. Read the related expansion card's instruction document before installing the expansion card into expansion slot in the slot. 5. Install related driver from the computer. 3. Installing a AGP expansion card: Please carefully pull out the small whitedrawable bar at the end of the expansion card. 6.
Manual
Page 16
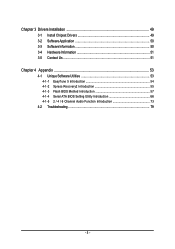
..., earphone or front surround channels to the lower port (purple). GA-8VM800M-775 Motherboard - 16 - Parallel Port The parallel port allows connection of 10/100Mbps. For more information please contact your OS does not supportUSB controller, please contact OS vendor for possible patch or driver upgrade. If your OS or device(s) vendors. Serial Port...
..., earphone or front surround channels to the lower port (purple). GA-8VM800M-775 Motherboard - 16 - Parallel Port The parallel port allows connection of 10/100Mbps. For more information please contact your OS does not supportUSB controller, please contact OS vendor for possible patch or driver upgrade. If your OS or device(s) vendors. Serial Port...
Manual
Page 20
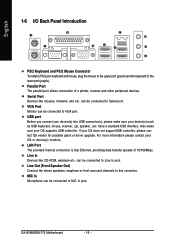
One IDE connector can connect to one IDE device as Master and the other as Slave (for the Serial ATA and install the proper driver in order to 150MB/s transfer rate. If you wish to connect two IDE devices, please set the jumper on one IDE cable, and the single ... (Serial ATA Connector) Serial ATA can then connect to the computer via an IDE connector. Pin No. Definition 1 GND 1 7 2 TXP 3 TXN 4 GND 5 RXN 6 RXP 7 GND GA-8VM800M-775 Motherboard - 20 - English 6) IDE1/IDE2 (IDE Connector) An IDE device connects to two IDE devices (hard drive or optical drive).
One IDE connector can connect to one IDE device as Master and the other as Slave (for the Serial ATA and install the proper driver in order to 150MB/s transfer rate. If you wish to connect two IDE devices, please set the jumper on one IDE cable, and the single ... (Serial ATA Connector) Serial ATA can then connect to the computer via an IDE connector. Pin No. Definition 1 GND 1 7 2 TXP 3 TXN 4 GND 5 RXN 6 RXP 7 GND GA-8VM800M-775 Motherboard - 20 - English 6) IDE1/IDE2 (IDE Connector) An IDE device connects to two IDE devices (hard drive or optical drive).
Manual
Page 49
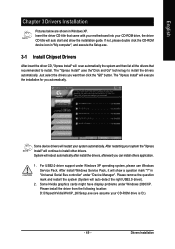
...and restart the system (System will show the installation guide. Please install the driver from the following location: D:\Chipset\nVidia\WinXP_2K\Setup.exe (we assume your system automatically. Drivers Installation in "Universal Serial Bus controller" under Windows XP operating system, please... use Windows Service Pack. Just select the drivers you automatically. The "Xpress Install" uses the"Click and Go" technology to install. Some device drivers will continue to install other drivers. For USB2.0 driver support under "Device Manager". After install Windows Service...
...and restart the system (System will show the installation guide. Please install the driver from the following location: D:\Chipset\nVidia\WinXP_2K\Setup.exe (we assume your system automatically. Drivers Installation in "Universal Serial Bus controller" under Windows XP operating system, please... use Windows Service Pack. Just select the drivers you automatically. The "Xpress Install" uses the"Click and Go" technology to install. Some device drivers will continue to install other drivers. For USB2.0 driver support under "Device Manager". After install Windows Service...
Manual
Page 50
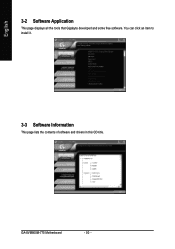
English 3-2 Software Application This page displays all the tools that Gigabyte developed and some free software. You can click an item to install it. 3-3 Software Information This page lists the contents of software and drivers in this CD-title. GA-8VM800M-775 Motherboard - 50 -
English 3-2 Software Application This page displays all the tools that Gigabyte developed and some free software. You can click an item to install it. 3-3 Software Information This page lists the contents of software and drivers in this CD-title. GA-8VM800M-775 Motherboard - 50 -
Manual
Page 51
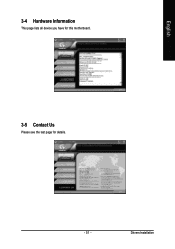
Drivers Installation English 3-4 Hardware Information This page lists all device you have for this motherboard. 3-5 Contact Us Please see the last page for details. - 51 -
Drivers Installation English 3-4 Hardware Information This page lists all device you have for this motherboard. 3-5 Contact Us Please see the last page for details. - 51 -

Manual
Page 53
... performance settings into different modes within BIOS setup in order to -date drivers and BIOS. (Do not use C.O.M. Through GIGABYTE M.I .A. 2) is designed especially to maximize memory performance and boost memory bandwidth up to enabled Gigabyte's unique C.I.A. 2 and M.I .T.'s integration of all new drivers with the latest LGA775 Intel® Pentium® 4 Processor as well as...
... performance settings into different modes within BIOS setup in order to -date drivers and BIOS. (Do not use C.O.M. Through GIGABYTE M.I .A. 2) is designed especially to maximize memory performance and boost memory bandwidth up to enabled Gigabyte's unique C.I.A. 2 and M.I .T.'s integration of all new drivers with the latest LGA775 Intel® Pentium® 4 Processor as well as...
Manual
Page 55
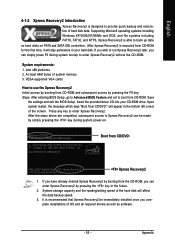
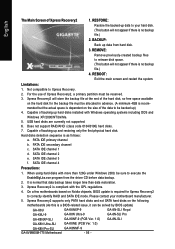
... go to Advanced BIOS Feature and set to boot from CD/DVD: Press any key to enter Xpress Recovery2. Intel x86 platforms 2. Insert the provided driver CD into your hard disk. Press any key to startup XpressRecovery2..... Award Modular BIOS v6.00PG, An Energy Star Ally Copyright (C) 1984-2004, Award ... in your CD-ROM drive. Upon system restart, the message which says "Boot from the CD-ROM, you complete installations of OS and all required drivers as well as software. - 55 - If you have already entered Xpress Recovery2 by booting from CD/DVD:" will stay permanent in the bottom left...
... go to Advanced BIOS Feature and set to boot from CD/DVD: Press any key to enter Xpress Recovery2. Intel x86 platforms 2. Insert the provided driver CD into your hard disk. Press any key to startup XpressRecovery2..... Award Modular BIOS v6.00PG, An Energy Star Ally Copyright (C) 1984-2004, Award ... in your CD-ROM drive. Upon system restart, the message which says "Boot from the CD-ROM, you complete installations of OS and all required drivers as well as software. - 55 - If you have already entered Xpress Recovery2 by booting from CD/DVD:" will stay permanent in the bottom left...
Manual
Page 56
...chipsets, BIOS update is a BIOS-related issue, it can be solved by BIOS update) GA-K8U GA-K8NXP-9 GA-K8U-9 GA-K8N Ultra-9 GA-K8NXP-SLI GA-K8NF-9 (PCB Ver. 1.0) GA-K8N Ultra-SLI GA-K8NE (PCB Ver. 1.0) GA-K8N Pro-SLI GA-K8NMF-9 GA-8VM800M-775 Motherboard - 56 - SATA IDE channel 1 d. SATA IDE channel 4 Precautions: 1. It ...including DOS and Windows XP/2000/NT/9x/Me. 5. GA-8N-SLI Royal GA-8N-SLI Pro GA-8N-SLI PATA IDE secondary channel c . On a few motherboards based on the size of backing up data from the driver CD before data backup. 2. RESTORE: English Restore the ...
...chipsets, BIOS update is a BIOS-related issue, it can be solved by BIOS update) GA-K8U GA-K8NXP-9 GA-K8U-9 GA-K8N Ultra-9 GA-K8NXP-SLI GA-K8NF-9 (PCB Ver. 1.0) GA-K8N Ultra-SLI GA-K8NE (PCB Ver. 1.0) GA-K8N Pro-SLI GA-K8NMF-9 GA-8VM800M-775 Motherboard - 56 - SATA IDE channel 1 d. SATA IDE channel 4 Precautions: 1. It ...including DOS and Windows XP/2000/NT/9x/Me. 5. GA-8N-SLI Royal GA-8N-SLI Pro GA-8N-SLI PATA IDE secondary channel c . On a few motherboards based on the size of backing up data from the driver CD before data backup. 2. RESTORE: English Restore the ...
Manual
Page 67
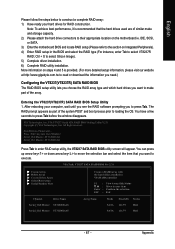
...BIOS and select the RAID type (For instance, enter Tab to select VT8237R RAID; You have a few seconds to select Silicon Image). 5) Complete driver installation. 6) Complete RAID utility installation. Scan Devices, Please wait... VIA Tech. Appendix Ctrl + S to press Tab before the window disappears. Serial_Ch0...execute. Note: To achieve best performance, it is provided. (For more detailed setup information, please visit our website at http:\\www.gigabyte.com.tw to read or download the information you need.) Configuring the VT8237(VT8237R) SATA RAID BIOS The RAID BIOS setup utility lets...
...BIOS and select the RAID type (For instance, enter Tab to select VT8237R RAID; You have a few seconds to select Silicon Image). 5) Complete driver installation. 6) Complete RAID utility installation. Scan Devices, Please wait... VIA Tech. Appendix Ctrl + S to press Tab before the window disappears. Serial_Ch0...execute. Note: To achieve best performance, it is provided. (For more detailed setup information, please visit our website at http:\\www.gigabyte.com.tw to read or download the information you need.) Configuring the VT8237(VT8237R) SATA RAID BIOS The RAID BIOS setup utility lets...
Manual
Page 72
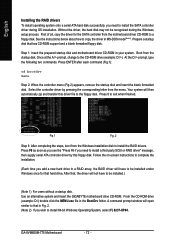
Press F6 as soon as you see the "Press F6 if you need to copy the driver in MS-DOS mode(Note1). Use an alternative system and insert the GIGABYTE motherboard drive CD-ROM. From the CD-ROM drive (example: D:\) double click the MENU.exe file in ...disk. A command prompt window will not have to be recognized during OS installation. Select the controller driver by this driver file to install the RAID drivers. GA-8VM800M-775 Motherboard - 72 - First of all, copy the driver for that has CD-ROM support and a blank formatted floppy disk. Step 1: Insert the prepared ...
Press F6 as soon as you see the "Press F6 if you need to copy the driver in MS-DOS mode(Note1). Use an alternative system and insert the GIGABYTE motherboard drive CD-ROM. From the CD-ROM drive (example: D:\) double click the MENU.exe file in ...disk. A command prompt window will not have to be recognized during OS installation. Select the controller driver by this driver file to install the RAID drivers. GA-8VM800M-775 Motherboard - 72 - First of all, copy the driver for that has CD-ROM support and a blank formatted floppy disk. Step 1: Insert the prepared ...
Manual
Page 73
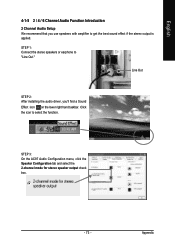
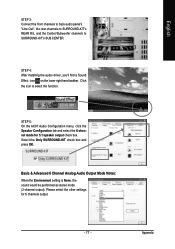
English 4-1-5 2 / 4 / 6 Channel Audio Function Introduction 2 Channel Audio Setup We recommend that you 'll find a Sound Effect icon on the lower right hand taskbar. STEP 1: Connect the stereo speakers or earphone to get the best sound effect if the stereo output is applied. STEP 3: On the AC97 Audio Configuration menu, click the Speaker Configuration tab and select the 2-channel mode for stereo speaker output check box. - 73 - Appendix Line Out STEP 2: After installing the audio driver, you use speakers with amplifier to "Line Out." Click the icon to select the function.
English 4-1-5 2 / 4 / 6 Channel Audio Function Introduction 2 Channel Audio Setup We recommend that you 'll find a Sound Effect icon on the lower right hand taskbar. STEP 1: Connect the stereo speakers or earphone to get the best sound effect if the stereo output is applied. STEP 3: On the AC97 Audio Configuration menu, click the Speaker Configuration tab and select the 2-channel mode for stereo speaker output check box. - 73 - Appendix Line Out STEP 2: After installing the audio driver, you use speakers with amplifier to "Line Out." Click the icon to select the function.
Manual
Page 74
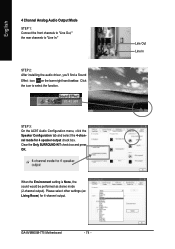
Clear the Only SURROUND-KIT check box and press OK. Line Out Line In GA-8VM800M-775 Motherboard - 74 - STEP 2: After installing the audio driver, you'll find a Sound Effect icon on the lower right hand taskbar. Click the icon to "Line In." English 4 Channel Analog Audio Output Mode STEP 1: ...
Clear the Only SURROUND-KIT check box and press OK. Line Out Line In GA-8VM800M-775 Motherboard - 74 - STEP 2: After installing the audio driver, you'll find a Sound Effect icon on the lower right hand taskbar. Click the icon to "Line In." English 4 Channel Analog Audio Output Mode STEP 1: ...
Manual
Page 75
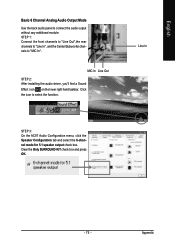
.... English Basic 6 Channel Analog Audio Output Mode Use the back audio panel to select the function. MIC In Line Out STEP 2: After installing the audio driver, you'll find a Sound Effect icon on the lower right hand taskbar. Clear the Only SURROUND-KIT check box and press OK. - 75 - STEP 1: Connect...
.... English Basic 6 Channel Analog Audio Output Mode Use the back audio panel to select the function. MIC In Line Out STEP 2: After installing the audio driver, you'll find a Sound Effect icon on the lower right hand taskbar. Clear the Only SURROUND-KIT check box and press OK. - 75 - STEP 1: Connect...
Manual
Page 77
... tab and select the 6-channel mode for 6 channels output. - 77 - Please select the other settings for 5.1 speaker output check box. STEP 4: After installing the audio driver, you'll find a Sound Effect icon on the lower right hand taskbar. Click the icon to SURROUND-KIT's SUB CENTER.
... tab and select the 6-channel mode for 6 channels output. - 77 - Please select the other settings for 5.1 speaker output check box. STEP 4: After installing the audio driver, you'll find a Sound Effect icon on the lower right hand taskbar. Click the icon to SURROUND-KIT's SUB CENTER.


